Making Balanced Headphone Cables
By Rob Robinette
Table of Contents
Make a Four Wire Balanced Line Headphone Cable
Make a HiFiMAN HE-500 or HE-400 Balanced Cable
Convert The HE-400 & HE-500 Headphone Cable From Single-Ended to Balanced
Convert the Sennheiser HD 580, 600, 650 & 6XX Cable From Single-Ended to Balanced
Convert an Audeze Cable From Single-Ended to Balanced
Make a 4-Pin Mini XLR to TRS 1/4 (6.3mm) or 1/8 Inch (3.5mm) Single-Ended Cable
Make a 4-Pin Mini XLR to TRS Single-Ended Cable Using 4 Conductor Cable
Make a 4-Pin XLR to TRS Plug Headphone Adapter Cable
Make a Speaker Amplifier to Headphone Resistor Network Interface Box
Headphone Resistor Network Calculator (or download xls spreadsheet)
Make a Single-Ended Amplifier Speaker Out to Headphone Adapter
Make a Balanced Amplifier Speaker Out to Headphone Adapter
Make a TRRS Balanced Headphone Cable or Adapter
Sony 4.4mm TRRRS Balanced Plug
Other Balanced Headphone Connectors: Fiio, Astell & Kern, Ibasso, Ray Samuels, 3-Pin XLR
How to Do a 4-Wire Round Litz Braid
Balanced vs Unbalanced Headphone Cables
Most headphone amplifiers offer only a common ground unbalanced stereo TRS plug connection. Common ground output means the left and right channels' negative outputs are simply connections to ground. The left and right negative signals are combined in the headphone and travel down a single wire (usually the headphone cable's metal shield) to the amplifier's ground (see photo below). The left and right stereo signal's positive connections are carried by two separate wires that are usually wrapped by the cable shield. A headphone cable's grounded shield not only acts as the stereo signal return path but also protects the stereo signal from radio frequency interference (RFI) noise. This type of headphone cable is called unbalanced or single-ended.
Unbalanced (Single-Ended) Headphone Cable
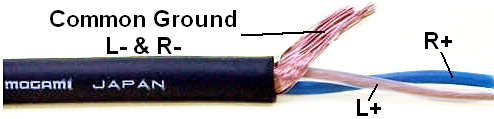
The cable's grounded shield is used for both signal transmission and noise suppression. The shield's impedance is different than the two conductors so the cable is unbalanced.
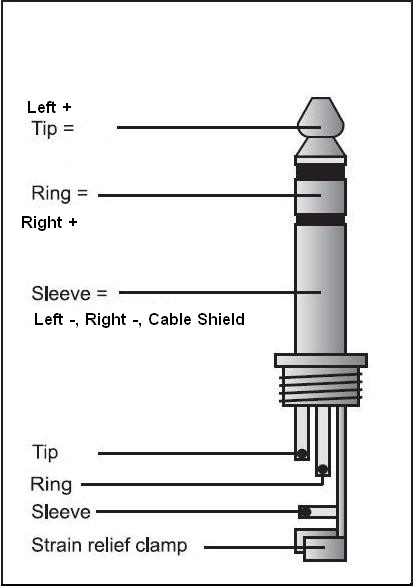
Standard Unbalanced Headphone TRS Plug
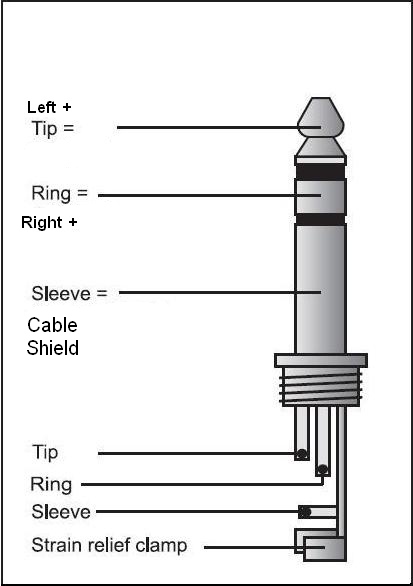
TRS stands for Tip, Ring, Sleeve. Sleeve carries combined Left - and Right - signal. Just remember Right = Ring.
A balanced headphone cable uses a headphone jack with 4 connections and the headphone cable has 4 wires of equal size and impedance to carry the stereo signal (see photo below). The 4 wires are for: Left +, Left -, Right + and Right -. A 4 wire balanced line cancels RFI and radio magnetic interference (RMI) naturally due to each stereo channel's two equal length and gauge wires both picking up the same electrical noise--one wire is positive and the other is negative so when the signal from the two wires is combined at the speaker the added noise cancels itself out. Adding a grounded shield to a balanced line will offer even more electronic noise protection. For more information on balanced line theory and benefits see this wikipedia article.
Balanced Headphone Cable

Four identical wires used for signal transmission. The grounded cable shield is used only for noise protection.
Note that almost all of the connectors shown on this webpage have the pin numbers molded into the connector for easy identification.
Make a Four Wire Balanced Headphone Cable
Female 4-Pin Mini XLR : 4-wire cable : Male 4-Pin XLR
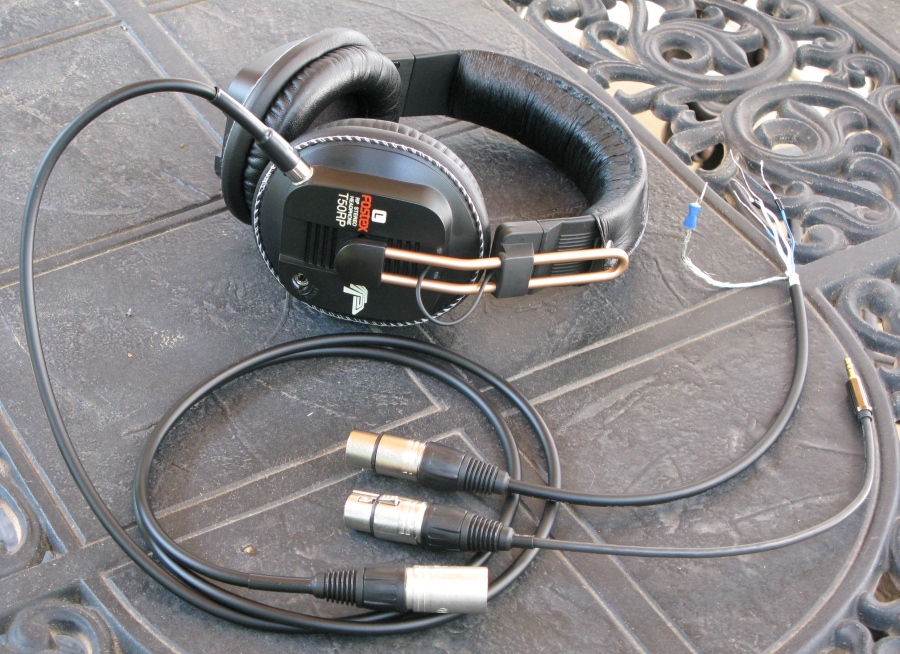
Fostex T50RP Headphones modified with a balanced line with Canare Star Quad cable, 4-Pin Mini XLR at the headphone and Male 4-Pin XLR (full size) at the amp end. The adapter cable on top is for connecting to an amplifier's speaker out terminals. The adapter on the bottom goes from 4-Pin XLR to a single-ended 1/8 inch TRS plug.
Here's an excellent shortcut to many of the cables on this page, a 10 feet long Male 4-Pin XLR to Female 4-Pin XLR straight extension cable for $19. They also sell a coiled version. It features Canare Star Quad cable and Neutrik connectors. I couldn't find the raw cable and connectors for that price. You can cut the cable in half and use both ends as cables or adapters and one connector is already professionally soldered for you. These cables also work great as balanced headphone extension cables.
When you want the best cable possible I recommend Canare Star Quad wound cable with four 21 AWG wires for the headphone cable. A star quad wound cable gives extra protection from magnetic fields and is used in the most demanding professional audio applications. I sourced my cable from NYProAudio.com but you can find it on eBay with an eBay search of " Canare star quad." Cost is about $1 per foot. The main drawback of Canare Star Quad is its thickness (1/4" or 6mm). You have to modify small connectors like Mini XLR to fit the cable so I recommend the thinner Mini Quad or Mogami cable discussed in the next paragraphs for use with any small connector or portable audio use.
Canare 4-Conductor, 21 AWG Star Quad Cable
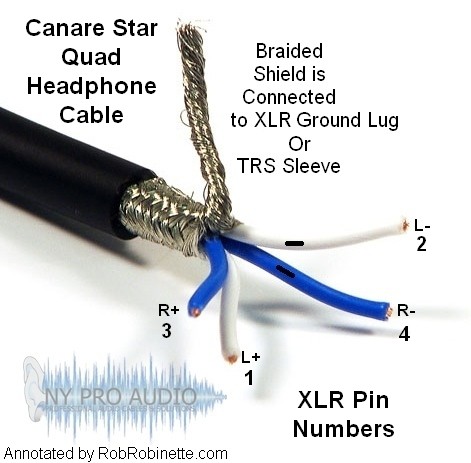
I marked two of the wires for negative polarity. If your cable has a shield only ground it to the XLR connector's ground pin at the amp end of the headphone cable.
Another star quad wound cable with an excellent reputation is Gotham Mini Star Quad (Gotham part # 10901 GAC-4/1 mini). NYProAudio actually recommends Gotham Mini Quad cable for headphones because it's thinner and more flexible than Canare Star Quad and is more suited as a headphone cable but its four conductor wires are slightly thinner at 26 AWG. I definitely recommend this thinner and lighter cable for portable headphone cables. To benefit by the star quad wind you should pair the yellow and white wires for one stereo channel and red and pink for the other.
Wire color & stereo signal to XLR Pin number. Gotham Mini Star Quad has a dual shield and red, pink, yellow and white 26 gauge wires. Pairing the wires this way will ensure the noise protection of star quad winding.
Mogami W2893 Balanced Microphone Cable is another audio industry favorite. It has four 26 AWG wires and comes in 10 colors. Like the star quad cables shown above it is a completely shielded cable. This cable is comparable in thickness to the Gotham Mini Quad so it is suitable for use with small connectors like Mini XLR or for portable audio applications.
Canare Star Quad cable comes with a pair of blue wires, a pair of white wires and a braided shield (see photo above). To benefit from the star quad layout you need to pair the blue wires for one stereo channel and the white wires for the other. To keep polarity straight use a multi-meter's continuity function to identify one of the blue and white wires and mark them on both ends. I used the marked wires as the negative wires. Connect the cable's braided shield to the XLR connector's ground lug--it should not connect to any of the 4 signal pins. Connecting the shield to the XLR ground lug will ground the shield to the XLR metal shell and the amp's chassis and supply RFI noise protection for the cable. Do not connect the braided shield to anything at the headphone end.
My modified Fostex T50RP headphones need a Female 4-Pin Mini XLR connector to mate with the Male Mini XLR on the headset. Neutrik/Rean actually calls these Mini XLR connectors "Tiny XLR" connectors so don't let that confuse you. Mini XLR connectors have a lock and button release to keep the cable secured to the headphone. I used the same standard stereo audio 4-pin XLR pinout for both ends of the headphone cable:
Pin Signal Canare Star Quad Wire Color Gotham Mini Star Quad
1 Left + White Yellow
2 Left - White with mark White
3 Right + Blue Red
4 Right - Blue with mark Pink
Note: Connect the headphone cable's braided shield to the XLR connector's ground lug. This will ground the shield and provide RFI noise protection.
Rean Female 4-Pin Mini (Tiny) XLR Connector

This Female 4-Pin Mini (Tiny) XLR connector plugs into the headphone connector. I recommend the Neutrik/Rean RT4FC-B 4 Pole Female Tiny XLR connector. I tried a Switchcraft connector and it did not make solid contact and the headphone audio would break up. I replaced it with the Rean shown above. The Rean connector comes with a blue and a black cable clamp. Use the larger blue cable clamp with Canare Star Quad cable and use the smaller black clamp with the Gotham Mini Quad cable.
The Gotham Mini Quad cable (Gotham part # 10901 GAC-4/1 mini) is a very high quality cable and is thinner and more flexible than Canare Star Quad which is another very high quality cable. I liked it so much I ordered 20 feet of Gotham GAC-4/1 mini raw cable for 70 cents per foot + $6.50 shipping direct from http://www.gothamaudiousa.com/contact.htm.
Important: Remember to slide on the XLR cable shroud and clamp before you begin to solder. It sucks to start soldering and realize you forgot to install the back half of the XLR connector. Tin the wires and XLR pins (put a little solder on them) before you join the wires to the pins. This will make it much easier to get a good solder joint between the wire and pin. Using a pointed solder tip will make soldering the small Mini XLR pins easier. I like to slide a small piece of heat-shrink tubing on the wire that will connect to Mini XLR Pin 4 (center pin) to prevent shorting. Soldering the Mini XLR connectors is a pain in the butt because the 4 small pins are packed together pretty tightly. Using a pen style solder gun with a sharp tip will make it easier to solder the wires to the small pins.
Of course the connector on the amp end of your headphone cable needs to match your amplifier input but the most common balanced line connector is the full size 4-pin XLR. Some amps use dual full size XLR 3-pin (separate left and right sockets). The Mjolnir headphone amp shown below comes with both 4-pin and 3-pin female XLR sockets.
Schiit Mjolnir Headphone Amp Outputs
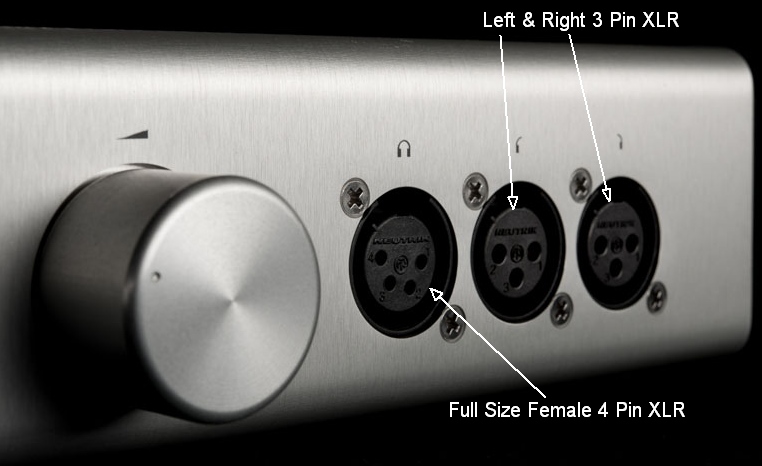
The Mjolnir amp offers both 4 and 3-pin XLR output. The 4-pin XLR output is the new standard for balanced headphones and uses just one cable.
You will need a full size Male 4-Pin XLR connector on your headphone cable to mate with the above Female XLR chassis connector. If your amp uses two full size 3-Pin XLR connectors I would recommend creating a Y cable adapter with a full size Female 4-Pin XLR on one end and two Male 3-Pin XLR connectors on the other ends. That way you can run one cable to your headphones. I recommend using high quality Neutrik XLR connectors. I sourced my Neutrik XLR connectors from eBay.
Neutrik Full Size Male 4-Pin XLR Cable Connector
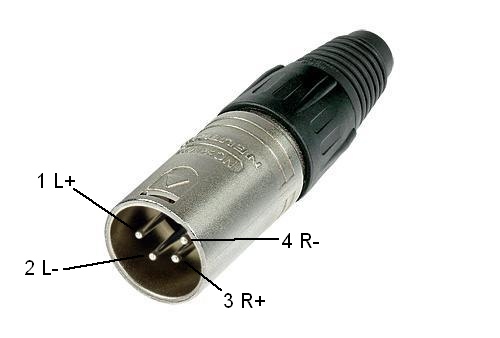
Again, remember the pin numbers will be opposite shown when viewing the rear of the connector when soldering.
Rear of Male 4-Pin XLR
Pins have been pre-tinned with solder. The cable's shield should be connected to the ground lug. Full sixe XLR connectors like this will accept up to 14 gauge wire.
Make a 4-Pin Mini XLR to TRS 1/4 (6.3mm) or 1/8 Inch (3.5mm) Single-Ended Headphone Cable
4-Pin Mini XLR : 2-wire cable : TRS Plug
Having a standard single-ended cable will allow you to plug your balanced headphones into a normal, non-balanced amp or media player. If you plan to use your headphones for portable use then having a cable with a 3.5mm (1/8") TRS plug is a good idea. A headphone cable with a Male XLR + Female XLR to 3.5mm TRS adapter will make for a very bulky and heavy cable for portable use.
You can save money and make a standard single-ended headphone cable using normal stereo headphone cable (two conductors + shield) rather than using expensive Star Quad 4 conductor cable. At the headphone end connect the cable's Right + wire to the Female Mini XLR Pin 3, the Left + wire to Pin 1. Connect the cable shield to Pins 2 and 4 by splitting the shield into two parts, twist both and tin their ends then solder one to Pin 2 and one to Pin 4.
Mini (Tiny) XLR Soldering
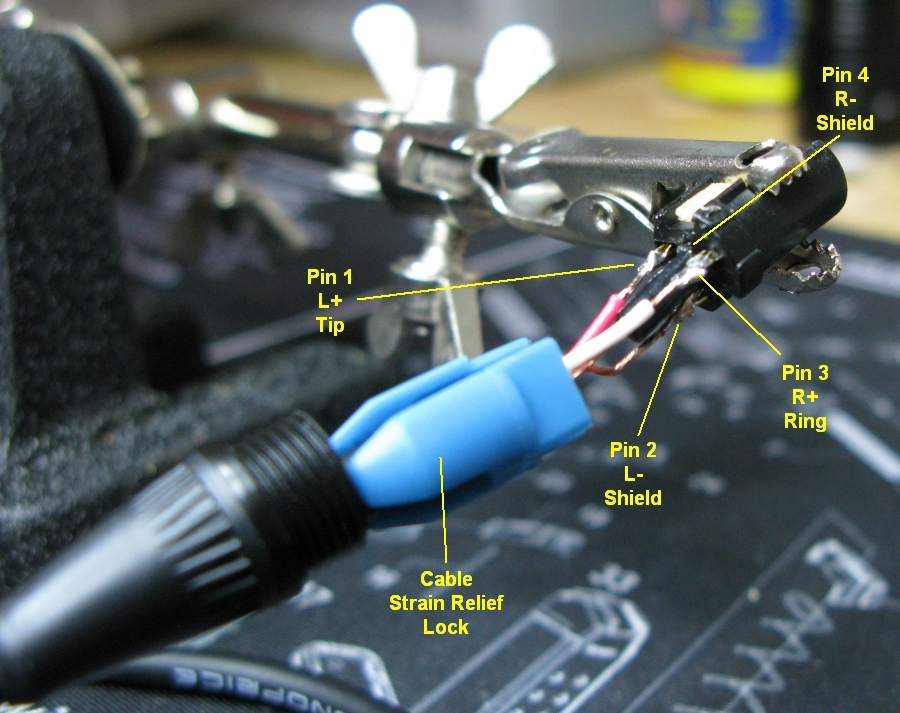
Pin 4, the center pin, is covered with black heat-shrink tubing to prevent shorting. The blue cable strain relief lock is for large cable like the Canare Star Quad. Use the supplied black cable lock for thinner Gotham Mini Quad.
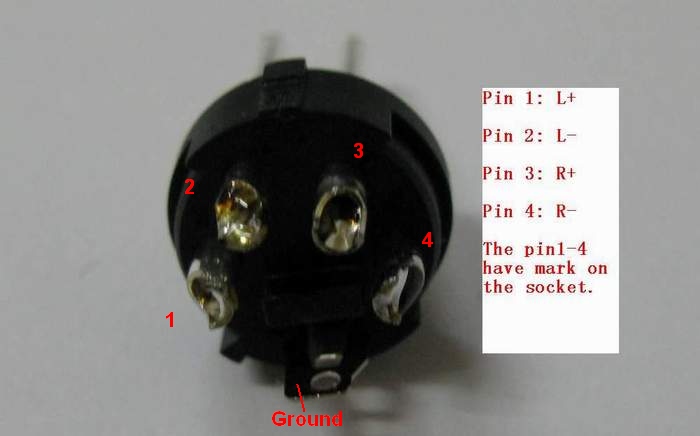
Headphone End of Cable - Female 4-Pin Mini XLR
Pin Signal
1 Left +
2 L- through the Cable Shield
3 Right +
4 R- through the Cable Shield
Note both negative pins 2 & 4 connect to the Cable Shield.
Amp End of Cable - TRS Stereo Plug
You can avoid this step by using an old headphone cable so you only have to wire the Mini XLR connector.
TRS Jack to 2 Conductor Cable
Both 6.3mm and 3.5mm plugs use the same wiring. TRS stands for Tip Ring Sleeve.
Plug Signal
Tip Left +
Ring Right +
Sleeve Left-, Right- through the Cable Shield
Make a 4-Pin Mini XLR to TRS Single-Ended Headphone Cable Using 4 Conductor Cable
Female 4-Pin Mini XLR : 4-wire cable : TRS
You also have the option of making a single-ended TRS Plug headphone cable using 4 conductor wire like the cable used above to create the balanced line headphone cable. This cable has a Female 4-Pin Mini XLR connector on the headphone end and a standard TRS 1/4 inch or 1/8 inch connector on the amp end.
TRS Stereo Jack to 4 Conductor Wire
TRS stands for Tip, Ring, Sleeve. Sleeve carries combined Left - and Right - signal. Just remember Right = Ring. Solder the Sleeve to the XLR pins 2 & 4. Solder the Tip to XLR pin 1. Solder the Ring to XLR pin 3. Both 6.3mm and 3.5mm plugs use the same wiring.
To place a 1/4" or 1/8" jack on the end of a 4-wire cable simply connect both - (negative) signal wires and the cable shield to the TRS Plug Sleeve as shown in the diagram above. The Left + wire connects to the Tip and the Right + wire connects to the Ring. However a 4 wire line connected this way loses its balanced wire RFI protection so it's really not any better than a standard single-ended cable.
Make a HiFiMAN HE-500 or HE-400 Balanced Headphone Cable
I was surprised when my HiFiMAN HE-500 headphones arrived with only a single-ended 6.3mm TRS cable. Thankfully HiFiMAN includes a pair of SMC connectors so you can make your own cable. If you don't want to make a new cable you can always just cut the TRS plug off and solder on a male 4-Pin XLR connector because the factory cable has the required 4 wires--see the next section for details on that option.
HiFiMAN HE-500 With Balanced Cable
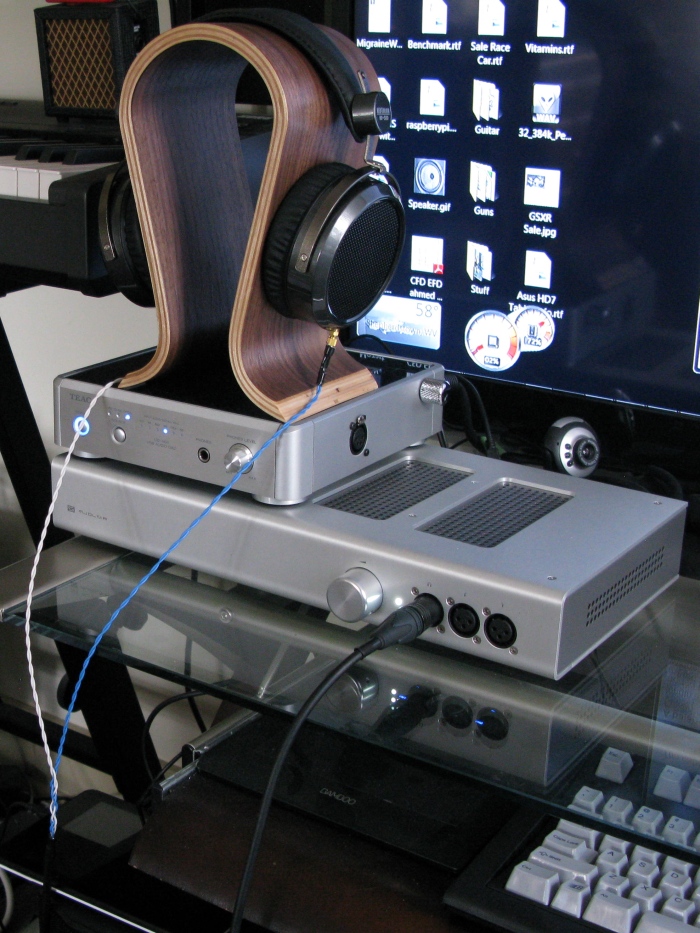
Canare Star Quad L-4E6S was used to make the cable to connect to Schiit Mjolnir balanced amp using a Male 4-Pin XLR connector. The amp is connected to the TEAC UD-H01 balanced DAC using dual 3-Pin XLR cables. The TEAC UD-H01 DAC (on top of the Schiit amp) has been modified with a balanced headphone amp and 4-Pin XLR connector.
I wanted a relatively short headphone cable for my desktop setup so I started with a 5 foot length of Canare L-4E6S Star Quad cable. I stripped 20 inches of sheath & shield to allow for a little braiding and the Y split to the ear cups. The included HiFiMAN cable has a 17 inch split to the ear cups so I added 3 inches for some decorative braiding.
Canare L-4E6S Stripped for Split to Earcups
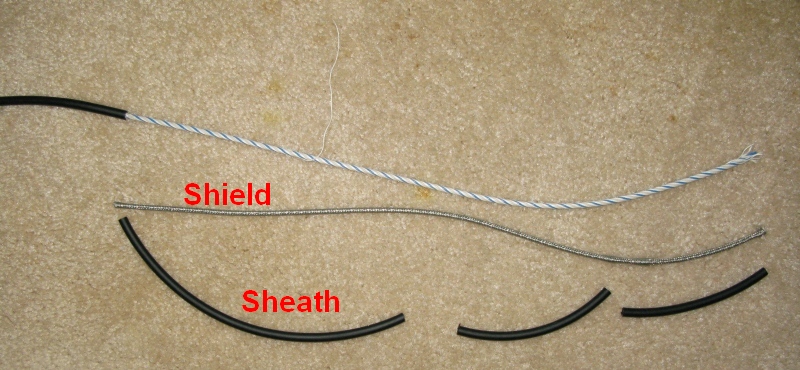
17 inches of Sheath (bottom) & Shield (middle) removed.
I chose to go with a shielded cable to the ear cup Y but you can use Canare Star Quad cable to make a bare 4 wire headphone cable similar to the factory HiFiMAN cable. To do that simply remove all the cable's sheath and shield. You can then unravel all of the wire and do a round braid or unravel part of the wire and use the star quad wind to within about 3 inches of the ear cup Y and use 2 or 3 inches of round braid to keep the star quad wind from unraveling. When unraveled the 4 wires will have a "twist memory" that allows a nice looking tight twist of the two wire pairs.
I was able to remove the rubber sheath in 10 inch chunks by "caterpillering" it. I carefully cut a slice all the way around the cable then pulled the slice open with my fingernail to verify the cut was complete. Using my fingernail I pulled on the sheath then slid my fingers down the entire 10 inch length while pulling on the cable. Repeat this and the sheath will slowly slide off. The braided shield was easier to remove. I carefully cut the sheath (don't cut into the 4 wires below it) and pulled a gap with my fingernail. When the cut was complete the entire 20 inch shield easily slid off.
With the shield off unwrap the 4 conductor wires. There is string wrapped with the wires so just unravel it and cut it off with scissors. To get the full benefit of star quad wound balanced cable you need to pair the two white wires as a stereo channel and the two blues as the other. I chose the two blue wires to be my right channel.
I decided to do about 3 inches of 4-wire round braiding just for looks (and to help prevent the star quad cable from unraveling). I followed this method. After the 3 inch braid I twisted the cable all the way to the headphone SMC connector. I used the wire's "twist memory" left over from the star quad twist to make the twisting easier. Be sure and twist the wires the correct direction. Looking down at the wires twist them counter-clockwise. I accidentally twisted my blue wires clockwise and the twist looked crappy while the counter-clockwise wrapped white wires happily twisted themselves into a nice tight wrap.
Braided Split With Heat-Shrink
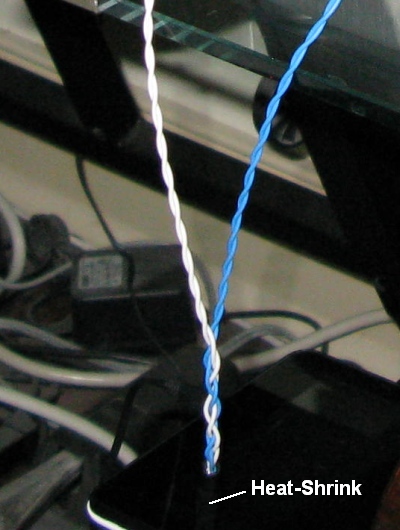
I placed 1 1/2 inchs of heat-shrink tubing on each ear cup wire, slid on the SMC crimp and soldered one wire to the SMC center pin and the other to the knurled barrel. I slid the SMC crimp into place--I had to use a pair of pliers to slide it over the soldered barrel. I crimped the crimp using a pair of pliers then slid the heat shrink tube up to cover the crimp and used a heat gun to shrink it into place. I also used a piece of heat shrink to hide the coax-braid junction.
Male SMC Connector
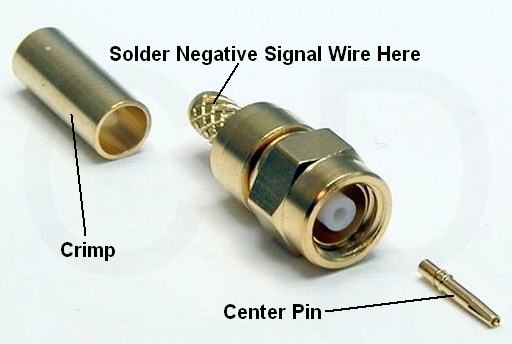
Extra Male SMC connectors are easily sourced on eBay. The + wire is soldered to the center pin. The - wire is soldered directly to the knurled barrel.
I added a Neutrik Male 4-Pin XLR connector to the amp end of the cable to mate with my Schiit Mjolnir balanced amp. I used a multi-meter to identify which wires were attached to the outside of the SMC connector and marked them with a black marker--I soldered the marked wires to XLR pins 2 and 4 (L- and R-).
Male 4-Pin XLR Pinout
Pin Signal Color (Canare L-4E6S)
1 L+ White
2 L- White with mark
3 R+ Blue
4 R- Blue with mark
Rear of Male 4-Pin XLR
Pins have been pre-tinned with solder. Up to 14 gauge wire will fit inside the XLR pins.
Convert The HE-500 or HE-400 Headphone Cable From Unbalanced (Single-Ended) to Balanced
It's as simple as cutting off the TRS plug and soldering on a Male 4-Pin XLR connector in its place.
Cut the TRS plug about 1 foot from the connector--keep the cutoff as you may want to solder on a 4-Pin Female XLR to use as an adapter cable.
Trim about 1/8 of an inch (3mm) of insulation from the 4 headphone wires.
Unscrew the headset's right SMC connector.
Using a multimeter's continuity feature (touch the two probes together and you'll hear a tone) touch one probe to the outside of the SMC connector then touch each of the 4 bare wires. When the meter beeps you found the wire connected to the outside of the SMC which will be Right - so mark the cable somehow so you'll know what it is when soldering.
Touch one probe to the center pin of the SMC connector and look for its wire, that will be Right +
Do the same for the other SMC connector which will be Left - for the outside of the SMC connector, Left + for the center pin.
Solder on the 4-Pin XLR connector. The pin numbers are actually molded into the XLR's plastic plug that has the 4 pins through it. Don't forget to slide on the XLR shroud before you start to solder. For braided line like this I would also recommend putting some heat-shrink tubing over the part of the cable that will be under the shroud. It will help the XLR cable lock grip the wires. Pre-solder the 4 wire ends and the XLR pins as this will make getting a good solder joint between the wire and pin much easier.
XLR Pin
1 L+
2 L-
3 R+
4 R-
Rear of Male 4-Pin XLR
Pins have been pre-tinned with solder.
Make a 4-Pin XLR to TRS Plug Headphone Adapter Cable
Another option is to make a short adapter cable with a standard TRS stereo jack on one end and a Female 4-Pin XLR connector on the other. You plug your balanced line headphone cable into the adapter cable's 4-Pin Female XLR connector and then plug the other end of the adapter cable (3.5mm or 6.3mm Plug) into the amp.
Female 4-Pin XLR to 6.3mm (1/4") & 3.5mm (1/8") TRS Adapters
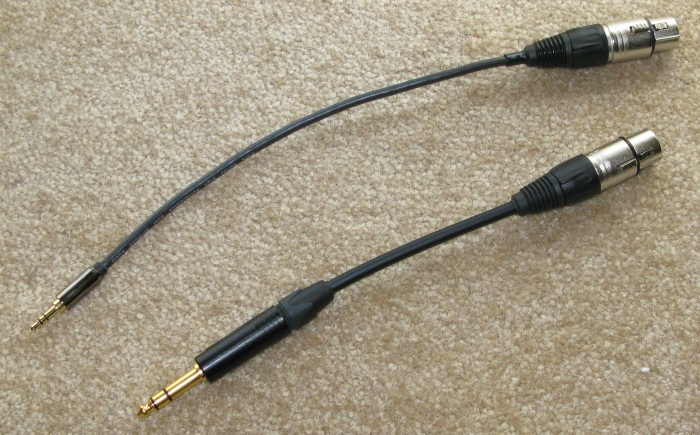
I bought a quality 2 feet long 3.5mm male to 3.5mm male cable and cut it in half. This way I only had to solder the easy to solder full size 4-Pin Female XLR connector. If you need to solder the TRS plug follow this guide.
Female 4-Pin XLR Connector
Pin Connection
1 3.5mm Tip (Left+)
2 Ground
3 3.5mm Ring (Right+)
4 Ground
Ground Lug Cable Shield (Pins 2 & 4 and the XLR jack Ground Lug are all connected to the cable shield)
You can make multiple cable shield connections by splitting the shield into three parts, twist them and tin their ends then solder one to Pin 2, one to Pin 4 and one to the XLR ground lug.
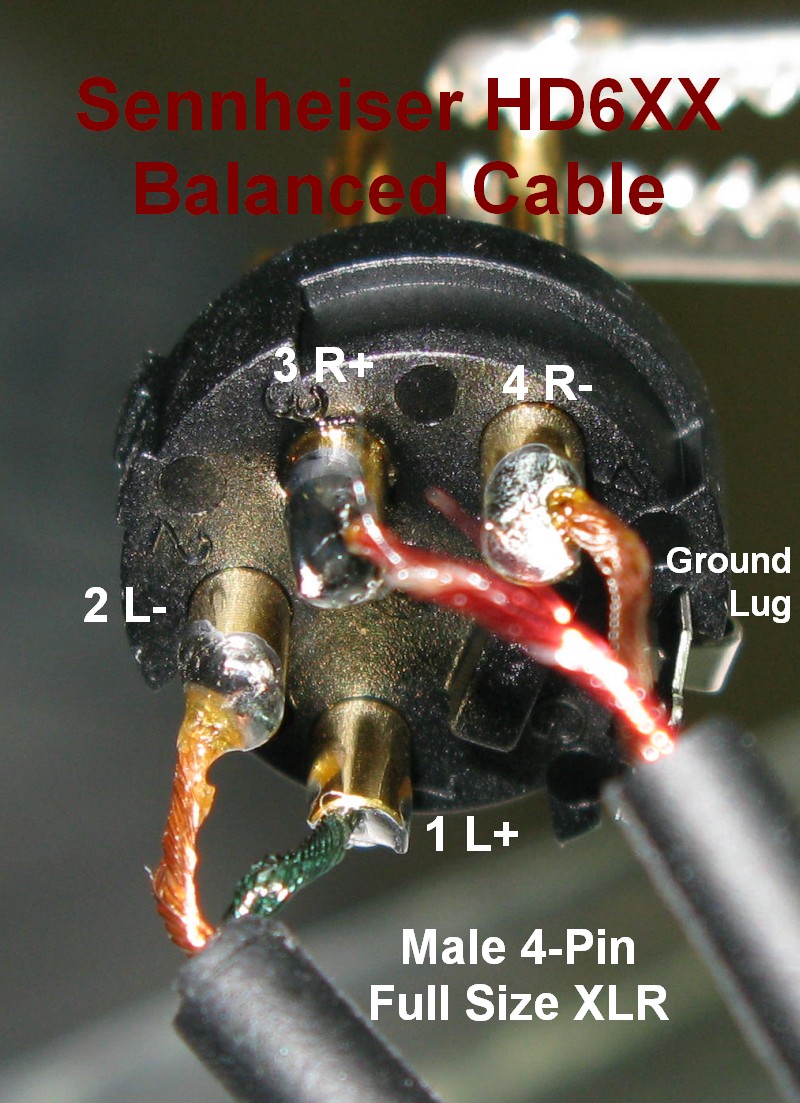
Sennheiser HD 600, 650, 6XX Balanced Cable
The cables provided with these headphones have four conductors so to convert the supplied single-ended TRS (Tip, Ring Sleeve) cable to balanced is as easy as clipping off the TRS connector and soldering on the balanced connector needed by your amplifier. My balanced headphone amp needs a full size 4-pin XLR connector. I purchased a single ended spare cable from Amazon for $23 and clipped off the TRS connector and replaced it with a Neutrik full size male 4-pin XLR cable connector. Use a multimeter in the continuity "beep" mode to identify which cable wires are connected to which headphone connectors and solder the XLR connector to the cable using the table at the bottom of this section as a connector pin guide.
The Stock Sennheiser Cable
The stock cable can easily be split into its left and right halves to make trimming the wires easier. The stock cable's green wire is Left+, its copper pair is Left-, the red wire is Right+ and its copper pair is Right-. The cable's wires are enamel coated for insulation so you must scrape off the enamel from all four wires--or at least remove enough to get a good solder connection. I used a pocket knife to gently scrape the insulation off and checked my results with a multimeter in the continuity mode to ensure I had enough insulation off for good contact.
This is optional but when I cut the TRS connector off the Sennheiser cable I left about one foot of cable on the TRS end and soldered on a Neutrik full size female 4-pin XLR cable connector to create a balanced to single-ended converter cable.
Standard Unbalanced Headphone TRS Plug
TRS stands for Tip, Ring, Sleeve. Sleeve carries combined Left - and Right - signal. Just remember Right = Ring. Solder the Sleeve to the XLR pins 2 & 4. Solder the Tip to XLR pin 1. Solder the Ring to XLR pin 3.
Building a Sennheiser Balanced Cable From Scratch
When you want the best cable possible I recommend Canare Star Quad wound cable with four 21 AWG wires for the headphone cable. A star quad wound cable gives extra protection from magnetic fields and is used in the most demanding professional audio applications. I sourced my cable from NYProAudio but you can find it on eBay with an eBay search of " Canare star quad." Cost is about $1 per foot. Use the two white wires for the left channel and the blue wires for the right. Use a multimeter in continuity "beep" mode to identify and mark one of the blue and white wires as negative (see pic below).
Canare 4-Conductor, 21 AWG Star Quad Cable
I marked two of the wires for negative polarity. If your cable has a shield only ground it to the XLR connector's ground pin at the amp end of the headphone cable.
Another star quad wound cable with an excellent reputation is Gotham Mini Star Quad (Gotham part # 10901 GAC-4/1 mini). NYProAudio actually recommends Gotham Mini Quad cable for headphones because it's thinner and more flexible than Canare Star Quad and is more suited as a headphone cable but its four conductor wires are slightly thinner at 26 AWG. I definitely recommend this thinner and lighter cable for portable headphone cables. To benefit from the star quad wind you should pair the yellow and white wires for one stereo channel and red and pink for the other.
Wire color & stereo signal to XLR Pin number. Gotham Mini Star Quad has a dual shield and red, pink, yellow and white 26 gauge wires. Pairing the wires this way will ensure the noise protection of star quad winding.
Schiit Mjolnir Headphone Amp Outputs
The Mjolnir amp offers both 4 and 3-pin XLR output. The 4-pin XLR output is the new standard for balanced headphones and uses just one cable.
Neutrik Full Size Male 4-Pin XLR Cable Connector
This is the male connector that mates to my Mjolnir amplifier. Can be purchased here. Remember the pin numbers will be opposite shown when viewing the rear of the connector when soldering.
Rear of Male 4-Pin XLR
The picture shows the stock Sennheiser cable's two halves separated. You must scrape off the enamel insulation on all four wires before soldering--or at least enough of it to get a good electrical connection. The green wire is Left+ and the red wire is Right+. If your cable has a shield (the stock Sennheiser cable shown above doesn't) connect it to the ground lug.
Sennheiser Headphone Connectors

Red is the right ear cup connector, black is the left. The connectors' thin pin is the + signal and the thick pin is the - (negative) signal. If the connectors aren't color coded they will have "L" and "R" stamped on them.
I purchased my Sennheiser connectors from ebay here for $14.
Wire up the XLR and Sennheiser connectors to your cable using the following guide:
Cable Connection Guide
XLR Pin Headphone Signal Sennheiser Cable Gotham Mini Star Quad
1 Black/Thin Left + Green Yellow
2 Black/Thick Left - Copper White
3 Red/Thin Right + Red Red
4 Red/Thick Right - Copper Pink
Example: Solder the Stock Sennheiser cable's green wire to XLR pin 1.
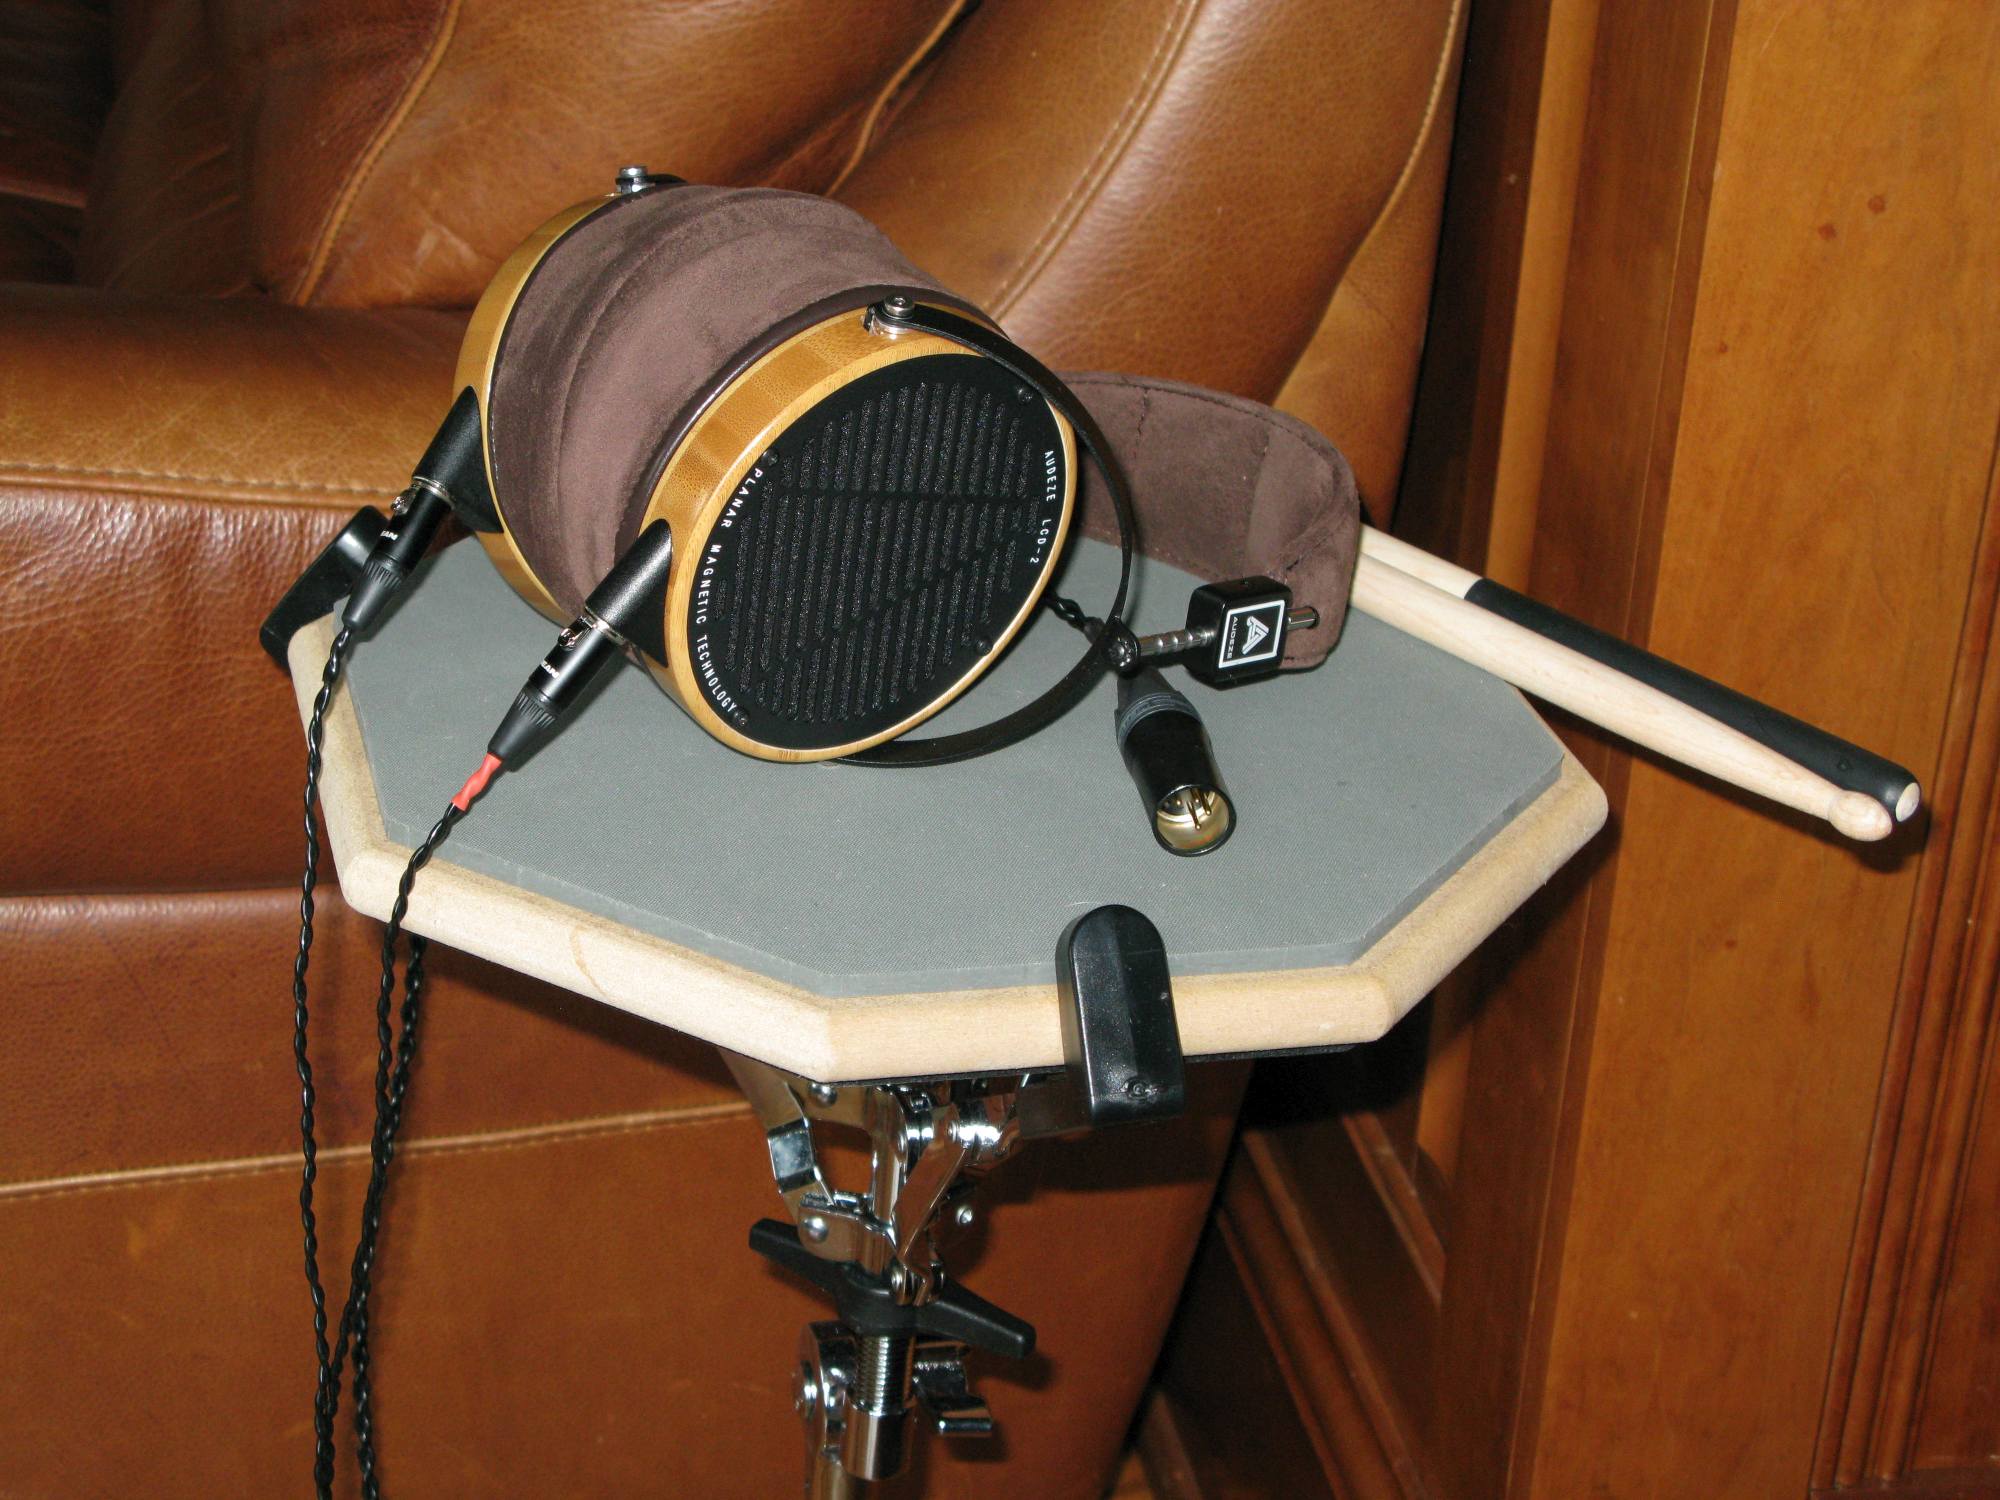
Audeze Balanced Cable
The cables provided with Audeze headphones have four conductors so to convert the supplied single-ended TRS (Tip, Ring Sleeve) cable to balanced is as easy as clipping off the TRS connector and soldering on the balanced connector needed by your amplifier. I recommend building a balanced to single-ended adapter so you can use your headphones with any amp. My balanced headphone amp needs a full size 4-pin XLR connector like this Neutrik full size male 4-pin XLR cable connector. Cut the TRS connector, separate the 4 wires and remove about 1/8 inch of insulation on the 4 wires.
This is optional but when I cut the TRS connector off the Audeze cable I left about one foot of cable on the TRS end and soldered on a Neutrik full size female 4-pin XLR cable connector to create a balanced to single-ended converter cable.
Standard Unbalanced Headphone TRS Plug
TRS stands for Tip, Ring, Sleeve. Sleeve carries combined Left - and Right - signal. Solder the Sleeve to the XLR pins 2 & 4. Solder the Tip to XLR pin 1. Solder the Ring to XLR pin 3.
The Stock Audeze Cable
The stock cable has two pairs of wires, left and right, the two pairs are then twisted together. It's easy to identify the two pairs and untwist the wires. The right Mini XLR connector usually has a piece of red shrink tube to mark the right XLR connector.
Female 4-Pin Mini (Tiny) XLR Connector
Audeze uses two of these 4-pin Mini XLR connectors to connect the cable to the headphone cups. Pins 1 & 4 are +, 2 & 3 are -.
Neutrik Full Size Male 4-Pin XLR Cable Connector
This is the male connector that mates to my Mjolnir amplifier. Can be purchased here. Remember the pin numbers will be opposite shown when viewing the rear of the connector when soldering.
You won't be able to get your meter probes into the Mini XLR pin holes so place a piece of wire into the Right Mini XLR pin 1 hole (see above). The pin numbers are molded into the face of the Mini XLR connector. Find the wire that corresponds to it using your meter in continuity (beep) mode. The Mini XLR pin 1 wire should connect to the full size male 4-pin XLR pin 3. Solder the wire to the full size XLR then repeat this procedure using the "Cable Connection Guide below for the right - wire. Do the same for the Left Mini XLR connector.
Cable Connection Guide
XLR Pin Signal Audeze Mini XLR Gotham Mini Star Quad
1 Left + Left pin 1 Yellow
2 Left - Left pin 3 White
3 Right + Right pin 1 Red
4 Right - Right pin 3 Pink
Example: Connect the full size XLR pin 1 to the Audeze Left Mini XLR pin 1.
Building an Audeze Balanced Cable From Scratch
When you want the best cable possible I recommend Canare Star Quad wound cable with four 21 AWG wires for the headphone cable. A star quad wound cable gives extra protection from magnetic fields and is used in the most demanding professional audio applications. I sourced my cable from NYProAudio but you can find it on eBay with an eBay search of " Canare star quad." Cost is about $1 per foot. Use the two white wires for the left channel and the blue wires for the right. Use a multimeter in continuity "beep" mode to identify and mark one of the blue and white wires as negative (see pic below).
Canare 4-Conductor, 21 AWG Star Quad Cable
I marked two of the wires for negative polarity. If your cable has a shield only ground it to the XLR connector's ground pin at the amp end of the headphone cable.
Another star quad wound cable with an excellent reputation is Gotham Mini Star Quad (Gotham part # 10901 GAC-4/1 mini). NYProAudio actually recommends Gotham Mini Quad cable for headphones because it's thinner and more flexible than Canare Star Quad and is more suited as a headphone cable but its four conductor wires are slightly thinner at 26 AWG. I definitely recommend this thinner and lighter cable for portable headphone cables. To benefit from the star quad wind you should pair the yellow and white wires for one stereo channel and red and pink for the other.
Wire color & stereo signal to XLR Pin number. Gotham Mini Star Quad has a dual shield and red, pink, yellow and white 26 gauge wires. Pairing the wires this way will ensure the noise protection of star quad winding.
Schiit Mjolnir Headphone Amp Outputs
The Mjolnir amp offers both 4 and 3-pin XLR output. The 4-pin XLR output is the new standard for balanced headphones and uses just one cable.
Female 4-Pin Mini (Tiny) XLR Connector
You will need two of these 4-pin Mini XLR connectors to connect the cable to the headphone cups. Jumper pins 1 and 4 together for +. Jumper pins 2 and 3 together for -.
Neutrik Full Size Male 4-Pin XLR Cable Connector
This is the male connector that mates to my Mjolnir amplifier. Can be purchased here. Remember the pin numbers will be opposite shown when viewing the rear of the connector when soldering.
Rear of Male 4-Pin XLR
The picture says Sennheiser but it's exactly the same for the Audeze. The green wire is Left+ and the red wire is Right+. If your cable has a shield (the stock Sennheiser cable shown above doesn't) connect it to the ground lug.
Cable Connection Guide
XLR Pin Signal Audeze Mini XLR Gotham Mini Star Quad
1 Left + Left pin 1 & 4 Yellow
2 Left - Left pin 2 & 3 White
3 Right + Right pin 1 & 4 Red
4 Right - Right pin 2 & 3 Pink
Example: Connect the full size XLR pin 1 to the Audeze Left Mini XLR pin 1 and 4.
Make Amplifier Speaker Terminal to Headphone Adapter Cables
Another adapter worth making is one that will allow you to connect your headphones to an amp or receiver's speaker output terminals. That's right, you can turn your solid state speaker amp into a headphone amp by connecting your headphone drivers to the speaker output terminals. If your solid state amplifier has balanced output you only need this adapter. If your amplifier has common negative output (black speaker terminals connected to each other), which is very common, you can make a simple three-wire adapter seen here. If you want to use a tube speaker amp to drive your headphones I recommend a headphone resistor network interface.
To make the adapter connect a Female 4-Pin XLR jack to a 4-wire cable and attach banana plugs. You can also leave the wire bare but it's a good idea to at least tin the wire ends with solder. Up to 14 gauge wire will fit inside XLR pins but 16 or 18 gauge is easier to work with and solder. The wires or banana plugs must be marked so you can tell left from right and positive from negative. I used my cable's two blue wires as the right stereo channel. Most banana plugs are color coded red and black. Place the black banana plug on the negative wires. If your amp is in a cabinet be sure and make the cable long enough to allow easy connection to your headphone cable.
You also have the option to connect the adapter's cable shield to the amp's chassis to provide your headphone cable with a ground so it will shield the cable from electronic noise. I rolled up the shield strands, put some solder on the end, put shrink tubing over the strands and crimped a spade connector on the end. I connected the spade connector to a screw on the back of my amp.
Female 4-Pin XLR Connector
Pin Signal Amp Speaker Terminal
1 Left + Left Red
2 Left - Left Black
3 Right + Right Red
4 Right - Right Black
If your cable has a shield you can connect it to the XLR connector's Ground Lug and the amplifier's chassis.
Single-Ended Amplifier Speaker Out Adapter
If your amplifier has common ground output (L- & R- speaker terminals connected to ground) you can easily make an adapter to connect your normal unbalanced headphones to the amp's speaker terminals. Simply purchase a headphone extension cable (can be found on eBay) and cut off the male TRS plug. Then strip back the cable to expose the two center conductors which are L+ and R+ and the metal shield which is the combined (common) L- and R-. You can twist the shield strands into two wires to connect to the amp's negative speaker terminals but since the black speaker terminals are connected together to ground you really only need to connect the cable's shield to one negative speaker terminal. Connect the L+ wire to the amp's left red speaker terminal and the R+ to the right red speaker terminal. You also have the option to put banana plugs on the wire ends if you want. Once completed plug your headphone cable into the adapter cable's female TRS connector.
Unbalanced (Single-Ended Amp) Adapter Wiring
Female TRS Socket Amplifier Speaker Terminal
Tip L+ Left Red
Ring R+ Right Red
Sleeve Combined L- and R- Either Left or Right Black
Only 3 wires are really needed because on a single-ended amp both black (-) speaker terminals are connected together to ground. Just connect the TRS Sleeve wire to either black speaker terminal. My suggested cable color coding is Red for R+, Blue for L+ and Black for the combined -.
Warning: Verify your amp is single-ended by unplugging it and placing a multimeter's probes on both negative speaker terminals (usually black) and testing for continuity (tone or 0 ohms of resistance). A common ground will show continuity or 0 ohms. Do not connect a single-ended adapter to an amp that does not have a common ground, you may damage or destroy the amp. Instead use a balanced speaker out adapter described in the preceding section.
TRS Jack to 2 Conductor Cable
Both 6.3mm and 3.5mm plugs use the same wiring. TRS stands for Tip Ring Sleeve. Cable shield connected to the Sleeve carries combined Left - and Right - signal.
Plug Signal
Tip Left +
Ring Right +
Sleeve Left-, Right- through the Cable Shield
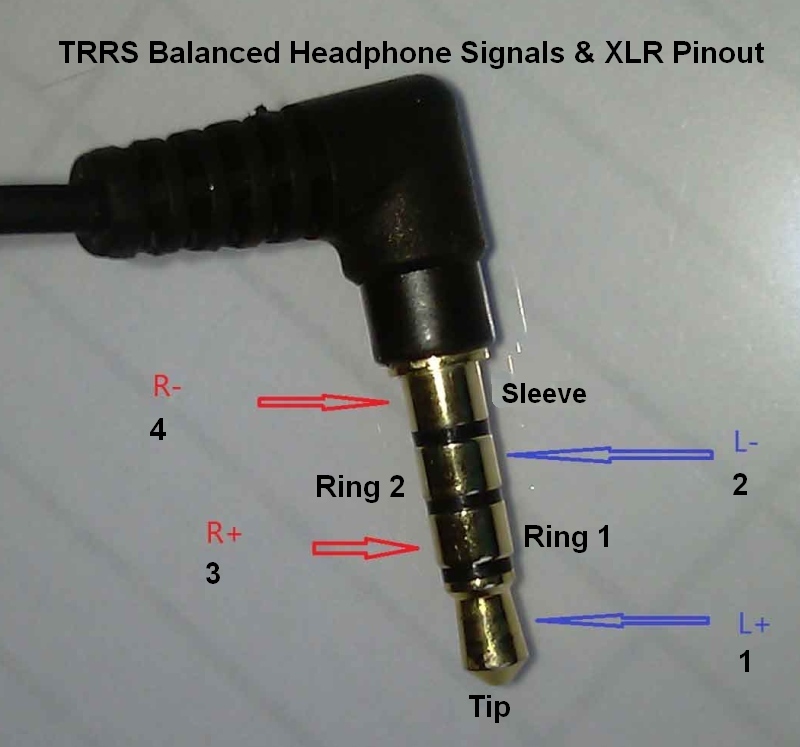
Make a TRRS Balanced Hedphone Cable or Adapter
Fiio and Astell & Kern use a 4-connector 2.5mm TRRS plug while HiFiMAN uses a 4-connector 3.5mm plug for their balanced line portable amps. Note that cell phones use 2.5mm TRRS plugs. TRRS stands for Tip Ring Ring Sleeve but for balanced cable the "Sleeve" part of the TRRS plug should NOT be connected to the cable's shield--if it is connected it will not be balanced because the cable's shield will change the cable's impedance. For a balanced cable all 4 wires need to be identical to benefit from common mode noise cancelation. You can check a pre-wired cable to see if the cable shield is connected to the TRRS plug's "Shield" connector by using a multimeter's continuity check.
For portable use it makes more sense to create a complete headphone cable rather than use an adapter because an adapter with Male and Female XLR connectors will be heavy and bulky. I recommend you purchase a TRRS plug and install it on a Gotham Mini Quad cable (Gotham part # 10901 GAC-4/1 mini). It's thinner, lighter and more flexible than the beefy Canare Star Quad.
Install a connector that matches your headphones on one end of a 4-wire cable then use a multimeter's continuity function to identify which wires connect to which part of the TRRS plug.
Fiio and Astell & Kern to Female 4-Pin (mini or full size) XLR Wiring
XLR Pin Signal TRRS Plug
1 Left + Ring 2
2 Left - Sleeve
3 Right + Ring 1
4 Right - Tip
Fiio and Astell & Kern 2.5mm TRRS Pinout

HiFiMAN to Female 4-Pin XLR Wiring
XLR Pin Signal TRRS Plug
1 L+ Tip
2 L- Ring 2
3 R+ Ring 1
4 R- Sleeve
Note: The cable's foil or braided shield must NOT be connected to anything at the TRRS plug end of the cable. If the shield is connected to any of the 4 wires the cable will not be balanced.
If your cable has a foil or braided shield verify it is not connected to the TRRS plug's "Sleeve" connector (see photo below). If you are making a TRRS to XLR adapter cable you can connect the cable's shield to the XLR's ground lug.
Signal & XLR pin number to the 4 parts of the TRRS plug. HiFiMAN uses a 3.5mm TRRS plug.
Sony 4.4mm TRRRS Balanced Plug
This new connector adds an extra Ring to allow four identical wires and a grounded shield.
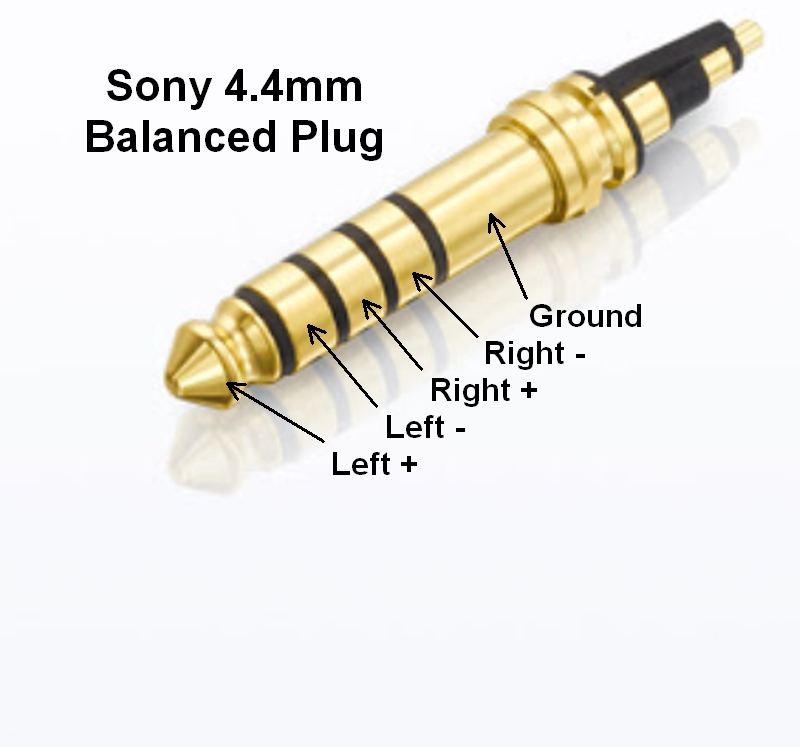
New Tip-Ring-Ring-Ring-Sleeve connector allows true balanced audio and a shielded cable.
Other Balanced Headphone Connectors
Ibasso PB2 Pinout
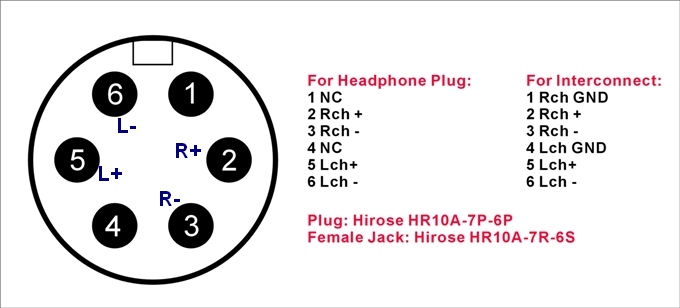
The plug is available from Ibasso for $9 here. Connect the headphone cable's braided shield to the Hirose plug's ground lug so it will be grounded to the amp and provide RFI protection.
The Ray Samuels Right Angle Plug Pinout
Used in the SR-71B, Lightning, Protector & Intruder
Pin 1 = L+
Pin 2 = R+
Pin 3 = L-
Pin 4 = R-
Note the pin numbers are on the plug. Connect the headphone cable's braided shield to the right angle plug's ground lug so it will be grounded to the amp and provide RFI protection.
Dual 3-Pin XLR Headphone Cable
Dual 3-Pin XLR Pinout
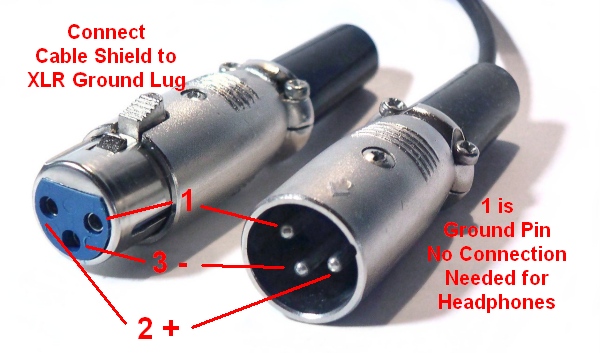
Pin # 1 does not need to be connected to ground for headphone use, just leave it disconnected.
Many headphone amps have a pair of 3-Pin XLR connectors. For the Left XLR connector you connect the L+ to Pin 2, L- to Pin 3 and the cable shield to the XLR connector's ground lug. Connecting the cable shield to the ground lug will provide RFI noise protection for the cable. Pin 1 does not need to be connected to ground for a headphone cable (it's there for microphones and other audio gear). The Right XLR connector would be R+ to Pin 2, R- to Pin 3 and the cable shield to the ground lug.
If you wish to use one headphone cable and Y the cable to the XLR connectors and/or the ear cups I recommend using Canare Star Quad or Gotham Mini Quad cable. Remove the rubber outside layer and shield for the cable Y, you'll need about 17 inches for the ear cup Y and around 6 inches for the XLR Y. Unravel the 4 conductor wires and then twist them into right and left pairs going to the ear cups and/or XLR connectors. You can cover the cable split with a couple inches of heat-shrink tube to dress up the cable. I also recommend heat-shrink for the XLR end of the cable Y to enhance the grip of the XLR connector's strain relief clamp.
A nice finishing touch is to braid the 4 wires for a couple of inches. I did this for my HE-500 balanced headphone cable. I used the braiding technique detailed in the following section.
Dual 3-Pin XLR Equipment Interconnect Cable
Commercial 3-Pin XLR cables (including those used for equipment interconnects) with shields connect the XLR connector metal shells, cable shields and pin 1 at both ends of the cable so I recommend this convention. If the cable isn't shielded then a 3 conductor wire is used and pin 1, the pin 1 ground wire and metal shells are all connected at both ends. The cable will normally have a 3-Pin XLR male on one end and a female on the other end. The connection is straight through with pin 1 to pin 1, pin 2 to pin 2 and pin 3 to pin 3.
Single 3-Pin XLR Stereo (3 wire unbalanced cable)
This is how to wire an unbalanced (combined R- and L- ground, Right+, Left+) stereo headphone cable with a single 3-Pin XLR connector.
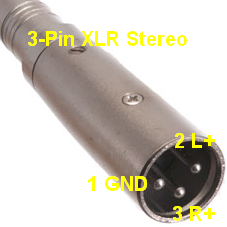
Pin 1 is combined ground, 2 is Left + and 3 is Right +. If your XLR connector is metal then ground the connector shell to Pin 1. Connect the cable shield to the XLR ground lug.
How to Do a 4-Wire Round Litz Braid
I like to start the braid at the amp end of the cable with the TRS or XLR connector soldered on and the connector's cable strain relief in place. I then put the connector carefully in a small table vise during the braiding. You can also have a friend hold the connecter as you braid. If you don't do it this way then you'll have to find a way to keep the braid from unraveling when you release the wires from the vise. Tightly wrapped tape or heat shrink tubing can be used to do this.
Braided Split With Heat-Shrink
Heat-shrink was used to cover the coax to bare wire junction. Canare Star Quad cable is shown.
1. Start with 4 parallel wires.
2. Take the left outside wire under its two neighbors then up around and down between the two wires you just went under.
3. Take the right outside wire under its two neighbors then up around and down between the two wires you just went under.
4. Repeat until you get to the end of the cable or to the cable split to the two headphone cups. For the split simply twist the two wire pairs the rest of the way to the headphone connectors.
Another way to describe this: Start with 4 parallel wires numbered 1 - 4.
1. Take wire 1 under wires 2 and 3 then bring it up between wire 3 and 4 then down between wires 2 and 3.
Repeat this from the other side of the wire bundle then alternate sides.
Note: Only the thinnest braided wire will fit inside a Mini XLR connector. Braiding wires will effectively shorten them so add about 10% to your unbraided wire length.
How To Do a 3-Wire Braid
Just like braiding hair.
1. Start with 3 parallel wires.
2. Take the right wire over the top of the middle wire and place it between the middle and left wires.
3. Take the left wire over the middle wire and place it between the middle and right wire.
4. Repeat.