How to install Spark Plugs & Wires
CAUTION: Attempting to perform this installation task with the engine hot will likely
lead to burned flesh!
1. Remove the end of the throttle cable from its attachment on the "constant
radius" arm, on which it pulls, by holding the arm in the open position and slipping
the barrel-shaped end out of its mounting slot.
2. Remove the clamp on the forward end of the rigid tube leading to the throttle body.
Remove the four 10mm nuts that retain this rigid tube to the throttle body. It is NOT
necessary to disconnect the small hose at the rear of this rigid tube.
Magnecore wires
3. Remove the two 12mm acorn nuts at the top of the throttle body. Slip the cable clamp
off of the rear stud, then re-position the rigid tube (loosened in step 2) over the top of
the engine, out of the way of the stock ignition wires. [Steve Stover adds: I removed the
bolt holding the boost control bracket, which made swinging the rigid tube over the top of
the engine a lot easier.]
4. Remove the two 12mm chrome acorn nuts from the underside of the throttle body.
Gently pull the throttle body off of the studs, exercising caution to keep from destroying
the gasket. Rotate this throttle body unit up, at the front, to expose the ignition coil
terminals. [Steve Stover adds: To remove the throttle body I HAD to disconnect the coolant
hose directly below the throttle body. A definite pain to get off and on.]
5. Now, loosen the two 10mm bolts holding the oil filler neck in place, but do not
remove them completely. [Rob Robinette adds: I was able to replace the plug wires without
loosening the oil filler neck, so try it before you take a go at the filler neck] [Steve
Stover adds: I had to move the filler neck to remove the front plug wire. On my car there
is a 3rd bolt holding the filler neck in place, under the horizontal part of the removable
neck. Another pain to get to. Since I had all the bolts loose I figured I might as well
remove the neck completely. It did make access easier, but when I went to bolt it back on
I couldn't get the rear vertical bolt to line up and start threading. I had to remove a
coil wire to get the bolt started. Then the wire was interesting to put back on.]
6. After detaching the two small hoses attached near the filler cap, the upper portion
of the oil filler neck must now be pulled away from the "Trailing Number 1" coil
wire to allow its removal.
7. Remove the stock wires and replace with the new wires using the following guide:
WE STRONGLY RECOMMEND REPLACING ONE WIRE AT A TIME TO AVOID ERRORS AND POSSIBLY
DAMAGING THE ENGINE.!
8. Reassemble in reverse order. [Rob Robinette adds: To help get the
tight fitting Magnecore wires on the coils I unrolled a paper clip and inserted it between
the rubber coil cap and the coil while sliding it on to give the air a place to escape. It
made it much easier to get the wires completely on the coils.] [Steve Stover adds: I
was VERY careful removing the throttle body to try and keep from breaking the gasket. The
gasket looked fine till I was putting the throttle body back on, when it tore. Next time I
will set the gasket aside while working, and place it on the intake side when putting it
together. On the bright side, the broken gasket hasn't affected the idle much more than 50
rpm, and that might just be the colder weather today. So I guess I'll drive it until the
new gasket gets here.]
More Info on Spark Plugs
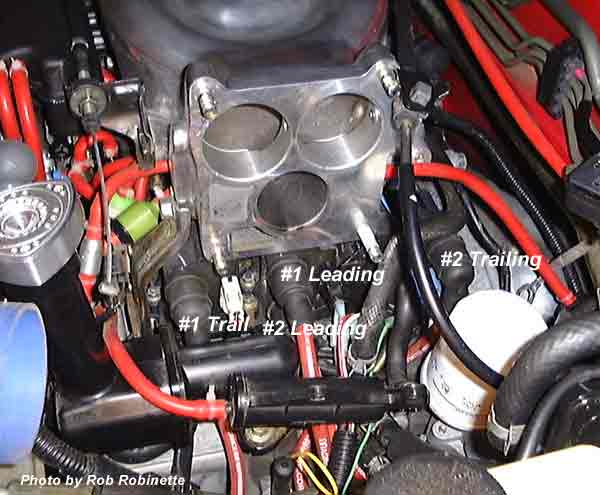
You’ll see L1 or L2 besides each hole on the leading ignitor. 1 means front rotor,
2 means rear rotor. Here’s an easy way to remember the difference between leading and
trailing. "L" for lower; "T" for top.
1) Front rotor is #1, rear is #2
2) For each rotor, the spark plug nearest ground is Leading (lower),
nearest hood Trailing (top)
3) Spark plug wires to the two trailing plugs have blue rubber caps (stock)
4) NGK spark plugs for trailing positions have two blue rings around the ceramic, near
the tip and have a T on them, leading have an L.
4) Wires usually have 1 or 2 labeled on them.
5) Number 1 rotor coils are marked with a white dot
6) Leading coil is in the middle, #1 trailing coil is toward battery, #2 trailing coil
is near firewall.
7) Rotor #1 plug wire on leading coil is on top, #2 is on the bottom.
8) Rotor #1 plug wire on trailing coil is toward front, #2 toward rear.
(All coils are actually labeled L1, L2, T1, or T2 - you have to look closely)
It is very easy to change the plugs from the bottom through the A-arm using a short
ratchet. Just jack up the front left wheel and crawl under.
|