How to Install Brake Lines
By Rob Robinette
Why do you need stainless steel brake lines?
Brake fluid gets very hot and places a lot of pressure on your stock, rubber brake lines. As they age they will bulge under pressure and make the brake pedal feel softer. A brake line replacement may firm up your brake pedal (and they look cool).
What you need
New brake lines, 4 copper crush washers for the rear banjo bolts, 8mm wrench (fits bleeder screws), 10mm flare nut wrench (line fittings)--If you try to use a normal 10mm wrench you will round off the flare nuts--the wrench is a good $4 investment, 12mm wrench or socket (banjo bolt), small torque wrench, pliers to pull out the metal clips and brake bleeding stuff. This procedure can be referenced on page P-21 of the RX-7 Workshop Manual.
I got the brake lines from Racing Beat for $130. They didn't fit very well and one had a manufacturing defect (see below). They were a pain in the butt to install but I know that if I had to do it again I could do it in 1/3 of the time. Hopefully this how-to will make it easier for you. You might want to replace your brake pads while you're doing this. See the Brakes information page for brake pad recommendations.
New stainless steel front brake line and chassis connector. Note the brake line removed from the rubber chassis clip due to poor fit of new lines. I plan to cut the chassis line with a pipe cutter and flare it to make it fit into the clip.
Warning
Don't install brake lines yourself unless you are a very competent mechanic. A single point failure in the brake system will result in the total loss of brakes and possible damage/injury/death! A brake shop can install the lines fairly cheaply. You must use all of the stock mounting points, crush washers, and clips (or use new crush washers).
Before you remove any of the brake line fittings, carefully clean all around them, so that dirt can't get into the system as the fittings are opened. The front brake lines have a mid brake line attachment point that must be secured first. The rear lines attach only at the line ends.
Note
The brake line attachment points have one point of the large hex nut ground off. This requires the hex nut on the brake line to fit into the brake line brackets in one particular position. Get familiar with this ground off hex point on your brake lines. It is impossible to install the metal retaining clips if you don't have the ground off point lined up properly. One of my Racing Beat front brake lines did not have the point ground off so I couldn't get it into the bracket (manufacturing defect). I had to use a die grinder to grind it off and make it fit.

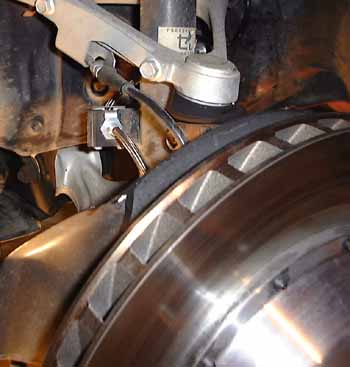
Rear brake line connections - left is chassis connection - right is caliper connection
Rear Brake Lines
I recommend you start with the rear brakes, they are a little easier to install. If you remove the brake reservoir cap and put some plastic wrap over the opening and then put the cap back on you will minimize how much fluid will drip out of the lines. Remove the wheel. Get some newspaper to soak up the brake fluid that will drip out of the lines and have some paper towels handy. Loosen the brake line connections on each end of the stock lines, a 10mm flare nut wrench will fit the brake line fitting and a 12mm will fit the banjo bolt. I recommend you plug the brake line on the fender to prevent excessive drippage. I used a rubber vacuum hose plug. Pull the two metal clips that retain the hose ends. Remove the stock lines. Save and re-use the copper crush washers from the banjo fitting. Start by installing the banjo fitting and washers to the wheel hub. Torque the banjo bolt to 15-21 foot pounds. Next fit the brake line's hex nut into the bracket and line up the ground off hex point with the bracket's matching point. If you don't get the fit right the brake line will not go through the bracket enough to get the metal clips back on (but don't put the clips on yet). Get the brake fittings started (hand tight only) and then put the metal clips on. If you don't get the lines started first you may not be able to start them once they are held in position by the metal clips. Don't tighten the brake line fittings before you get the metal clips on, they will prevent the lines from turning when you tighten the fittings. I had to pull the metal brake lines lose from the plastic clips on the fender well to get the brake lines to line up because my Racing Beat lines were slightly different from stock and they alter the point where the lines join up. Torque the brake line fittings to 113-190 inch pounds (10 to 15 foot pounds).
Warning
You must torque the brake line fittings to spec! If you don't you run the risk of having a fitting come lose and dump all of your brake pressure which will result in total brake loss! (The parking brake may or may not still work) Verify that both metal clips are secure, that the fittings are torqued properly, and that there is absolutely no way that wheel travel will kink or snag a brake line (see warning above!).
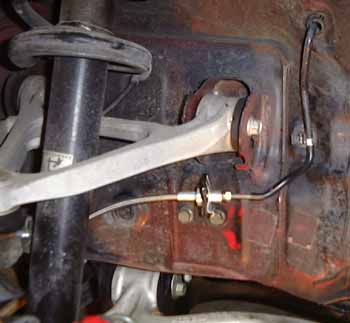
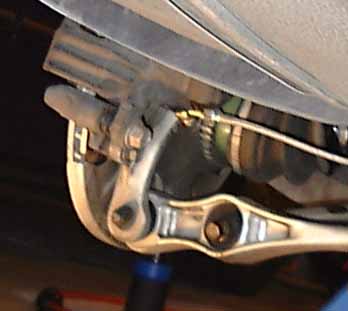
The front brake mid-line connector
Front Brake Lines
The only thing different on the front brakes is a mid brake line mounting point and no banjo fitting. You must install the mid-line connector and metal clip first. If you don't do it first you may have to twist the brake line to finish the installation (and that is bad). The line ends have swivels which are easy to line up once the center is secured. The rest of the installation is the same as the rears. Again, make sure that wheel travel and steering will not kink or snag a brake line.
