How to Repair the Antenna
Replacing the Mast
You can buy the mast from Mazda and put it in yourself. If you can pull the toothed plastic cable out then you don't even have to take the unit out of the car.
There's a collar you need to unscrew around the top of the fender where the antenna comes out. I unscrewed mine by hand. Once you get the collar off and the old antenna & cable out you just push in the cable as far as it will go with the radio ON. It will only go in about a half inch and will only go in with the teeth facing the rear of the car. Have someone turn the radio off and it will be pulled down. Replace the collar & you're done.
I just did mine and had to take the antenna motor out & take the cover off to get the cable out.
Good Luck!
Brad Snakenberg
Removing the Antenna and Replacing the Mast
By Drew
[Rob Robinette Adds: The antenna retraction mechanism in the 3rd gen RX-7 fails at a pretty high rate. You can delay its failure by cleaning and lubing it while its extended. I used WD-40 to clean it and then wiped it down with some light 3M oil (and mine hasn't failed yet).]
The factory manual shows the assembly on page J-51
1. Take out jack (and the rest of the stuff you have in that compartment)
2. Pull up carpet and lay on strut brace
3. Pull out the middle interior piece, between the tail lights. Be careful. Pull it gently so as not to break anything.
4. Remove all the screws for the RH interior quarter
5. Remove the (two?) push pins from the top of the quarter...I was unable to get these out w/o breaking them. (If anybody knows the part no. for these...please tell me!)
6. Bend the quarter a bit so you can get to the antenna.
Note: All the following photos are of a 2nd gen RX-7 but the 3rd gen is very similar.

This shows the corner of the trunk. You can see the power connection (upper left), and antenna connection (pulled out >over the jack) [all photos by Chuck Sterling]
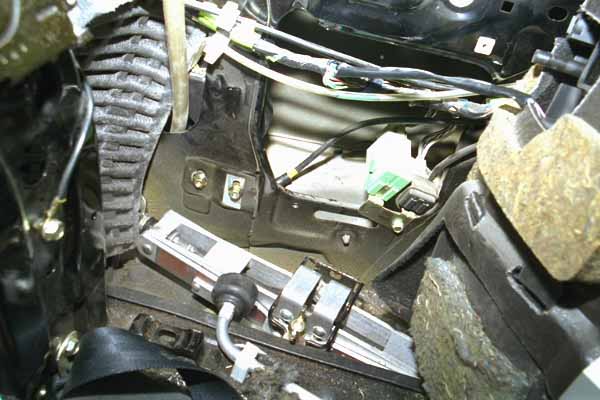
This shows the left rear corner of the trunk. The two nuts just above the jack are the mounting points for the antenna. The mounts are fragile and should not be over tightened. The antenna lead can be seen disappearing to the right of the photo. [Chuck Sterling]
7. Unscrew the plastic housing from the antenna.
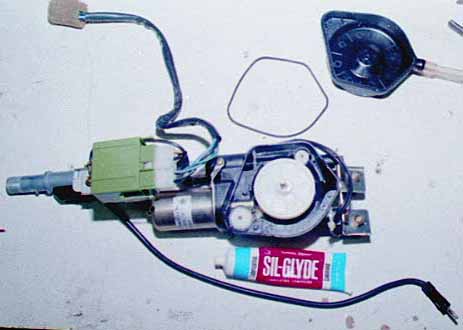
This shows the gearbox with reduction gear, guide roller and of course the clutch, installed. The retaining strip and take-up spool are not installed in this view. [Chuck Sterling]
8. Clean out the broken parts of the mast from inside the housing.
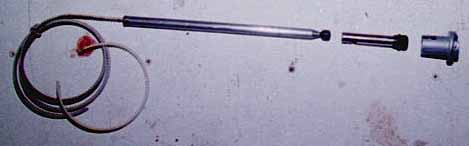
This shows the broken antenna. The plastic rack that pushes and pulls the antenna up and down broke. That really is paint, not blood. [Chuck Sterling]
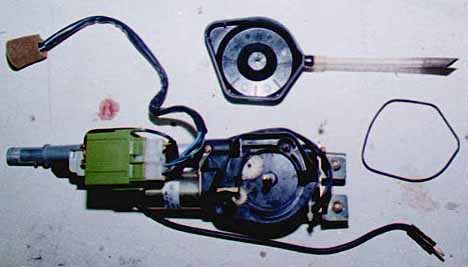
This is a view of the case with the clutch, take-up spool, reduction gear, and antenna removed. At the lower left edge of the gearbox, you can see the worm gear on the motor shaft. When the gearbox is assembled, the worm gear engages a reduction gear that in turn drives the small white plastic gear under the worm gear. The larger white gear in the upper left of the gearbox is a rev counter that causes the motor to shut off after a certain number of revolutions of the take-up spool. There is a small stud in the upper right edge of the gearbox that holds a small plastic wheel that guides the plastic antenna rack as it is moved. Although clean in this photo, the entire case was pretty much packed with old silicon grease, and when I reassembled everything, I was very liberal with the Syl-Glyde. [Chuck Sterling]
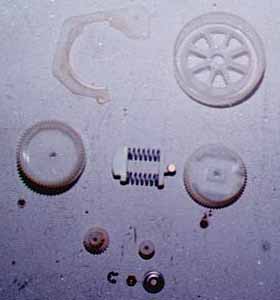
This is a view of the retaining strip, spool, disassembled clutch, guide wheel, reduction gear, and small hardware. There’s no pressing need to disassemble the clutch, other than to clean it, and it is a genuine bear to reassemble. Slip, and the springs go into low earth orbit. [Chuck Sterling]
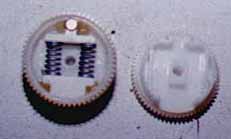
This shows the clutch partially reassembled. The two halves fit together and retain the springs, pressure plates and metal roller. I’ve put a few globs of Syl-Glyde grease in the assembly, as you can see. The roller normally sits in a detent until something jams, then it deflects and allows the clutch to slip for a revolution until it lands in the detent again and maybe this time the parts move. If it stays jammed for a while, the rev counter by the gearbox eventually stops the motor. There are two sets of teeth on the circumference of the clutch. One engages the motor drive and the other, on the other part of the clutch, engages the antenna rack. [Chuck Sterling]
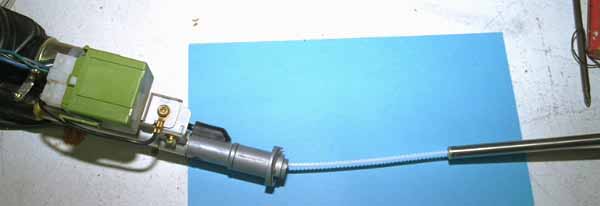
This shows the new antenna being fed into the reassembled gearbox. The rack only has teeth on one side, and they must be positioned to be on the inside of the coiled rack on the take-up spool. It won’t go in otherwise and I suppose you could break it trying to shove it in there wrong. [Chuck Sterling]
This shows my snap-ring pliers being used to turn the upper retaining nut through the opening in the wing. And a really cluttered corner of my shed. [Chuck Sterling]
