Intro To Long Range MRAD Shooting
By Major Rob Robinette
Table of Contents
Handloading 6.5 Creedmoor for Long Range Shooting
Handloading 308 Win for Long Range Shooting
6.5CM vs. 308 Win For Long Range
Crack & Thump Range Estimation to an Unknown Shooter
The Horus Tremor3 MRAD Reticle
Introduction
This article is about getting you up to speed quickly in long rang shooting using an MRAD (mil dot) scope. There's a lot of myths and gotchas that can cost you time and money in long range shooting. It will take just a few minutes to read this page but you'll gain some valuable insight into long range shooting and MRAD scope use.
I have read that MRAD reticles are useful only if we do our shooting in meters but as you'll see below the mil reticle works just fine when working in yards, feet and inches. There are three main benefits to using MRADs over MOA (Minute Of Angle means 1/60th of a degree). Range estimation is simple, turret adjustments are in a more logical 1/10 of an MRAD versus 1/4 of an MOA and you'll be working with the world's long distance shooting and military sniping standard.
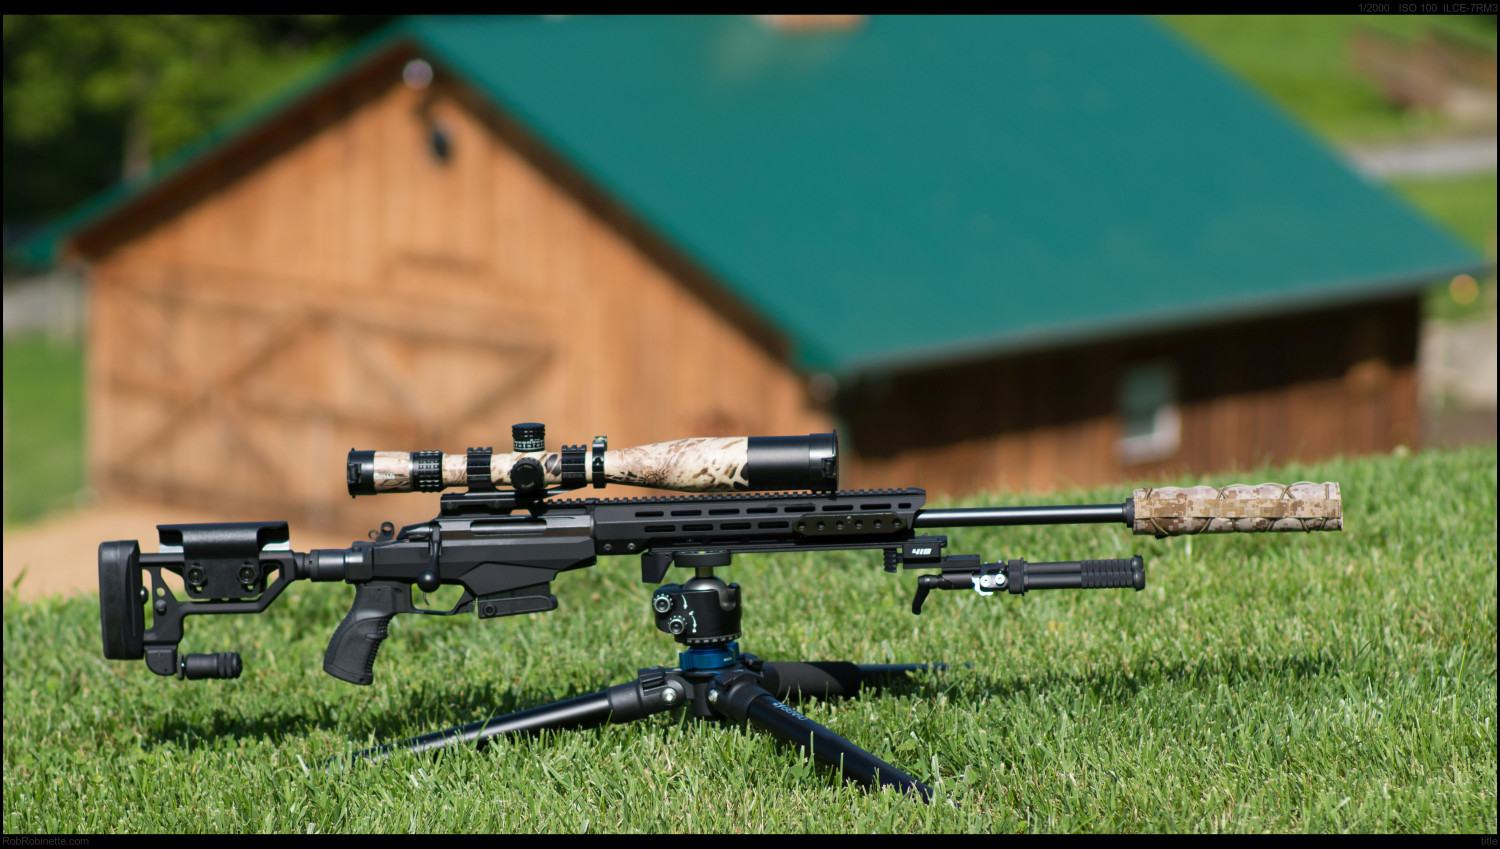
My 1000+ Yard Rifle
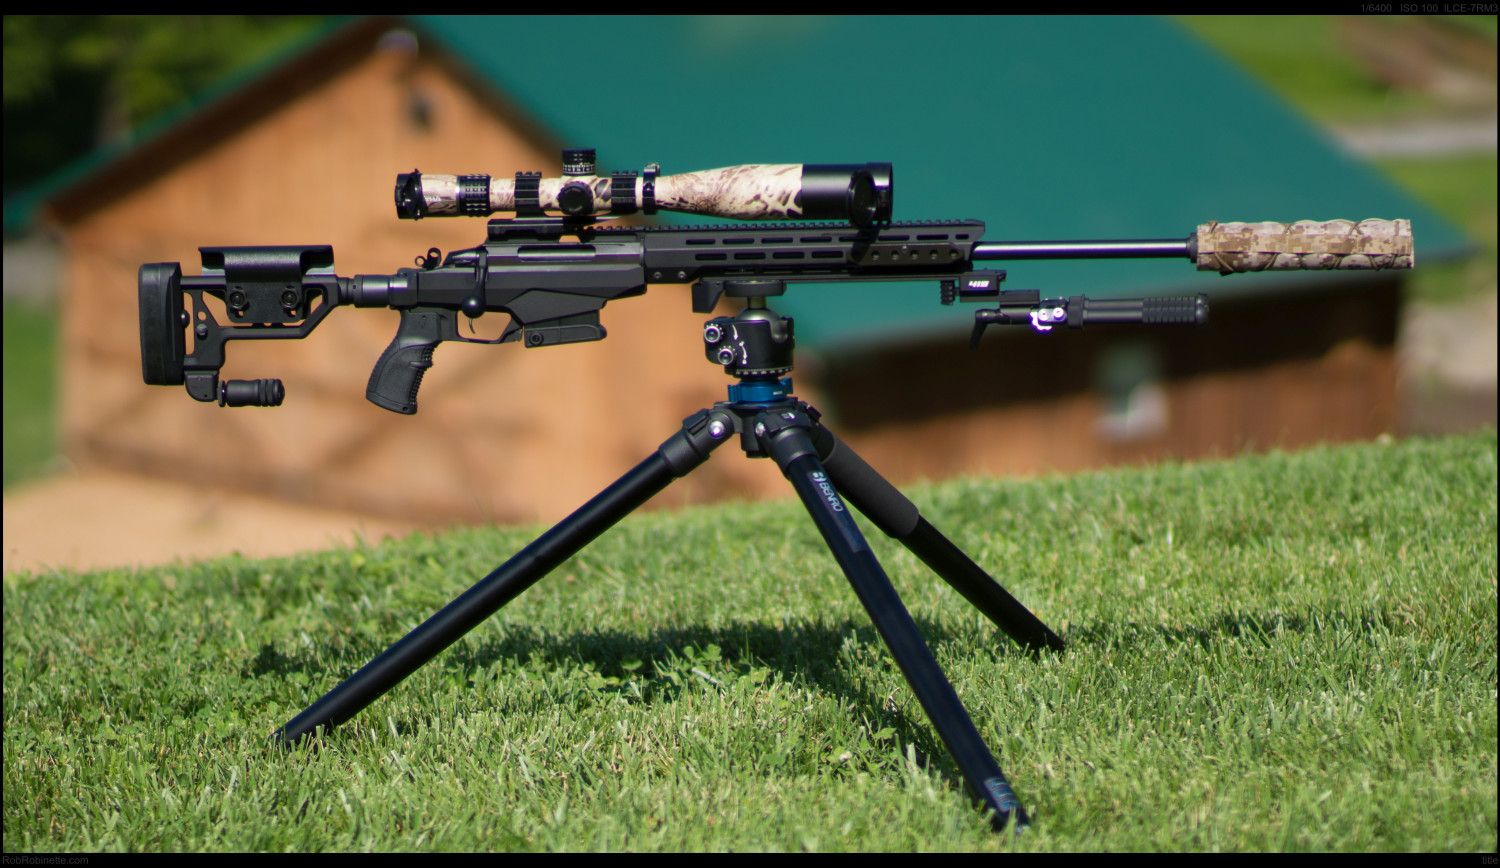
Tikka T3x TAC A1 Rifle in 6.5 Creedmoor with Burris XTR II 5-25x MRAD scope, Vortex scope level, Phantom 7.62 suppressor, Accu-Shot BT12-QK Monopod and XLR Industries M-LOK Steel Chassis Weights. Sawtooth Rifles 13" M-LOK Arca plate with Atlas BT65-NC bipod and front and rear Area 419 barricade stops. The Arca plate is clamped into a LeoFoto LH-55 ball head, the ball head is mounted on a Benro TMA47AXL tripod.
The MRAD Scope and Reticle
MRAD is short for milliradian. MRAD = milliradian = mil. An MRAD reticle is marked out in mils and fractions of mils to allow us to estimate the range of distant objects and quickly get on target. There are 6,283 mils in a geometric circle and 1 mil equals 3.438 MOA.
The MRAD gives us a 1000 to 1 ratio:
At 1000 feet 1 mil = 1 foot.
At 1000 meters 1 mil = 1 meter.
At 1000 yards 1 mil = 1 yard (36 inches).
At 100 yards 1 mil = 3.6 inches
A standard 0.1 mil turret click = .36 inch at 100 yards and 3.6 inches at 1000 yards.
True "Mil Dot" MRAD Reticle
![]()
Bare bones true mil dot reticle. The distance between each dot is 1mil (1 milliradian or MRAD).
For long range shooting and hunting I highly recommend a variable magnification MRAD scope with at least 20x max zoom. A recent 1000 yard record breaker used a 40x scope. The scope should also have a first focal plane (FFP) mil reticle and both turret adjusters calibrated in mills. Having the reticle on the first focal plane keeps the reticle mil or MOA markings accurate to allow holdover and range estimation at any scope magnification. A second focal plane scope can only do accurate holdover and range estimation at a specific zoom level (usually max zoom). If your scope will only be used for long range target shooting and usually at max zoom then a second focal plane (SFP) reticle may be preferred because the reticle will not grow fatter as you zoom and obscure the target. The focal plane doesn't matter with fixed magnification scopes. I also highly recommend turret adjusters calibrated in the same units as the reticle.
Be aware there are scopes with MRAD reticles but MOA turret adjusters. You must closely read a scope's specifications to make sure you're getting exactly what you want because most quality long range scopes come with several different reticles and turrets in both MOA and mils. If you don't pay close attention you'll end up having to ship it back.
I do not recommend bullet drop compensation (BDC) reticles for long range shooting because their drop marks are specific to a particular bullet at a specified muzzle velocity and standard weather conditions. Even if the reticle is in mil the drop marks will clutter the scope.
A long range scope should have exposed turret adjusters (not under removable caps). When shooting at 1000 yards and beyond we have to dial in elevation so easy access is needed. Zero stop turrets can be easily reset to zero so we can dial in elevation then easily get back to our zero.
Scope tube diameter is also important for long range shooting. A large tube diameter allows for more adjustment range and we need that range due to the extreme bullet drop at very long distance. We have to move the reticle quite a bit to get the barrel high enough to loft a bullet out beyond 1000 yards. A 30mm tube is adequate but personally I would never go below 34mm for a 1000+ yard scope.
I also like a medium size objective around 50mm for light gathering but without being crazy big. I recommend 50mm for tactical rifles to reduce bulk but a bench rest rifle can benefit from the larger light gathering capability of a 56mm lens.
We need a parallax adjuster to set range and focus and eliminate parallax error.
A diopter adjuster allows us to tune the scope to match our vision to keep the reticle in sharp focus with old eyeballs.
For target shooting I recommend using a sun shade extension on the front of the scope. The extension will prevent sun glare and flare. I do not recommend using more than one sun shade. For a tactical rifle I do not recommend a sun shade because its added length can act as a lever and will make it easier to bump the scope out of alignment or bend the tube.
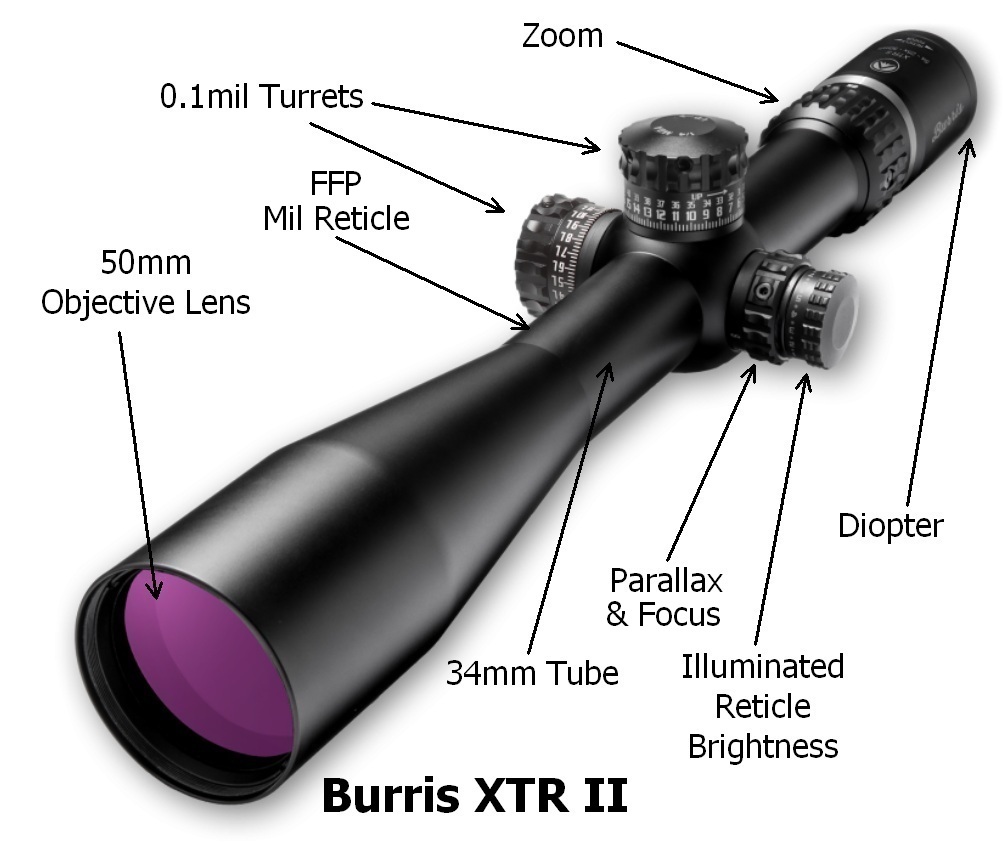
When a scope description says "Burris XTR II 5-25x50" the "5-25" is the scope zoom of 5 times magnification adjustable to 25 times magnification. The "x50" is the objective lens diameter in millimeters (see scope diagram below). Common objective lens diameters are 44, 50 and 56mm. The larger the diameter the better the scope's light gathering capability which can be important at high magnification or at low light at dusk and dawn. In good light a large objective may not be needed. It is actually fairly common to see long distance target shooters with a "cap with a hole" over their objective lens (aperture mask) to reduce the effective objective size to increase depth of focus which makes it easier to get a perfect focus. An aperture mask can also reduce the negative effect of mirage and masks are often used in short range 22LR matches to allow sharp focus down to 25 or 50 yards.
A great value long range scope is the Burris XTR II with 5-25x zoom #ad with the Steiner developed SCR mil reticle on the first focal plane (FFP), 34mm tube, 50mm objective and 0.1 mill click turrets for both elevation and windage. Its multi-coated lenses create a sharp view even at 25x magnification. It comes with a sun shade but no lens caps. It has an easy to use left side parallax/range knob, diopter adjustment ring and zero stop turrets. A portion of the reticle can be illuminated and is night vision goggle compatible. This scope is so packed with value I own three of them. I have them on an AR-10 in 6.5 Creedmoor, a Ruger Precision Rimfire in 22 Long Rifle and a Serbu BFG-50 in 50BMG. Using the same scope and reticle on all three keeps things consistent and helped me get really good with the scope. You'd be surprised how difficult it can be to remember the dimensions of two or three different mil reticles.
Burris XTR II 5-25x MRAD Reticle Scope
This inexpensive 50mm honeycomb killflash fits the Burris XTR II 50mm scope.
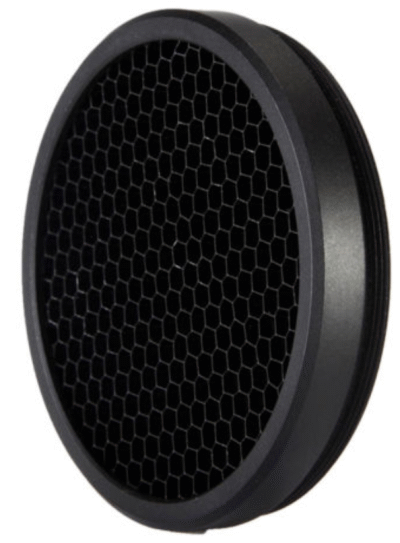
50mm killflash reduces lens flash and sun glare.
Currently the most popular long range scope is the Vortex Razor HD Gen II 4.5-27x56 #ad at around $2000. It's a beautiful first focal plane scope with a 34mm tube, 56mm objective lens and comes in several varieties of MRAD and MOA illuminated reticles. I chose the Horus TReMoR3 MRAD reticle. Like the Burris XTR II scopes it features a side focus wheel, 0.1mil zero stop turrets and a diopter ring. The scope uses standard USMC 6,283 mils per circle.
The Scope Mount
The important things to consider here are to use quality scope rings (or single piece mount), get the right height mount for the rifle and whether or not you need built-in elevation. My Ruger Precision Rifle in 6.5 Creedmoor has 20 MOA (6mil) of elevation built in to it's Picatinny rail scope mount. This built-in elevation keeps us from running out of elevation adjustment at long range. The Ruger Precision Rimfire in 22LR has 30 MOA (9mil) built in to its rail so we may not need our scope mount or rings to come with built in elevation too. I use the Burris AR-P.E.P.R. 34mm mount #ad with 20 MOA of built in elevation on both my Ruger long range rifles and it's not too much when combined with the rifles' built in rail elevation. 50 MOA (15mil) total elevation for the Precision Rimfire still works fine with the XTR II scope.
You must get a good cheek weld on the stock for accurate long range accuracy so your rings must allow the scope objective to clear the barrel and still match your face up to the stock. If your stock has an adjustable comb then you just have to worry about clearing the barrel.
The Burris AR-P.E.P.R. mount is a little low for the Ruger Precision Rifle and Rimfire. The Ruger Precision Rifles like a tall scope mount to get the buttstock down on our shoulder but my Serbu 50BMG has a tall Picatinny rail and doesn't need a tall scope mount. Scopes with large 56mm objectives usually need a taller scope mount to clear the barrel. Many rings and mounts come in low, medium and high height.
I wanted to reach out to one mile with my Tikka T3x TAC A1 and after crunching the numbers realized I needed at least 30 MOA of rail or mount elevation. With 30 I would have to use max turret adjustment and still hold over the target so I decided to go with 40 MOA. The Tikka's factory scope rail is flat so I went with Burris XTR Signature 34mm medium height (1.5" height) scope rings which can be adjusted from flat to 40 MOA. With the rings set at 40 MOA I can now dial the turrets to one mile. Even with 40 MOA set these 1.5" rings provide clearance for my Vortex Razor HD with its big 56mm objective lens.
A scope bubble level is an important accessory which helps keep us from canting the rifle and throwing off our shots. You'd be surprised what an imperceptible amount of cant can do to our shot placement at 1000 yards. I have this Vortex bubble level #ad on all of my long range scopes. I shoot with both eyes open so I mount the level on the left side of the scope and can see the level with my left eye while looking through the scope with my right. We can also use the scope level to level the rifle using our bipod's cant lock.
Related accessories used to precisely level our scope during mounting are the Arisaka Defense Optic Leveler #ad and the Wheeler Engineering Professional Reticle Leveling System #ad. The Arisaka Defense Optic Leveler must slide between the bottom of the scope and rifle (or between scope and scope mount) so it works best with scope rings. I used it when I mounted my Vortex Razor HD using Burris XTR Signature scope rings. There was not enough room between my one piece Burris AR P.E.P.R. scope mount and scope so I had to use the Wheeler Engineering Professional Reticle Leveling System instead.
To use the Wheeler Leveling System we start by leveling the gun's optic rail with the scope removed, then attach a barrel mounted precision level and set it to match the optic rail level. We then mount the scope and place an included level on the scope upper turret. When the barrel and scope levels match we're ready to tighten down the scope. Finally we install our scope bubble level and set it to match the barrel mounted level. I like this system and it gives me a very precise level for my long range guns.
The scope will want to slide forward under recoil so when using a Picatinny rail you wan to push the scope mount forward as you tighten down the scope mounts. This will ensure the scope mount will be in contact with the front edge of the rail slot so the scope won't move under recoil.
Scope Height
Many long range shooters mount their scope as low as possible. Low mounted scopes are popular because for short to medium range hunting it helps with point blank range with no turret dialing. But a low scope can have several detrimental effects on long range accuracy. A low scope will be more effected by barrel heat mirage and if you're running a large brake or suppressor you may be blocking the scope's view of the target. You won't see the brake or suppressor through the scope but it decreases the scope's light gathering. You paid for that big scope objective so don't block its view. If your stock has an adjustable comb then get the scope up into clean air. A good cheek weld is important so if your stock isn't adjustable then the cheek weld trumps scope height.
Top Mount Bipod Blocking Scope View
Taped Scope

You can't tell if your scope is being blocked by your muzzle brake/suppressor/top mount bipod by just looking through the scope. Even with 70% of the scope view blocked with tape the view looks normal, just dimmer.
View Through Taped Scope
Taped scope view looks normal, just dimmer.
The only downside to added scope height (assuming good cheek weld) is the effect of rifle cant is magnified but a scope bubble level will keep that in check. Every long range scope should have a level.
Did you know that by raising your scope you slightly reduce the amount of elevation adjustment required? It's true. Take a look at these two ballistic charts. The only difference between the two is the scope height. The first uses 1.5 inches for scope height and the second is at 4 inches. Compare the two charts Total Come Up and Trajectory at 1800 yards. It is 42.4 inches less for the higher scope.

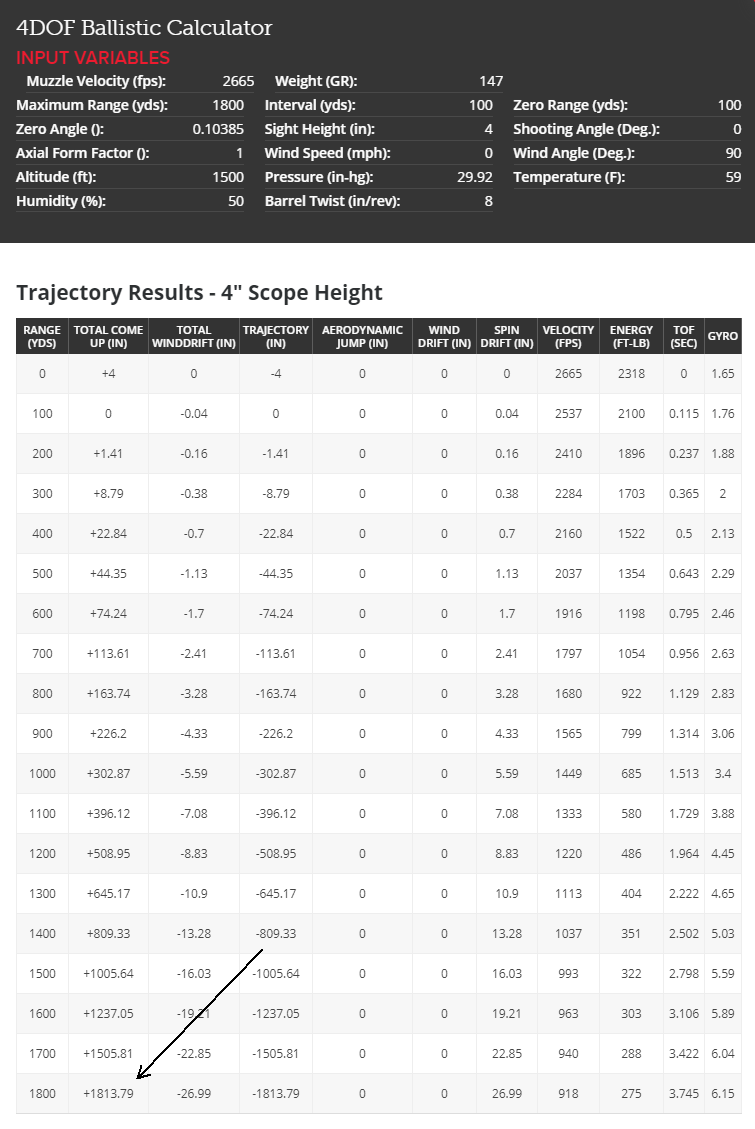
We need 42.4 inches less elevation adjustment with a 4 inch scope height compared to a 1.5 inch scope height. That is 0.66 mils (7 clicks) less elevation adjustment needed.
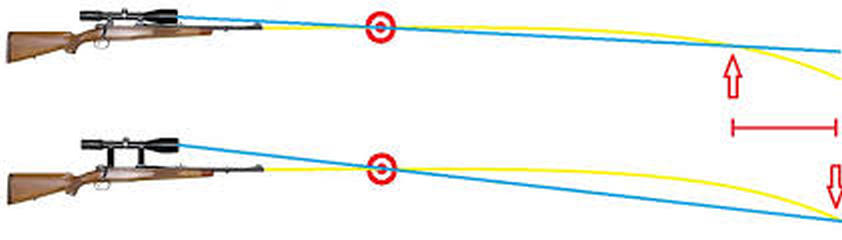
This is how scope height increases available elevation adjustment for long range. The taller scope needs more down elevation to get on the zero target so there is more up elevation available for long range targets.
The moral of the story is don't mount your long range scope so low you have trouble opening your scope covers ;) Get that scope up so it has a clear view of the target.
Using the MRAD Reticle
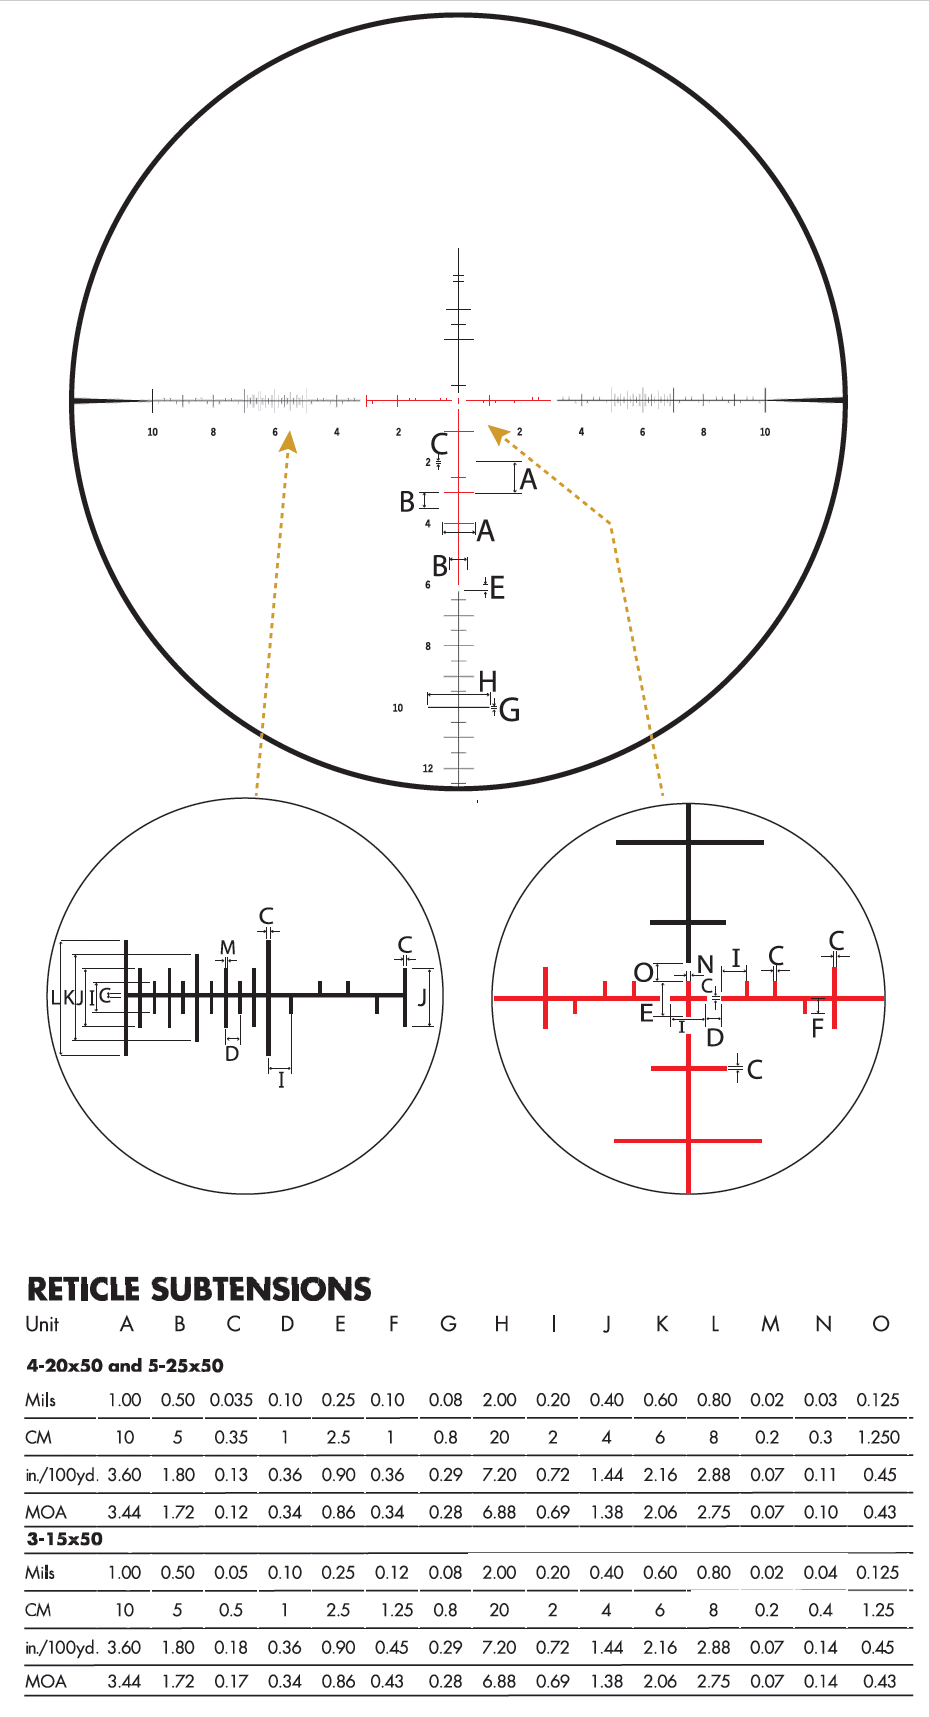
We can't estimate range accurately using the MRAD system if we don't know our reticle. There are hundreds of MRAD reticles so spend some time in your scope's user manual to get to know your reticle dimensions (subtensions). Knowing your reticle will help you quickly and precisely measure bullet splash and objects to the tenth of a mil.
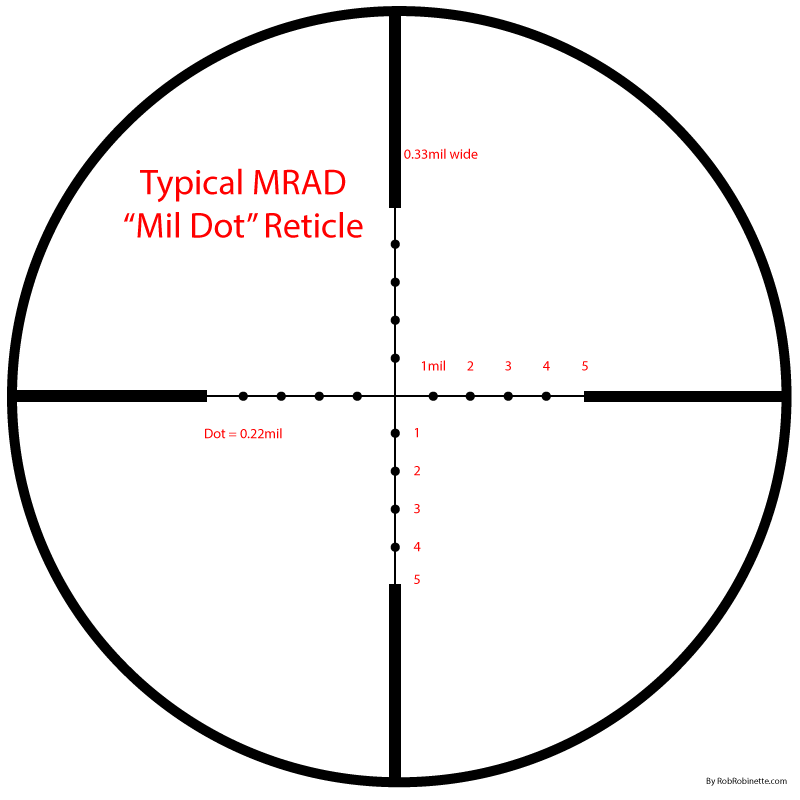
10mils across for target measurement. The distance between each dot is 1mil and each dot is 0.22mil wide. The thick black crosshairs are 0.33mil wide.
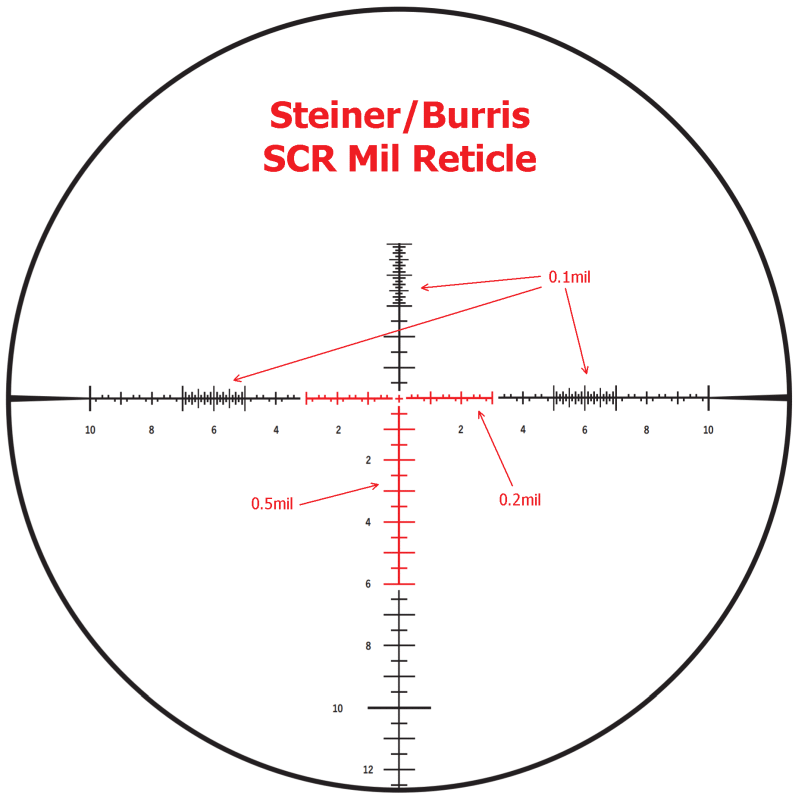
The SCR (Special Competition Reticle) available in the Burris XTR II scope is licensed from Steiner. Each major hash is 1mil. Numbers make that obvious. Note the three 0.1mil ranging brackets which aid in accurate target measurement. The red part of the reticle can be illuminated for low light conditions and is compatible with night vision goggles (the entire reticle is black when not illuminated). Be aware the Burris XTR II scopes have several reticle options in mil and MOA.
Burris XTR II SCR MRAD Reticle Dimensions
Adjusting For Bullet Splash
With an MRAD reticle and mil turrets adjusting for a miss using bullet splash is very straightforward. What we measure in the scope is exactly what we dial in on the turrets. Most scopes with mil turrets move 0.1mil per click.
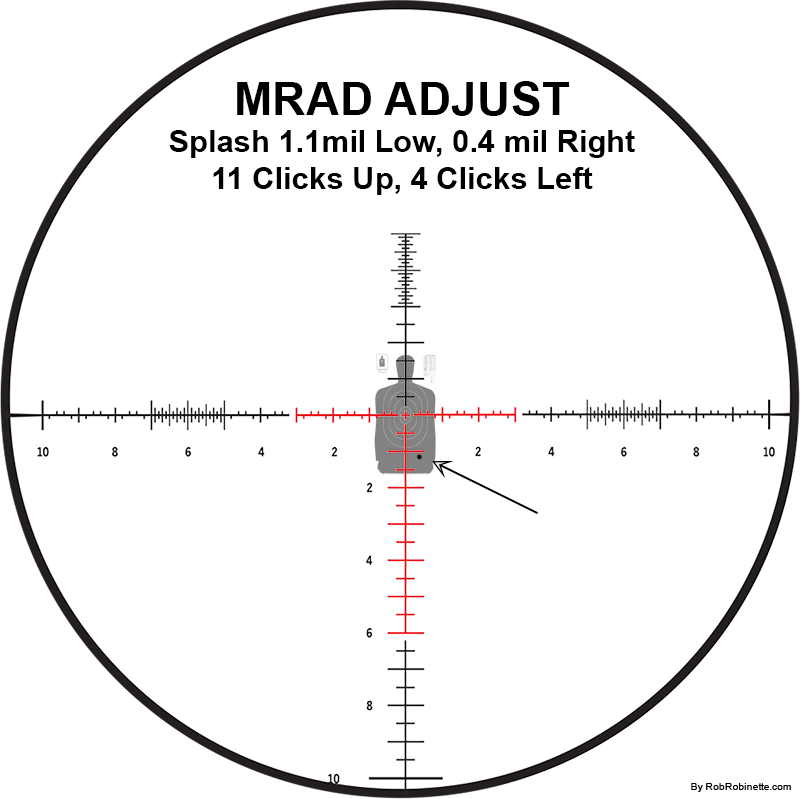
We fire and strike 1.1mil low and .4mil right so the correction is 11 clicks up and 4 clicks left.
Rapid Follow Up Shot
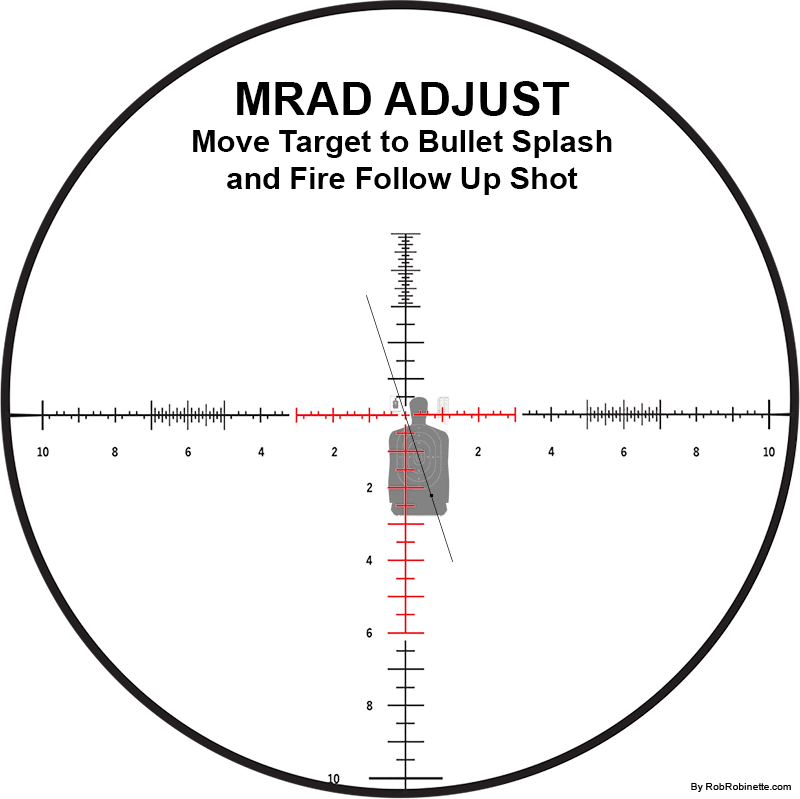
When a rapid second shot is required we simply move the splash point to the target center so we end up holding 1.1mil high and 0.4mil left. Note how the original bullet strike, target center and crosshair are in a straight line and equal distance from one another.
Zeroing the Long Range Rifle
We normally zero our long range rifles at 100 yards because the shorter distance reduces environmental and wind effects. Once zeroed we reset our turrets to 0. The Burris XTR II scopes have zero stop turret caps. After zeroing we loosen two hex-head screws in each of the turret caps. For elevation we set zero to the index mark and push the turret cap down against the stop and tighten the hex screws. This allows us to reset to zero by simply turning the turret down until it stops so we don't even have to look at the turret index. To set the windage turret to zero we set zero to the index mark and push the turret cap in until the cap edge aligns with the index mark, then tighten the hex screws.
The Vortex Razor HD Gen II scope uses a slightly different zeroing method. We set both turrets to 0 and remove the turret caps using a coin or screwdriver. Loosen 3 hex screws in each turret cap and then zero the rifle using the internal adjusters. When zeroed tighten the 3 hex screws and install the turret covers.
After zeroing we generate our range cards. Range cards give us turret adjustments from zero for other ranges and weather conditions.
MRAD Ranging
This is why the MRAD reticle is so popular. It offers a simple method to quickly estimate range.
To estimate range using an MRAD reticle we must know the size of the object we're looking at.
We must measure with our reticle to 0.1mil accuracy to get good range estimation. Being off by 0.1mil at 1000 yards means a ranging error of 142 yards.
MRAD Ranging Formula
size in inches * 27.8 / mils = range in yards
See Alternate Ranging Formulae for inches-to-meters and centimeters-to-meters formulae
Example: A typical Whitetail deer measures 18 inches from back-to-belly and is measured in the scope at 1.6 mills: 18" * 27.8 / 1.6 mils = 313 yards. 27.8 is a conversion constant.
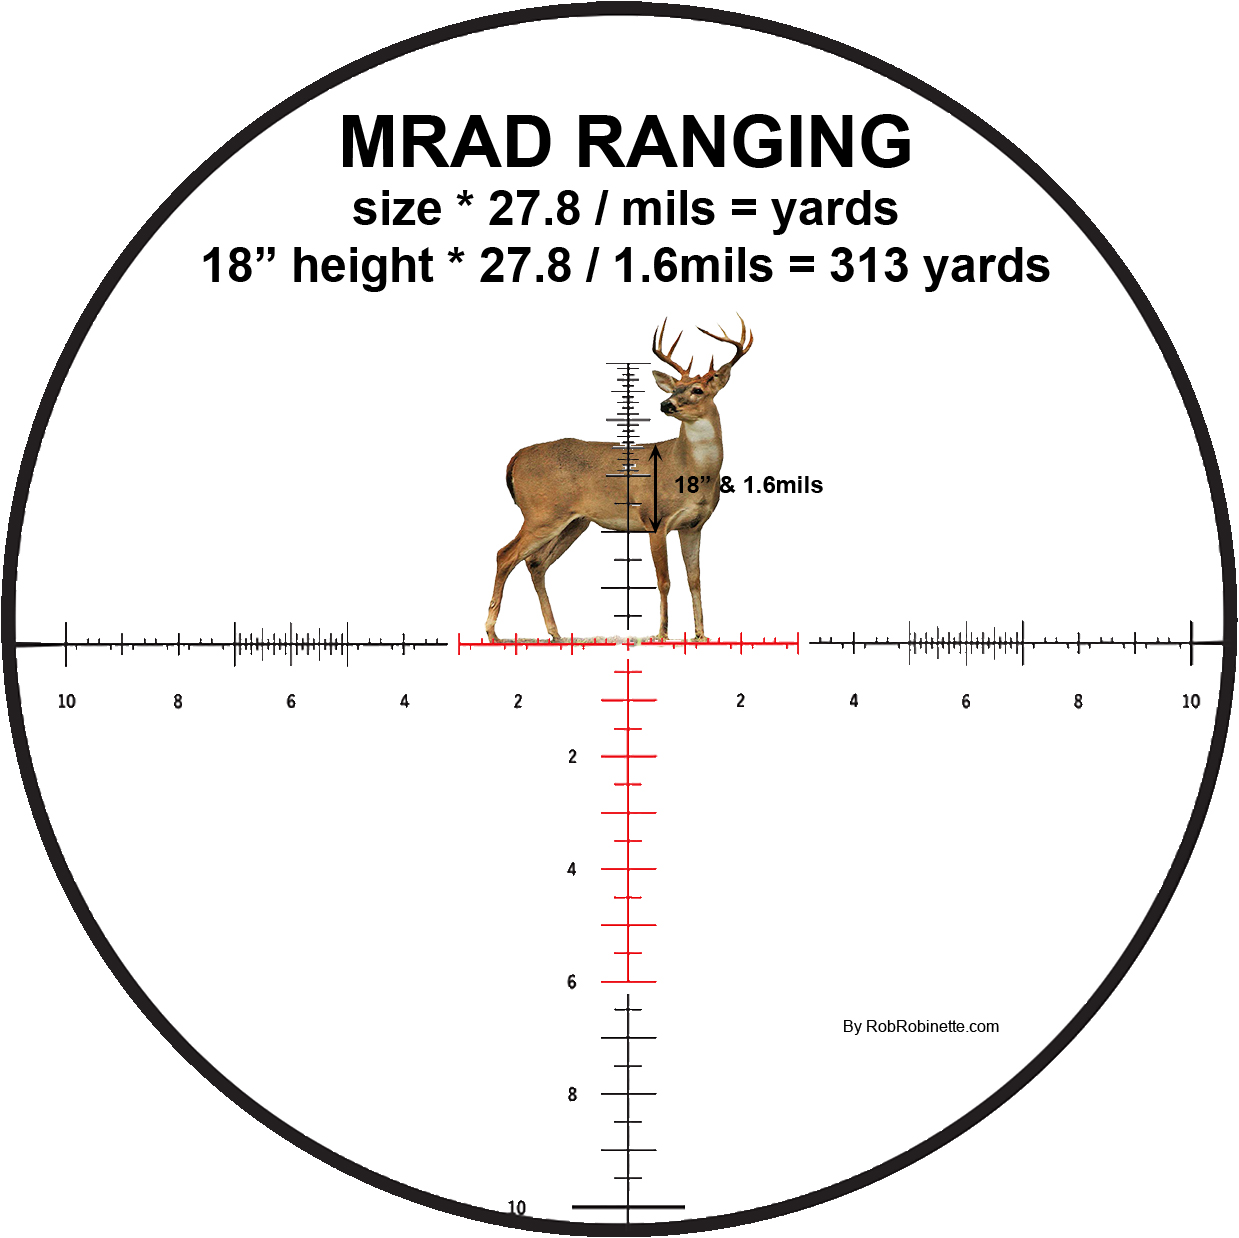
We measure our target through the scope from back-to-belly, which we know is approximately 18 inches, at 1.6mils. Note how I position the deer on the reticle so I can use the ranging bracket's fine 0.1mil hash marks for a more precise measurement.
When entering this equation into a calculator you do not need to use parenthesis. Just key it in exactly as it's written.
Mil Dot Ranging a Man Size Target
A typical man is 6 feet or 72 inches tall.
Typical Size Man
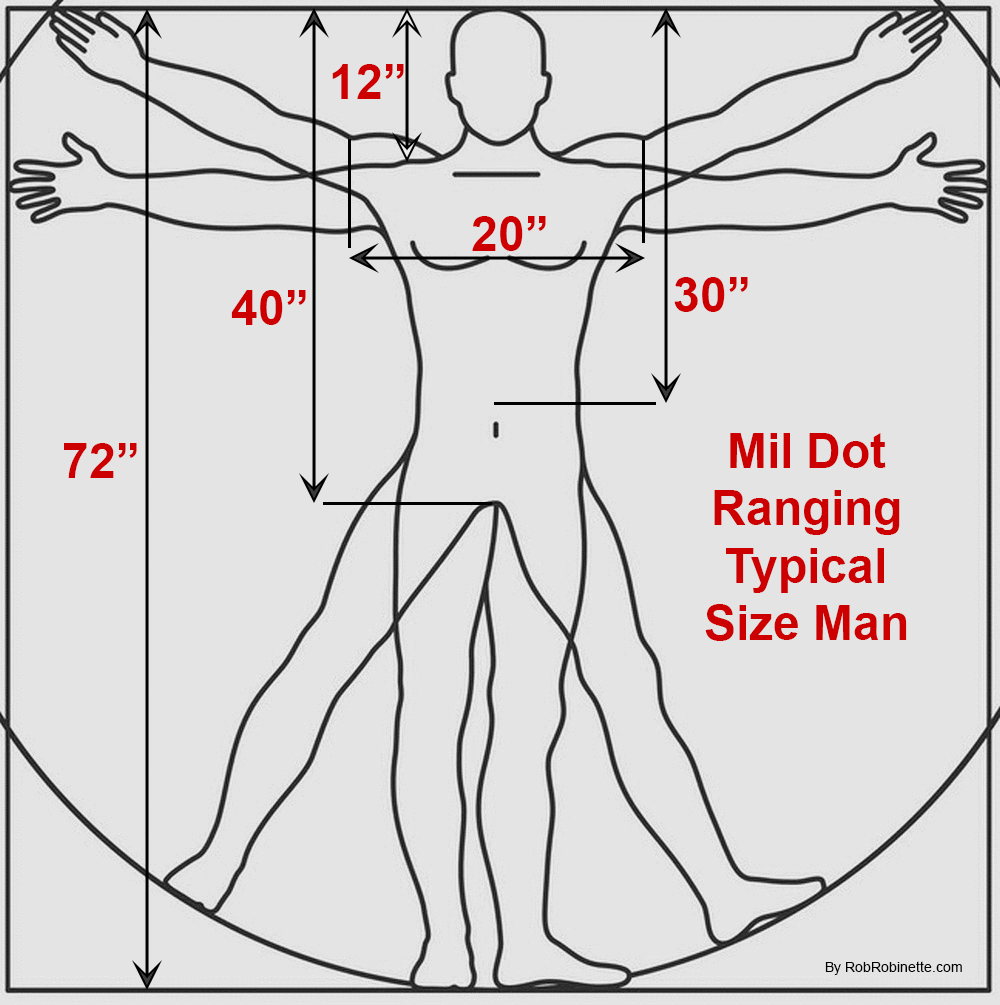
72 inches tall, 40 inches from crotch to top of head, 30 inches from belt to top of head, 20 inches shoulder width and 12" from shoulder to top of head.
Example: A typical 72" tall man is measured in the scope at 2.4 mills tall: 72" * 27.8 / 2.4 mils = 834 yards
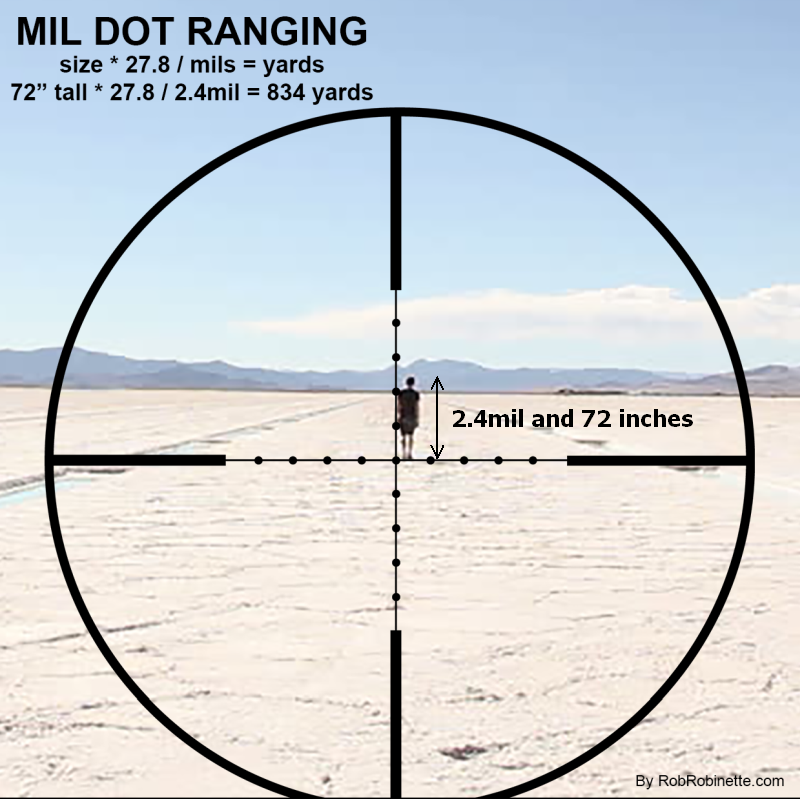
We can also measure his shoulder width. 20" wide shoulders * 27.8 / 0.7mils = 794 yards. Yes, that's all there is to MRAD ranging. It's that simple.
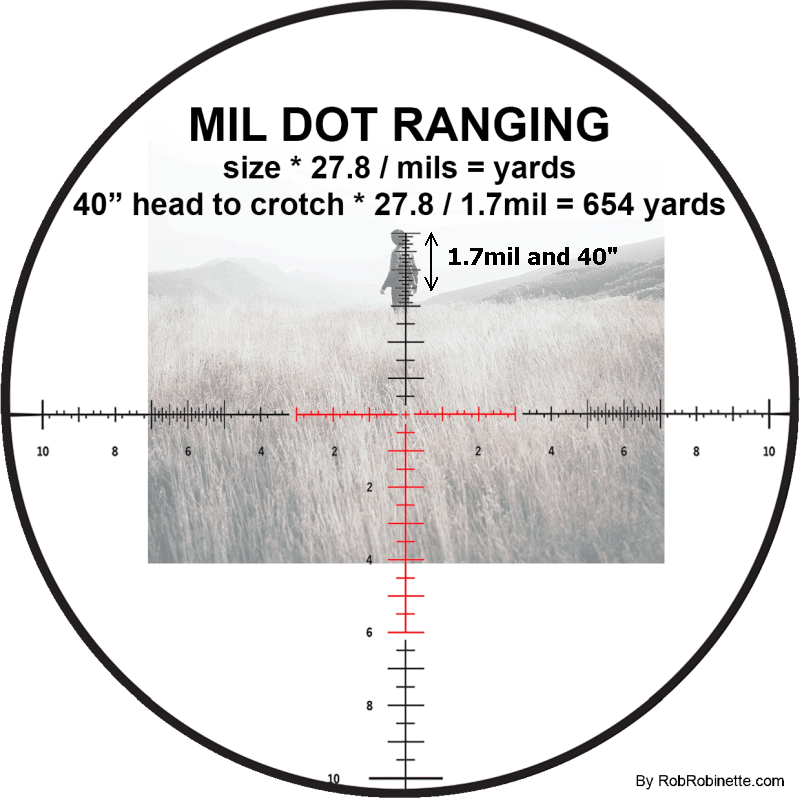
Using the vertical ranging bracket's 0.1mil fine hash marks for accurate measurement. 40 inches top of head to crotch * 27.8 / 1.7mil = range of 654 yards.
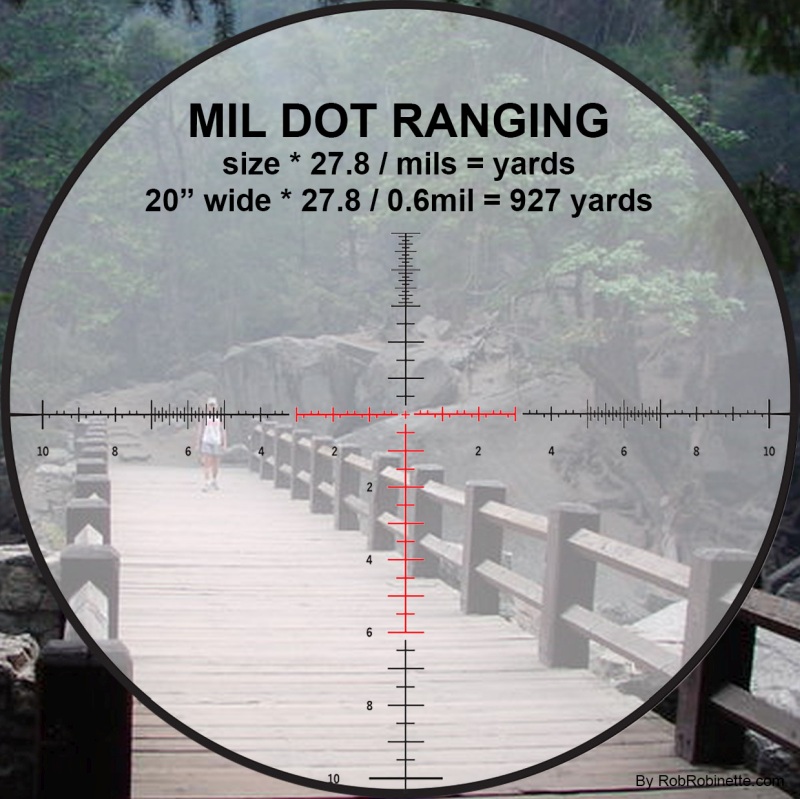
Using the horizontal ranging bracket's 0.1mil fine hash marks to measure shoulder width. 20 inches * 27.8 / 0.6mil = 927 yards.
Many long range paper targets are 21" x 21" so we can use this known size to estimate range. The standard B-27 silhouette target is 24" x 45" (black silhouette size, not paper).
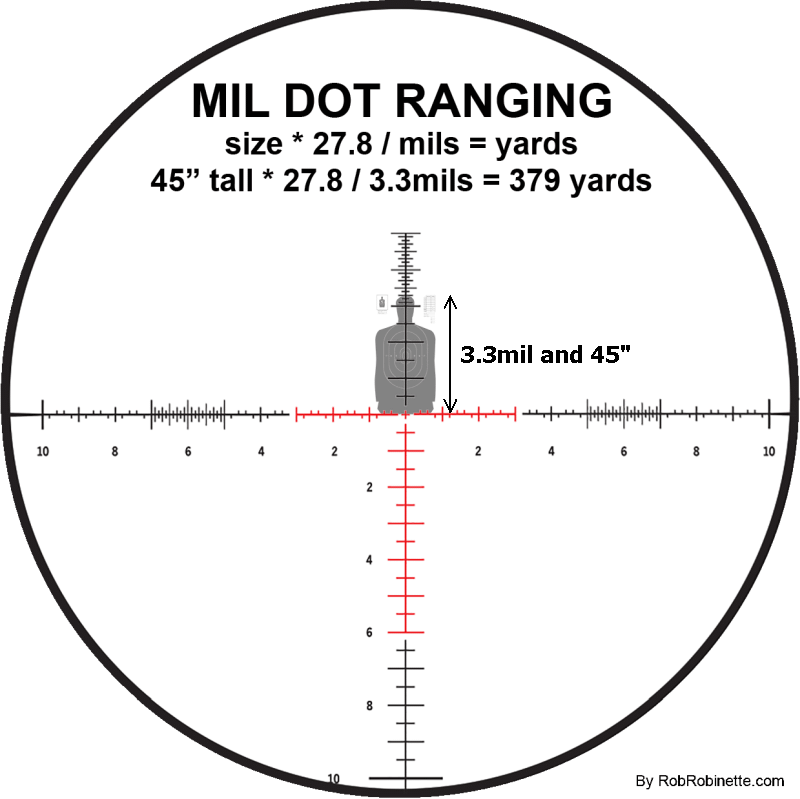
Standard B-27 silhouette target is 24" x 45" (black silhouette, not paper) so 45 inches * 27.8 / 3.3mils = 379 yards.
Knowing sizes like the standard height of doorways or window height can also help with range estimation.
If our target is something specific such as a Scud missile at 34.6 inches in diameter and 37 feet in length we can use that for very accurate ranging. If you know your intended target's dimensions then make note of it in your field notebook.

37 feet * 12 = size in inches of 444 inches. 444" * 27.8 / 10.0mil = 1,234 yards. We can also use an equation for target size in feet: size in feet * 333 / mils. For the Scud it would be: 37 feet * 333 / 10.0mils = 1,232 yards.
We can also use our MRAD reticle to determine if a target is inside our max target range. Let's say we don't want to take a shot at a deer at greater than 700 yards. We can use this version of the ranging formula:
size in inches * 27.8 / max range = mils
18" back-to-belly * 27.8 / 700 yards = 0.7mils. If a deer measures less than 0.7mils back-to-belly then we are outside our max range of 700 yards.
MRAD Ranging Formulae
Inches * 27.8 / Mils = Range in Yards
Simplified Formula which is within 7 yards at 1000 yards: Inches x 28 / Mils = Range in Yards
Feet * 333 / Mils = Range in Yards
Yards * 1000 / Mils = Range in Yards
Inches x 25.4 / Mils = Range in Meters
Meters * 1000 / Mils = Range in Meters
Centimeters * 10 / Mils = Range in Meters
Millimeters / Mils = Range in Meters (damn it, we should have switched to metric!)
Where does the 27.8 conversion factor come from? We know: Yards * 1000 / Mils = Range in Yards. Divide 1000 yards by 36 inches and we get 27.8.
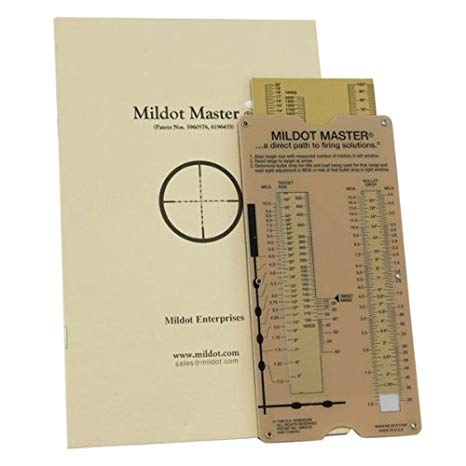
Mildot Master
Here's an indispensible piece of gear for any long range shooter that needs to use a mil reticle to estimate range. The little Mildot Master ranging slide rule #ad works with no batteries and it's easy to use. It does the ranging math for us and also converts bullet drop in inches to mils.
How a Scope Works
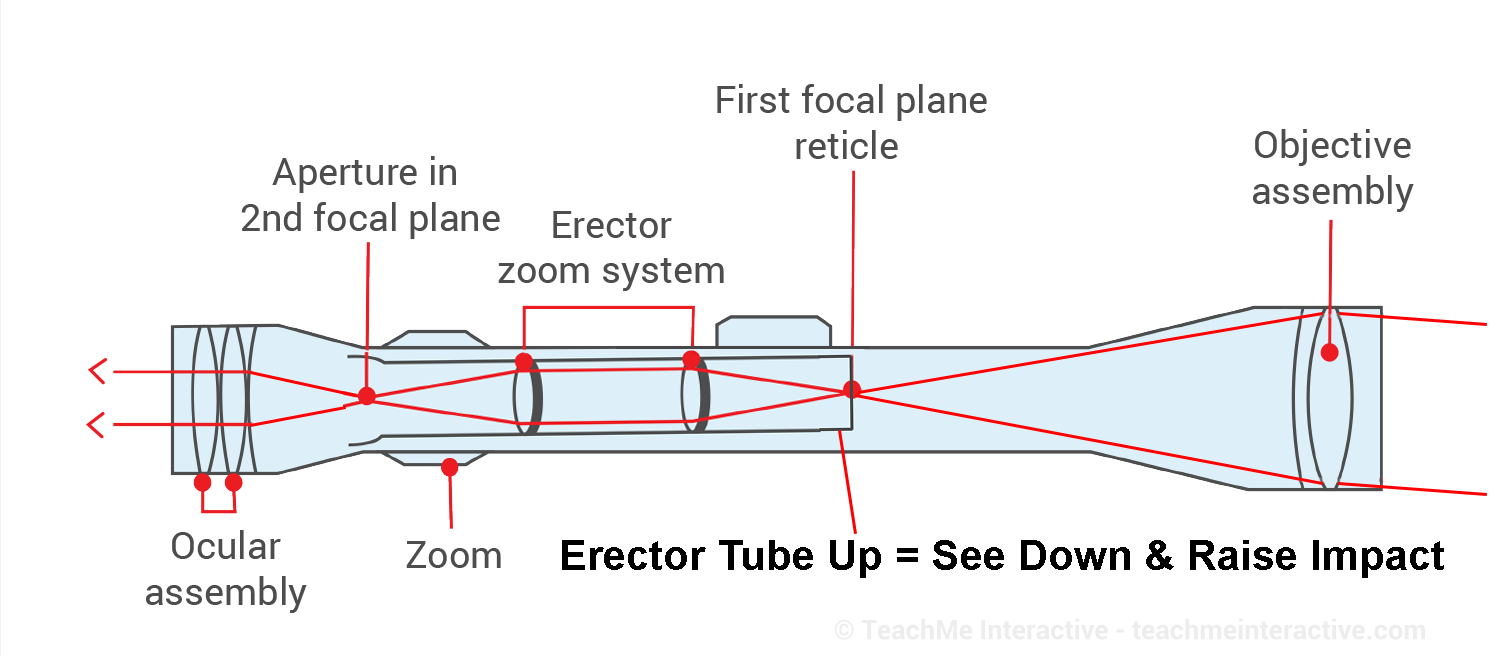
A rifle scope is a telescope with a steering mechanism and reticle. The steering mechanism is an erector tube that can be moved by turret screws. The reticle is attached to the erector tube.
A scope's turret adjusters move the end of the erector tube. Moving the end of the erector tube changes our point-of-view. It's similar to sitting in front of a window. If we want to see lower out of the window we would stand up and if we wanted to see higher out of the window we would crouch down.
If we move our point-of-view to the left we can see more to the right out of the scope objective lens. Moving the end of the erector tube to the left shifts our view to the right. Moving the end of the erector tube down shifts our view up. The reticle is attached to the erector tube so it will remain centered as we move the erector tube.
Erector Tube Centered

In this image the erector tube is centered. A first focal plane (FFP) reticle is located on the end of the erector tube before the zoom lenses so the reticle is magnified during zoom. A second focal plane (SFP) reticle is located after the zoom lenses and is not magnified during zoom. Original image by teachmeinteractive.com.
American turret adjusters have a standard right-hand thread so as we turn the elevation turret adjuster clockwise, the adjuster screws inward, lowers the end of the erector tube which raises our view and lowers the point of impact. Turning the elevation adjuster counter-clockwise raises the erector tube and raises the point of impact as shown below. You can verify the erector movement by shining a flashlight through the objective lens while looking into the objective lens while turning the adjusters. Turning the windage turret clockwise (in) pushes the erector tube to the left which allows us to see more to the right. Some European scopes have left-hand threaded elevation turret adjusters so their turret cap labels run the opposite direction.
Erector Tube Raised
As we raise the erector tube our point-of-view is raised so we can see down through the objective lens. Seeing lower moves the reticle lower on our target so we raise the rifle to compensate which raises our point of impact. This diagram also shows why using two or more sun shades is a bad idea--it can block the objective's view when cranking in elevation or windage. (The downward angle of view out the front of the scope is exaggerated at 4.3 degrees but approximately 1.6 degrees maximum is typical of high quality long range scopes)
Ballistics and Range Cards
There are some great free online ballistic calculators that generate the range cards we need to determine turret adjustments from zero for different ranges and conditions. One of my favorites is the JBM Ballistics Trajectory Card. We just plug in our values and a very accurate range card is created. Right-click the range card and select print and we're golden. Range cards are also called ballistic tables or DOPE (Data Of Previous Engagement) cards. Always use the G7 ballistic coefficient if it is available for your boat tail bullet. The G7 will give much more accurate ballistic predictions for long range shooting.
My JBM Range Card Input Values

Click on "Explanation of terms" at top left of the JBM input page for an explanation of all the inputs. If our bullet isn't in the JBM library we can usually get its specs from the manufacturer's website. 2695fps muzzle velocity is Hornady spec for 6.5 Creedmoor from a 24" 1:8 barrel.
The JBM Ballistics Range Card (shown below) lists ranges down the two outer columns and different ambient temperatures are shown across the top. Each intersection of range and temperature shows two numbers. The upper number is the elevation adjustment in clicks and the lower is the windage adjustment in clicks needed for a 10mph direct crosswind. You can dial the adjusters for windage or just hold off the reticle.
Range Card For 6.5 Creedmoor
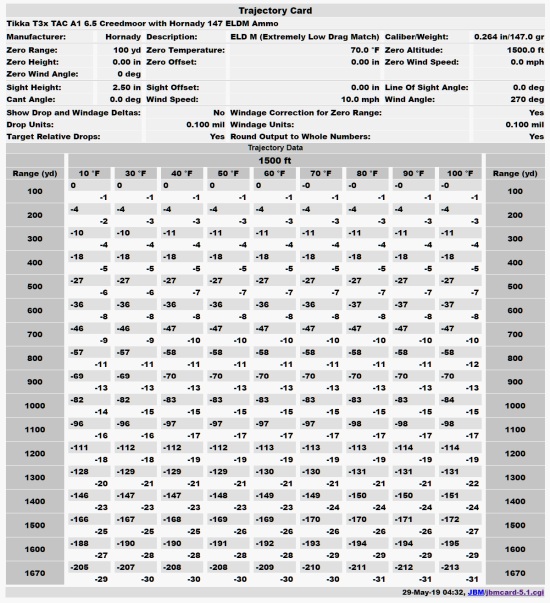
Yardage down both sides of the table, ambient temperature across the top and turret clicks in the middle. This range card lets me dial in scope turret clicks to compensate for different ranges, temperature and wind. For example on an 80 degree day at 1000 yards I would need 83 clicks of up elevation (8.3mil) and 15 clicks of windage (1.5mil) for a direct 10mph crosswind. For a 5mph wind we simply cut the windage adjustment in half. For a 20mph wind we double the windage adjustment. For my scope each click is 0.1mil. 1760 yards = 1 mile.
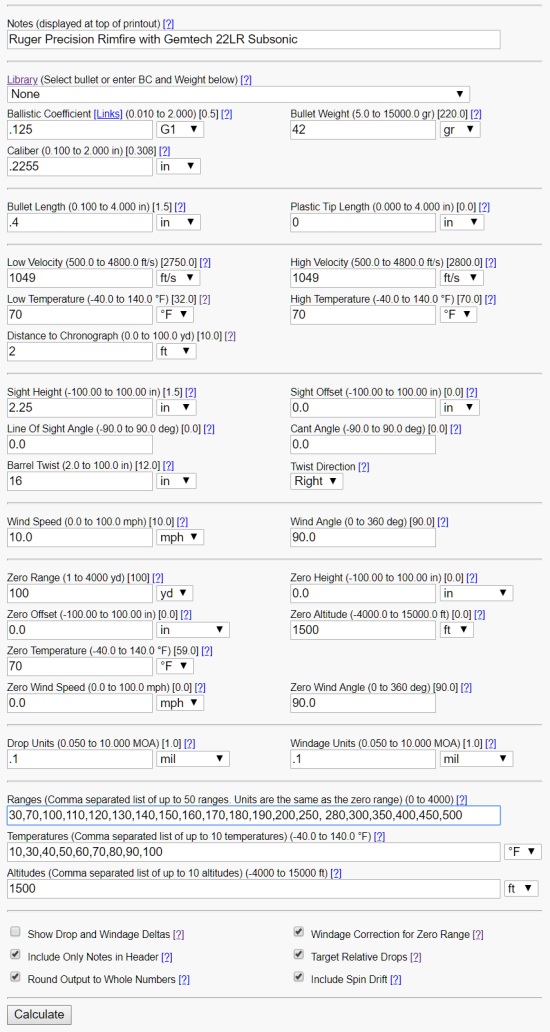
Input Values For 22LR Subsonic
Note we use the G1 ballistic coefficient for 22LR because the bullet is not a boat tail. The G7 BC should only be used for boat tail shaped bullets.
Gemtech 22LR Subsonic Range Card
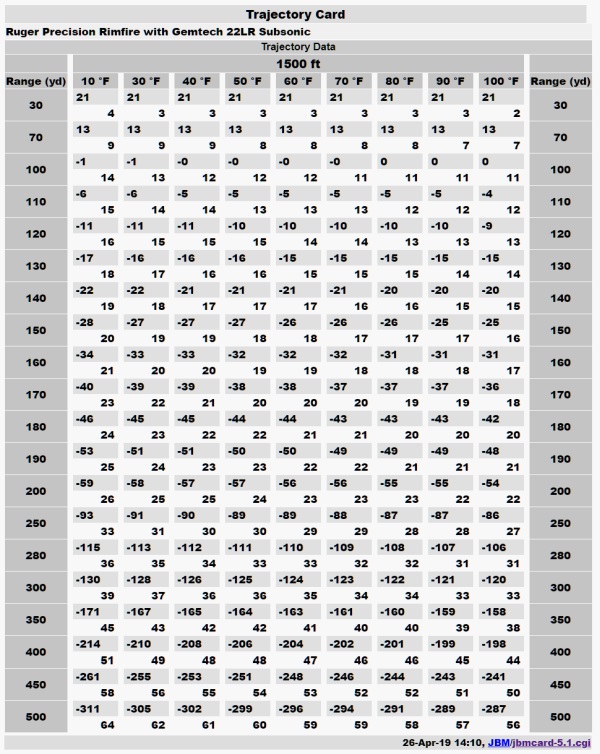
I zeroed my Ruger Precision Rimfire 22LR at 100 yards on a 70 degree day. On an 80 degree day at 200 yards I would need 55 clicks of up elevation (5.5mil) and 23 clicks of windage (2.3mil) for a direct 10mph crosswind. Gemtech 22LR Subsonic is the most accurate subsonic ammo I have tried. With my Ruger Precision Rimfire rifle's 18 inch barrel I get 1049fps average muzzle velocity with a standard deviation of 13 and and extreme spread of 50, which is pretty good for subsonic 22LR. 1074fps is the fastest I have ever recorded so I get absolutely no transonic crack.
I have a range in my backyard and shoot from the upstairs deck so I took my new Ruger Precision Rimfire up there and zeroed it at 100 yards with Gemtech 22LR Subsonic. I almost always shoot suppressed at home due to the dogs' and wife's noise sensitivity. I wasn't expecting to have so much fun. It's a bit of a challenge to hit a 6" gong at 135 yards with subsonic 22LR but the RPR makes it pretty easy. That's my max distance for the backyard range.
I took my Tikka T3x TAC A1 and Ruger Precision Rimfire out to my hayfield where I can get a maximum range of 285 yards. I have a 16" and 10" bullseye gong I can move into and out of the field so it doesn't get in the way of hay operations.
After shooting the 6.5 Creedmoor suppressed I moved to the suppressed 22. The Applied Ballistics Mobile App said I needed 110 0.1 mil clicks of elevation for the 285 yard target! (100 yard zero) You've got to be over 1200 yards before you get 6.5 Creedmoor to drop that much. I dialed in the 110 clicks and 1 click left for spin drift since winds were calm. When I fired I thought I had a misfire because it sounded like only the hammer fell. While I was looking the rifle over I heard a faint gong ding which seemed to happen about 30 seconds after I fired (yes, a slight exaggeration). The gun did fire but my ears were calibrated by the relatively loud suppressed 6.5CM. The first round hit is testament to the accuracy of Bryan Litz's Applied Ballistics Mobile App and the Burris XTR II scope. I spent the next 30 minutes wailing on those 1/2" thick AR500 steel gongs with the mighty power of a 42gr subsonic round.
The Hornady 4DOF Ballistics Calculator is another excellent, free, extremely accurate online calculator but it only works with the bullets in its database. If your bullet is in the database then you should use the 4DOF calculator.
Free Hornady 4DOF Ballistic Calculator
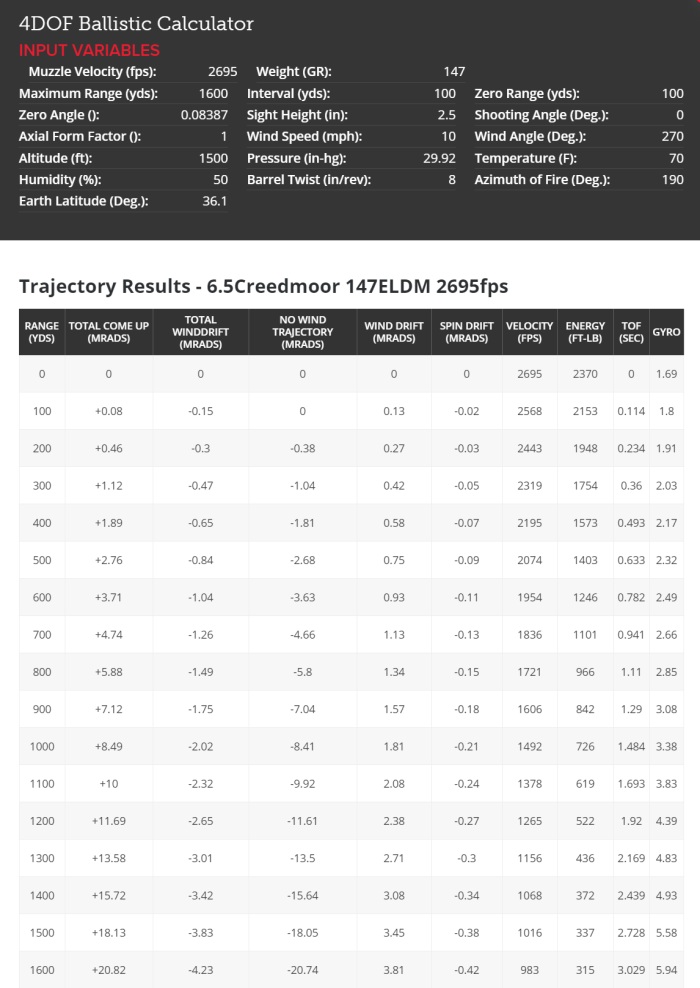
Hornady 6.5 Creedmoor 147 ELDM Ammo from 24" 1:8 barrel at factory spec 2695fps muzzle velocity. MRADS = mils. The "Total Come Up" and "No Wind Trajectory" are different due to aerodynamic bullet jump caused by a 10mph direct crosswind. The jump adds 0.08mil to all ranges. The bullet begins to go transonic around 1300 yards. "TOF" is time of flight. "Gyro" is bullet gyroscopic stability in Sg (Stability-gyroscopic) and we need it >1.5Sg at the muzzle for long range shooting. Sg increases downrange because bullet velocity drops faster than bullet spin.
If the 4DOF doesn't have your bullet in the database just click on the "Choose Calculator" button up top and the Standard Hornady Ballistics Calculator will appear.
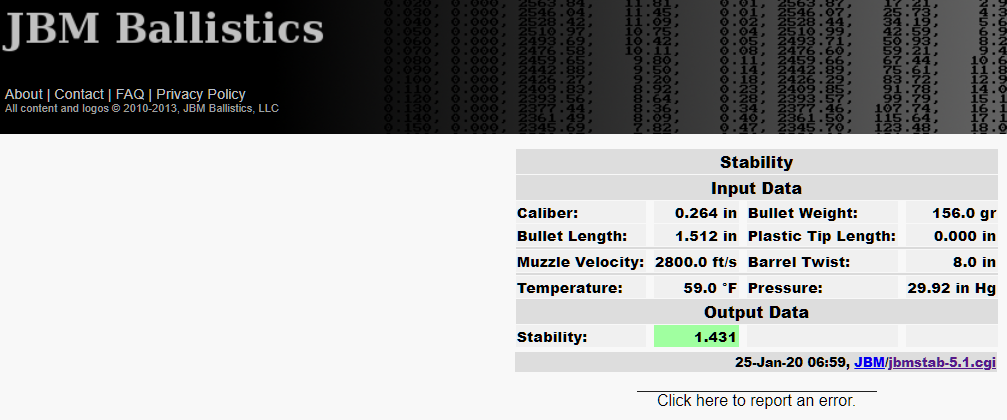
JBM Ballistics Bullet Stability Calculator
The 6.5 Creedmoor 147gr ELDM bullet is highly stable at an Sg of 1.788 when fired from an 1:8" twist barrel at 2695fps.
For phone and tablet based apps you cannot beat Bryan Litz's Applied Ballistics Mobile App (android & IOS). It's $30 but worth every penny. Read through the users manual and once set up it's very easy to use and it's incredibly accurate. I use it on the range and I'm very happy with it. It can automatically pull local weather data into the app and use the phone's GPS location to compensate for coriolis effect. For the ultimate in accuracy you can purchase Bryan's drag curve data for specific bullets which accounts for transonic and subsonic performance at extreme long range shooting. I purchased his drag curves for the Hornady 6.5 Creedmoor 147gr ELD Match and 7.62 Sierra MatchKing 220gr bullets for $2 each. The Kestrel 5700 Elite ballistic wind meter uses Bryan Litz's software for ballistics computation and is extremely accurate.
Applied Ballistics Mobile App "HUD" (head up display) showing corrections in both mils and clicks. Across the top we have set 1000 yards, 10mph wind from 3 o'clock. Elevation is Up 78 clicks and windage correction is Right 13 clicks which includes wind, spin drift and coriolis effect. "Lead" at the bottom is for a moving target. I have 3mph of target movement (walking deer) from 3 o'clock which needs 2.0mils left* lead. The 2mils of lead is in addition to any windage correction so I would need 13 clicks right for windage plus hold right 2mils for the moving target. You can click on the three boxes in the upper right corner and set look angle (uphill/downhill) and azimuth to target (heading to target for coriolis effect) by simply pointing the phone at the target. The bottom row shows Velocity and Energy at the target and Time of Flight to the target.
*I discovered and reported the lead target direction is incorrect in the Android version of Applied Ballistics Mobile. They acknowledged the problem and said, "They're working on it."
Most rifles have right-hand rifling and spin the bullet to the right (clockwise). A right-spinning bullet will spin drift to the right and a left spinning bullet will spin drift to the left. Spin drift is significant and must be accounted for in long range shooting.
When a right-spinning bullet exits the muzzle and encounters a right crosswind it will "jump" up vertically. It will jump down or "sink" vertically for a crosswind from the left. A left-spinning bullet will do the opposite, jump in a left crosswind and sink in a right crosswind.
Barrel twist rate, and therefore bullet spin rate, affect spin drift and aerodynamic jump. Faster spin will give us more drift and jump.
The horizontal direction of coriolis bullet drift in the northern hemisphere is to the right. It is to the left in the southern hemisphere. Vertical coriolis bullet drift direction is the same worldwide--high when shooting east, low when shooting west. Some ballistic calculators will ask for target latitude and target direction (azimuth) to calculate coriolis bullet drift.
Firing up hill or down hill will cause a bullet to strike high. The steeper the angle, the higher the bullet strike. Most ballistic calculators have an input for "look angle" or "line of sight angle" to compensate for this.
Wind Reading & Correction
Wind, by far, has the most effect on accuracy and learning to read the wind is one of the most difficult skills to master in long range shooting. The quickest way to sharpen your wind reading skills is to carry around a small wind meter and guess the wind then verify with the meter. You can also carry a rangefinder and work on reading range. Take the meter and finder on your next hike or dog walk. You'll be surprised how quickly your skills will improve.
Wind 101: We correct into the wind. If the wind if from the right we move our aim point to the right (hold off to the right, into the wind).
The US Army's FM 23-10 Sniper Training manual has several wind reading methods:
From FM 23-10: A common method of estimating the velocity of the wind is to watch the range flag. The shooter determines the angle between the flag and pole, in degrees, then divides by 4. The result gives the approximate velocity in miles per hour. A similar wind estimation method is to drop a piece of paper, grass, cotton, or some other light material from shoulder level. We then point directly at the spot where it lands and divide the angle between our body and arm by 4 to get the wind velocity in miles per hour. A 3-to-5 mile per hour wind can barely be felt on the face. With a 5-to-8 mile per hour wind tree leaves are in constant motion and with a 12-to-15 mile per hour wind small trees begin to sway.
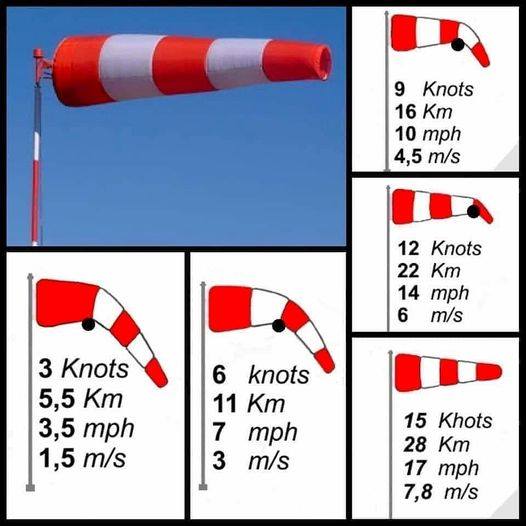
Reading an aviation style windsock.
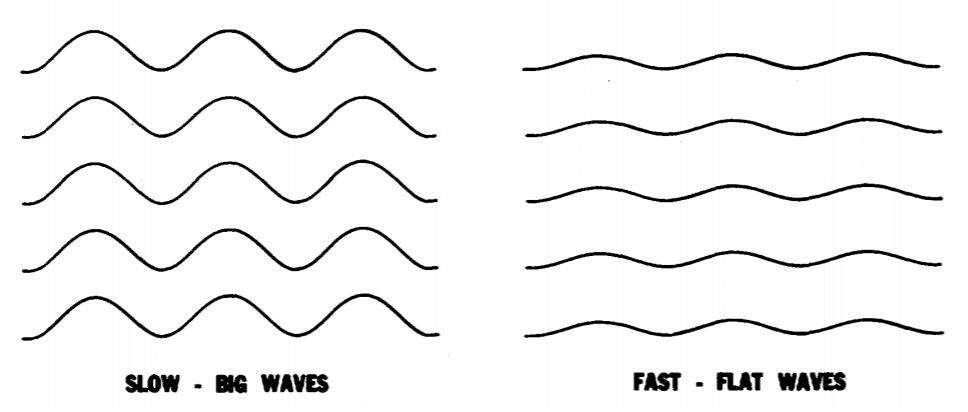
Reading Mirage For Crosswind
We can get a wind reading by watching how a mirage is blown around. To do this, set the scope for high magnification and focus the scope halfway down range then bring the scope up to the target or slightly above. The mirage will appear to move at the same speed as the crosswind.
Reading Mirage For Crosswind
USMC MCTP 3-01E

US Army FM 23-10.
Kestrel 5700 Ballistics Handheld Wind Meters
Small, lightweight and accurate wind meter is a weather station in your hand. It senses wind velocity and direction using a built in compass, temperature, humidity and absolute pressure (covers altitude and barometric pressure). The 5700 has ballistic software built in for accurate shooting solutions. It also has Bluetooth link to external ballistics software such as Applied Ballistics Mobile App for your iPhone or Android. It also pulls range from some Bluetooth range finders. The no-extra-charge Ruger (non-Elite) version has built in Ruger rifle and common ammo profiles. The 5700 Elite has higher accuracy Applied Ballistics ballistic software, 27 more rifle profiles and supports multiple targets. The weather vane shown below turns your Kestrel into a true weather station. The 5700s have a built in compass so it sends the correct wind direction and velocity to the Kestrel Ballistics App and Applied Ballistics Mobile App ballistics programs. The vane is tripod mountable to get the 5700 up off the ground.
Kestrel Ruger 5700 Ballistics & Weather Vane
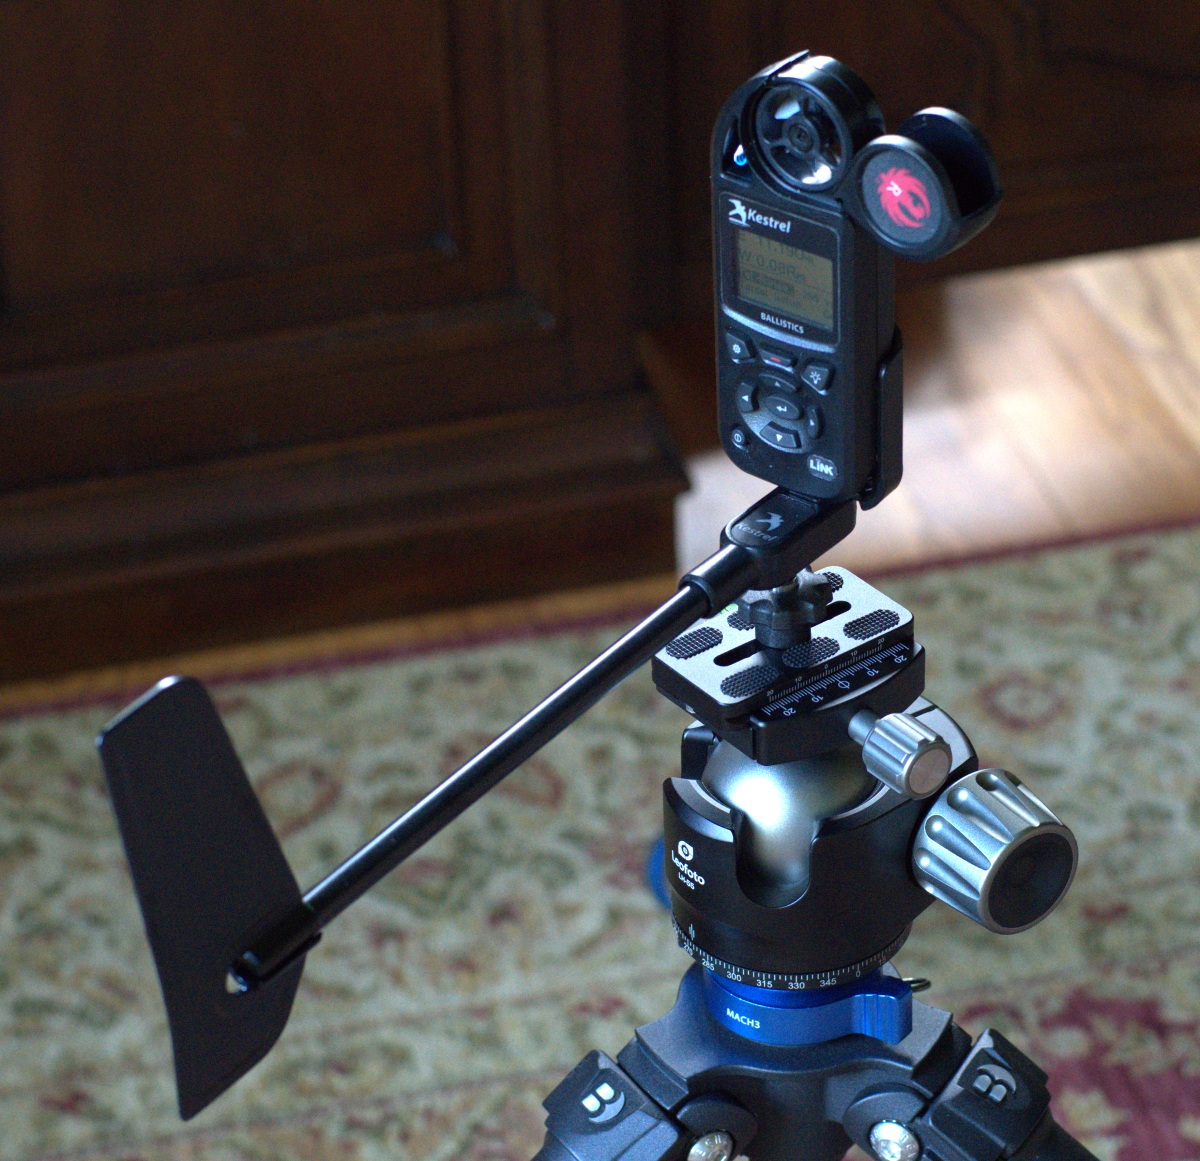
Shown with optional weather vane.
Wind Correction
I like to use the US Marine's "wind clock system" to adjust for wind other than a direct crosswind.
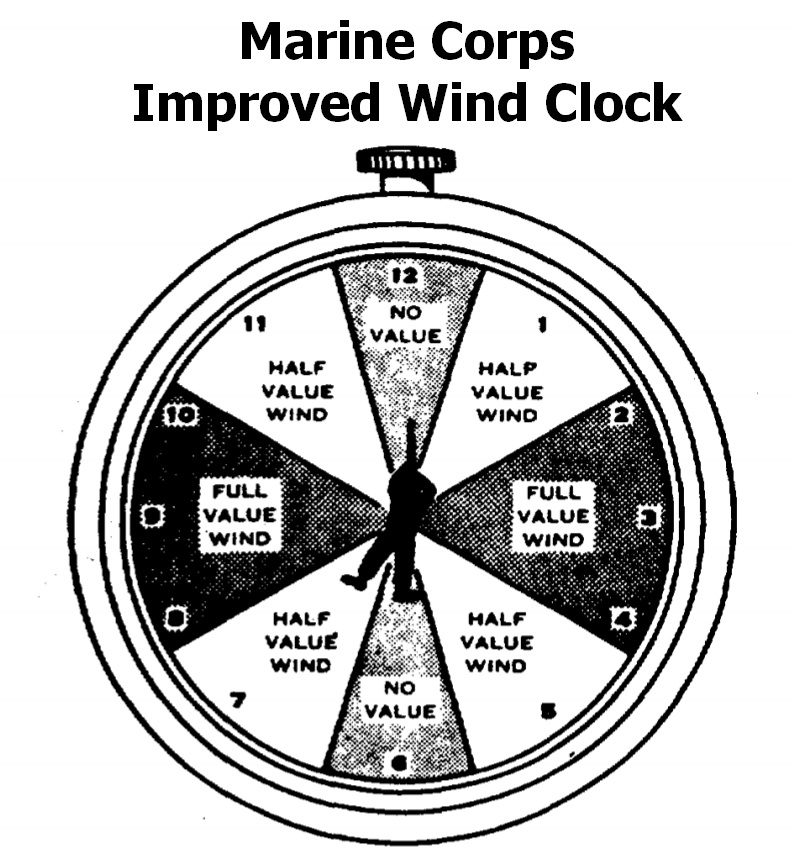
US Marine MCTP 3-01E wind clock system.
If the wind is in our face or back (12 or 6 o'clock) we disregard the wind correction.
If the wind is a crosswind from 2, 3, 4 or 8, 9, 10 o'clock we use the full wind correction from the range card.
If the wind is from any other direction (quartering wind from 1, 5, 7 or 11 o'clock) we cut the wind value in half.
The JBM 6.5 Creedmoor range card shown below gives a wind correction for a 10mph direct crosswind. We use this exact correction if we have a 10mph wind from 2, 3, 4 or 8, 9, 10 o'clock (with the target at 12 o'clock). If the wind is 5mph we would use half the range card windage correction. If the wind is 20mph we would double the correction.
Example: We'll use the 6.5 Creedmoor range card with 40mph of wind from the left-front (11 o'clock). Our target is at 1000 yards and the temperature is 30 degrees so the range card says the correction for 10mph of direct crosswind is 15 clicks (1.5mil) left.
Using the Marine wind clock with the wind from 11 o'clock we cut the wind value in half to 20mph. Since the range card value is for 10mph of wind, with 20mph of wind we double the range card wind correction from 15 to 30 clicks (3.0mil). We can then either hold off left of the target 3mil or adjust the windage turret 30 clicks left (into the wind). I dial the turret for elevation but prefer to hold off for wind correction unless the wind is freakishly steady. I always hold off for moving targets.
I do not recommend the use of the US Army's wind clock system because it cuts the wind in half for winds from 2, 4, 8 and 10 o'clock. Basic geometry tells us those directions should only be reduced by 13%. That's why the Marines use full wind values for those crosswinds.
.308 Winchester Wind Correction Formula
Here's a formula for .308 Win and 7.62 NATO wind correction in mils:
Range in hundreds-of-yards * Wind Velocity / X (if range is 800 yards then use 8 in the formula)
X = 50 up to 500 yards
X = 47 @ 600
X = 45 @ 700
X = 43 @ 800
X = 40 @ 900
X = 37 @ 1000 yards
Example: Our target is 800 yards away and wind is at 9 o'clock @ 20mph:
8 * 20 / 43 = 3.7mil left
If the wind shifts to 7 o'clock we cut the wind in half:
8 * 10 / 43 = 1.9mil left
If you shoot .308/7.62 NATO then I recommend you put this formula in your shooting notebook as a backup wind technique.
The Long Range Rifle
I love long range shooting with 22 Long Rifle. Don't get me wrong, I also enjoy shooting 6.5 Creedmoor, .308 Winchester and 50BMG but at four or five cents a shot 22LR is easy on the wallet which allows of us to stay on the range longer and really get better. There's no substitute for sending lead down range. Another advantage of 22LR is "long range" is shorter than a typical long range caliber. It can be a challenge to find a 1000 yard range with a bench open when you're ready to shoot. 22LR subsonic at 250+ yards is a similar challenge to shooting 6.5mm at 1000 yards. You'll quickly learn to work your scope and read the wind and this skill will directly transfer to high caliber long range shooting. Subsonic 22LR will also teach you to read the wind because it really pushes the low BC 22LR bullet around.
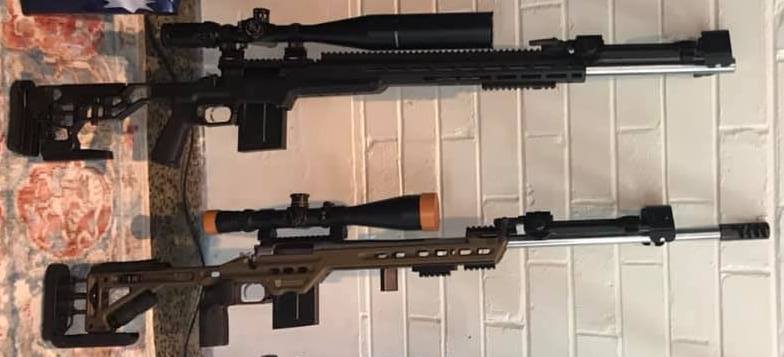
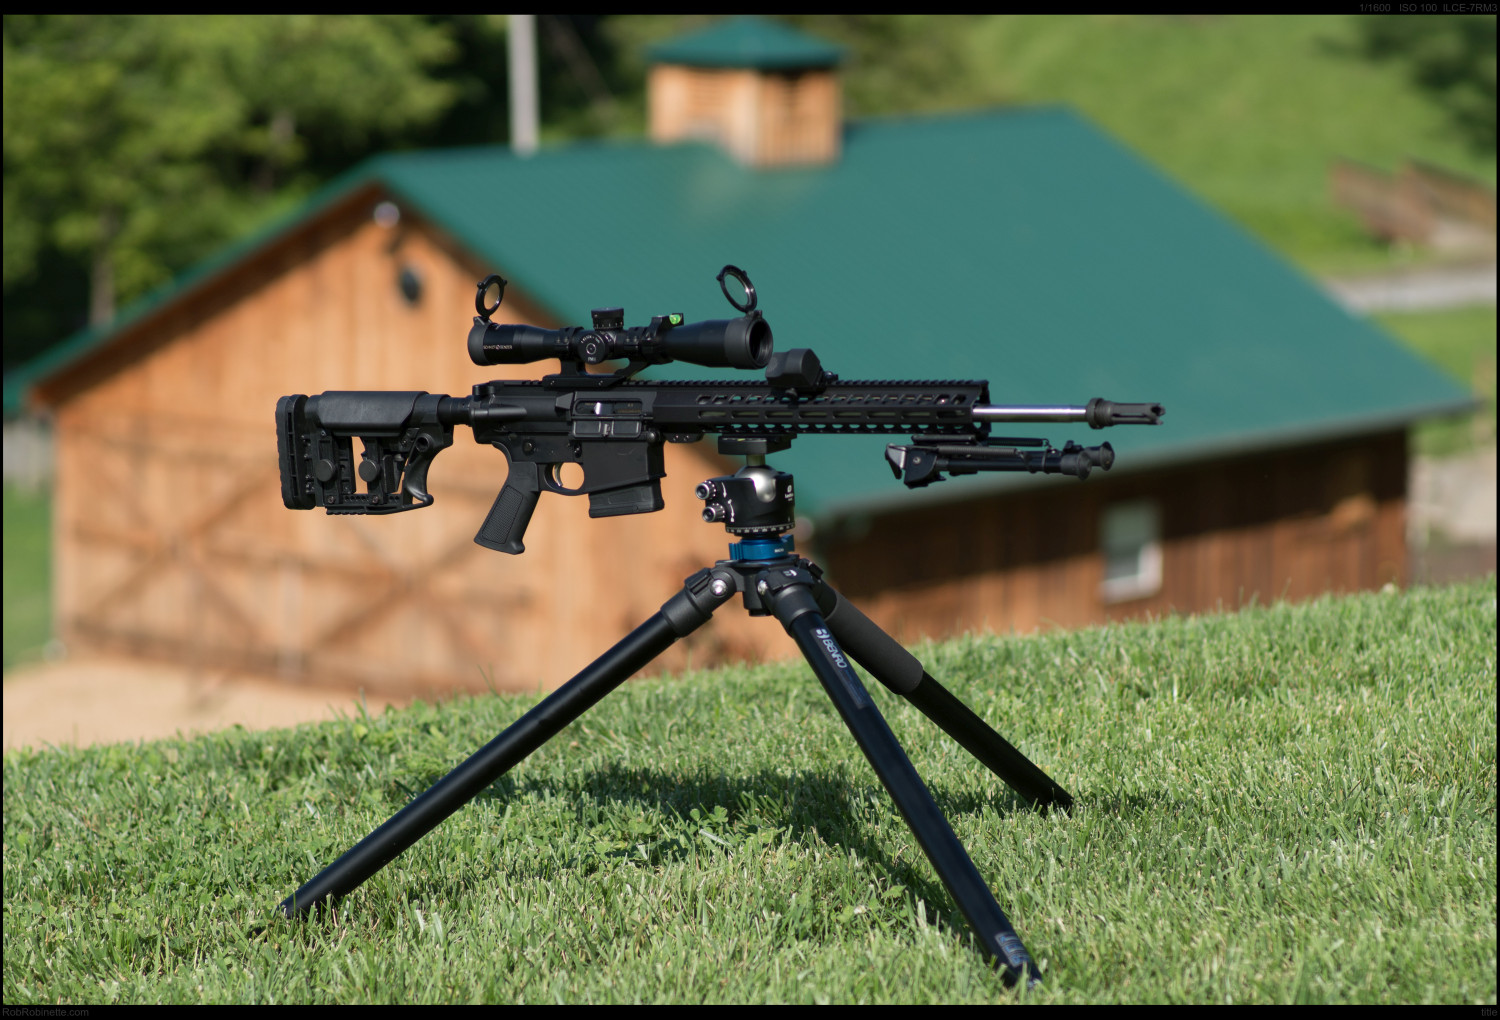
Serbu BFG-50 in 50BMG, Ruger Precision Rifle in 6.5 Creedmoor and Ruger Precision Rimfire in 22 Long Rifle. All with Burris XTR II 5-25x scopes and Harris bipods on the Rugers. The 6.5mm has a Silencerco Phantom 7.62mm suppressor and the 22LR has a home made suppressor (with Form 1 & tax stamp). I also use the Phantom on my long range AR-10 and 300 Blackout coyote gun.
If you are new or just getting started in long range shooting I highly recommend the Ruger Precision Rimfire in 22 Long Rifle for learning to hit small things at great distance. You can find them for around 400 well spent dollars. The best thing about the Ruger Precision Rimfire is its similarity to full size center-fire long range bolt action rifles. The Precision Rimfire even has a built in option to increase its bolt throw to match the .308 and 6.5mm bolt throw for positive training transfer.
Ruger Precision Rimfire 22LR
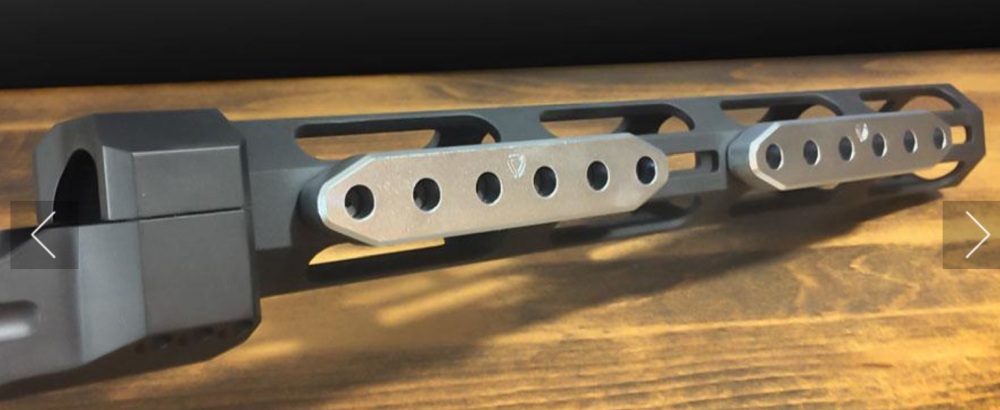
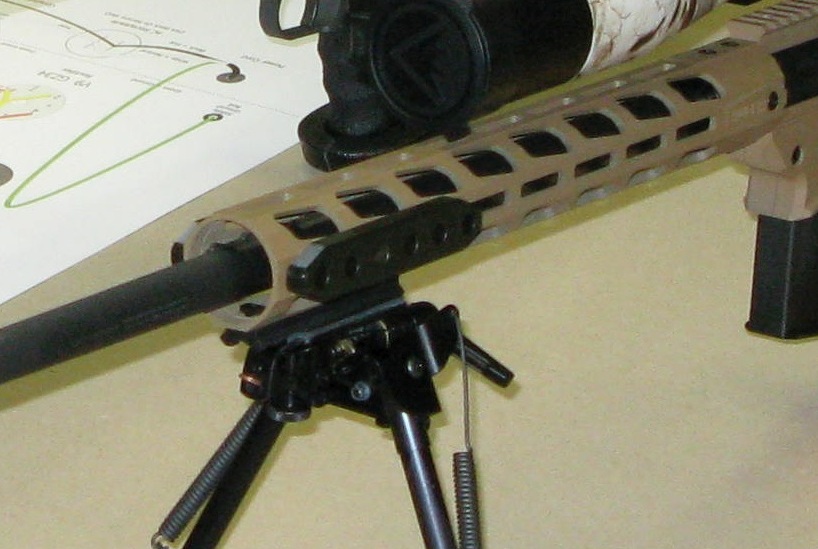
More fun than a barrel of monkeys. 12" Arca-to-M-LOK rail and barricade stops by Area 419, Atlas BT10 bipod #ad with Area 419 Arca clamp and Accu-Shot BT12-QK Precision Rail Monopod #ad on buttstock.
I also highly recommend the Ruger Precision Rifle in 6 or 6.5 Creedmoor. They are a fantastic value for a true long range bolt action chassis system rifle and they are so popular there are a host of options and upgrades available for them. For a pure target rifle the 6mm Creedmoor's ballistics are a little better than 6.5mm but if you think you may hunt anything larger than small varmints with the rifle then the 6.5mm Creedmoor is the better choice.
I recommend using a bolt action rifle for maximum accuracy because a semi-automatic action will use more or less gas energy depending on the temperature, cleanliness and lubrication of the action which affects consistency and accuracy. If you have the coin, consider a custom Remington 700 based chassis rifle, Tikka T3x TAC A1 or Sako TRG. Bergara is also making some great long range rifles. All of these are highly regarded long range bolt action rifles.
Tikka T3x TAC A1 Rifle in 6.5 Creedmoor is a fantastic value for a tack driving bolt action long range rifle.
You may be tempted to go straight to a high power long range cartridge such as 300 Win Mag, 338 Lapua or 50BMG (I did) but the cost per round and the pounding your body will take will present a very steep learning curve. You may find it difficult to fine tune your accuracy with these hard kicking rounds. Place a Snap-Cap in your magazine and you will most likely be startled by how much you flinch in anticipation of the shot. That's why I push 6 and 6.5 Creedmoor and 22LR so hard. You may be a good shot but you'll be surprised how much you'll learn when you start lobbing bullets down range 1000 yards or more. Pick a less expensive round so you can afford to shoot as much as you like and actually enjoy pulling the trigger.
Handloading 6.5 Creedmoor for Long Range Shooting
Although Hornady factory ammo for the 6.5 Creedmoor is excellent, to get the most from your long range rifle you need to use hand loaded cartridges tuned to your rifle. Typically during load development we look for velocity nodes where powder weight differences generate minimum velocity changes for maximum precision and accuracy.
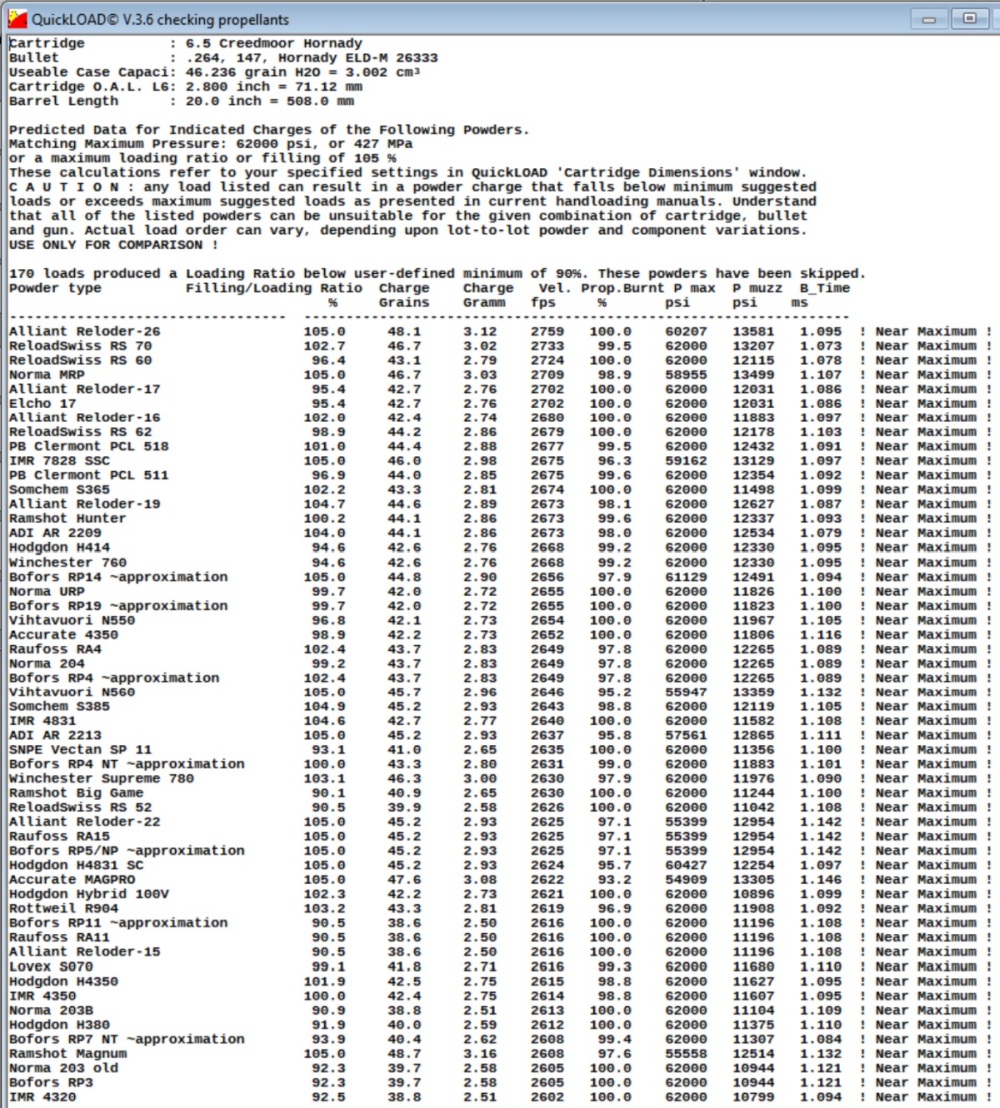
QuickLOAD is an interior ballistics program that can help us find the best powder and powder weight for our cartridge, bullet and barrel length combination. Take a look at the propellant table below for the 6.5 Creedmoor & 147gr Hornady ELDM bullet fired from a 24 inch barrel:
6.5 Creedmoor Hornady 147gr ELDM Propellant Table
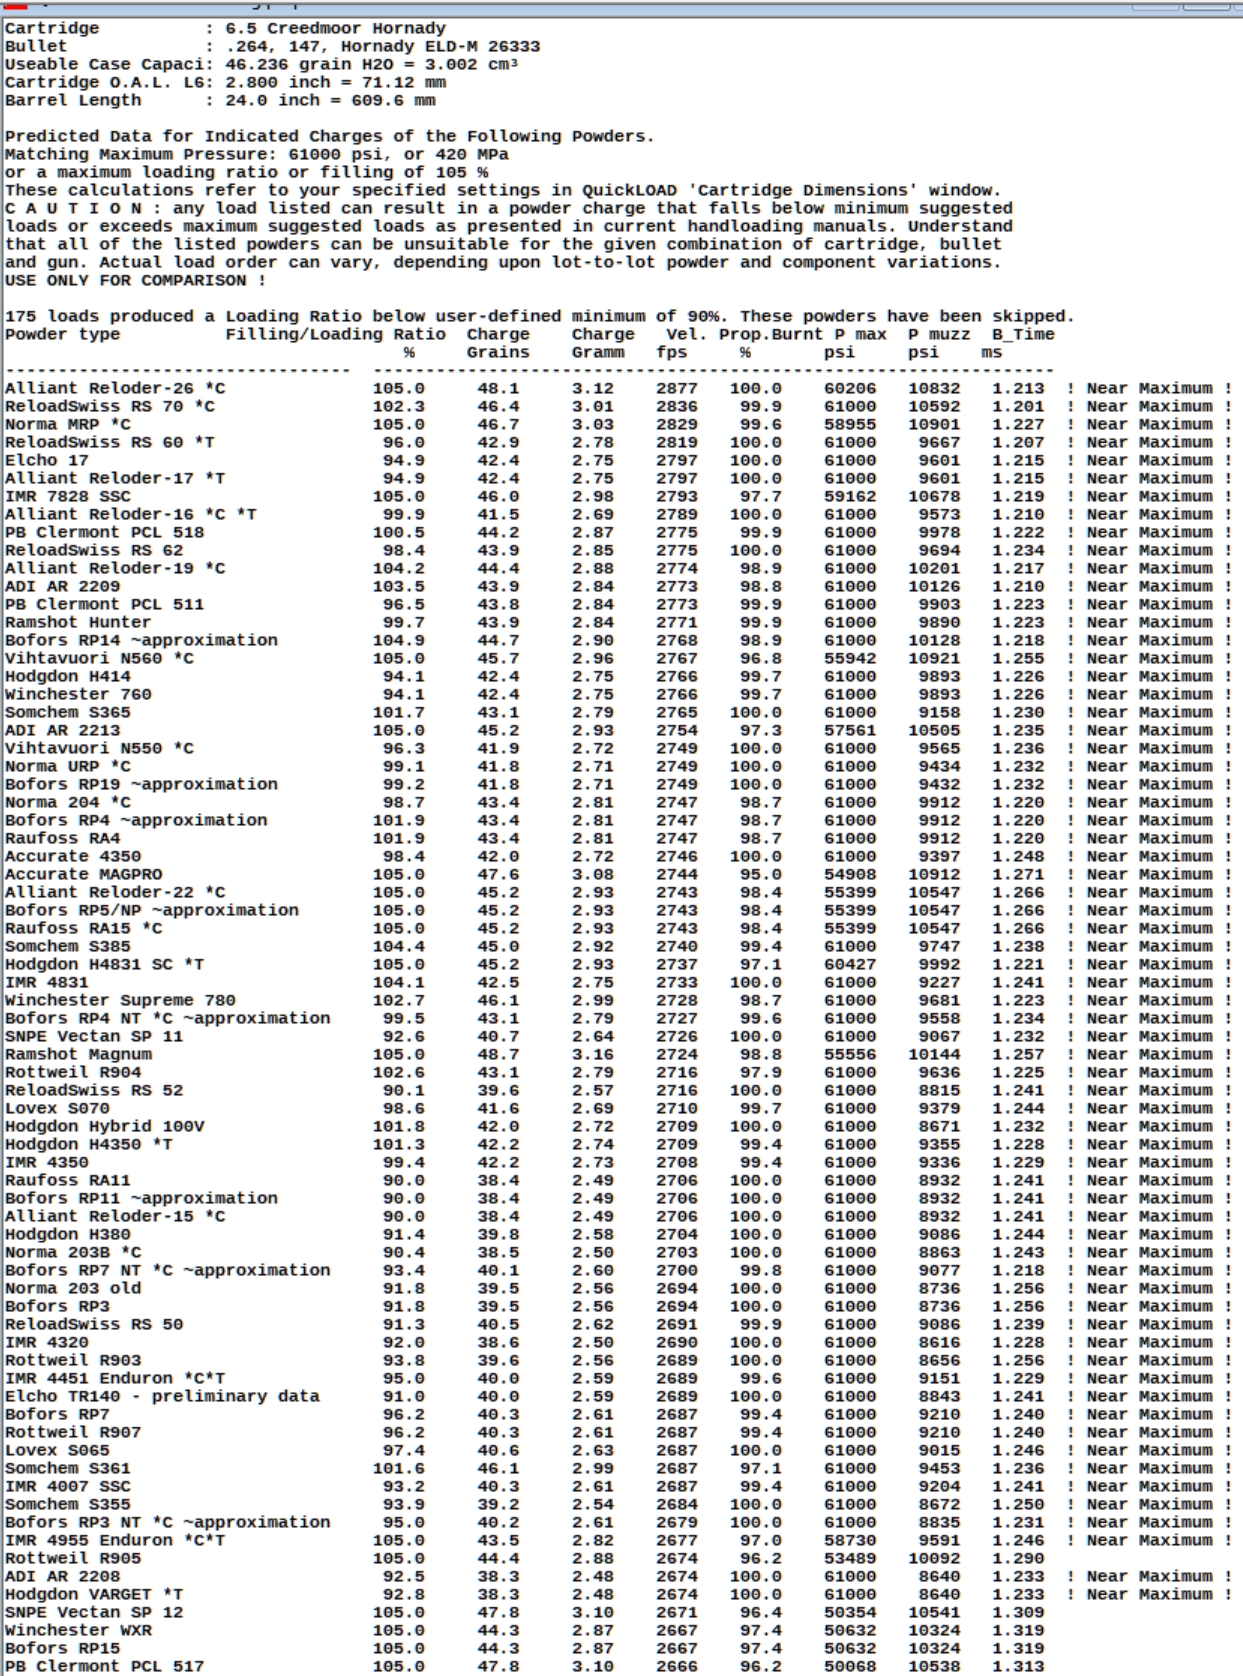
This is a propellant table created by QuickLOAD internal ballistics software for the 6.5 Creedmoor cartridge with the Hornady 147gr ELD Match bullet and cartridge overall length of 2.8". The propellant table shows us what powders will work best in our 24" barrel rifle. Case capacity is overfilled up to 105% of case capacity for some powder crush. Powders are sorted by bullet velocity. A few less grains of Alliant Reloder 26 will be a winner. Do a quick Google search of "Reloder 26 6.5 Creedmoor" and sure enough, you'll see people are getting outstanding results. If you are a hand loader you should use QuickLOAD because it can save you time and money developing loads. Alliant Reloder 26 comes out as the top powder for 6.5 Creedmoor with the 147gr ELDM and barrels from 16 to 30 inches.
QuickLOAD: 6.5 Creedmoor 147gr ELDM With Reloder 26
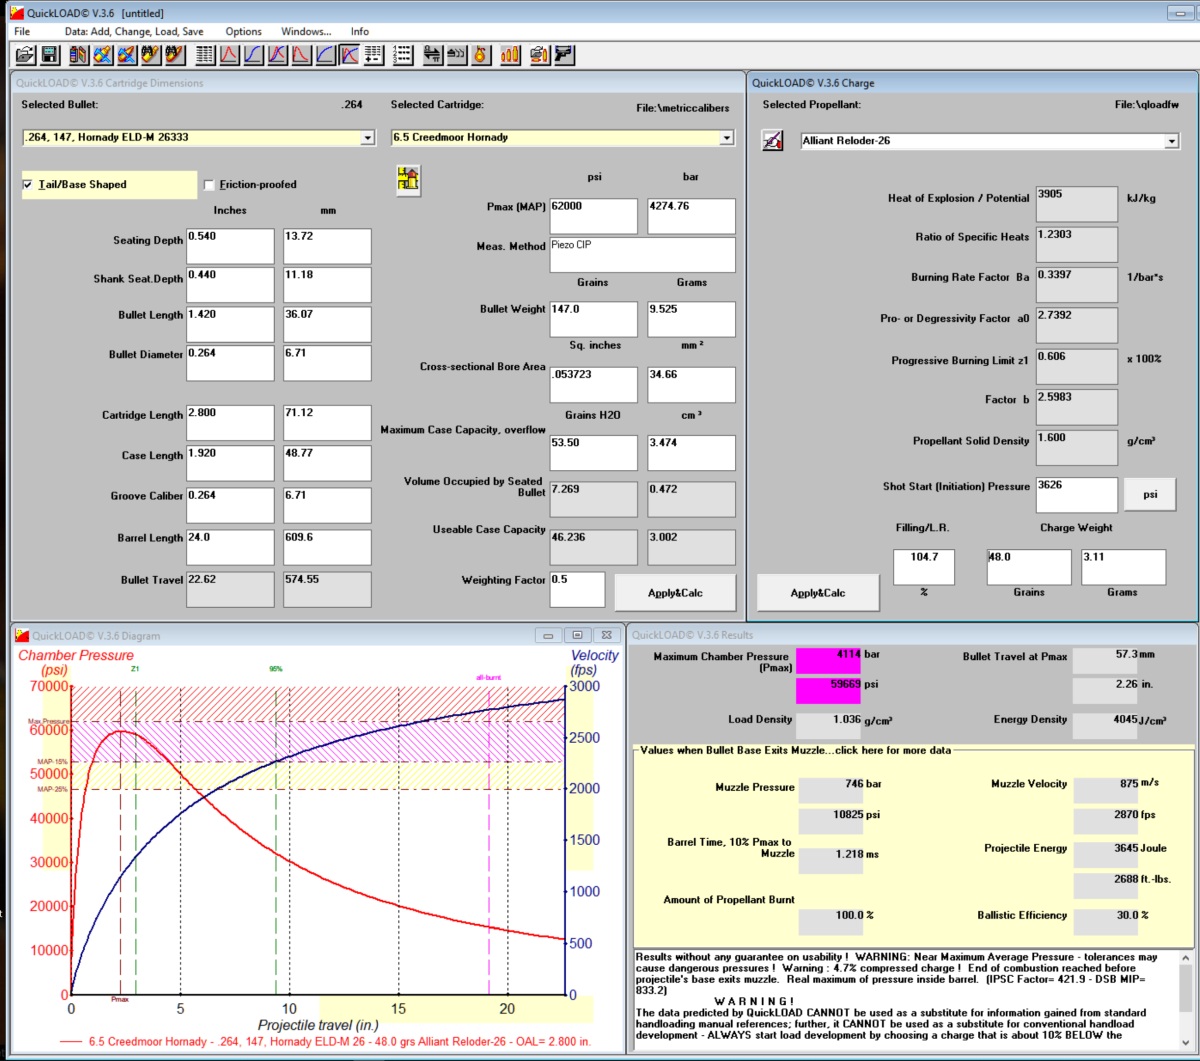
QuickLOAD prediction: 6.5 Creedmoor 147gr ELDM with 48.0gr of Reloder 26 with OAL of 2.8" gives 2870fps with 104.7% case fill (some powder crush), 100% powder burn and a max pressure of 59,669psi with max being 62,000psi.
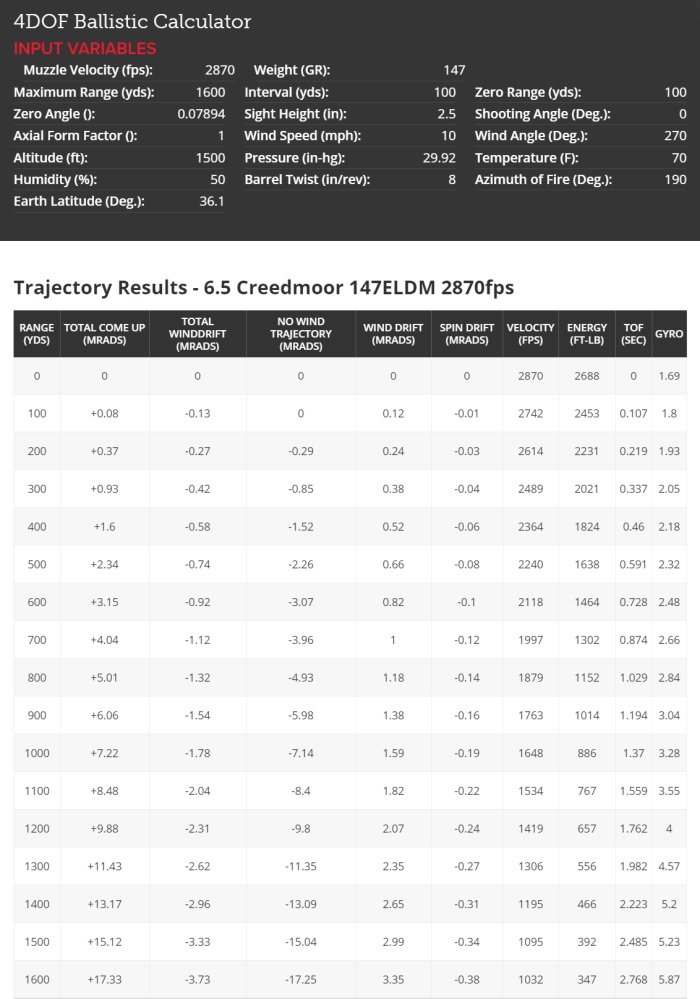
The free online Hornady 4DOF Ballistic Calculator is extremely accurate. Velocity is entered as predicted by QuickLOAD above. The bullet begins to go transonic beyond 1400 yards. Wind is set to 10mph of direct crosswind from the left. "Total Come Up" is elevation turret adjustment in mils (MRADS). "Total Windrift" is windage turret adjustment in mils. The difference between "Total Come Up" and "No Wind Trajectory" is 0.08mil down of aerodynamic jump (sink actually) which is caused by the left crosswind. A right crosswind would cause aerodynamic jump of 0.08mil up. For no wind shooting use the "No Wind Trajectory" for come up. "Total Come Up" includes aerodynamic jump and coriolis effect. "Total Windrift" includes wind drift, spin drift and coriolis effect. The 147gr ELDM is stable from this 1:8 twist barrel with a gyroscopic stability (Sg) of 1.69 at the muzzle (1.5 is minimum for long range shooting).
6.5 Creedmoor Hornady 140gr ELDM Propellant Table

A few grains less of Alliant Reloder 26 will be a winner with the 140gr ELDM bullet too. I recommend the 147gr ELDM bullet over the 140 due to the 147's better ballistic coefficient (BC).
6.5 Creedmoor Hornady 147gr ELDM 20" Barrel Propellant Table
A shorter 20" barrel looses 118fps compared to the 24" barrel used above. Alliant Reloder 26 is still the best powder for maximum velocity. I have an AR-10 with a 20" 1:8 6.5 Creedmoor barrel. Alliant Reloder 26 comes out as the top powder for 147gr 6.5 Creedmoor with barrels from 16 to 30 inches.
Berger's new 156gr EOL Hunter and 155gr Sierra MatchKing are worth investigating for long and extreme long range for 6.5 Creedmoor and other 6.5mm rifles. Berger specifically mentions 6.5CM for this heavy-for-caliber bullet. We should be able to get 2800fps with these bullets from a 24" 1:8 6.5CM barrel using Reloader 26 powder with the following stability:
With a stability factor of 1.431 stability is good but not great for long range but Berger lists their 156gr for 6.5 Creedmoor so they must have had adequate stability during testing.
Handloading .308 Win For Long Range Shooting
The venerable .308 Winchester (7.62mm NATO) is right at its max range for 1000 yard shooting with factory ammo but if you load your own ammo and optimize it for a long barreled target rifle you can ensure it will still be stable and supersonic beyond 1000 yards.
I like 220gr class bullets for 1000 yard .308 shooting due to their extremely high ballistic coefficient (BC). I've always shot 220gr Sierra MatchKings (SMK) but I'm going to have to try some Berger 220X. The F Class F-TR record was broken in 2018 at the US F-Class Nationals with a .308 shooting Berger 220X bullets.
200-16X New F-TR 1000-Yard National Record
September 2018. 200-16X New F-TR 1000-Yard National Record Ray Gross and Mike Plunkett Both Shoot 200-16X to Share New Record In the F-TR class, two men, Ray Gross (Team McMillan) and Mike Plunkett, both set a new pending 1000-yard record with a 200-16X score. That’s a perfect 10 points for all twenty (20) shots, with 16 of them in the smaller X-Ring. This F-TR division is limited to two cartridge types, .223 Remington (5.56×45) and .308 Win (7.62×51), and F-TR rifles must be shot with a bipod (no front rest). F-TR Weight limit, including bipod, is 8.25 kgs (approximately 18.18 pounds).
Ray, along with the vast majority of other F-TR competitors, was shooting a .308 Win. His load included Berger 220X bullets, in Lapua brass, with Vihtavuori N140 powder and CCI 450 primer. Ray’s rifle features a 28″ Bartlein Heavy Palma barrel, mated to a Kelbly Panda action in McMillan stock. Up front was a Phoenix bipod with lowering bracket. The scope was a Nightforce NXS 8-32x56mm.
.308 Winchester 220gr SMK Propellant Table
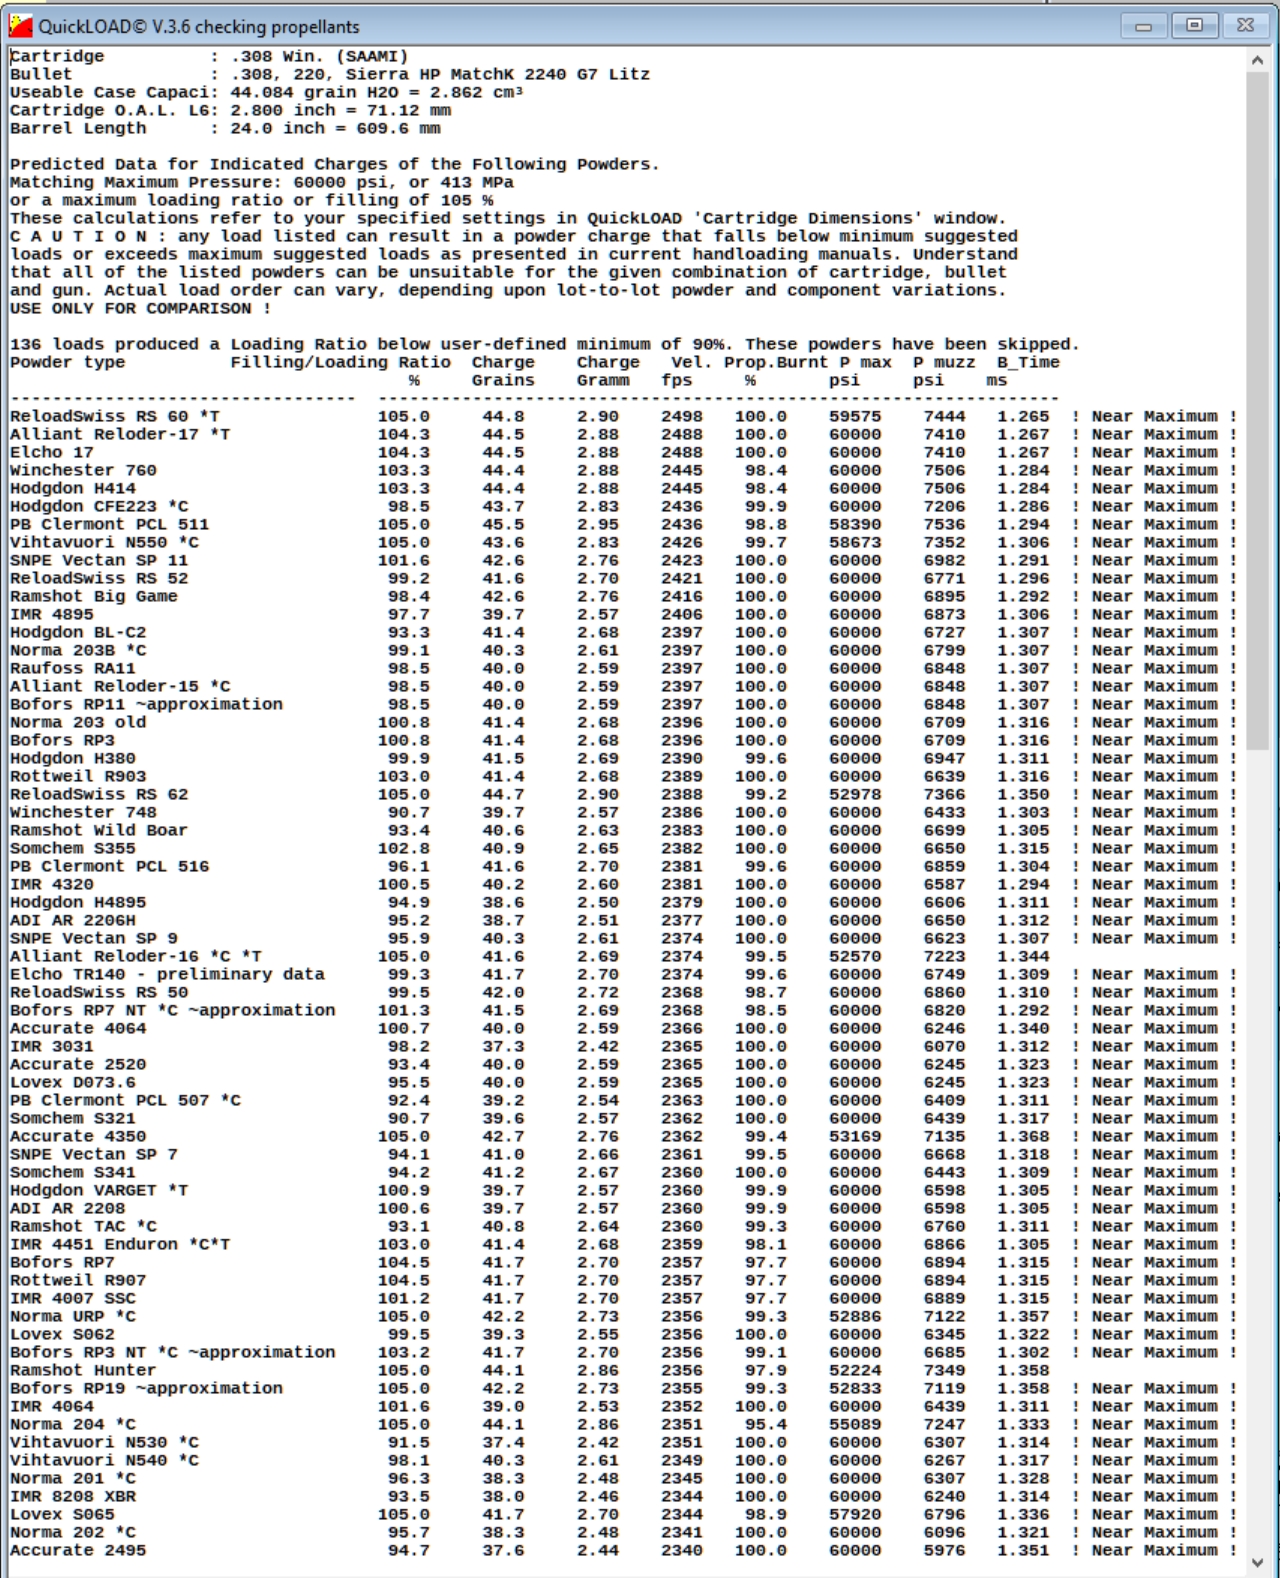
A few grains less of Alliant Reloder 17 is the winner for .308 Winchester and a 220gr Sierra MatchKing bullet, OAL of 2.8" from a 24", 1:10 twist barrel.
QuickLOAD: .308 Win 220gr SMK With Reloder 17
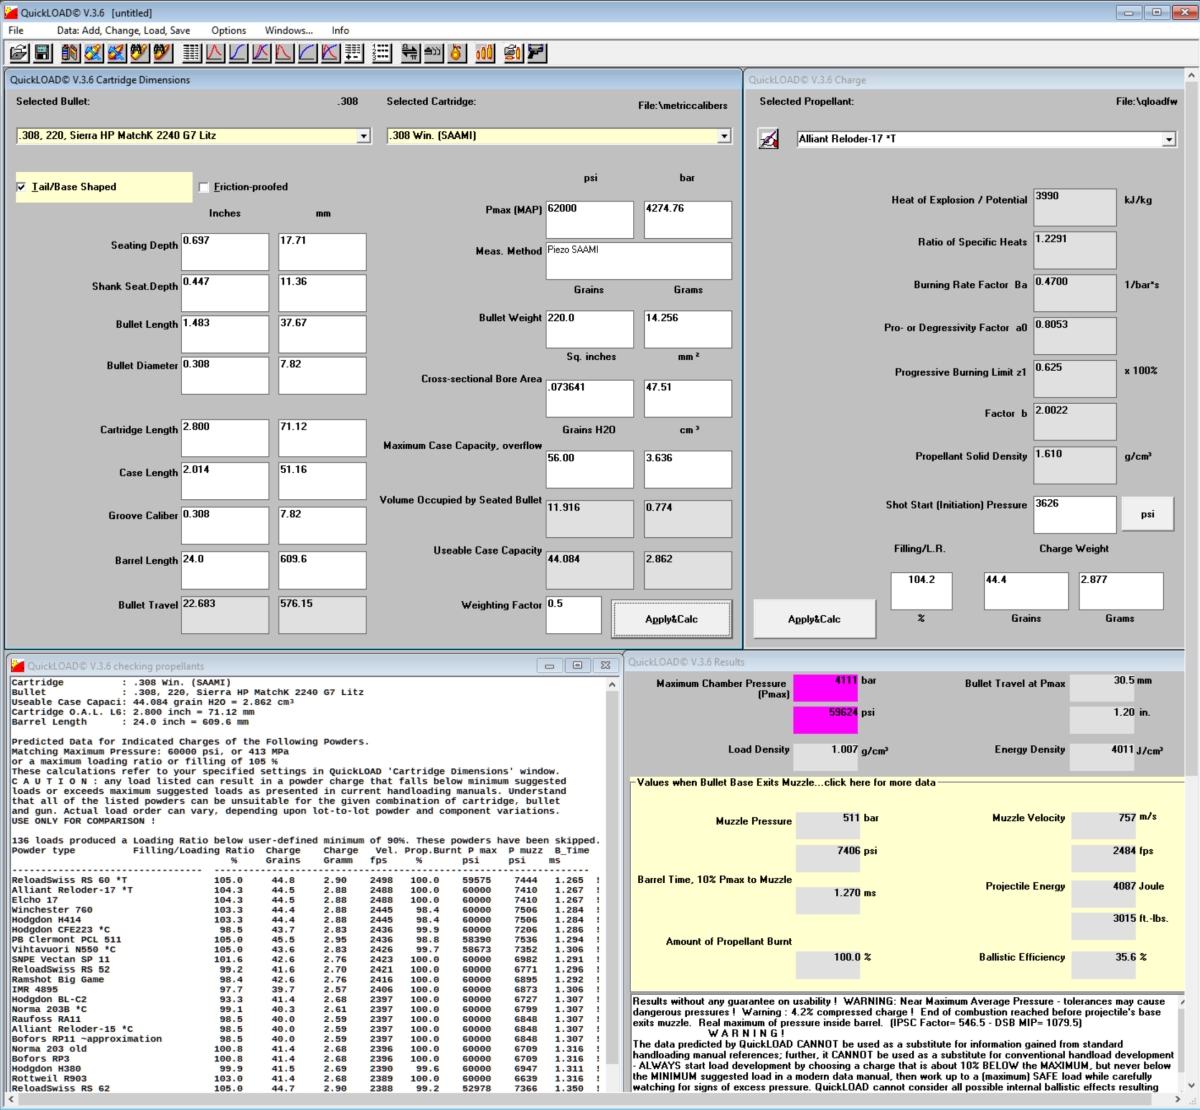
QuickLOAD prediction: .308 Win 220gr SMK with 44.8gr of Reloder 17 with an OAL of 2.8" gives 2505fps with 105.1% case fill (some powder crush), 100% powder burn and a max pressure of 61,151psi with max being 62,000psi. This is a dangerous load so you'll need to back off a few grains.
.308 Win 220gr MatchKing @ 2503fps
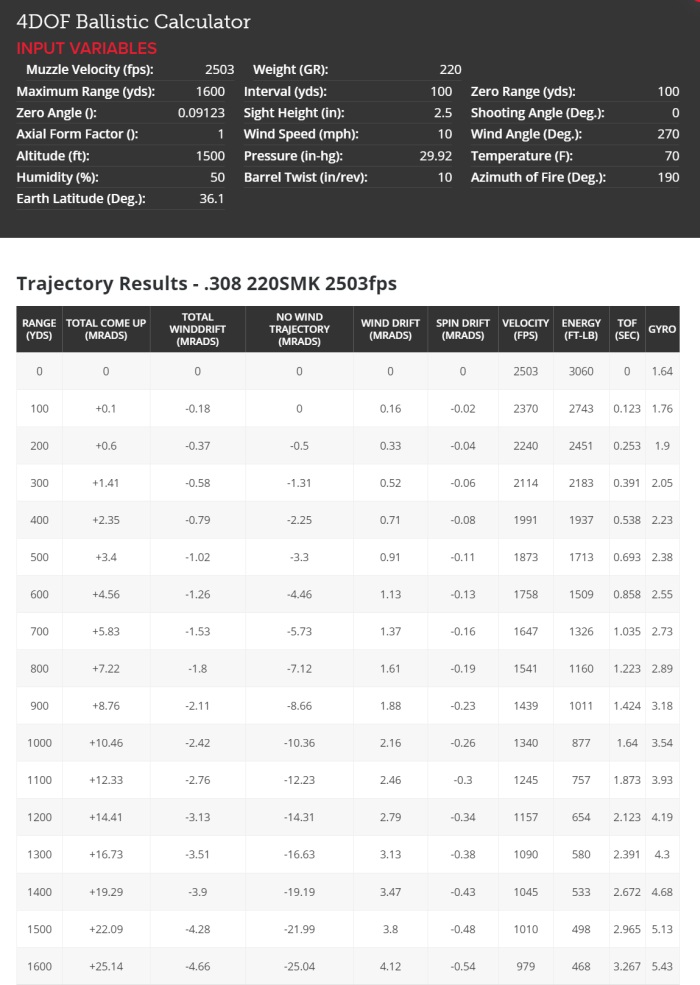
Wind is set to 10mph of direct crosswind from the left. At 1000 yards we need 3 clicks to the left to compensate for spin drift to the right. The bullet begins to go transonic just beyond 1200 yards. The 220gr MatchKing is stable from this 1:10 twist barrel with a gyroscopic stability (Sg) of 1.64 at the muzzle (1.5 is minimum for long range shooting). If the barrel twist rate was 1:12 the Sg would be a marginally stable 1.14 so I recommend at least a 1:10 twist barrel for 220gr MatchKing bullets.
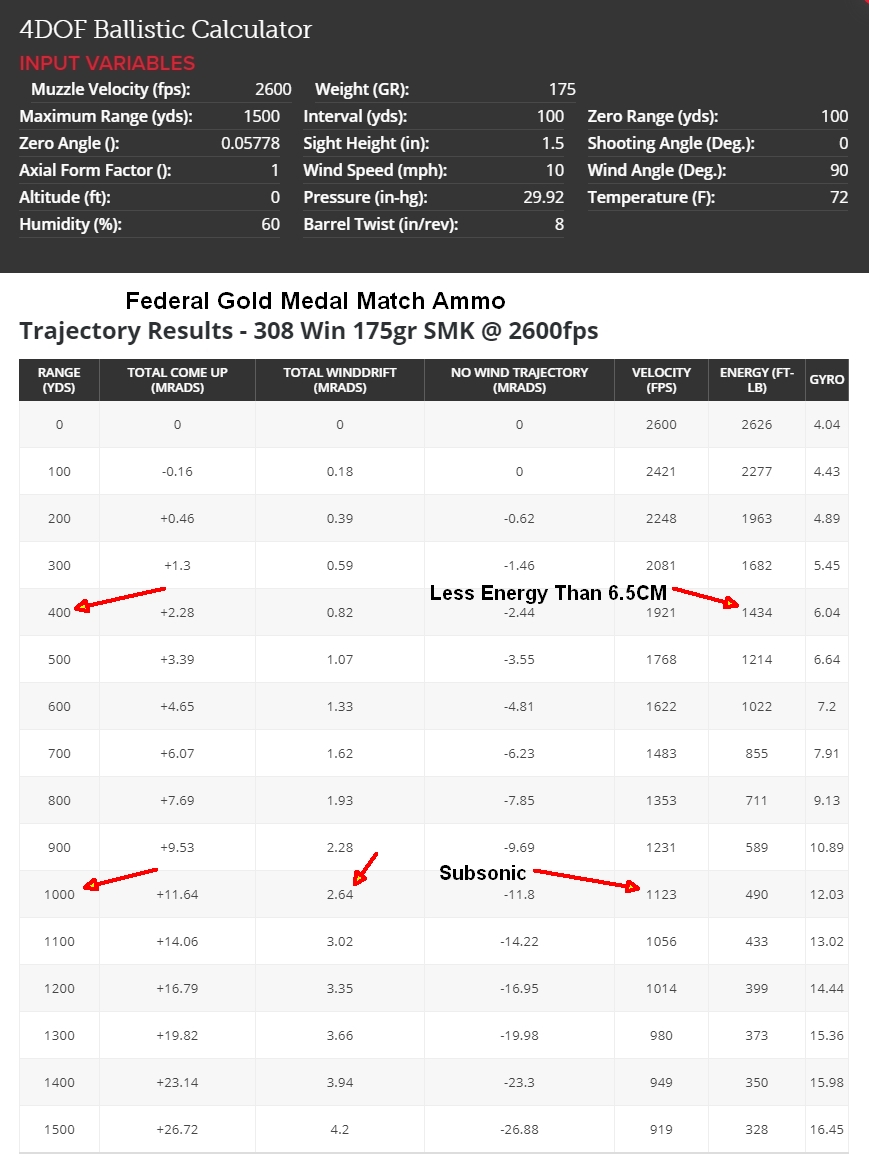
I was surprised to find that for long range shooting the heaviest bullet available for a caliber usually performs best unless too much case capacity is taken up by the big bullet. I used to favor the 175gr Sierra MatchKing for long range .308 Winchester but I ran the numbers comparing it to the 220gr MatchKing and found that it greatly outperforms the lighter bullet, especially in the all important wind drift measurement. Both bullets were run using QuickLOAD's best powder and velocity, 2800fps for the 175gr and 2503fps for the 220gr with a standard cartridge overall length of 2.8" and 24" 1:10 twist barrel.
.308 Win 175gr Sierra MatchKing @ 2800fps

Compare this 175gr range card to the 220gr above and you'll see the 220gr bullet stays supersonic 100 yards farther downrange. The 175gr SMK suffers 24% more wind drift and spin drift at 1000 yards.
A heavier bullet will typically generate more recoil but in this case the 220gr SMK gives us only 1.5lb more recoil energy for an 11% increase over the 175gr.
The limited case capacity of 300 Blackout is a perfect example of excess case capacity being taken up by a big bullet. When using a 220gr Sierra MatchKing in the 300BLK, the large, long bullet must be seated deep into the cartridge which reduces room for powder. Because of this, muzzle velocity is greatly reduced and it performs worse than the 168gr MatchKing at both short and long range.
6.5 Creedmoor Versus 308 Winchester
6.5CM has become very popular and rightly so. It is a light recoiling round that is superior to 7.62 NATO/308 Win in almost every way. Don't get me wrong, I love my 308 rifles and if I could only have one SHTF rifle it would be a 308.
Take a look at the ballistic tables below for the 6.5CM and 380Win. After 400 yards downrange the 6.5CM carries more energy. The 308 goes subsonic at 990 yards downrange while 6.5CM stays supersonic 260 yards farther.
But the most important stat is wind drift because wind represents the largest variable in long distance shooting and we will never know exactly what the wind is doing. 308Win has 47% more wind drift than 6.5CM due to its superior ballistic coefficient.
The icing on the cake is 6.5CM has 39% less recoil than 308Win when firing from a similar weight rifle. Comparing the same factory ammunition below fired from a 6.2 lb lightweight hunting rifle with no muzzle brake, 308 Win generates 26 ft-lbs of recoil energy while the 6.5CM generates only 18.7 which is 39% less recoil. Less recoil typically results in better accuracy. See my Recoil Calculator for more info.

Factory ammunition is used to compare 6.5 Creedmoor and 308 Winchester. While 308Win has 420 ft-lbs more energy at the muzzle, by 400 yards 6.5CM carries more energy downrange. 6.5CM stays supersonic 260 yards farther downrange. 308 Win has 39% more recoil and 47% more wind drift at 1000 yards.
As you can see, 6.5CM is hands down the winner over 308Win for long range shooting. Don't fight it, just get one, or two.
These are my favorite books on long range shooting:
The Long Range Shooting Handbook is a very good intro and one tidbit I found invaluable was the author's mantra, "Focus on the reticle, steady pressure on the trigger." It helps remind you to focus on the fundamentals. The three books by Bryan Litz cover everything you need to know about external ballistics. I highly recommend his Applied Ballistics For Long Range Shooting #ad. The Complete .50 Cal Sniper Course #ad digs very deep and focuses on the tactical application of the .50 caliber rifle. It is the most comprehensive tactical long range shooting book available. The Army Field Manual FM 23-10 Sniper Training is a good, free reference but be advised the section on humidity is wrong. High humidity decreases air density and makes a bullet strike high, not low. The USMC Sniping manual is very similar to the Army manual but uses a superior "Wind Clock" method.
Ruger Precision Rimfire With Scope, Bipod & Suppressor
Nothin's more fun than long range .22 subsonic gong ringing. Consistently hitting a 6 inch gong at 150 yards or a full size target at 300 yards with subsonic ammo is a challenge because of the large elevation and windage corrections required for the slow moving bullet. The 22LR's classic G1 bullet shape generates tons of wind drift to aid your wind reading and wind correction practice. Shooting 22LR saves money compared to shooting my Tikka T3x in 6.5 Creedmoor. Both rifles have identical scopes, bipod, buttstock monopod and stock adjustment. Here I'm shooting from my home's rear upper deck and the family doesn't even notice. The hammer fall is louder than the muzzle blast. Newcon Optik Spotter ED #ad MRAD reticle spotting scope at left. I have a BATFE Form 1 with tax stamp for the home-built aluminum monolithic baffle suppressor.
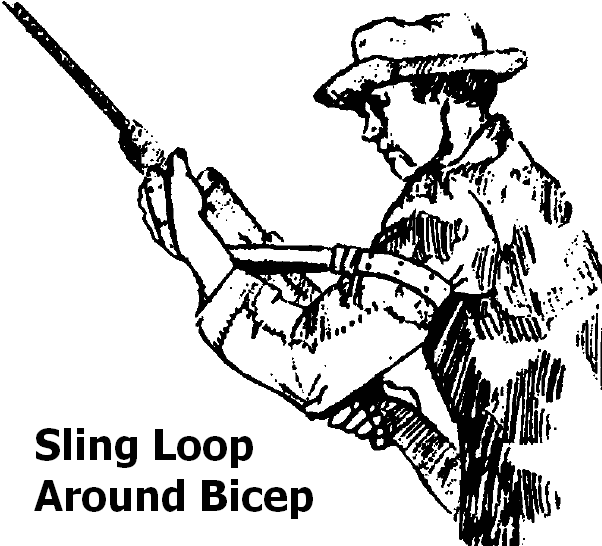
A high quality, correctly adjusted sling can improve marksmanship in certain positions. Arm is placed in sling loop, loop is pulled up above the bicep, a keeper is slid against the bicep to keep the sling in place. Note the wrist wrap for additional stability. From FM 23-10
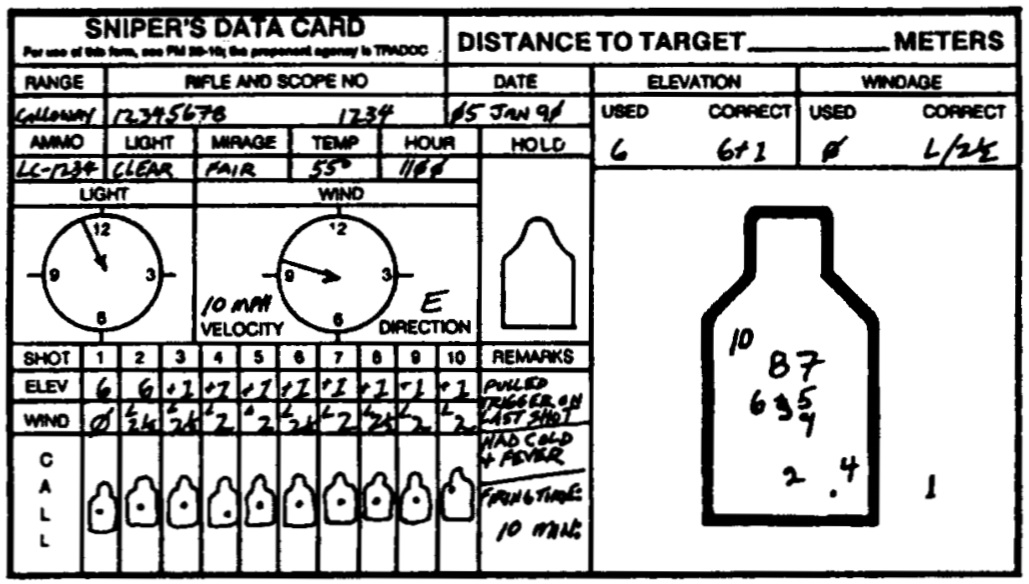
To get the most out of your range sessions I recommend following the Army's FM 23-10 Sniper Training manual and fill out a data card during every practice session. This will help you focus on every pull of the trigger, help you learn to call your shots and provide valuable data for future reference.
Example of Completed FM 23-10 Sniper's Data Card
Blank Data Card
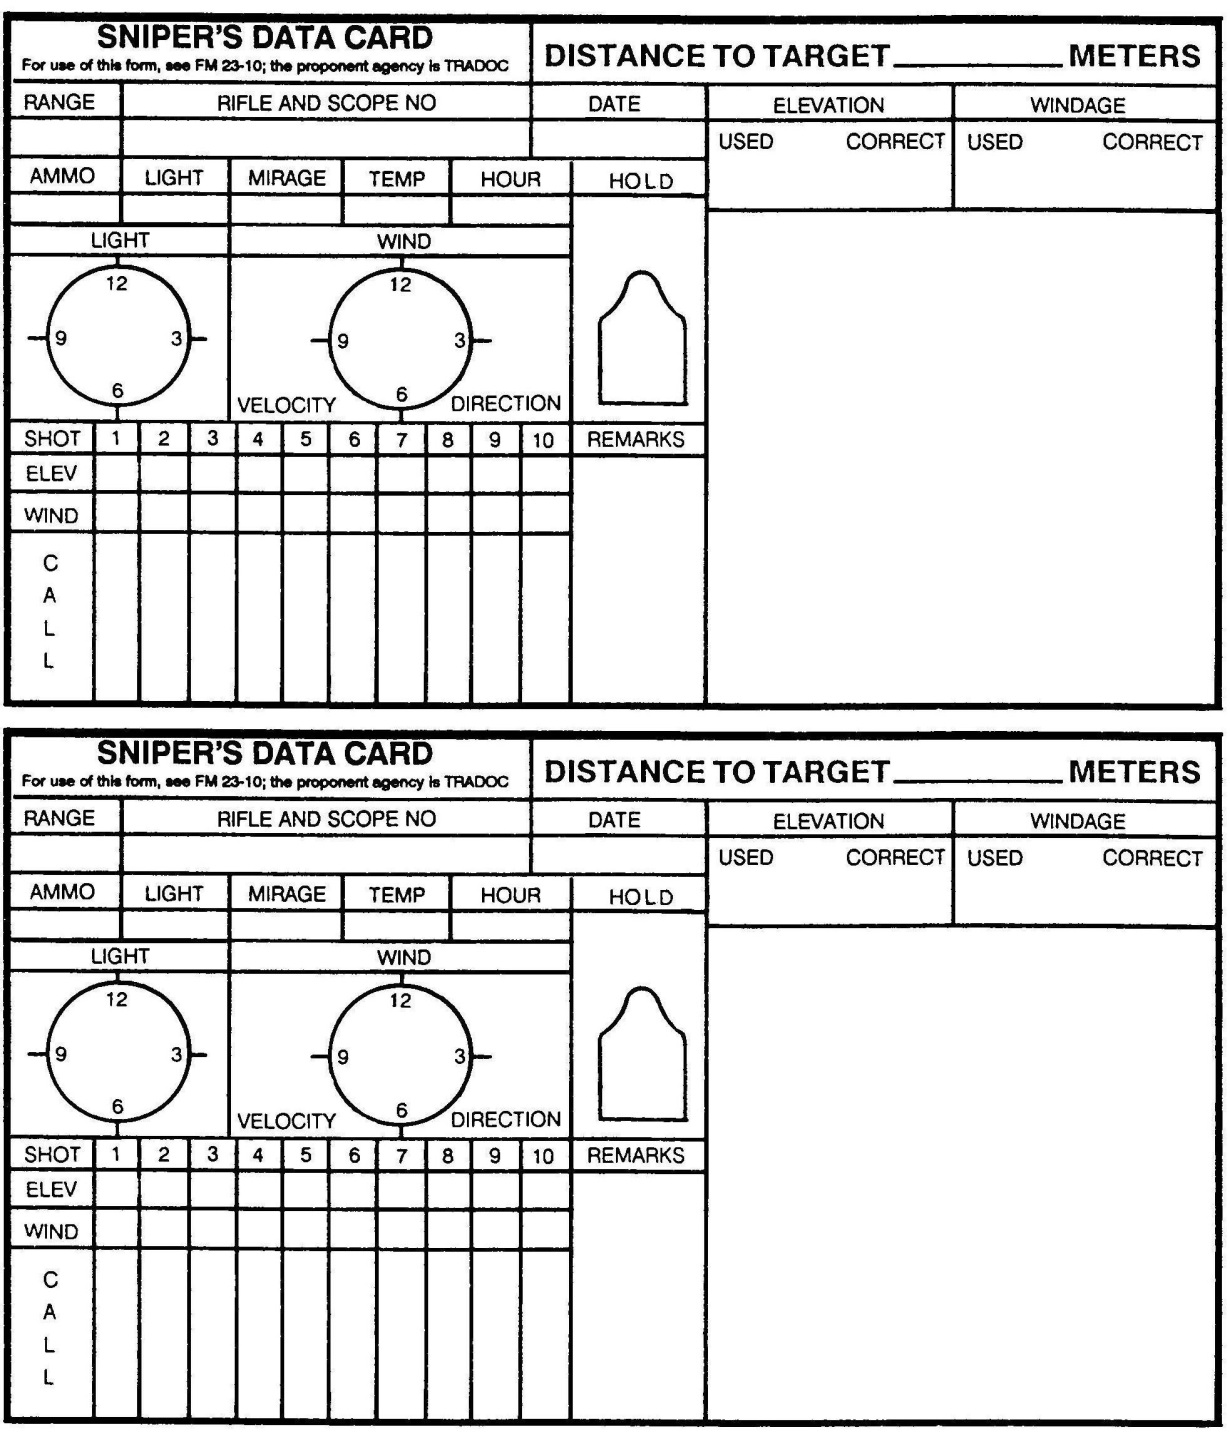
Right-click the form and select "Save Image as" or "Print". From FM 23-10.
Bipod
You'll need a bipod or tripod for long range shooting and you can't go wrong with Atlas. I installed an Atlas BT65-NC (No Clamp) #ad using an Area 419 Arca-Swiss clamp on my Tikka. I put an Atlas BT10 bipod #ad with a Picatinny rail clamp on my Ruger Precision Rimfire. The BT65-NC comes without a clamp, with a quick-adjust lever, cants and the legs extend from 5 to 9 inches. It's my favorite bipod. The BT10 pans and cants and the legs extend from 5 to 9 inches.
Atlas BT65-NC & BT10 Bipod
I also like the Harris Engineering S-LM Hinged Base Bipod with 9-13" telescoping legs #ad. The legs are the right length for prone and bench top shooting and the hinged base allows you to cant the rifle to keep it level on uneven terrain. The bipod mounts to a forearm sling stud. If you do get a Harris S-LM bipod I highly recommend this quick adjust cant lever #ad. If you use a Ruger Precision Rifle or Tikka T3x TAC A1 you'll need one of these M-LOK stud mounts #ad to mount a Harris bipod. Area 419 sells an adapter kit to mount a Harris bipod to an Arca clamp. You can also get the adapter kit with a forward barricade stop.
Harris S-LM Bipod, Quick Adjust & Mount
A buttstock squeeze bag allows for fine control of buttstock position and is much steadier than just holding the buttstock against your shoulder. You rest the buttstock on the bag, pull the rifle against your shoulder with your shooting hand, then raise the rifle to target with a squeeze or lower it by relaxing the squeeze. Your bipod height is used for gross rifle adjustments and the bag makes the fine adjustments. I highly recommend you use a squeeze bag even if only for sighting in your rifles. It will greatly improve your shooting precision.
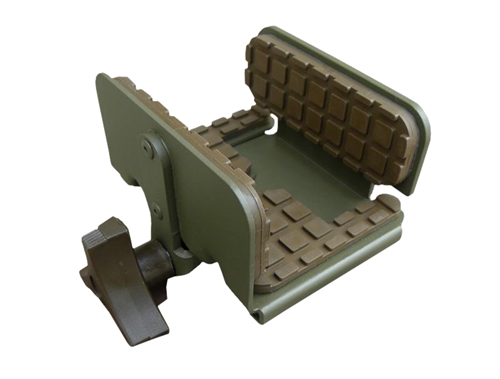
A "bag rider" or "slider" is a common option for rifles with a Picatinny rail on the bottom of the buttstock. It makes it easier to position a squeeze bag to make fine targeting adjustments. The bag rider below has a slight taper so moving the bag forward or rearward will also adjust butt height.
The buttstock monopod has fallen out of favor in the long range shooting community but I found the Accu-Shot BT13-QK Precision Rail Monopod #ad fits perfectly on the Tikka T3x TAC A1 and Ruger Precision Rifle & Rimfire rifles and also worked well as a bag rider. Both rifles have a small section of Picatinny rail on the bottom of the buttstock made for a monopod or bag rider. You adjust the length of the monopod to get precisely on target. If you run out of monopod adjustment you can adjust the length of the bipod leg length.
Tripod
Lately the big guns of long range shooting competition have been moving to large, heavy duty tripods that can support the entire weight of the rifle. I recommend you go with Arca-Swiss mounts to attach your gun to the tripod. The Arca-Swiss mount is a quick disconnect standard for professional tripods. It is also called just "Arca" mount or 1.5 inch dovetail. There are Arca mounts that mount to a rifle using M-LOK and KeyMod such as the 12" long Area419.com M-LOK-to-Acralock rail or this short 2.5" Really Right Stuff M-LOK-to-Arca rail.
Serbu BFG-50 On Tripod

Shadow Tech Pig Saddle is holding the rifle, the Pig Saddle has a 2.5" Arca rail attached. The Arca rail is clamped into a Leofoto LH-55 ball head, ball head mounted on Benro TMA47AXL tripod.
Tikka T3x TAC A1 Set for Prone
12" long Area419.com M-LOK-to-Acralock rail attached to the rifle. The Benro TMA47AXL tripod can go very low.
M-LOK to Arca-Swiss plate. There are also KeyMod-to-Arca adapters available. These plates have a recoil stop at one end to keep the rifle from sliding out of the mount under recoil.
You'll also need a ball head that goes on top of your tripod and clamps onto the rifle's Arca mount. The ball head allows the rifle to swivel all around. I highly recommend the Leofoto LH-55 (55mm, 2.2" ball) rated at 50lbs. It's capable of supporting my very heavy Serbu 50BMG rifle. The LH55 is a very nice copy of the $489 Really Right Stuff BH-55.
LeoFoto LH-55 Ball Head
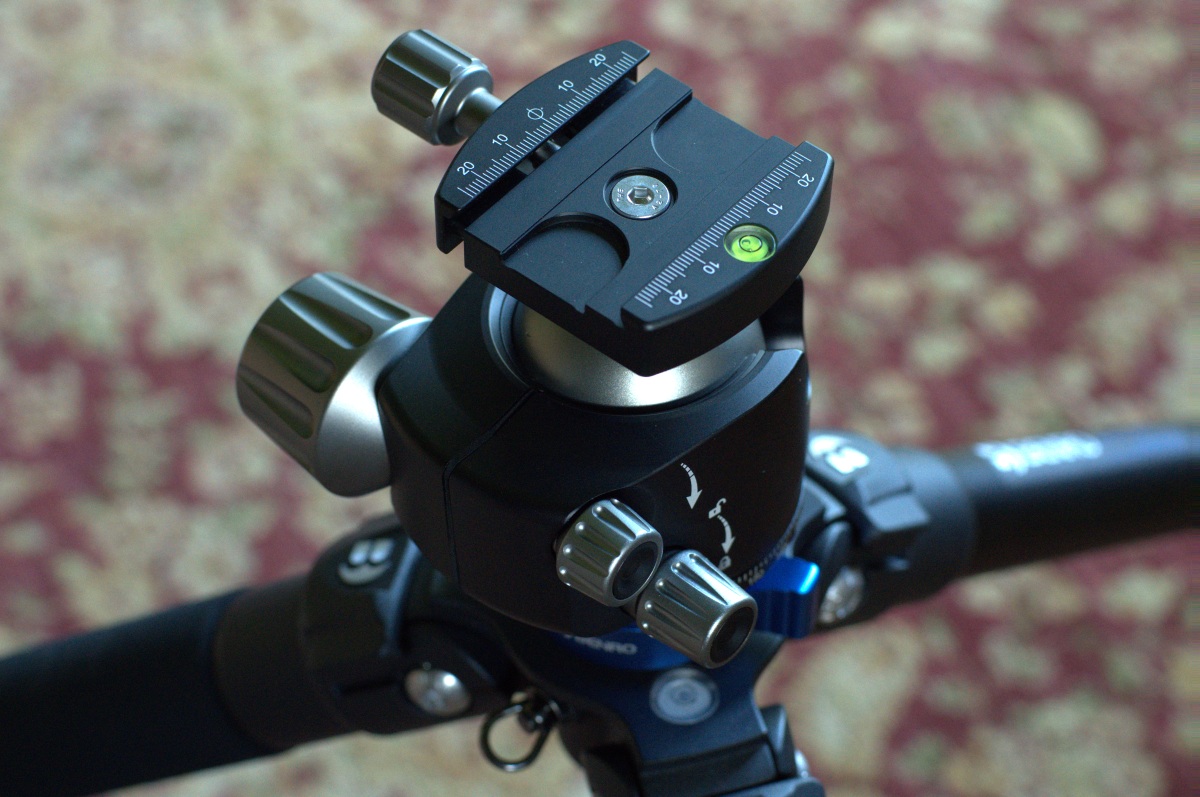
LeoFoto LH-55 ball head comes with Arca-Swiss clamp.
For the tripod I went with the very heavy duty aluminum $195 Benro TMA47AXL which is rated for a 44lb load and can extend to fit the tallest shooters. It works great for standing, sitting and even prone shooting. It comes with a standard long center shaft for photography but also includes a short shaft which is perfect for gun use because it allows the tripod legs to extend out at a 90 degree angle to get the tripod down on the ground for low prone. With the short center shaft installed the tripod can go from 5 inches off the ground to 71 inches so it's good for prone to standing, off camber terrain and tall shooters. If you have a big budget you may want to go with the top shelf Really Right Stuff SOAR carbon fiber tripods.
6.5 Creedmoor AR-10 rifle with Schmidt & Bender Police Marksman II 10x scope and short M-LOK-to-Arca plate. Note the tripod short center shaft which allows the tripod to drop flat on the ground for low prone shooting and yet can extend up to 71 inches for the tallest shooter.
The Shadow Tech Pig Saddle is a rifle clamp that fits on top of your tripod's ball head using a $7 Arca-Swiss plate. Use it for your rifles that don't have an Arca plate.
Pig Saddle
Shooting Table
You want a rectangular table so you can sit at the long end, square behind your rifle with plenty of room so you don't have to worry about your bipod slipping off. You'll need room for your knees to go under the table. Some fold-up tables block your knees so beware of that.

You don't want to lean into the rifle from the side like these shooters. You want to sit with your shoulders square behind the rifle so the rifle will recoil straight back for increased accuracy and help keep the target in sight to view bullet splash. If the above shooting tables were wider you could shoot from the near end and square up behind the rifle but still offer the traditional side shot position.
You don't want to lean into the rifle from the side like most shooting tables were designed--that's the old way of shooting. A rectangular, smooth concrete tabletop with 4"x4" concrete or wooden legs would be ideal due to it's weight and stability. An adjustable height bench seat would allow most shooters an excellent stance behind the rifle.

This table should be deeper for use with bipods but the shooter is sitting properly with shoulders square behind the rifle.
The same goes for shooting prone. The old angled military stance has been replaced with lying directly behind the rifle with shoulders square to the rifle.
Your scope may have to come back a little to get the correct eye relief when shooting square.
MRAD Spotting Scope
A quality spotting scope with an MRAD reticle can be very expensive but the Newcon Optik Spotter ED #ad spotting scope is a tremendous value. It has extremely high quality coated optics, zooms from 20 to 60x, has a big 85mm objective lens, has course and fine focus and a diopter adjustment. It comes with a nice case, field cover and a little tripod too. Newcon Optik is a Canadian company that makes gear for the world's militaries. Compare the Spotter ED to other MRAD spotting scopes and you'll see its inherent value. Of course our spotting scope doesn't have to have an MRAD reticle but it really helps when working with a spotter. He can call our bullet strike corrections without having to do any conversions and he can backup our range estimations.
My shooting bench is a bit too crowded to fit my spotting scope so I purchased a full size Vortex Optics Pro GT Tripod #ad to mount the Spotter ED. It's very sturdy but lightweight and wreaks of quality.
Suppressor
I'm a big suppressor fan, especially when I'm home on my personal range. I don't have to wear hearing protection, it keeps my wife, dogs and neighbors happy and cuts recoil by about 20% (due to both reduction in muzzle gas velocity and additional rifle weight). Shooting suppressed subsonic 22LR at 300 yards is crazy fun but my 6.5 Creedmoor and .308 Win rifles benefit from suppression too. They're both hearing safe with my Phantom 7.62 suppressor.
Once you start shooting suppressed you won't want to go back to bare barrel shooting. Just find your local Class III firearms dealer and get the 6 month to 1 year purchase process going. The Tikka T3x TAC A1 and Ruger Precision Rifle and Rimfire have threaded barrels for easy suppressor and muzzle brake attachment. See my suppressor page for more info.
Recoil Management
I mentioned the recoil reduction offered by a suppressor but large, heavy muzzle brakes are popular, especially for larger caliber rifles. A muzzle brake will reduce recoil by redirecting muzzle gas and by adding weight. A well designed and heavy muzzle brake can cut more than 50% of total recoil energy. The big downside of a muzzle brake is the noise and blast, not only for ourself but the guys on the firing line with us. That said, I would never fire a 50BMG rifle without a muzzle brake. PrecisionRifleBlog.com has an excellent test and analysis of a number of quality muzzle brakes.
Adding a half pound, 90% efficient muzzle brake to a Ruger Precision Rifle in 6.5 Creedmoor will cut recoil energy from 14.7ft-lb to 8.5ft-lb, a 42% decrease.
The physics of shooting tells us a heavier rifle will hit us with less recoil so many long range shooters use very heavy rifles (see my free online Recoil Calculator for proof). I added a pair of these XLR Industries M-LOK Steel Chassis Weights to my Tikka T3x TAC A1 and 6.5mm Ruger Precision Rifle (the 22LR Precision Rimfire doesn't need them with 0.1ft-lb of recoil). Adding a pair at 15 total ounces will reduce the Tikka and 6.5 Creedmoor Ruger Precision Rifle's recoil energy by 8%. The 6.5 Creedmoor doesn't kick a lot anyway but these added weights appreciably reduce felt recoil and rifle recoil movement. Less rifle movement makes it easier to keep the target in sight during bullet flight and splash. The weights are easy to remove if you want to take the rifle hunting. If you want a dual-purpose long range rifle for hunting and target shooting I recommend a carbon fiber wrapped barrel for light weight hunting, then add one or two pair of these chassis weights for target shooting.
Chassis Weights
XLR Industries M-LOK Steel Chassis Weights mounted on a Ruger Precision Rifle reduce felt recoil and rifle movement. A set of two add 15 ounces (15/16 pound) and cost $89.
Steel Targets
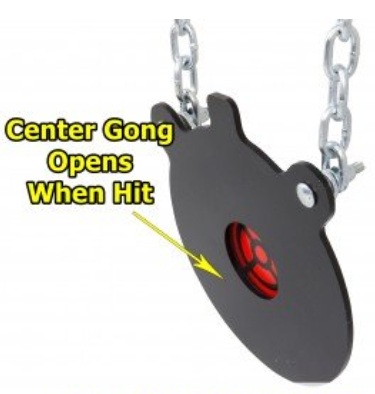
I get all my steel gongs and hanging hardware from ShootingTargets7.com. Their prices + free shipping are excellent and they have a wide variety of targets, stands and mounting hardware suitable for 22LR up to 50BMG. I like to pair a big 16" round gong with a 10" bullseye gong for long distance shooting. Get dialed in on the large gong then try to hit the bullseye center gong.
10" Bullseye Gong
ShootingTargets7.com sells gongs in AR500 steel thickness from 3/16 to 5/8 inch. To get the most gong noise you want to use the thinnest steel that can handle your caliber. You don't get much noise when a 22LR bullet strikes a 1/2" thick gong. See this for info on caliber versus gong thickness.
3/16" thick steel targets work great for 22LR while 1/2" thick AR500 steel will handle 6.5 Creedmoor to 300 Win Mag. 338 Lapua Mag through 50BMG needs 5/8" thick AR500 steel. Maximum bullet velocity at impact is 2850fps for all calibers and thicknesses of AR500 steel. Exceed this and the target will be damaged by pitting.
I use cheap rattle can white spray paint on the gongs. For two-part bullseye gongs I paint the center day-glow orange. The white paint makes bullet strikes easier to see. Simply paint over the bullet strikes and you're ready to go again.
Crack & Thump
During Army Basic Training in 1978 at Fort Sill, Oklahoma, I read our platoon training plan and saw "Crack and Thump" on the schedule and wondered what it was. A week later my platoon sat in a 15 feet deep pit while instructors fired over our heads from different directions and distances. We used the Crack & Thump method to estimate the direction and distance to the shooters. I was surprised how well it worked. I've read many internet warriors bash on Crack & Thump and claim it can't work but I don't care, I got the training and it simply works.
The "crack" in Crack & Thump is the supersonic crack of the bullet passing by. The "thump" is the thump of the distant muzzle blast traveling at the speed of sound (1130fps @ 72ºF). It sounds like a low frequency thump because low frequencies travel farther than high frequency sound. Because most bullets travel faster than the speed of sound the bullet and crack will arrive at your location before the thump of the muzzle blast.
The muzzle blast thump is very directional and it's easy to determine which direction a shooter is firing from. This is the main reason modern snipers use suppressors--to keep the muzzle blast thump from giving up their firing direction and distance. If you can get beyond the initial panic of being shot at and listen, you will be able to tell from which direction the fire is coming and estimate the shooter's range. Basic Army Wisdom: If you hear the thump coming from your rear then get on the other side of the barrier :)
The time interval between hearing the bullet crack and the muzzle thump is related to distance--the longer the interval between the crack and the thump, the more distant the shooter.
Keep in mind that the purpose of Crack & Thump is to figure out where to look for the shooter, not to determine a precise location but Crack & Thump is accurate enough to call in artillery fire on a sniper.
Crack & Thump Rules of Thumb
< 75 Yards you won't hear a crack and thump, just a single noise. If you don't hear a thump the shooter is either close or the bastard is using a suppressor.
100 - 400 Yards you will hear a definite short separation of the crack and thump.
1/4 second = 200 yards
1/2 second = 400 yards
500 - 1000 Yards you will hear a long separation of the crack and thump.
3/4 second = 700 yards
.84 second = 1000 yards
> 1100 Yards you will not hear a crack but a "whiz" as the subsonic bullet passes. You may still hear the thump so you can estimate the direction of fire.
These rules of thumb are accurate enough to figure out where to look for the shooter and it will give you a hint of how deadly the fire is. If you have almost a full second between the crack and thump the shooter is 1000 yards away so he probably won't be able to hit you if you run from one location to another.
The above rules of thumb were determined using the current US Army sniper round, 7.62 NATO rifle firing a 175 grain Sierra MatchKing (SMK) bullet at 2600fps muzzle velocity. I used the 7.62 NATO sniper round because 7.62/308Win is extremely popular and a good "middle of the pack" cartridge. 5.56 M855 ball 62gr @ 3000fps and 50BMG 750gr @ 3000fps are within 1/10 sec of the 7.62 Crack & Thump times shown in the chart below. I used the super-accurate Hornady 4DOF Ballistics Calculator to get the time of flight numbers.
Time of Flight = Crack Time
TOF is Time of Flight. Beyond 1100 yards the bullet is subsonic (slower than 1130fps) so you won't hear a crack but you may be able to hear the thump and determine the direction of fire.
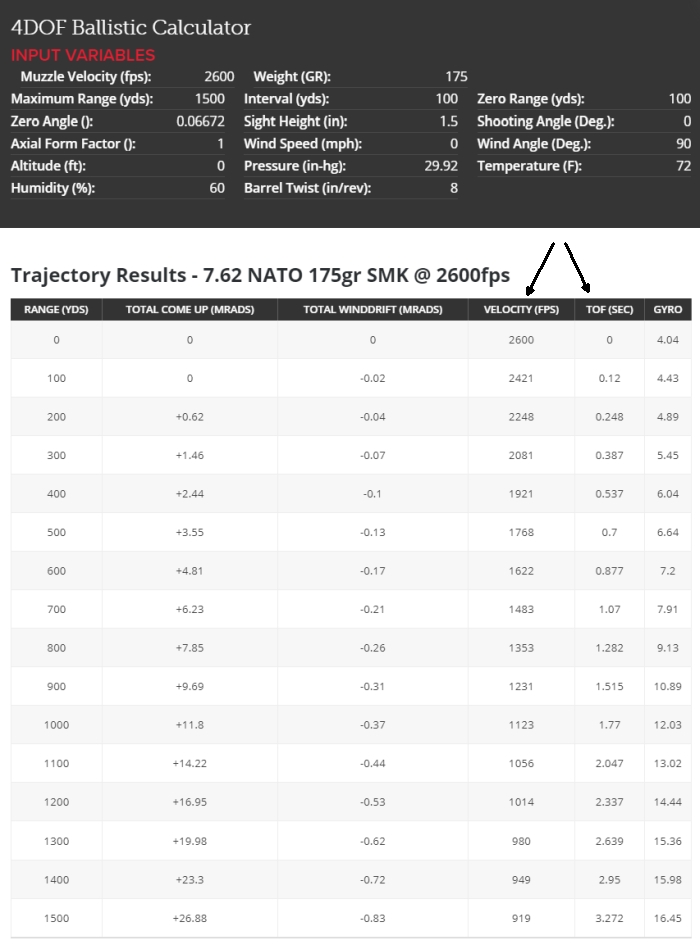
7.62 NATO Crack & Thump Times
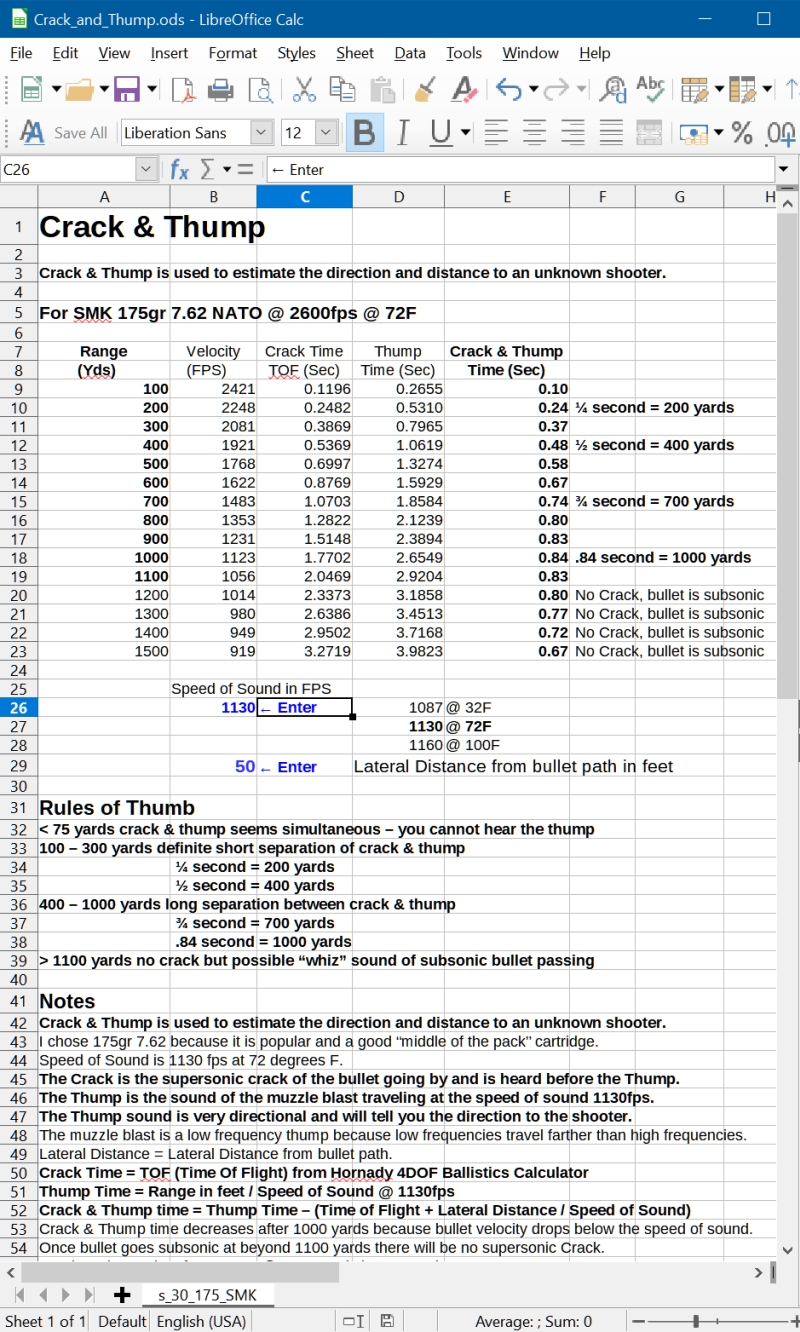
Crack Time equals Time of Flight (TOF) from the Hornady 4DOF Ballistics Calculator. Thump Time = range in feet / speed of sound. Crack & Thump Time = Thump Time - (Crack Time + Lateral Distance / Speed of Sound). Speed of sound is 1130fps at 72ºF. Muzzle velocity of 2600fps is from Federal Gold Medal Match 175gr 308Win specifications. Values above are with the bullet passing 50 feet away from you (Lateral Distance). You can download this Crack and Thump Excel spreadsheet.
Long range cartridges like 338 Lapua Mag and 50BMG Crack & Thump times out to 1000 yards are within .1 second of 7.62 NATO but they will stay supersonic to around 2000 yards. The Crack & Thump time for 50BMG at 2000 yards is 2 seconds. If you hear an impossibly long time interval between the crack and thump then you know the shooter is using a serious sniper round from extreme range.
Don't get too worked up about this paragraph because it's really not important but I mention it because it is usually discussed as one of the reasons Crack & Thump doesn't work. For every 100 feet a bullet passes away from you, 1/10 of a second is added to the Crack & Thump time due to the crack having to travel 100 feet laterally. When a supersonic bullet passes more than 100 feet to your side you will know it because the crack sound will be directional--you will know the bullet did not pass overhead. If the crack sounds like it's right on top of you then you know you are in the line of fire. My downloadable Crack and Thump Excel spreadsheet allows you to enter the lateral distance to the bullet path.
This is a good video by Rex at Sniper 101 with good audio that demonstrates the crack & thump sounds and discusses the technique. Even Rex questions the validity of the Crack & Thump method but believe me, I've had the training and it really does work.
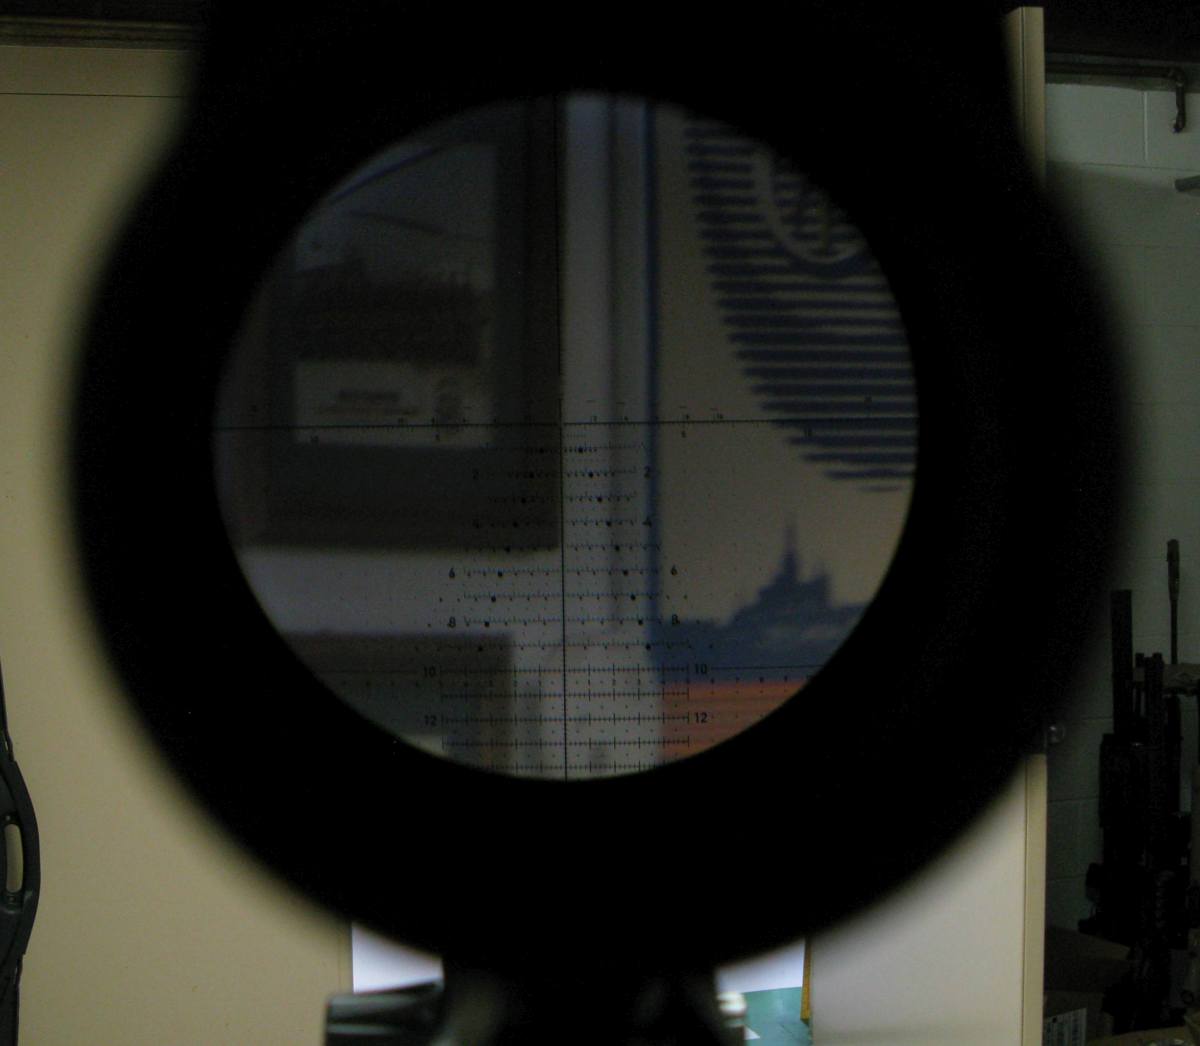
TReMoR3© MRAD Reticle
The Horus TReMoR3 reticle in the Vortex Razor HD Gen II and other long range scopes has become very popular as of late. It is designed to use hold off for both elevation and windage to eliminate turret dialing and allow rapid transition from target to target at differing ranges. This can be valuable in both tactical situations and timed competition. My Vortex Razor HD Gen II scope has this reticle and I like it a lot. You can use it like any other MRAD scope but the addition of the wind speed dots and Rapid Range Bars (stair steps) are nice adds. Only dots are wind dots, everything else except the "Mover Mark" mph numbers, is in mils.

Horus reticles show "wind mph dots" below the horizontal crosshair down to the 10 mil line (all dots are wind speed dots in mph). The wind dots allow us to hold off for wind without using a wind formula. The value you assign to a wind dot varies with bullet velocity and ballistic coefficient (BC). For .308 175gr Sierra MatchKing each dot is 4mph. For the faster 300 Win Mag each dot is 5mph. 6.5 Creedmoor Hornady 147gr ELDM @ 2665fps is also 5mph per wind dot. The reticle uses standard USMC 6,283 mils per circle.
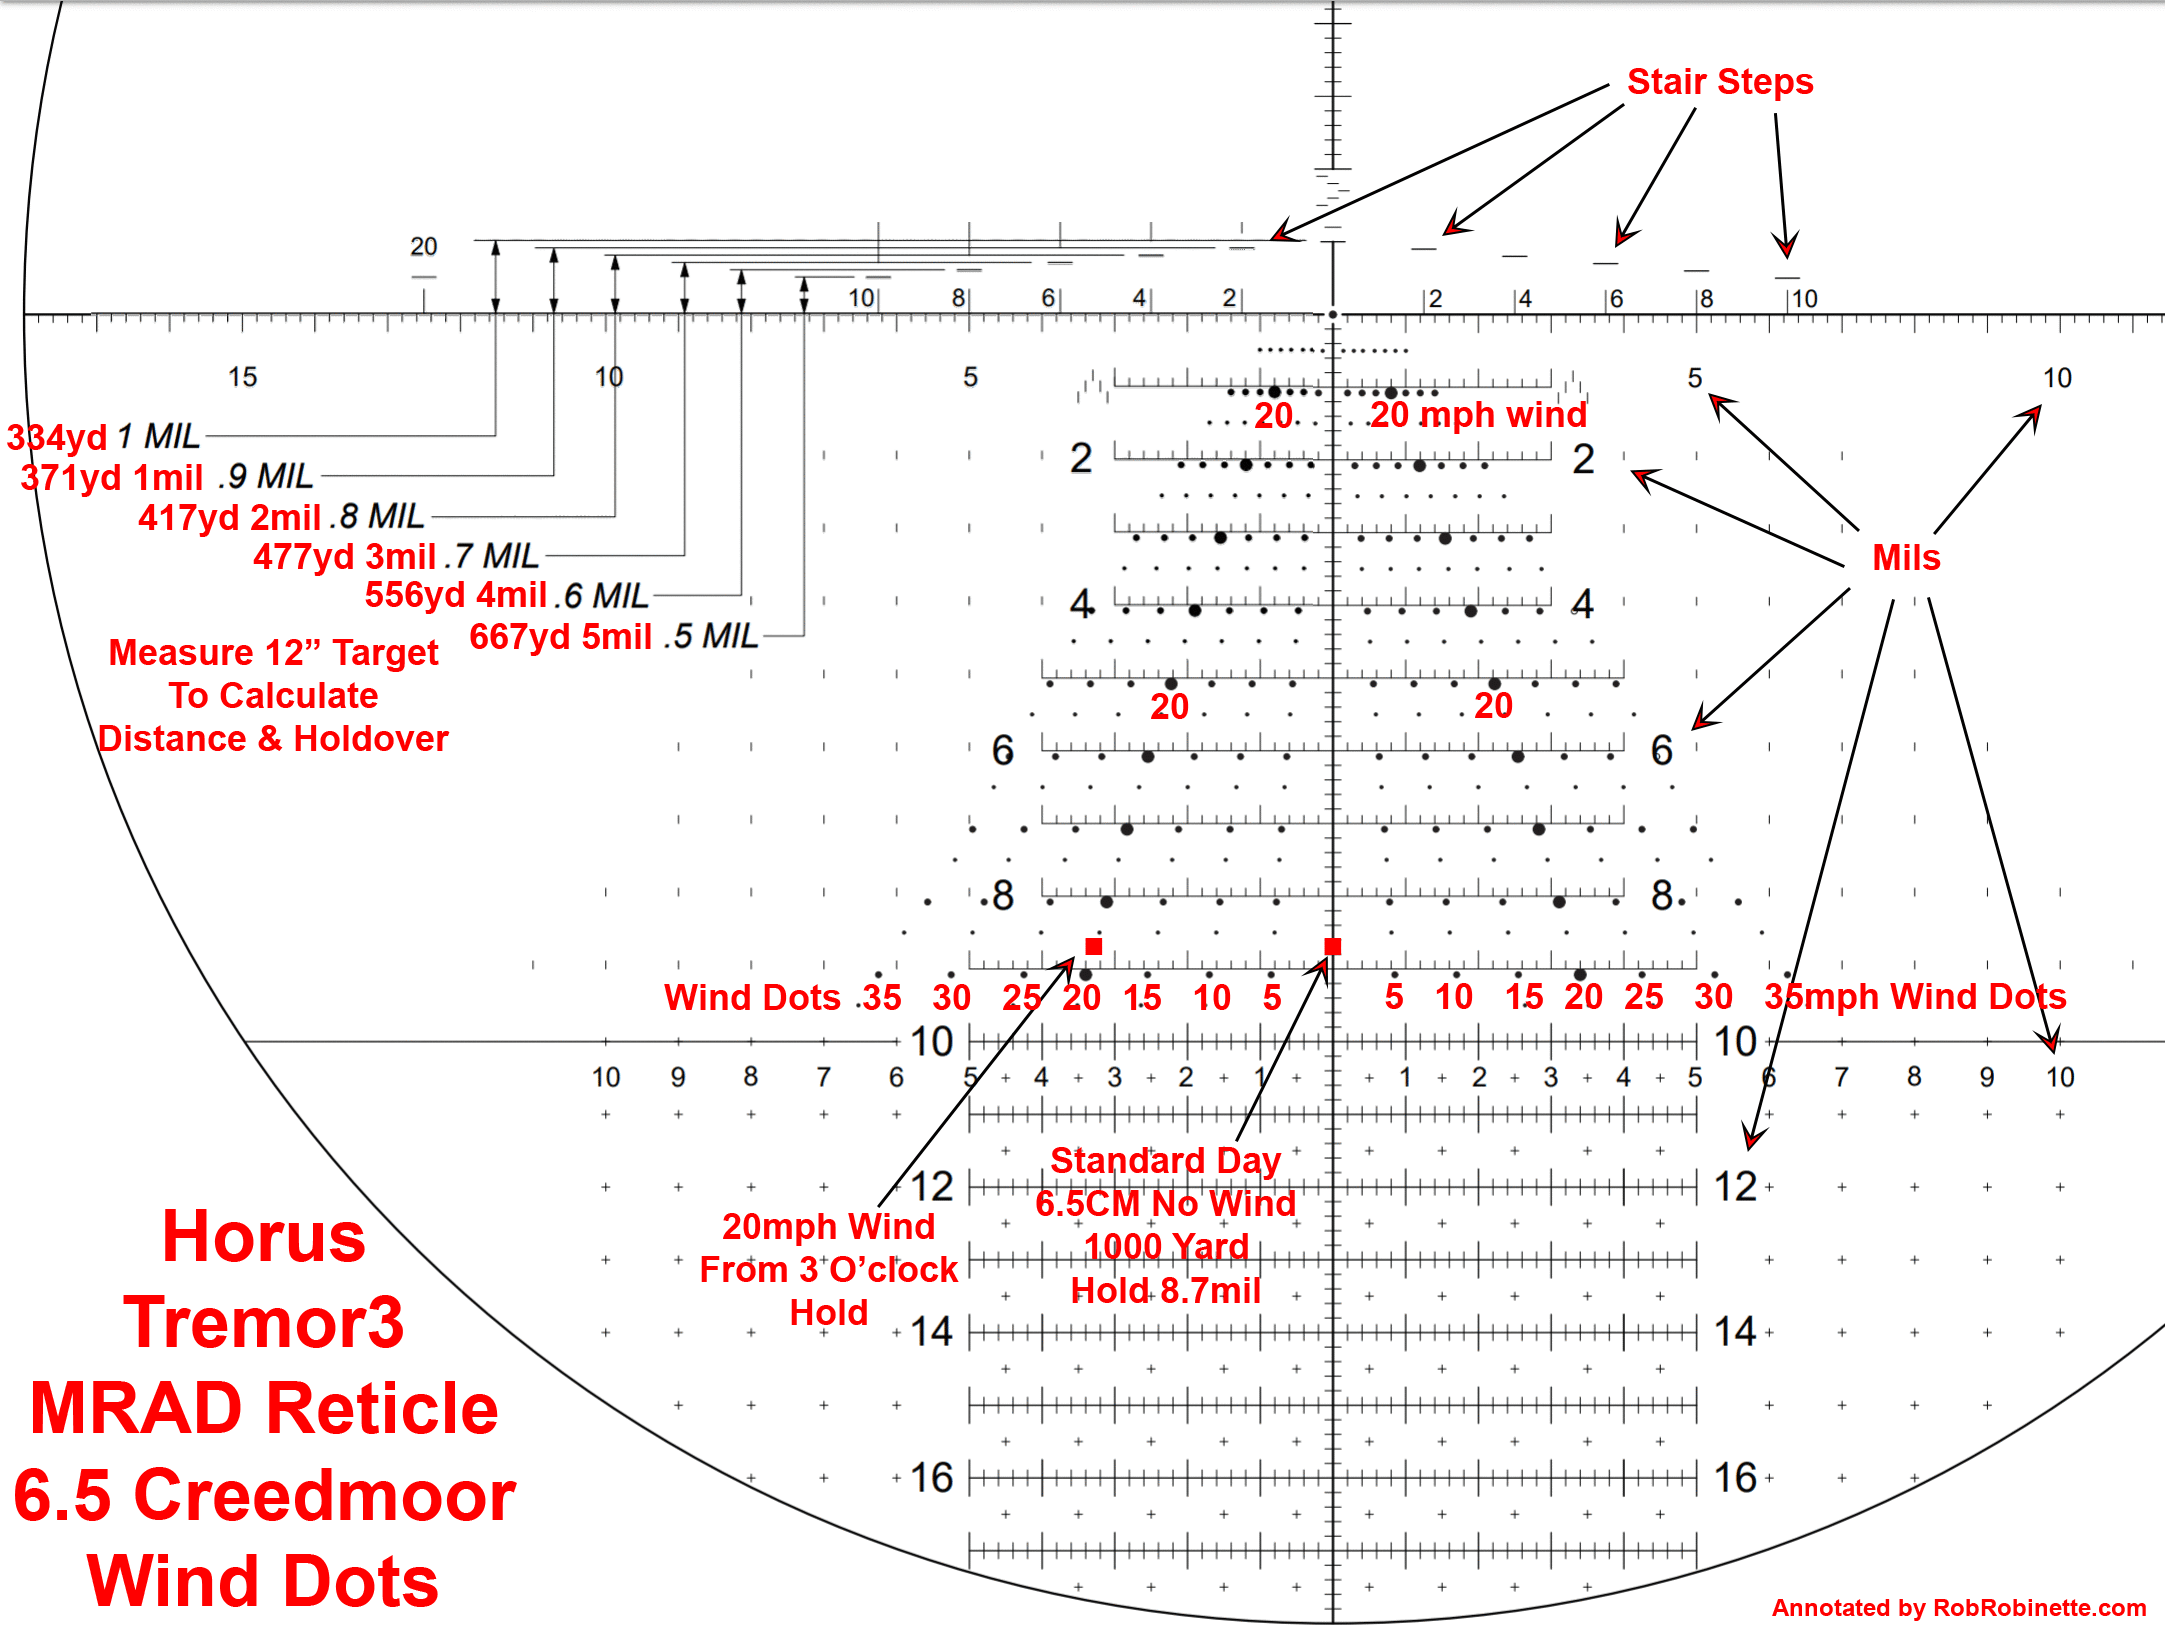
Wind dots run from 5 to 35mph. Each dot is 5mph for 6.5 Creedmoor. The big dot is 20mph at all ranges. The small numbers above the horizontal crosshair are moving target lead "mover marks" in mph. The stair step hash lines above the horizontal crosshair are designed to precisely measure a 12" target for range estimation. Horus calls them "Rapid Range Bars." We also use the stair steps and mover mark numbers to calculate the elevation hold. Standard day 6.5 Creedmoor 147gr ELDM 1000 yard hold of 8.7mils is shown as red squares for calm wind and for wind of 20mph from 3 O'clock.
Tremor3 Holdover Calculation
To calculate elevation holdover using the Tremor3 reticle we bracket a 12-inch target between the horizontal crosshair and a Rapid Range Bar (stair steps). Use the corresponding mph indicator below the Rapid Range Bar and cut it in half to obtain the elevation hold. For example: We measure a 12 inch target and find it fits under the stair step above the 10mph Mover Mark, we cut 10 in half and our holdover is 5 mils).
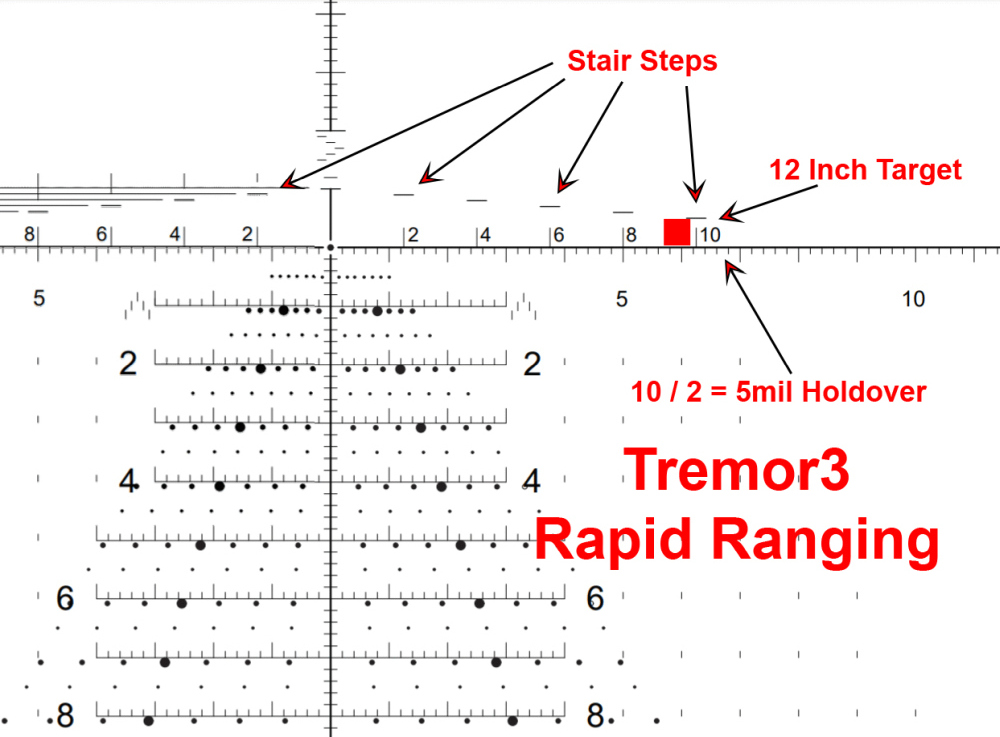
To use the Tremor3 Rapid Ranging Bars (stair steps) to calculate holdover we measure a 12" target. In the graphic above the target best fits under the bar above the 10mph Mover Mark so we cut 10 in half for 5mil of holdover.
The Rapid Range Bars were designed for 175gr Sierra MatchKing .308 Winchester. For 147gr ELDM 6.5 Creedmoor @ 2665fps the Rapid Range Bar holdover calculations are up to .6 mil high.
Tremor3 Wind Dot Calibration
I use the Hornady 4DOF Ballistic Calculator to calibrate wind dot values. For standard day (59 degrees, sea level, 29.92, 50% humidity) Hornady 6.5 Creedmoor 147gr ELD Match ammunition @ 2665fps has a wind dot value of 4.7mph so just round up and use 5mph per wind dot.
To use the Hornady 4DOF calculator to calibrate wind dot value enter your bullet and muzzle velocity and other input data. Input 10mph of wind from 90 degrees (direct crosswind). In the bottom "Display Fields" Section click on "Wind Drift" and "No Wind Trajectory", then click "Calculate".
Hornady 4DOF Calibrate Wind Dot
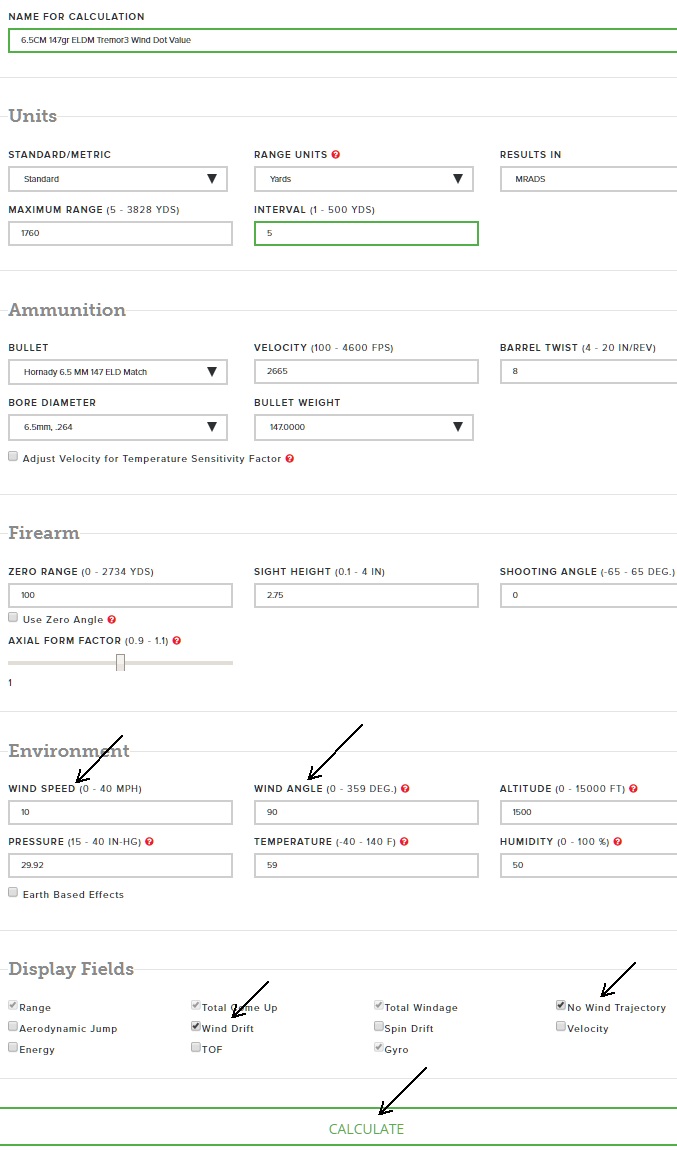
Input 10mph of wind from 90, select "Wind Drift" and "No Wind Trajectory" at the bottom.
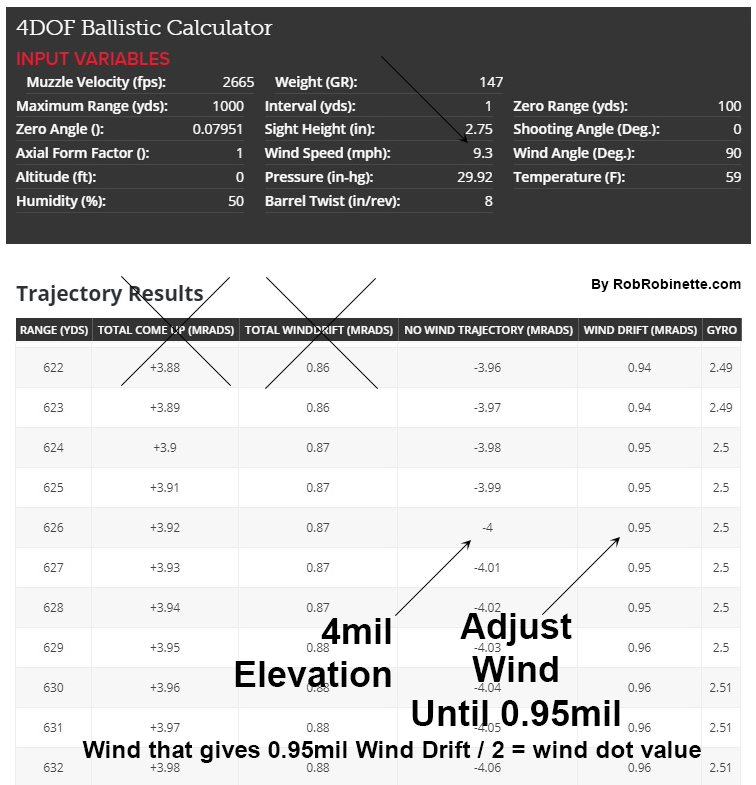
Move down the "No Wind Trajectory (MRADS)" column to find 4mil of elevation hold. Then adjust the wind value input until the "Wind Drift (MRADS)" column shows 0.95mil Wind Drift. Cut that wind value in half and you have the wind mph per dot. Above we have 9.3mph of crosswind that gives us 0.95mil of Wind Drift at 4mil of elevation so each wind dot = 9.3 / 2 = 4.65mph. For most calibers and bullets the wind value will be between 3 to 5mph. Do not use the "Total Come Up" and "Total Windrift" columns because they include spin drift and aerodynamic jump.
Standard Day Sea Level Wind Dot Values
5.56 72gr ELDM wind dot value is 2.8mph
308 Winchester 175gr SMK wind dot value is 3.7mph
308 Winchester 220gr SMK wind dot value is 4.5mph
6.5 Creedmoor 147gr ELDM wind dot value is 4.7mph
338 Lapua wind dot value is 5.5mph
50 BMG 750gr wind dot value is 6mph
Now that you know the basics of MRAD long range shooting get out to your local range and throw some lead down range or better yet, find a friend with property and a 1000 yard view.
By Major Rob Robinette
US Army and Air Force (Retired)
Major Robinette was a Battalion Marksmanship Champion, Squadron Rifle Team Captain, Range Officer and F-15 Eagle pilot. Rob also spent 10 years as a federal law enforcement officer. He holds a Federal Firearms License and is the owner of Nolichucky Guns. He enjoys all forms of rifle and pistol use.