[ M16 4-Way Select Fire ] [ Gun Recoil ] [ Intro to Long Range Mil Dot Shooting ] [ QuickLOAD ] [ 300 BLK ] [ Leupold RX2800 ]
How to Build a Suppressor
By Major Rob Robinette
Warning: You must have a BATFE Form 1 with tax stamp before you start to legally build a suppressor. National Firearms Act (NFA) rules apply and you can do hard prison time for violating the law.
The first step in manufacturing a suppressor is getting permission from the Bureau of Alcohol Tobacco Firearms and Explosives (BATFE) by filling out a Form 1 and sending in $200 for a tax stamp. It will take three months to a year to get the tax stamp, so send it in early. You must wait to begin building your suppressor until you receive the tax stamp.
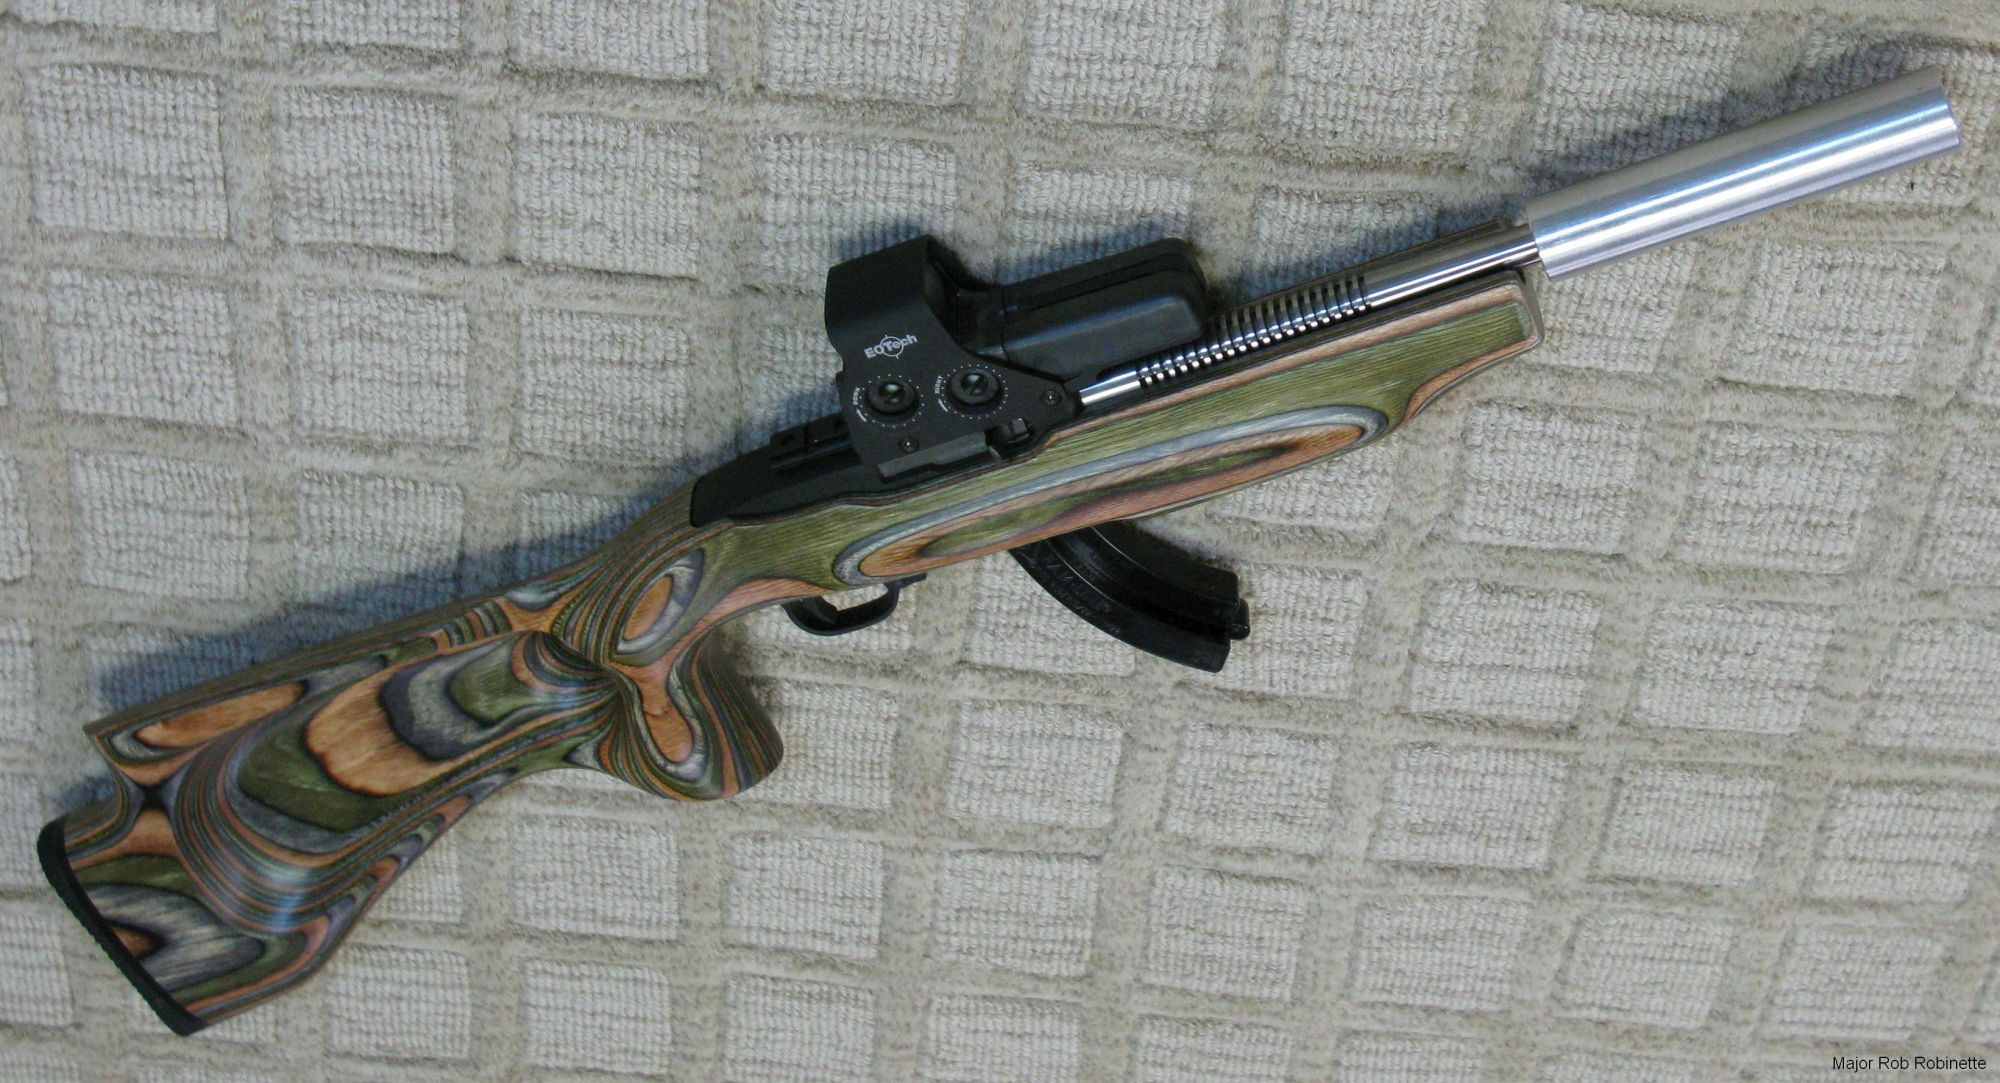
9mm Tavor X95 With Suppressor

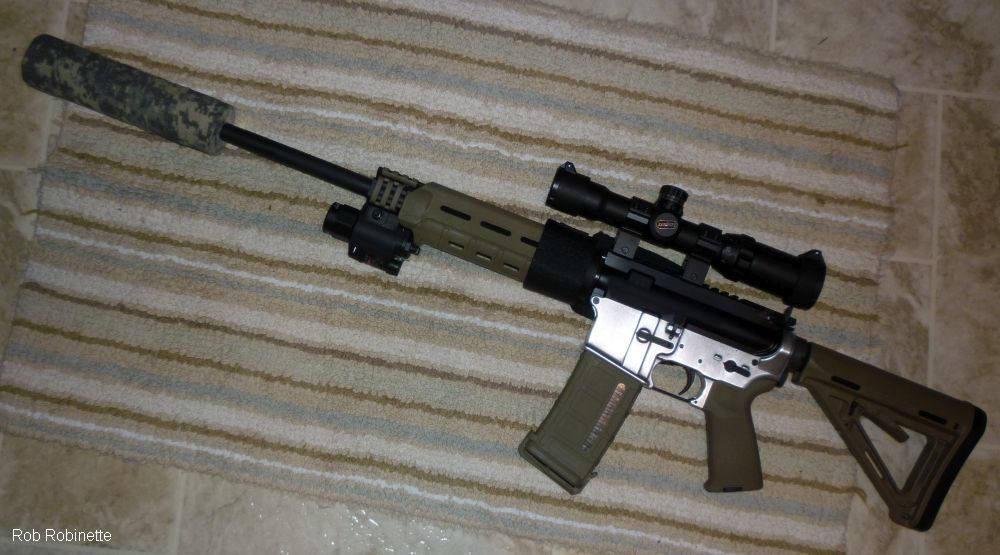
1 3/4 inch diameter by 5 inch long home-built suppressor. It has an odd 1/2"x36tpi barrel thread.
Table of Contents
Flashlight and Filter Suppressors
Removing Flash Hiders and Other Muzzle Devices
Introduction
In most states in the USA, if you are legal to buy a firearm, you are legal to build one. This applies to suppressors too with one caveat, you must get a tax stamp from the BATFE, Bureau of Alcohol, Tobacco, Firearms and Explosives. As you will see below, it is very easy to build a suppressor or silencer, but the penalty for possessing one without a tax stamp is a felony, and can lead to hard prison time.
A suppressor works by reducing the explosive sound caused by hot gas exploding out of the barrel muzzle when a bullet clears the barrel. A suppressor captures this high energy gas and routes it through baffles to allow gas expansion, gas cooling, and bleed energy. By the time the gasses emerge from the suppressor they have finished expanding, slowed and cooled enough to prevent a loud, sharp sound wave.
My homemade .22 suppressors are Hollywood quiet--quieter than a pellet gun--but many people are surprised by how loud suppressed 9mm and 45 ACP are. It's not like in the movies where all you hear is brass hitting the floor. My 300 Blackout suppressor is very comparable to my Silencerco Osprey 45 commercial suppressor, but they're much louder than a suppressed .22.
An additional benefit of using a suppressor is a significant reduction of recoil. A suppressor can reduce rifle recoil momentum by approximately 25% by slowing gas exit velocity. Pistol cartridges use relatively small amounts of powder and therefore generate less muzzle gas than rifles, so pistol suppressors have less gas to work with, and only reduce recoil momentum by approximately 5 to 10%.
The added weight of a suppressor also reduces recoil. Since pistols are light, the additional weight of a suppressor can greatly reduce recoil. The weight of a SilencerCO Osprey 45 ACP suppressor (0.65lb), installed on a fully loaded Glock 21 (full size 45 ACP at 2.47lb), will cut recoil energy by 21% due to the added suppressor weight. The same suppressor installed on a Glock 17 with empty magazine (full size 9mm at 1.55lb) will cut recoil energy by 30% due to weight alone. Total suppressor recoil reduction usually comes in around 25% for pistols and 15 to 40% for rifles. See my online Recoil Calculator for more info.
A pistol suppressor also reduces muzzle flip by making the weapon longer, which spreads its weight over a greater length, increasing its moment of inertia, thereby reducing rotation (muzzle flip is a rotational force).
A suppressed pistol with a red dot sight can be frighteningly accurate. Less noise, less recoil, less muzzle flip and a sighting system that can take advantage it.
Something else Hollywood gets very wrong is the sound of a bullet striking flesh--it's loud. When hunting with a suppressed rifle the reduction in muzzle blast allows you to hear the bullet strike. A shot to an animal's chest with a subsonic 300 Blackout round sounds like a two-by-four body smack. Hollywood really does need to pick up on this for a little extra realism.
Here's a short high quality stereo mp3 recording I made of a suppressed 300 Blackout shot where you can hear the muzzle blast, bullet whizzing by and the target impact. It was a 100 yard shot with the microphone about 70 yards downrange. The impact is as loud as the muzzle blast. The bullet was a 220 grain Sierra MatchKing boat tail bullet.
Speaking of subsonic bullet flight noise, the US Army's Silencers: Principles and Evaluations report found that streamlined boat tail bullets were much quieter in flight than flat base bullets such as the 30-30 Winchester or pistol bullets.
Since I have a Grizzly combo lathe/mill at home that I use for making race car parts, I already had everything I needed to make a suppressor. By the way, I have been asked about my lathe/mill, but I cannot recommend the Chinese made Grizzly combo lathe/mill because its tolerances are a little sloppy and I'm not familiar enough with any other lathes and mills to make a recommendation.
I decided to go with an all aluminum monolithic baffle design for a 300 Blackout suppressor as my first suppressor build. "Monolithic baffle" means the baffle is cut from a single piece of round metal bar. 300 Blackout uses standard .308 size bullets and has fast spin rifling to stabilize heavy subsonic bullets. It's very good at sending heavy 220 grain bullets at subsonic speeds downrange accurately. 300 Blackout can also be loaded for supersonic, and makes an excellent home defense and hunting caliber.
If I were building a suppressor for .308 supersonic loads, I would use at the very minimum, steel for the blast baffle (first baffle the bullet encounters). A single steel engine freeze plug can make an excellent supersonic rated blast baffle. They come in many different diameters. An all aluminum suppressor should only be used with subsonic ammunition. The fast moving gas from supersonic rounds will quickly wear away aluminum baffles. All 147gr 9mm and 230gr 45 ACP ammo are subsonic.
I have used the .30 cal suppressor pictured below on several .308 rifles using subsonic 175 to 220 grain Sierra MatchKing bullets and Trail Boss powder. Subsonic .308 loads are very mild, and a thick aluminum blast baffle is fully adequate. A 1:10" twist .308 barrel will stabilize a 220gr bullet at 1050fps. A 1:12 twist .308 barrel will not stabilize subsonic bullets. Low velocity bullets spin slower than full speed rounds, so a tighter twist is needed for heavy and slow subsonic bullets. Trail Boss pistol powder works well because it's fast burning for less muzzle blast, and it's a low density powder that will fill more cartridge space for more consistent subsonic velocity.
JBM Ballistics Bullet Stability Calculator
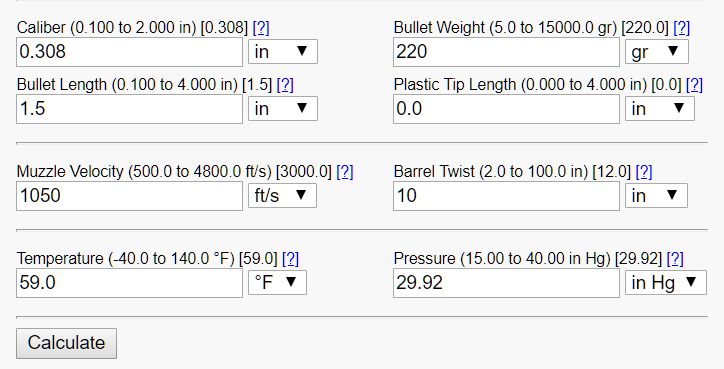
Use this bullet stability calculator to see if your rifle/bullet combination will stabilize a subsonic bullet. A stability value of > 1 will be stable.
***A note about pistol suppressors: Most semi-auto pistols are recoil operated (locked breech), and need a spring mechanism to decouple the barrel and suppressor to allow the pistol to cycle. A spring and piston decoupler, or "booster," allows the barrel to move back and down, without the suppressor initially moving with it. Because of this, the non-booster suppressors on this page will not work with recoil operated pistols. Blow back pistols, like most 22LR pistols, do not need a booster, so the suppressors on this webpage will work with them. Rifles, of course, will also work with the suppressors shown on this webpage.
Pistol caliber carbine rifles are a great fit for homemade non-booster suppressors because they do not use pistol style locked breach operation. Also their heavy, large diameter bullets hit hard at subsonic velocity, and their longer barrels allow fast burning pistol powder to completely burn for less muzzle blast. They make excellent home defense weapons for these reasons. I absolutely love my Tavor X95 bullpup in 9mm with a homemade suppressor, but a 45ACP carbine would add some stopping power.
Since 5.56/223 is such a popular caliber, many people are interested in adding a suppressor. Suppressors work well for making supersonic 5.56 hearing safe, but I'm not a fan of subsonic 5.56. When you slow a 5.56 bullet to subsonic speeds you end up with the energy of a 22LR. Subsonic 5.56 will not cycle a semi-automatic action either so you end up with the equivalent of a bolt action 22LR. It is difficult to make a home made suppressor that can stand up to the pressure of normal 5.56 ammo so consider going the commercial route for a 5.56/223 suppressor.
I was really surprised by how quickly suppressed semi-auto rifles gum up. I have an NFA M-16, and when run at full-auto with a suppressor it will only run for about 200 rounds before it will stop functioning due to a dirty action. My rifle's primary failure mode is the hammer and hammer pin get dirty and slow the hammer action until it won't set off the primer. I use fixed, non-rotating hammer and trigger pins to prevent receiver wear from spinning pins, so a gummed up hammer pin works directly against hammer movement. I get a new round in the chamber but no ignition at hammer fall. If you plan to shoot a lot of suppressed AR rifle, then plan to clean it after every shooting session.
The problem with suppressed semi-auto rifles, especially the AR due to its complicated action, is the suppressor holds hot, expanding gasses until the bolt opens and the gas pressure in the suppressor shoots the dirty gas down the barrel and out the action. I thought that using a piston actuated AR would solve this problem but the hot gas from the gas tube is insignificant compared to the large volume that shoots down the barrel into the action when the bolt opens. Semi-auto pistols don't gum up nearly as quickly as ARs due to their relatively simple actions.
Suppressed ARs also have a problem with gas shooting out the charging handle into the shooters eye. You can change out the hollow charging handle for a gas blocking charging handle to reduce gas-eye but I highly recommend you always wear shooting glasses when shooting suppressed ARs.
Since subsonic bullets are limited to a velocity of around 1050 feet-per-second (any faster and they become transonic and make noise), the best way to add stopping power is to increase the bullet's diameter and weight. That's why I'm a big fan of suppressed 45ACP, because it's hard to beat a 230 grain 45 caliber bullet for short range subsonic stopping power. For even more stopping power 45ACP +P in 200 to 230 grain jacketed hollow point can be used for maximum energy transfer at subsonic velocities, like this Buffalo Bore 45ACP +P 200gr JHP with 490 foot-pounds of muzzle energy. Buffalo Bore +P 230gr JHP and Hornady +P 220gr JHP Critical Duty are also good choices for subsonic personal defense ammo. +P ammo will usually be louder through a suppressor than standard ammo but the extra stopping power delivered may outweigh the drawback of extra noise.
45ACP defensive ammo is designed to fully expand at subsonic velocity, so it's a proven, inexpensive solution with excellent stopping power. The cost of 147gr 9mm subsonic ammo can be higher than 45 ACP ammo too.
If you like the mild recoil of a 9mm pistol (I know I do), keep in mind that a suppressor greatly reduces recoil and muzzle jump due to added weight and the slowing of muzzle gas. A suppressed 45ACP pistol shoots like a non-suppressed 9mm. Adding a 0.5lb suppressor to a 2lb semi-auto pistol will cut recoil by 20% due to the added weight alone. The suppressor's slowing of muzzle gas will cut another 10 to 20% of recoil. A pistol suppressor also reduces muzzle flip, by making the weapon longer, which spreads its weight over a greater length, increasing its moment of inertia, thereby reducing rotation. This is another reason I like suppressed 45ACP for home defense--it shoots soft.
For hunting distances, I recommend 300 Blackout because of the excellent BC and aerodynamic efficiency of the 200 to 220 grain subsonic 30 caliber bullets. There are several 300 Blackout subsonic hunting rounds available that will fully expand at subsonic velocities, such as this Hornady and Underwood ammo.
I'm a big fan of holographic and red dot sights for subsonic weapons due to the typical short ranges used. Pistol iron sights are also a good match for subsonic shooting. I'm also a fan of putting a high-quality flashlight like the Surefire Turbo on my home defense pistols. Its added weight will reduce recoil.
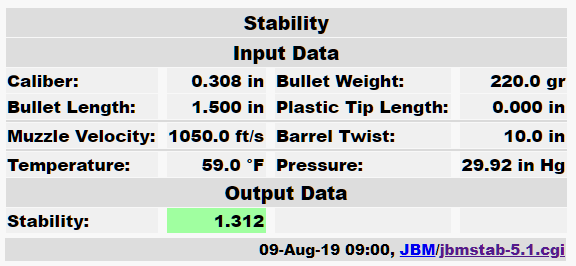
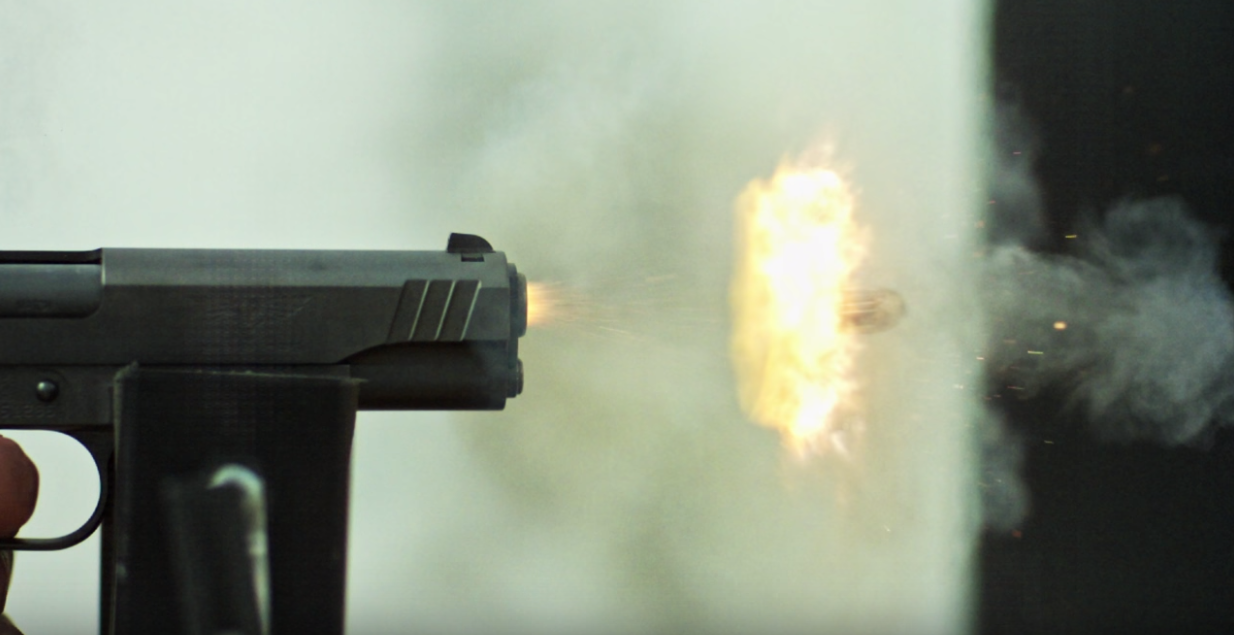
If you hand load, then try faster burning powders for your suppressed ammunition. If your powder is still burning when the bullet clears the barrel it will cause extra noise. Compare the slow burning powder in the 45ACP pistol below to the 9mm with completely burned gasses. Trail Boss pistol powder works well in large case rounds like 308Win because it's thick and fluffy and takes up more case capacity for more consistent and accurate burn. If you don't hand load, then be sure and try a variety of ammo to find the quieter, quicker burning ammo brands.
45ACP With Slow Burning Powder
You can see the bullet just in front of the flame. Faster burning powder will reduce or eliminate the exterior flame and reduce noise, both with and without a suppressor.
9MM With Fast Burning Powder
This 9mm ammo would be much quieter through a suppressor due to the powder being fully burned in the barrel.
.22 Caliber Suppressor On Sig 1911-22
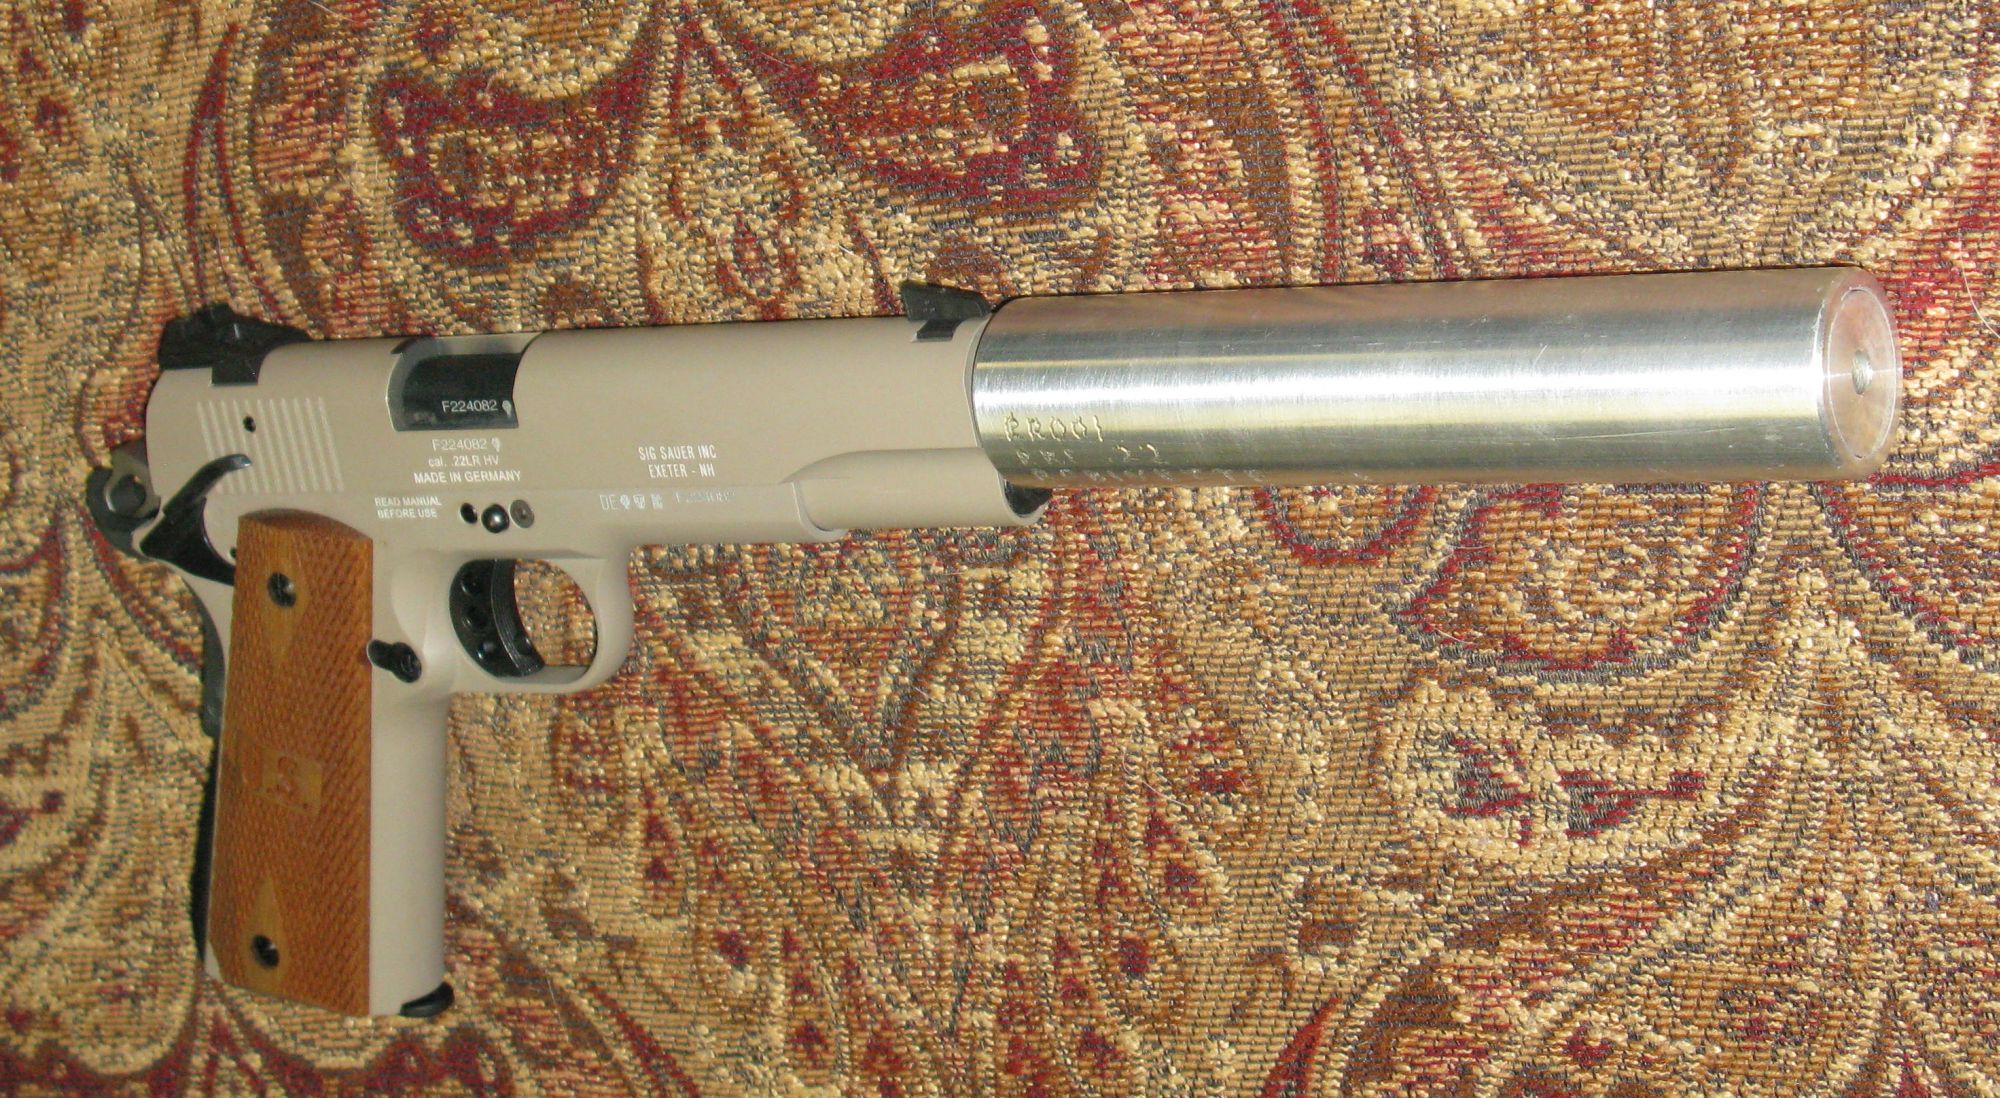
1 1/4 inch by 7 inch long suppressor. This pistol's blow back action has a fixed barrel so no suppressor "booster" is required.
These are two of my favorite books on suppressors:
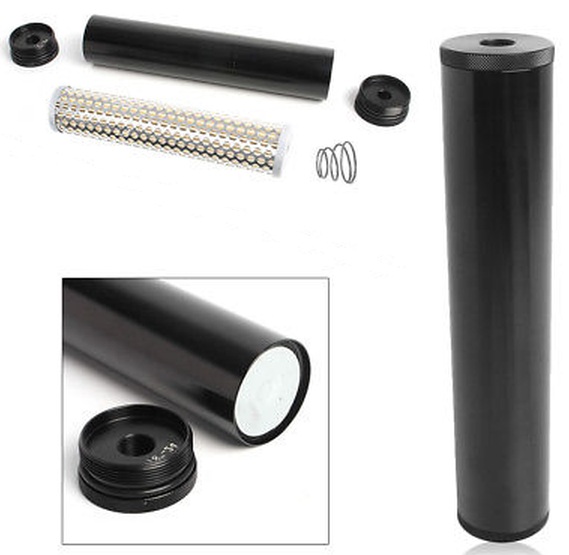
Raw Materials
I used 1 1/2 inch outside diameter aluminum round bar for the 300BLK and 9mm baffles, and 1 1/2 inch inside diameter aluminum round tube for the baffle covers. The specs on the aluminum round bar are: 1 1/2 inch diameter 6061 T6 aluminum round Stock # R3112 from www.metalsdepot.com. The 1 foot long bar only costs $17. The 300BLK suppressor is 8 inches long. The tubing for the baffle cover is 1 3/4 x .125 (1.75" diameter with .125" wall and 1.5" inside diameter) 6061 T6 round tube Stock # T3R134125. This size suppressor is what I recommend for all calibers except .22 or .17.
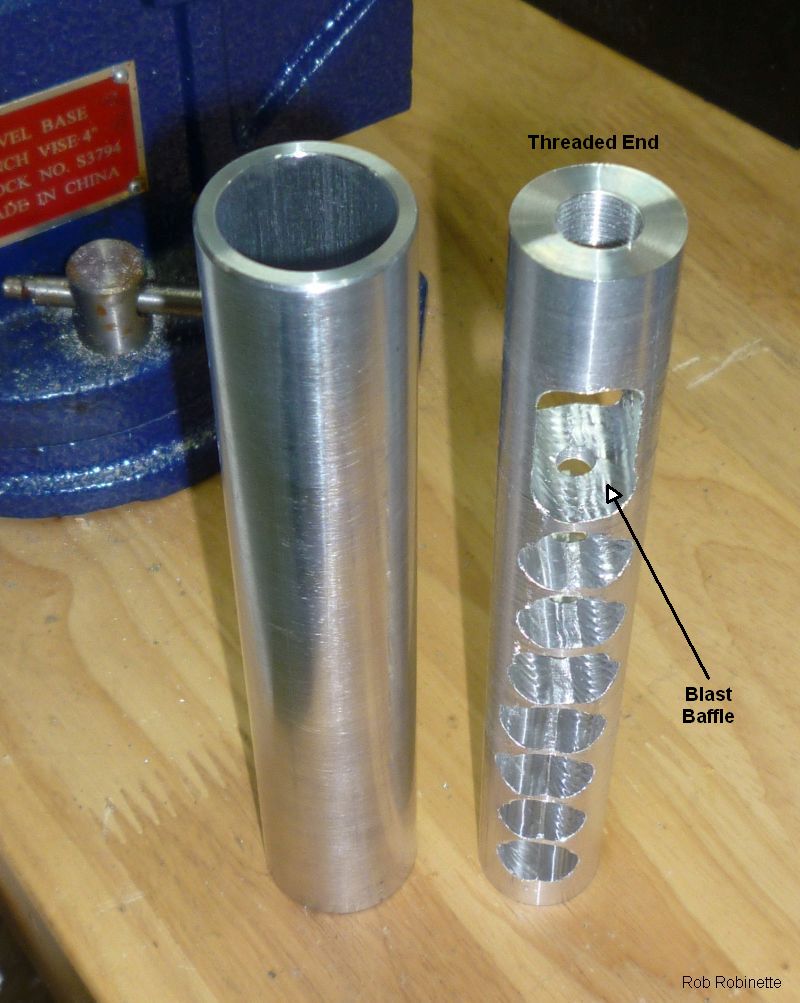
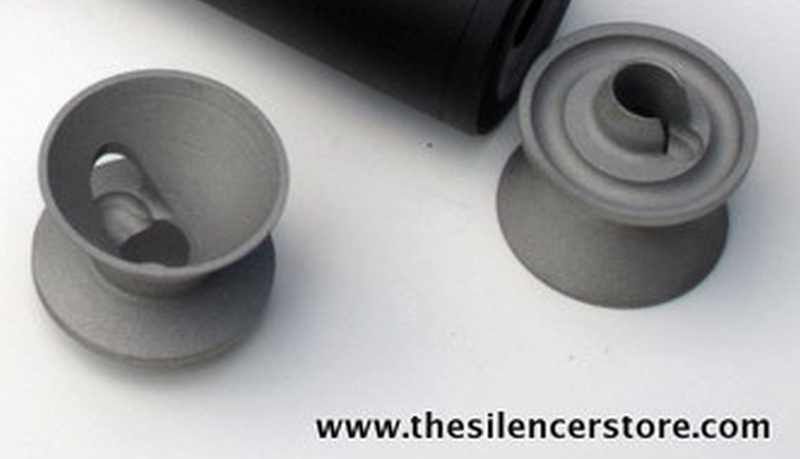
Baffle Cover & Baffle
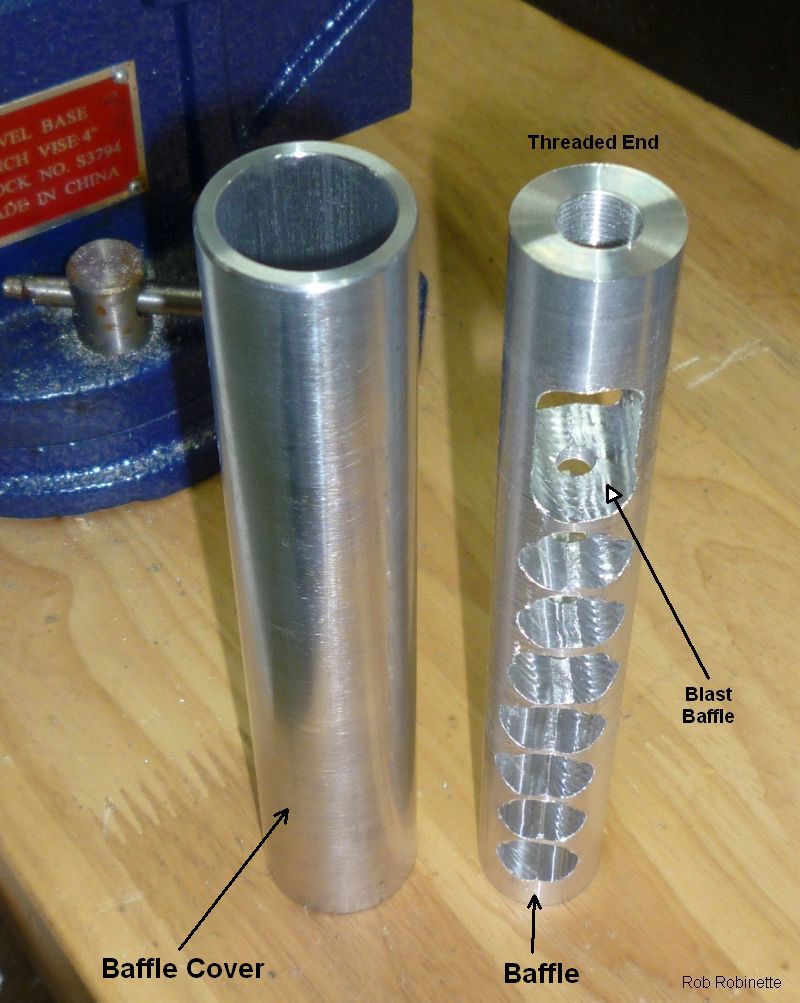
The baffle cover tube on left slides over the baffle.
For my .22 caliber suppressors, I use a 1 inch outside diameter 6061 T6 aluminum round Stock # R31 and 1 1/4 x .125 (1.25" diameter x .125" wall and 1" inside diameter) round tube Stock # T3R114125. I have built .22 suppressors at 6 and 7 inches long and prefer the extra suppression the 7 inch length gives. The extra length really helps quiet a short pistol barrel.
MetalsDepot.com Order
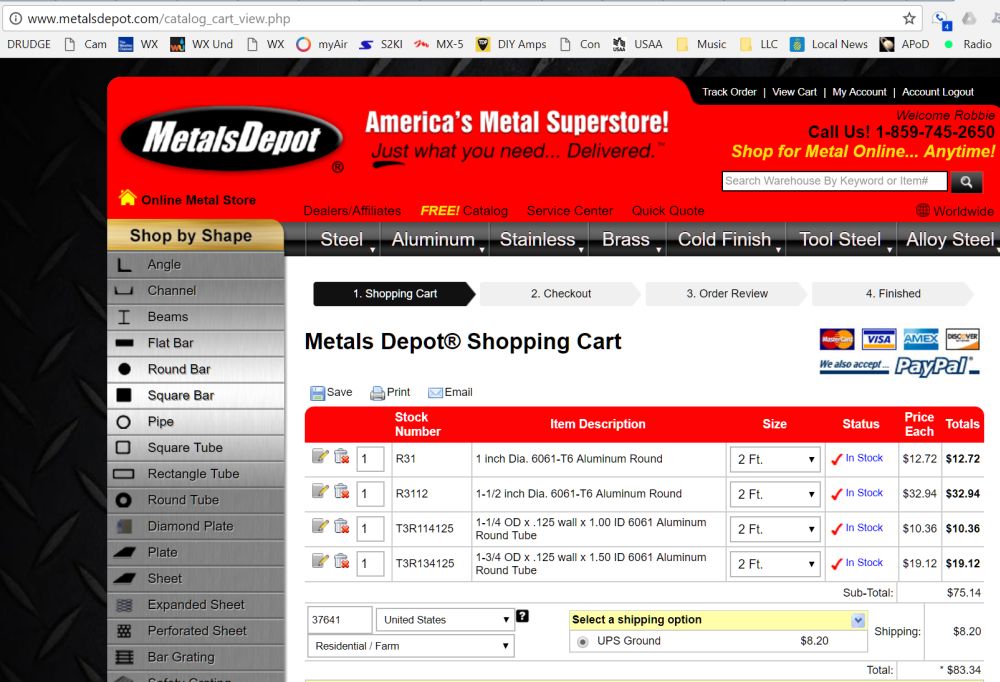
The first and third items are for a 1 1/4" diameter .22 suppressor, the second and fourth items are for a 1 3/4" diameter 300 Black suppressor. 1 foot long round bars are all that is needed to make a suppressor. Note how the outside diameter (OD) of the baffle matches the inside diameter (ID) of the tube.
You can also split the difference between these two size suppressors and use a 1 1/2" outside diameter x .125" wall x 1.25" inside diameter tube (stock # T3R112125) with a 1 1/4" diameter aluminum round bar (stock # R3114). This size suppressor will have to be longer than a 1 3/4" diameter suppressor for the same sound suppression but it will look sleeker.
Basic Steps to Build a Suppressor
To manufacture a monolithic baffle suppressor the basic steps are:
Start with a solid round metal bar to make the baffle
Cut the bar to length
Face both ends of the baffle on a lathe
Drill and tap one end of the baffle where the baffle will screw onto the threaded barrel
Drill the bullet path through the baffle
Drill/mill out the gas chambers in the baffle
Clean the bullet path with the bullet path drill bit
Cut the baffle cover tube to length
Face the ends of the baffle cover tube on the lathe
Finish the baffle cover tube on a lathe or simply polish it with steel wool
You may need to remove some material from the outside of the baffle so that it will fit inside the aluminum tube
Insert the completed baffle into the baffle cover tube and seal. If you have difficulty knocking the baffle into the cover tube with a plastic mallet, then remove more metal from the outside of the baffle to slightly reduce its diameter. The seal can be a press fit, welded, epoxied, one or more small screws, or even duct tape. .22 suppressors work fine with a press fit but larger caliber's will need something to keep the outside tube from leaking gas and shifting position under fire. Two or three small screws around the end of the suppressor works well for this purpose.
Building a Suppressor
The pictures below show three suppressors being manufactured, an 8" x 1 3/4" 300 Blackout, a 5" x 1 3/4" 9mm and 7" x 1 1/4" .22 caliber. I have Form 1's and tax stamps for all three.
I use a chop saw to cut the round bars and tubes. A vice and hack saw can also be used because facing the bars and tubes in a lathe will true them up.
Facing the Suppressor Baffle On the Lathe
Facing the suppressor baffle ensures a precision fit and alignment when the suppressor is screwed onto the rifle barrel. Face both ends of the baffle and tube. Facing the baffle and tube will also make it easier to mount them square in the lathe.
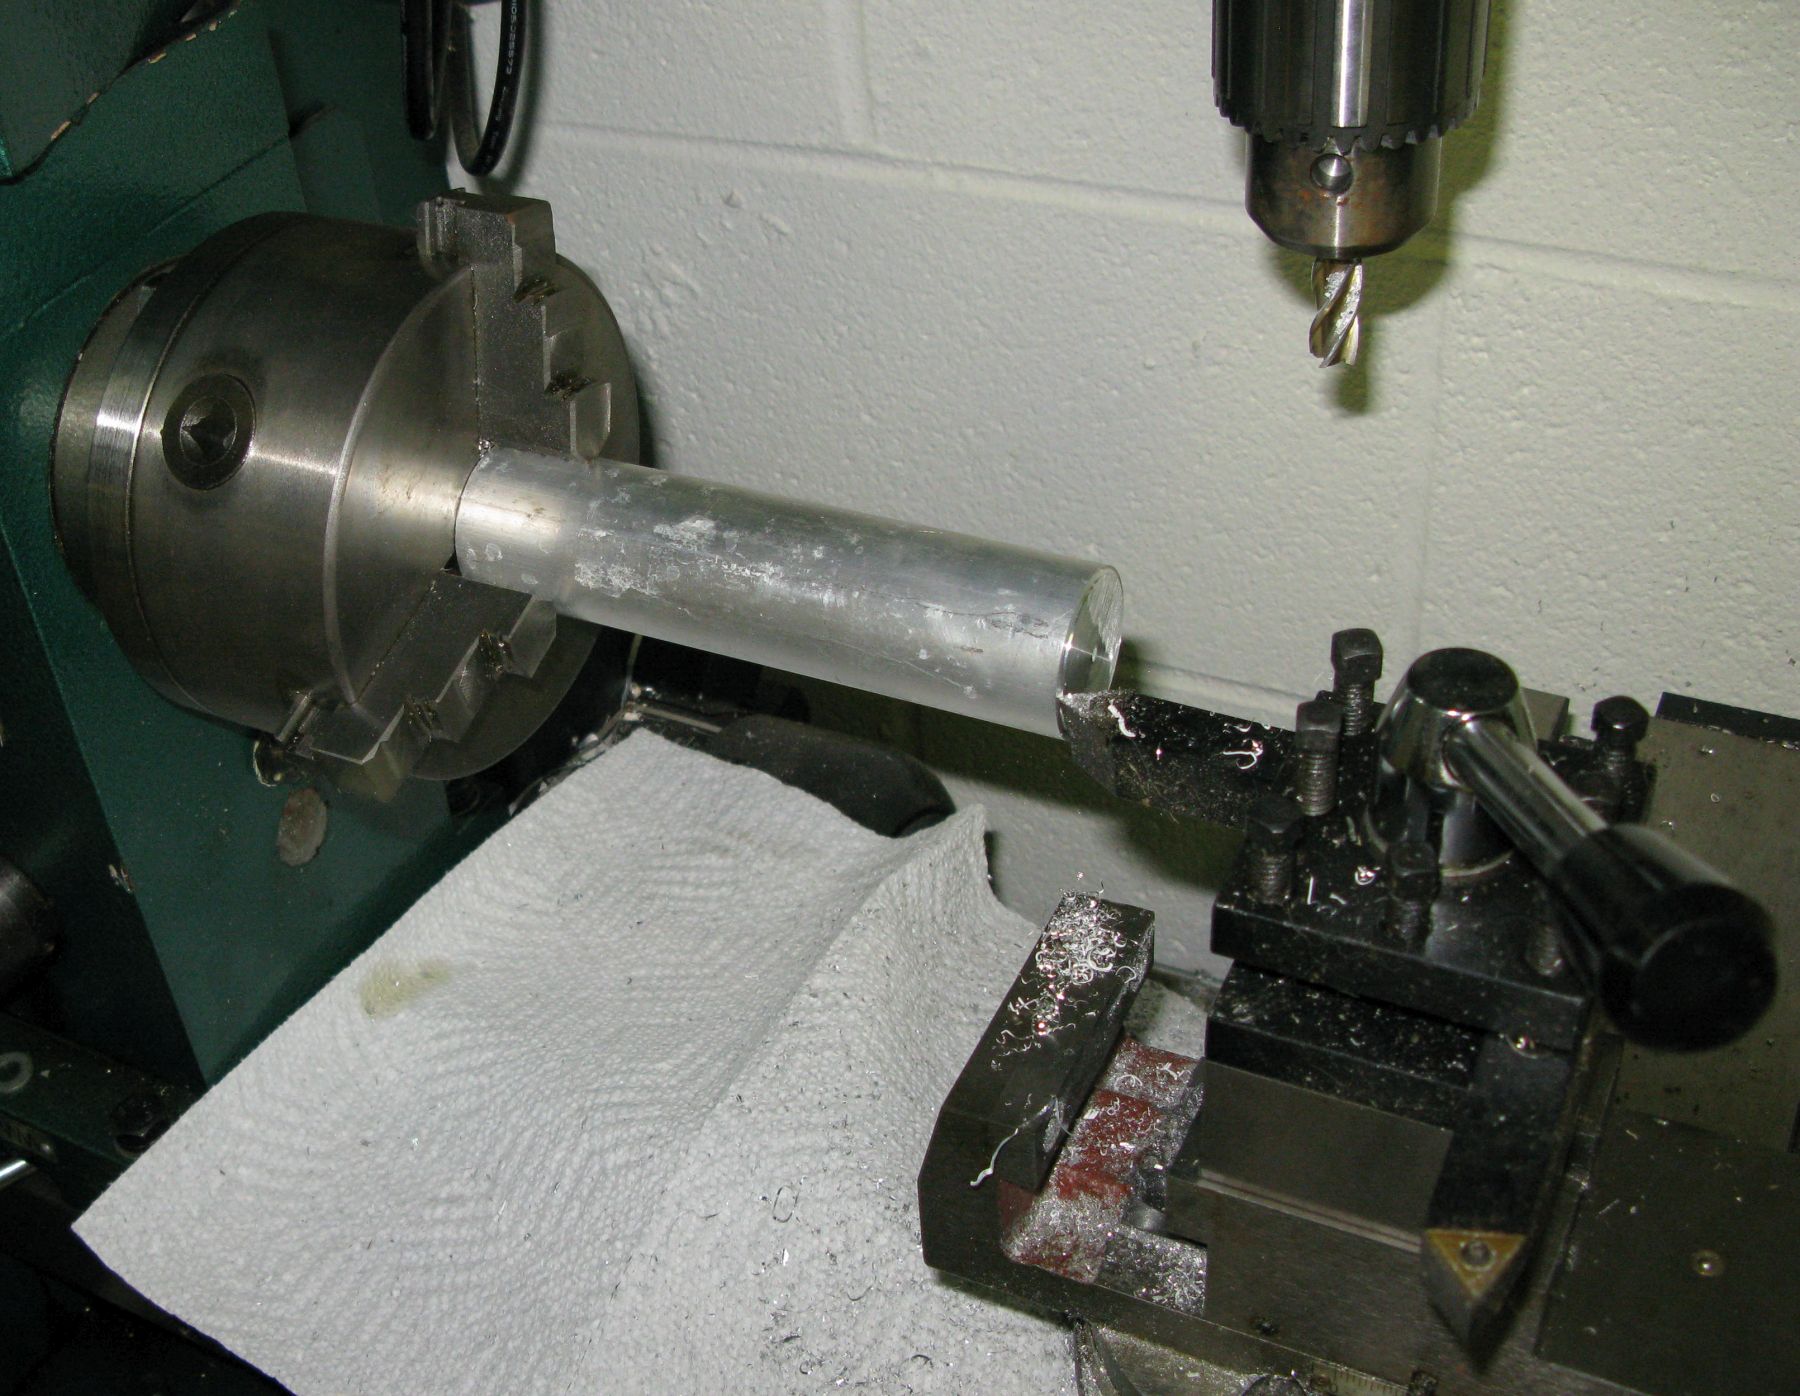
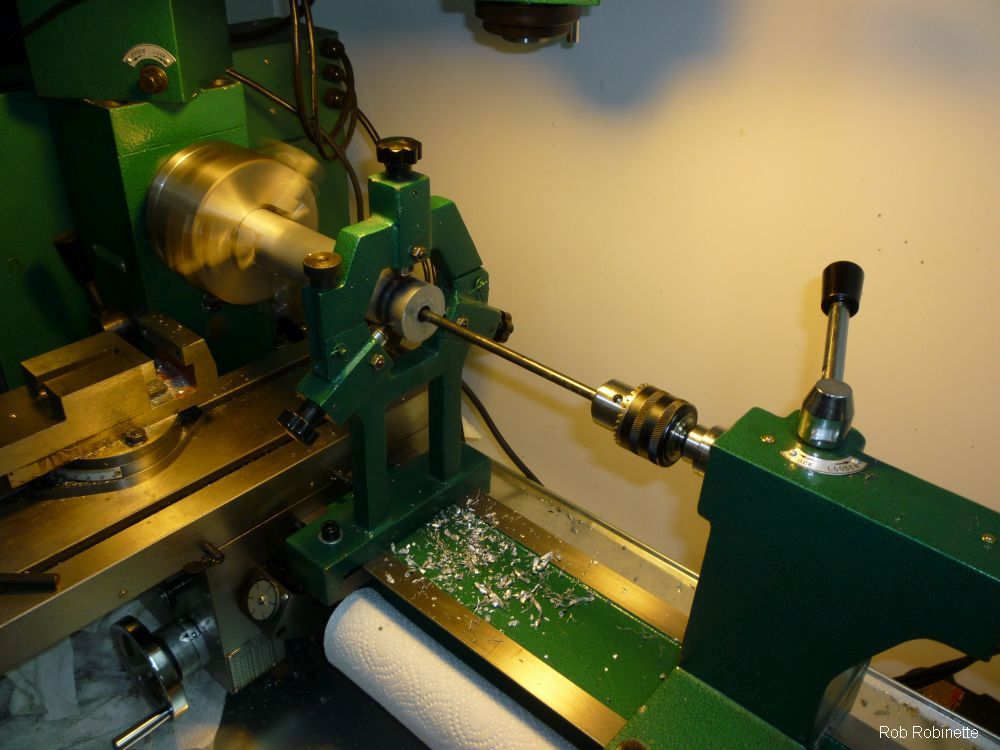
Drill the Barrel Thread Tap Hole
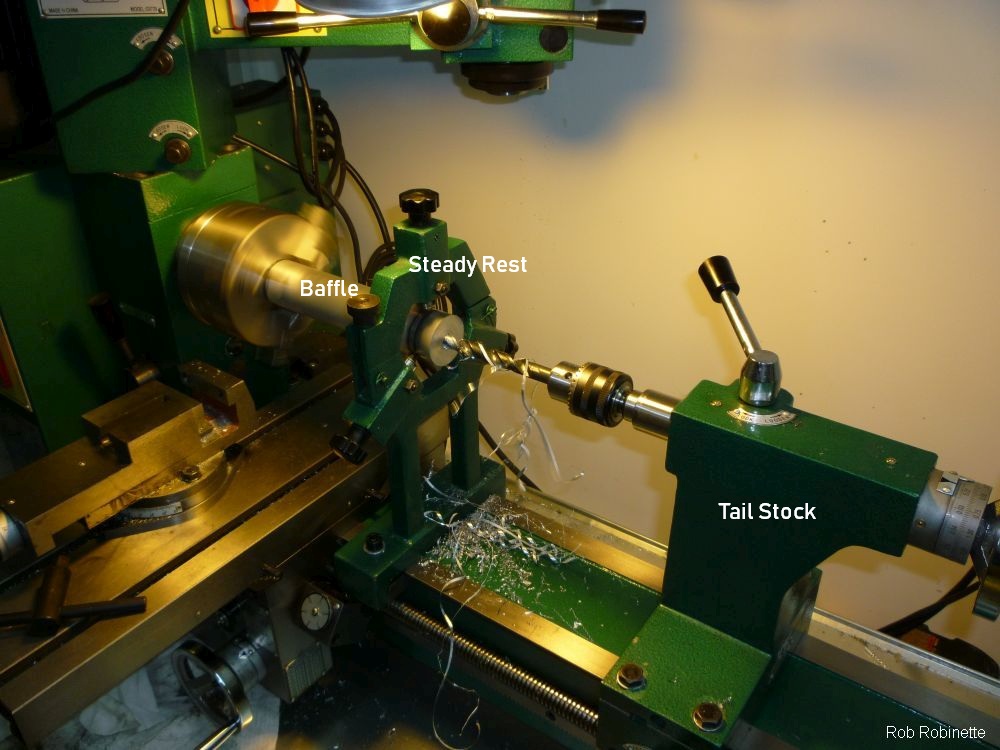
To prepare for tapping the barrel thread, I drilled the thread end of the baffle. The depth of this hole isn't critical because it will lead into the large blast baffle, but it needs to be deep enough to allow the suppressor to screw onto all the thread offered by your rifle barrel. Longer baffles will need to be supported on the lathe by a steady rest (shown holding the baffle at near end). The tail stock holds the drill bit stationary and in perfect alignment while the lathe spins the baffle.
Standard Barrel Threads & Tap Sizes
Thread sizes are given by diameter and threads per inch or mm. "1/2x28" means 1/2 inch diameter and 28 threads per inch (tpi). "M13x1LH" means 13mm diameter and 1 thread per mm left hand.
.22/.223/5.56 use a 1/2x28 tap and a 7/16 (.4375) inch drill bit.
The Steyr Aug uses a metric M13x1LH (13mm x 1 thread per mm left hand) and a 12mm drill bit.
H&K 5.56 uses a M15x1 and a 14mm drill bit.
Sig Sauer Mosquito and GSG Firefly use a 9mmx0.75 and an 8mm drill bit.
.308 and 300BLK use a 5/8x24 tap and 9/16 (.5625) inch drill bit.
6.5 Creedmoor, 6.5 Grendel and most other 6.5 & 6.8mm rifles use the .308 standard 5/8x24 tap and 9/16 (.5625) inch drill bit.
7.62x39 AK-47 typically uses a metric M14x1LH (left hand) and a 13mm drill bit.
9mm uses a 1/2x28 tap (same as .22 and 5.56) and a 7/16 (.4375) inch drill bit.
The Tavor 9mm uses 1/2x36 tap, but still uses a 7/16" drill bit.
H&K and Sig 9mm (including MPX) use a M13.5x1LH (left hand) and a 12.5mm drill bit.
338 Laupa Some use the .308 standard 5/8x24 tap and a 9/16 (.5625) inch drill bit, while others, like the Ruger Precision Rifle, use a 3/4x24 tap and a 11/16" drill bit.
.40 cal uses 9/16x24 and a 1/2" (.5") drill bit
H&K .40 uses a M14.5x1LH and a 13.5MM drill bit.
45 ACP uses a .578x28 (37/64x28) inch and a 17/32" (.53125") drill bit.
H&K 45 USP Tactical uses M16x1LH and a 15mm drill bit.
H&K Mark 23 Socom uses M16x1RH and a 15mm drill bit.
Optional Boring For the Tap
Boring the tap hole to the pre-tap size. This is not necessary if you have the correct size drill bit as listed above.
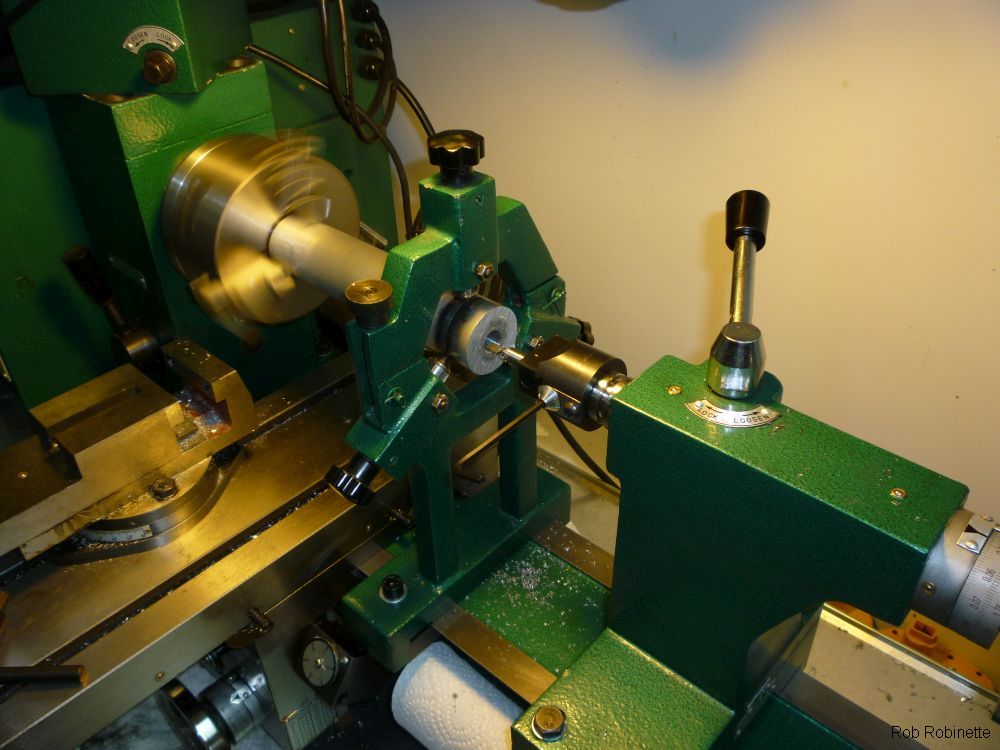
Tap the Baffle Thread
Tapping the baffle--Do not use lathe power to do this. I used the tailstock to simply hold the tap for perfect alignment with the bullet path. The tailstock is loose so it can be pushed by hand into the baffle. I turned the lathe chuck by hand to start the tap. I did the last half of the tap using a standard tap hand wrench so I could feel when the tap bottomed out. I used a 5/8x24 threads per inch (tpi) tap to match the thread on my 300 Blackout barrel.
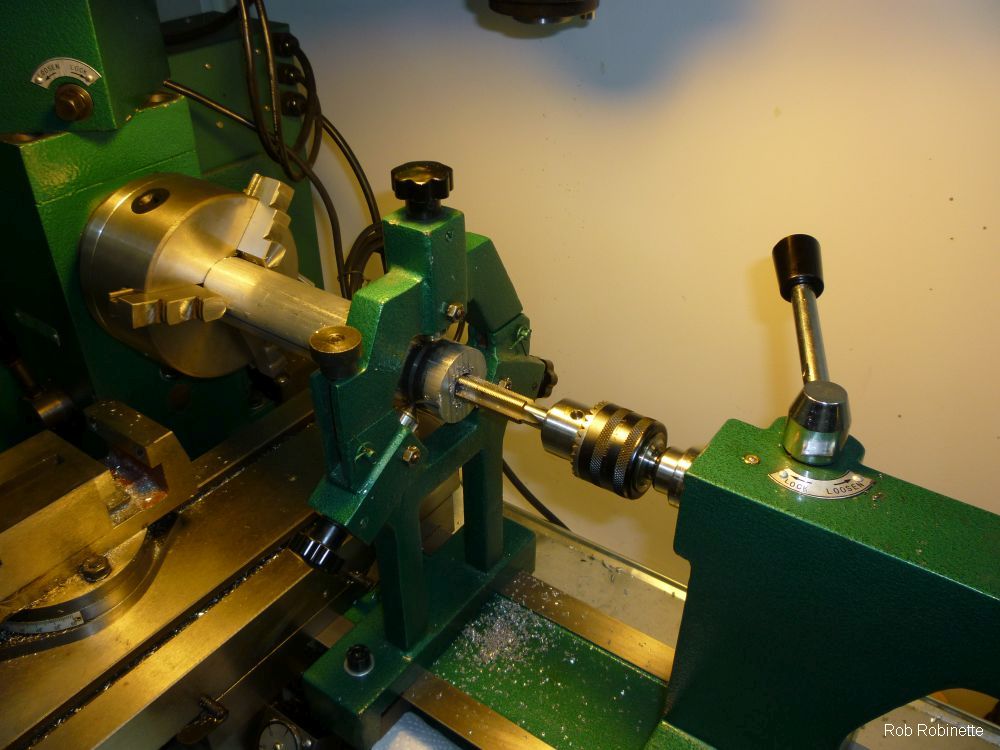
Finish the Tap By Hand
Finish the tap by hand so you can feel the tap bottom out. This suppressor is for my Tavor X95 9mm bullpup rifle so the thread is an odd 1/2" x 36 threads per inch. Shorter suppressors like this can be worked on the lathe with only the lathe chuck holding the baffle (no steady rest needed).
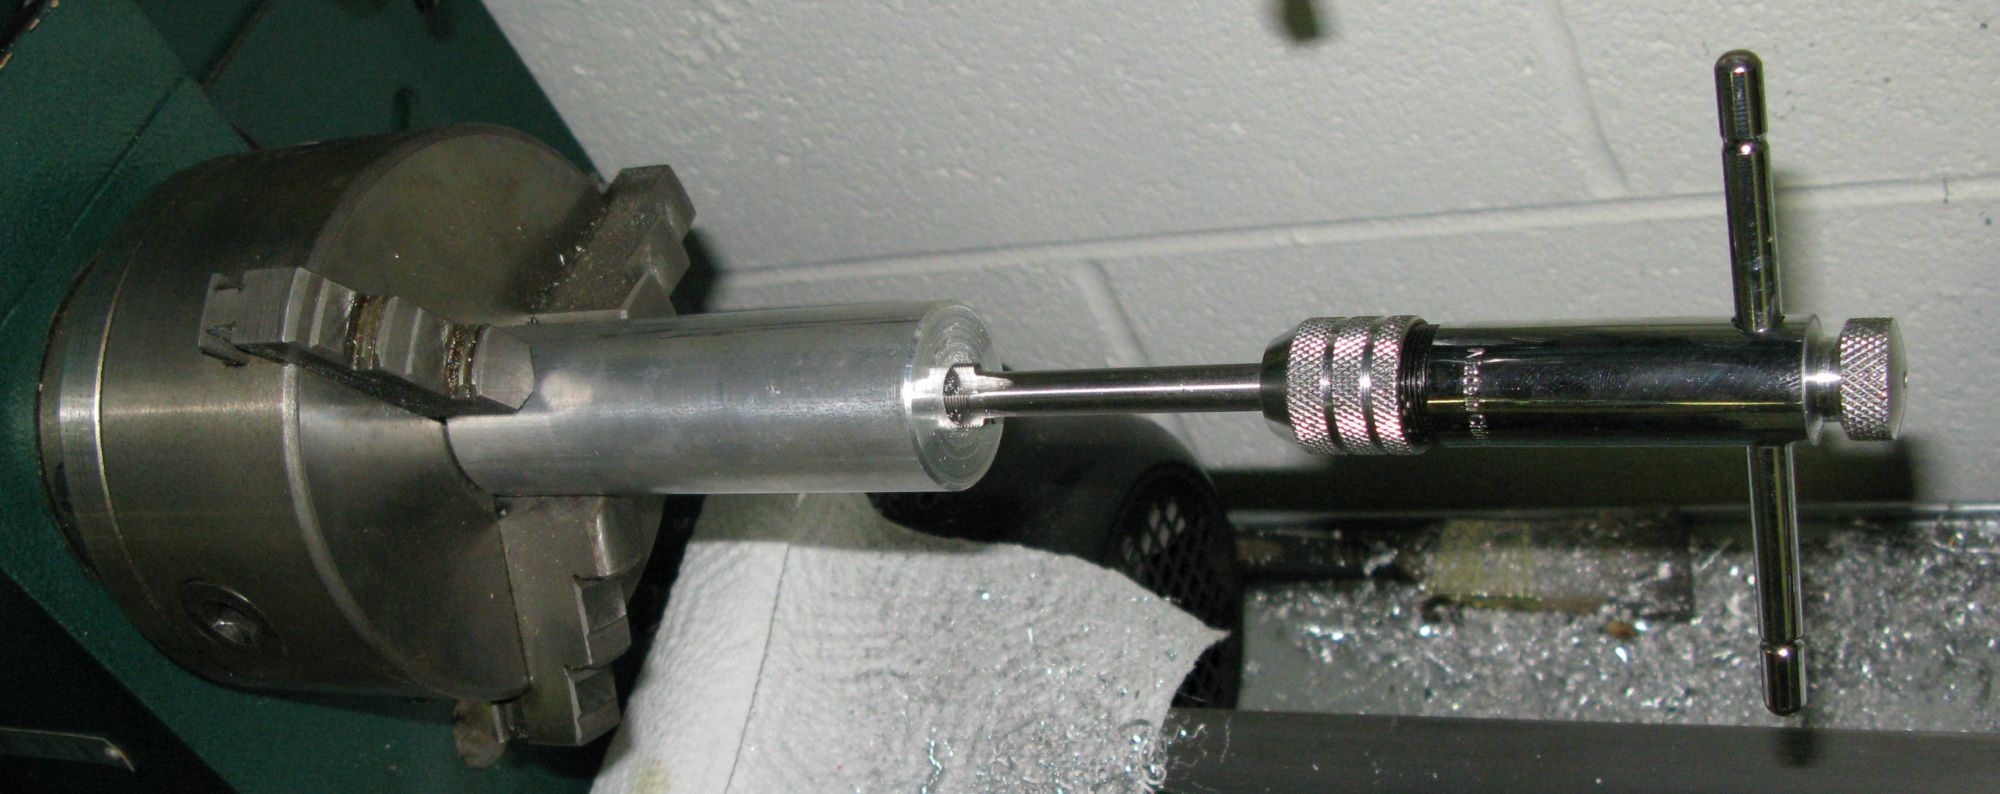
Drilling the Bullet Path
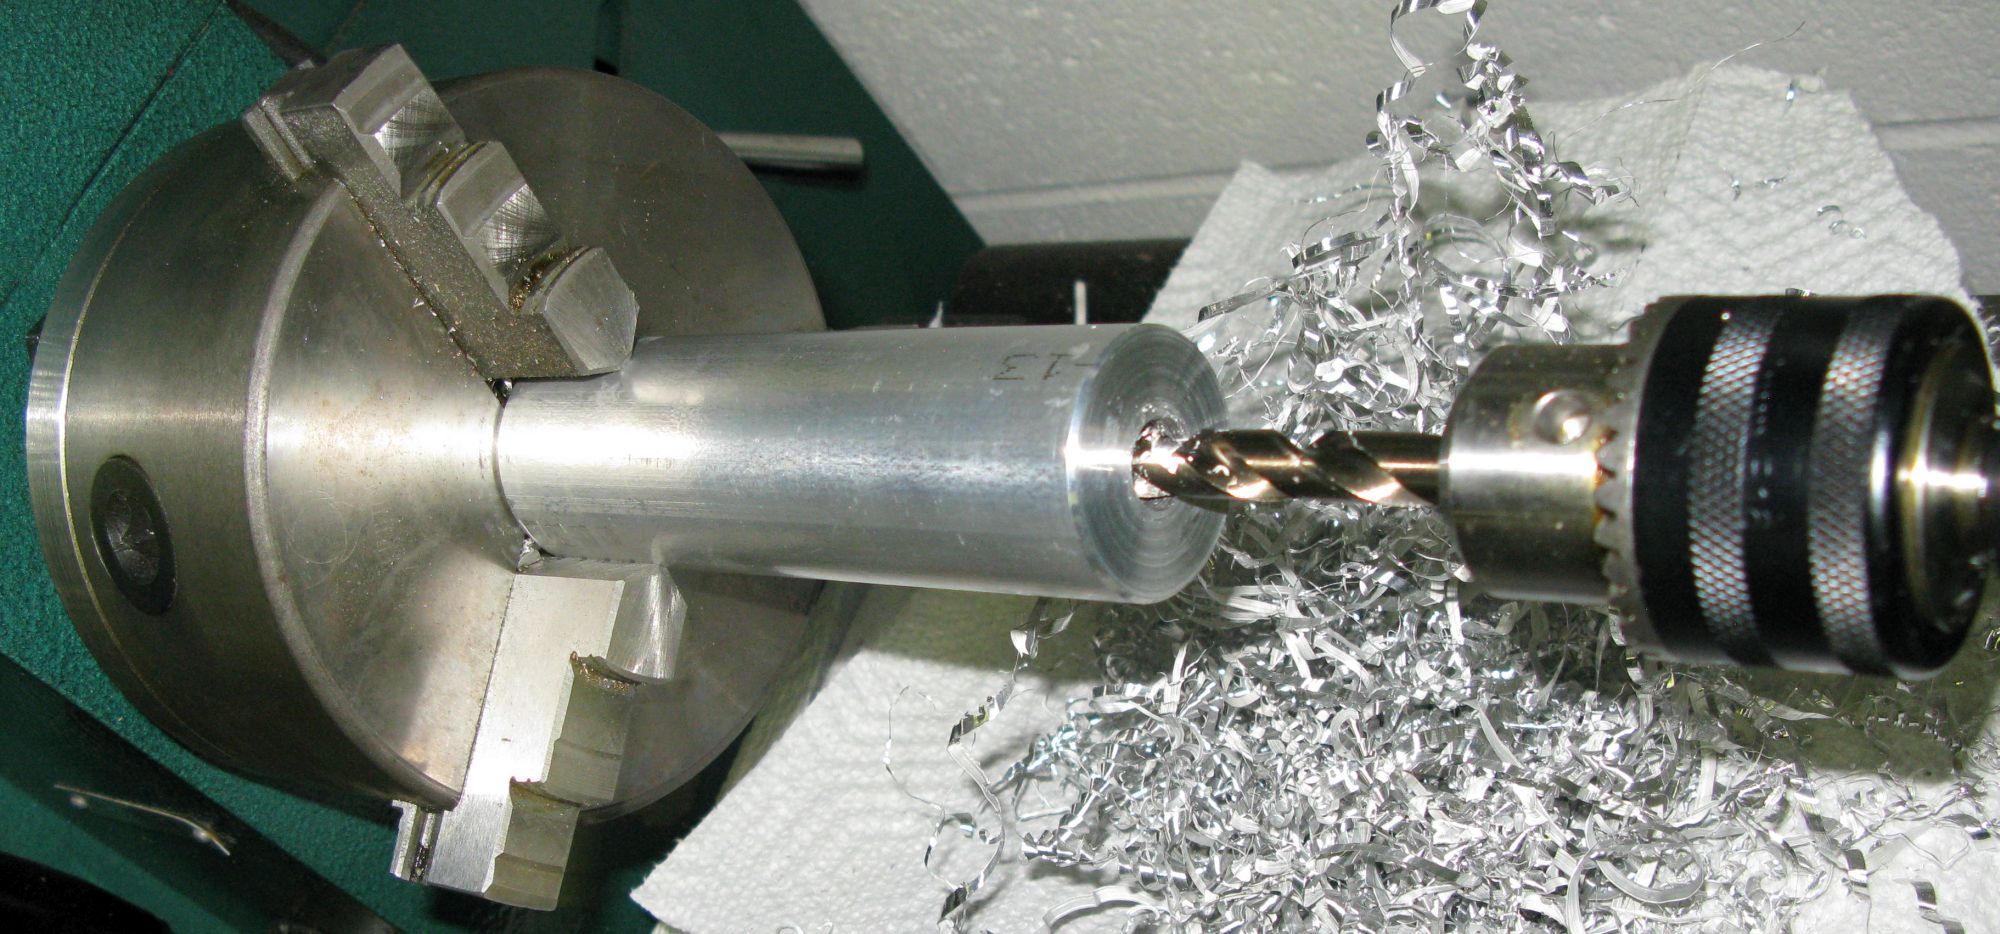
You can flip the suppressor baffle around and drill from both ends to keep from having to use a long drill bit. The bullet path drill bit will be smaller than the thread hole--see below for bullet path drill bit sizes. The drill bit is held stationary by the tailstock and the lathe spins the baffle.
Using An Extra Long Bullet Path Drill Bit For Long Suppressors
Drilling the bullet path the full length of the suppressor baffle. Start the bullet path hole with a normal length drill bit for more precision then switch to a long bit when needed. I got the long 11/32" drill bit at Home Depot.
The following bullet path diameters should be considered the minimum size. The PrecisionRifleBlog muzzle brake test found that using the correct caliber muzzle brake isn't that important. Shooting 6mm through a 7.62mm muzzle brake was only 1 to 3% less effective in reducing recoil compared to the same brake in 6mm. This also applies to suppressors so when deciding on the bullet path diameter it's better to err on the side of caution and drill a larger bullet path through the suppressor. This is why it has become popular to purchase a 45 caliber suppressor and use it on smaller calibers such as 9mm and 40S&W to good effect.
300BLK and .308 bullet diameter is .308 inch so use an 11/32" (.344") drill bit for the bullet path through the baffle.
.22 and .223, 5.56 and 224 Valkyrie bullet diameter is .224" so use a 1/4" (.250") drill bit. If your suppressor is longer than 7 inches you may want to go with a larger 9/32" (.281") drill bit for more clearance at the exit hole.
9mm bullet diameter is .355 so use 3/8 (.375") bullet path. If your suppressor is longer than 8 inches you may want to go with a larger 13/32" (.406") drill bit for more clearance at the exit hole.
.40 cal and 10mm bullet diameter is .40" so use a 7/16" (.4375") drill bit.
45 ACP bullet diameter is .451 so use a 1/2" (.500") drill bit.
These are my favorite books on the AR-15, M16 and M4:
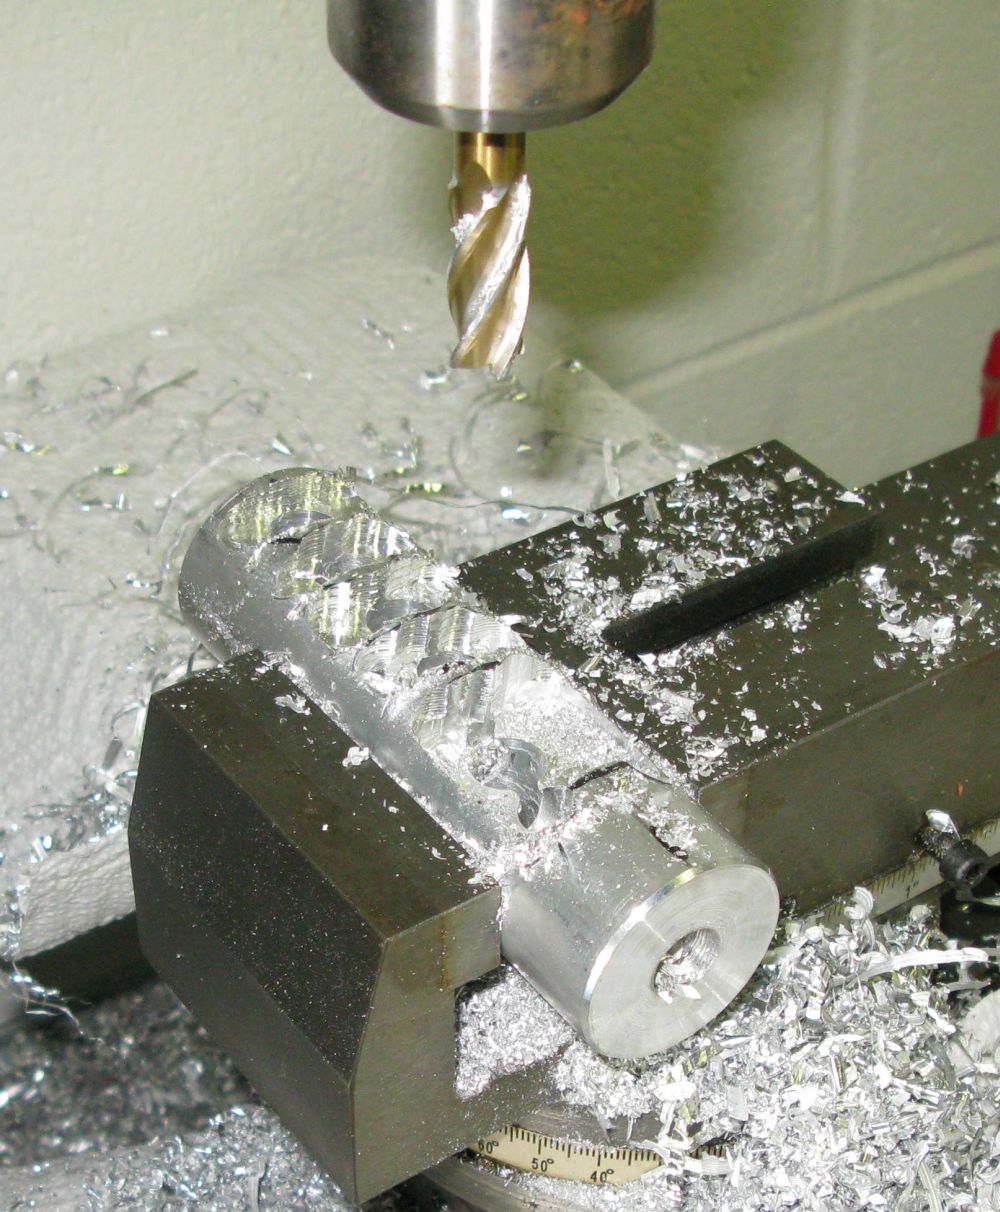
Drill the Baffle Gas Chambers
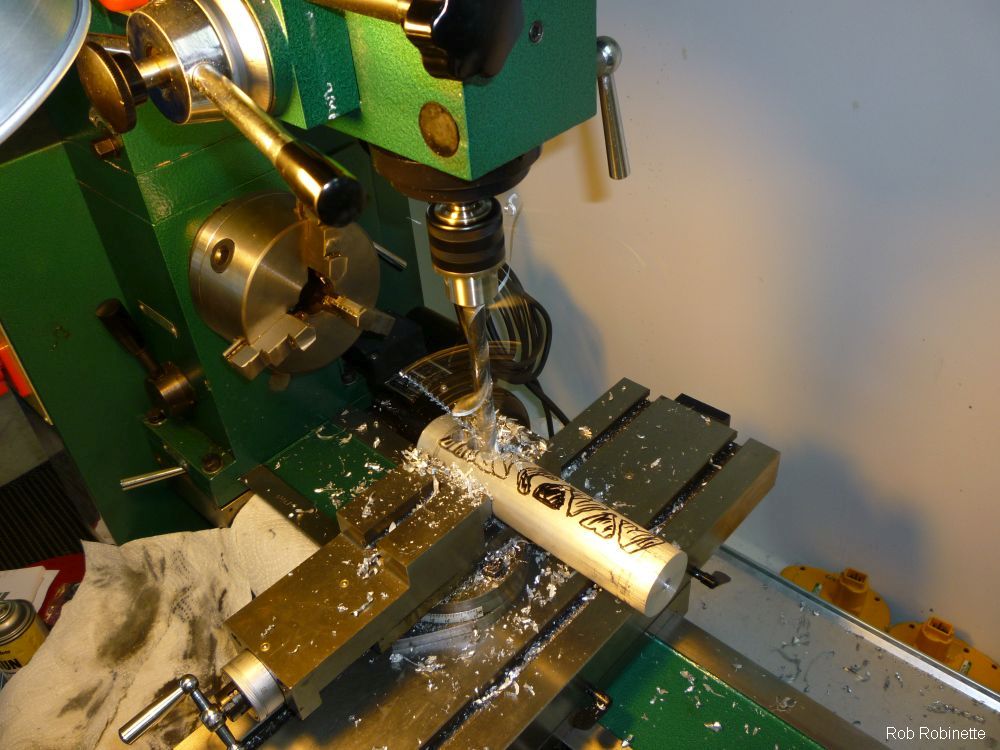
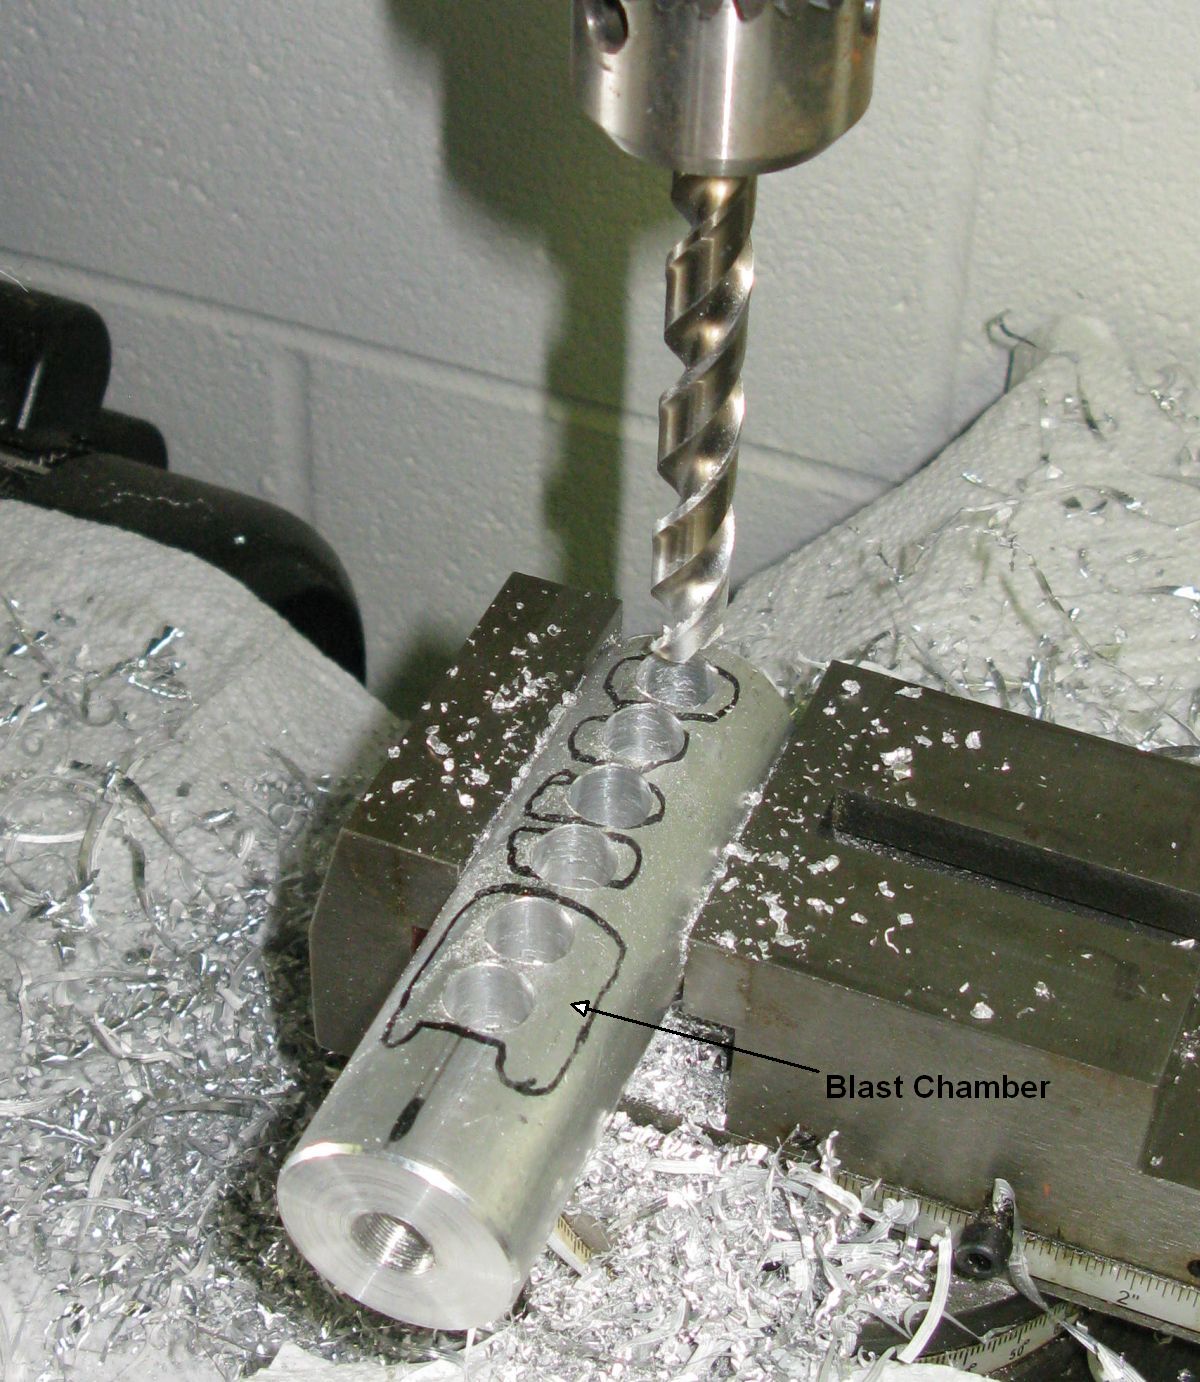
Drilling the baffle chambers. Note the marked baffles to be milled out. I started with a drill bit then finished up with an end mill (below) to finalize the baffle chamber shapes. You must leave enough metal from the barrel end of the suppressor to the blast chamber (first chamber) to allow the suppressor to screw onto the entire length of thread on the end of your barrel. In other words, don't cut the blast baffle too close to the end of the suppressor.
Milling the Baffle Gas Chambers
Clean the Bullet Path
Cleaning up the bullet path after milling using the bullet path drill bit.
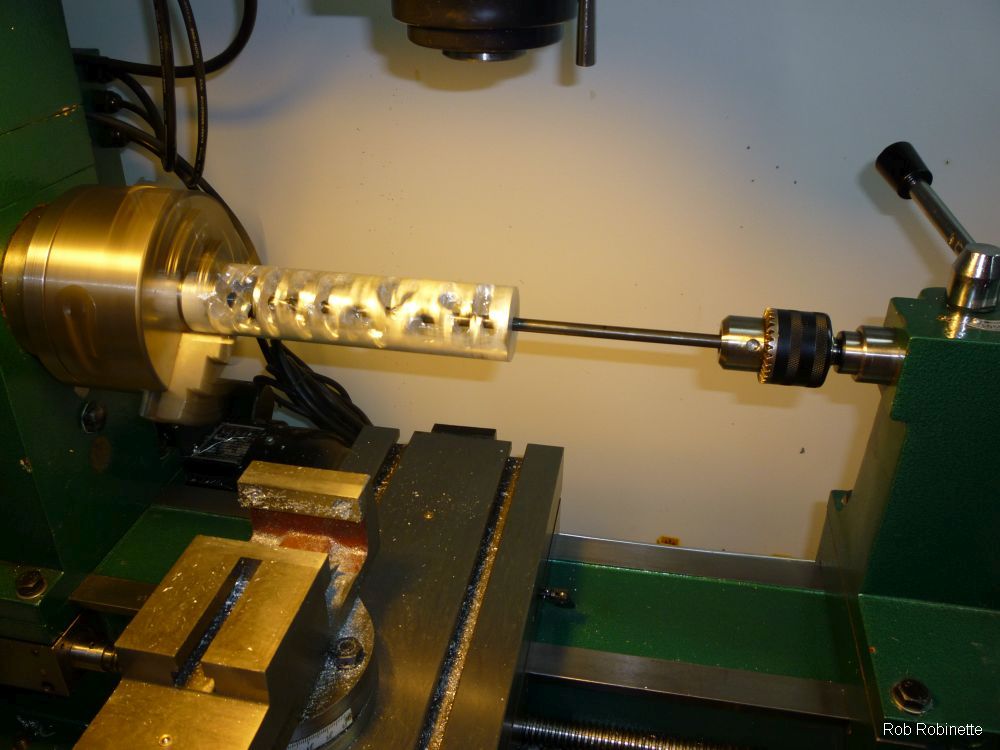
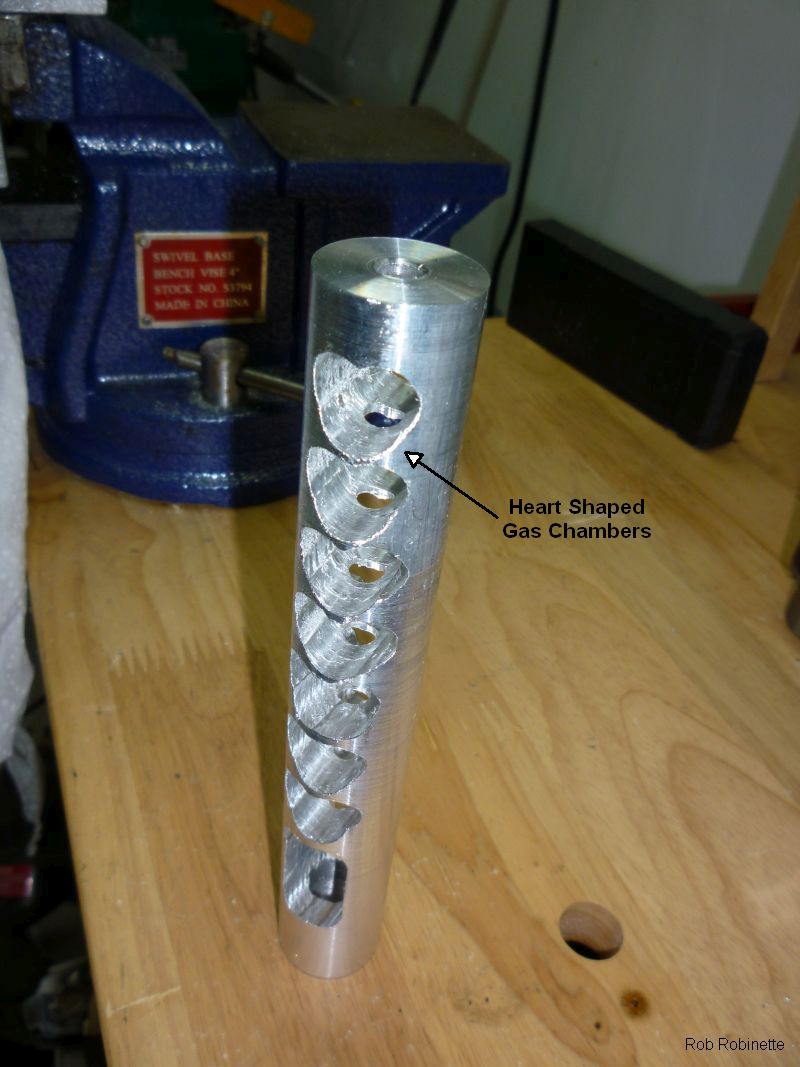
The Finished Baffle
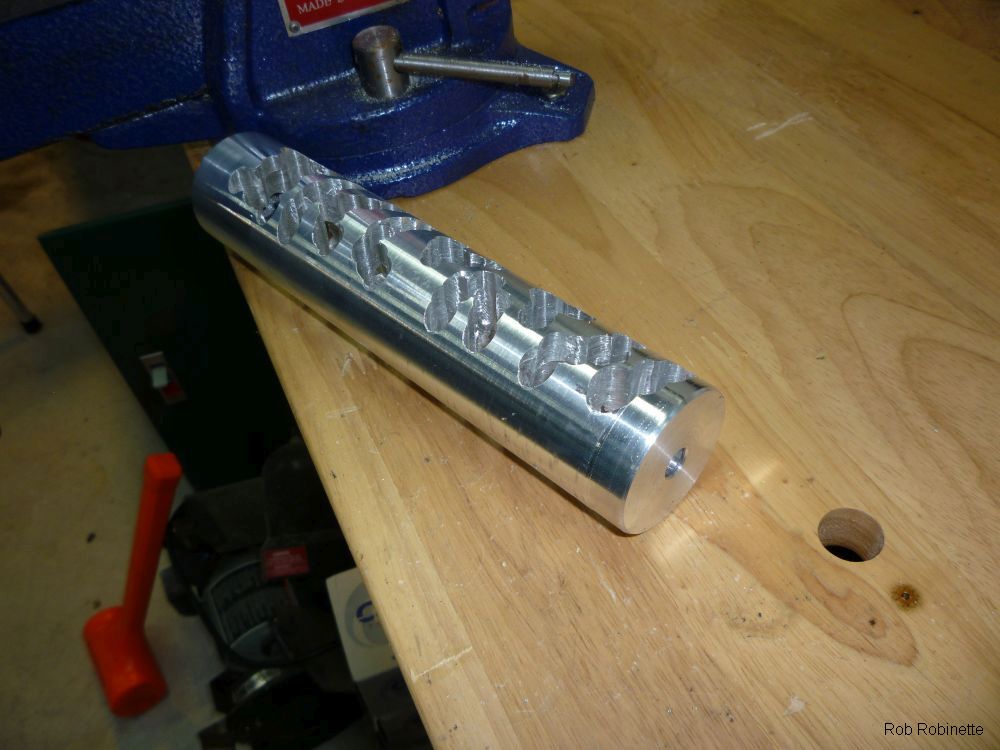
The finished baffle. I had to turn the baffle in the lathe to remove about 15 thousandths from its diameter to make it fit easily into the tube. I intentionally left the baffle chambers odd shapes to disrupt the gas's path through the baffle. I now recommend heart shaped baffle chambers like in the .22 suppressor shown in the next section because of how well that shape worked in controlling the gas. I also recommend leaving much less metal between the chambers to make the gas chambers as large as possible and also make the suppressor lighter.
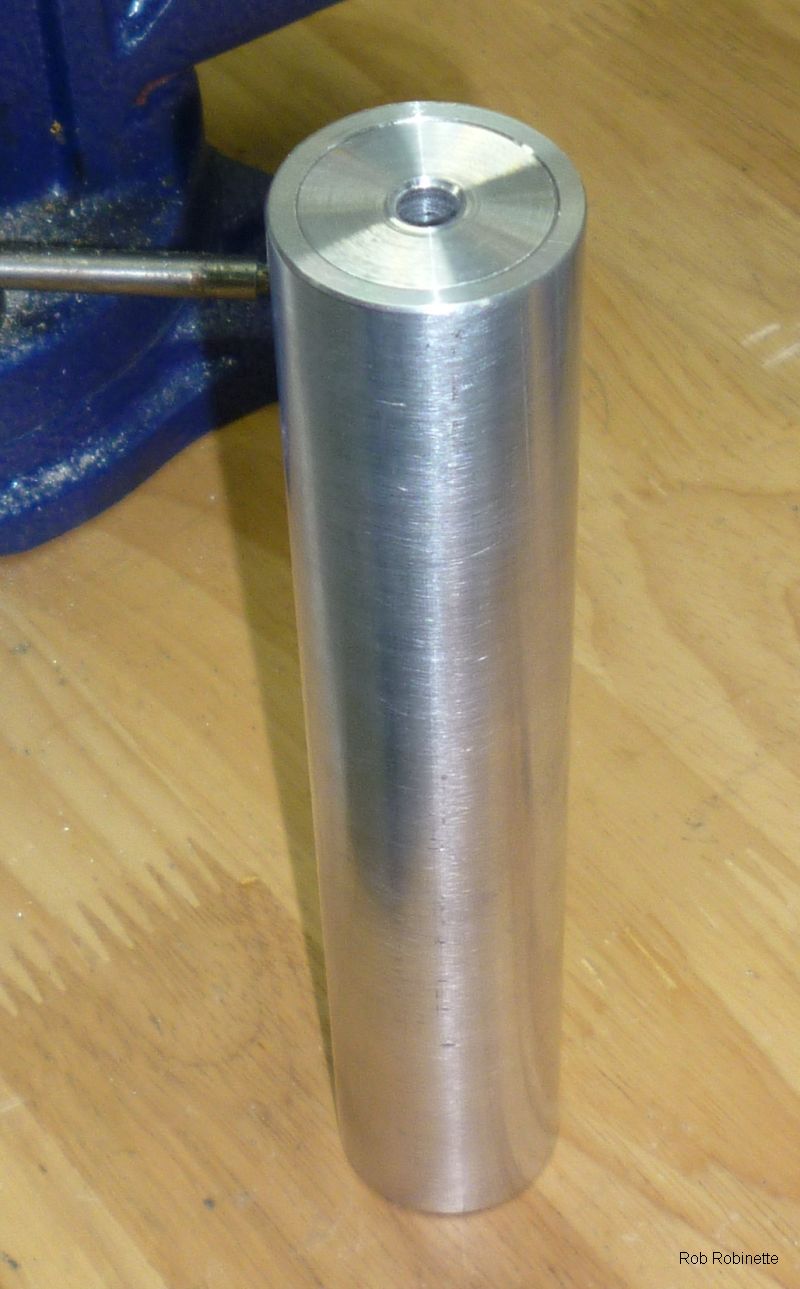
Welded Tube-to-Baffle Seal
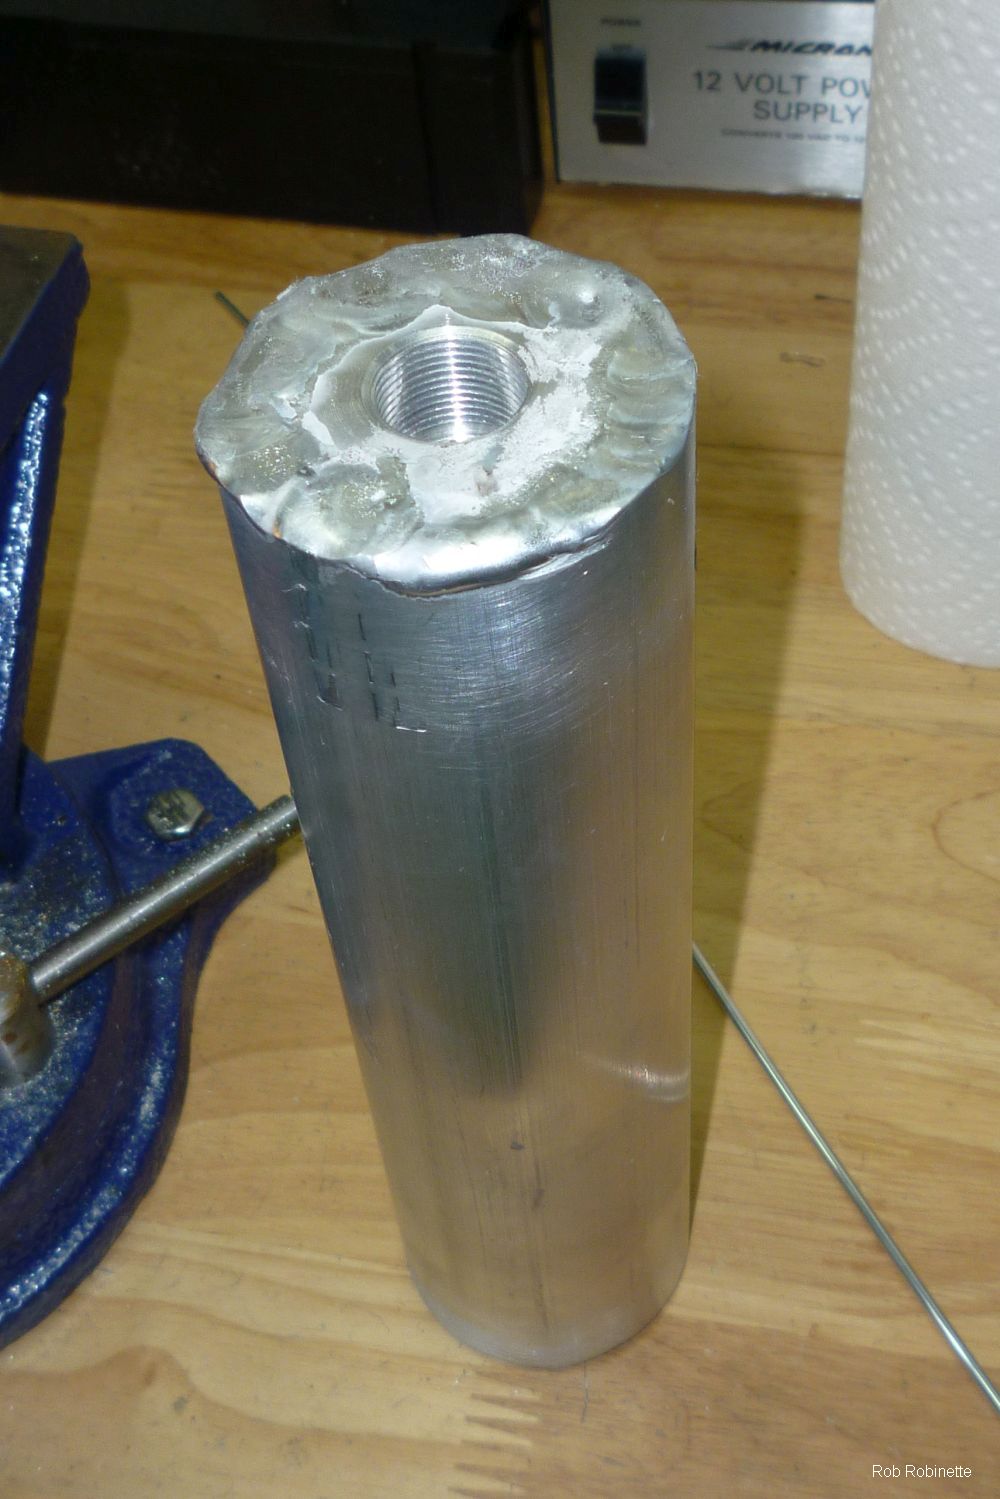
I slid the completed baffle into the aluminum cover tube and welded both ends to seal the suppressor. It's now ready to be screwed onto a rifle, inspected for barrel alignment and test fired. Please forgive the crude welding, I'm an amateur aluminum welder. You'll need an AC TIG welder to do this kind of work. If I need to open the suppressor I can use the lathe to cut the welds to remove the tube cover. A sealed suppressor can be cleaned by soaking it in mineral spirits. If I were to do another 300BLK suppressor I would seal the ends with three small screws.
Mounted 300BLK Suppressor
![]()
The suppressor wrapped and installed on the 300 Blackout upper. The wrap helps reduce noise by damping suppressor vibration.
Before test firing a suppressor you must mount it and do a bore sight inspection to verify the baffles and exit hole are lined up with the rifle bore. If the suppressor exit hole doesn't look perfectly centered don't fire the weapon because a baffle strike will destroy your suppressor. Remove all washers and lock nuts from the rifle muzzle because they can throw off the suppressor alignment. The best alignment usually comes from seating the suppressor tightly against the muzzle thread shoulder.
The BATFE requires you to inscribe or engrave the exterior tube of the suppressor with the information from the Form 1:
Serial #
Model #
Manufacturer (your name or trust name as shown on the Form 1)
Manufacturer's city & state
I used a Dremmel tool with a fine bit to engrave the suppressor information.
Building a .22 Suppressor
A well made .22 suppressor really can be called a silencer because they are Hollywood quiet. Mount one of these on a Ruger 10/22 and you'll soon be looking for ways to quiet the action or lock the bolt closed. They're that quiet. I absolutely love shooting suppressed .22 and at 4 cents a round you can't beat the price-to-fun ratio.
Finished .22 Baffle
A .22 baffle made of 1 inch solid round aluminum bar. Note the large square blast baffle at the bottom and the heart shaped gas chambers. This suppressor worked out very well and is quieter than a commercial .22 suppressor I purchased later. The baffle is 7 inches long.
For the suppressor barrel thread I used a 7/16 inch drill bit to drill the hole and then used a 1/2x28 tap.
.22 bullet diameter is .224" so I used a 1/4" (.250") drill bit to drill the bullet path through the baffle.
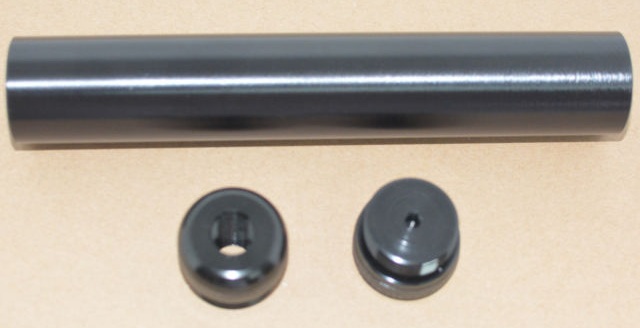
Baffle Ready For Insertion
The 1 inch diameter .22 baffle next to it's outer cover seal tube made from aluminum tube with a 1 inch inside diameter.
Completed .22 Suppressor
The .22 baffle inserted into the tube seal with a nice tight press fit. This thing is quieter than a pellet gun when used on a bolt action .22. Seriously.
Before test firing a suppressor you must mount it and do a bore sight inspection to verify the baffles and exit hole are lined up with the rifle bore. If the suppressor exit hole doesn't look perfectly centered don't fire the weapon because a baffle strike will destroy the suppressor. Remove all washers and lock nuts from the rifle muzzle because they can throw off suppressor alignment. The best alignment usually comes from seating the suppressor tightly against the muzzle thread shoulder.
A suppressor can become hot enough to burn you if you shoot enough rounds through it. I laid my rifle down on a tarp and melted it to the suppressor so be aware of the heat.
Be sure and check the security of the suppressor for tightness with a gloved hand between shooting breaks. They can loosen over time and cause a baffle strike.
The BATFE requires you to inscribe or engrave the exterior tube of the suppressor with the information from the Form 1:
Serial #
Model #
Manufacturer (your name or trust name as shown on the Form 1)
Manufacturer's city & state
I used a Dremmel tool with a fine bit to engrave the suppressor information.
SBR 10/22 & Suppressor
This is a shorter 6 inch long by 1 1/4 inch .22 suppressor I made (with Form 1 tax stamp) mounted on my NFA registered Short Barreled Rifle Ruger 10/22 with a nice Keystone Sporting Arms Revolution Yukon Laminate Thumbhole Stock. I shortened the stock to fit the 8 inch barrel. This is a really great shooting suppressed .22 with the EOTech 510 holographic sight. Barrel is an 8 inch TacticalInc.com stainless Charger pistol barrel (Ruger Charger barrels fit the 10/22). Since a suppressed bullet only needs to accelerate to 1000 feet per second a short barrel like this works great. Anything longer is a waste for subsonic shooting. Another benefit of the 8 inch barrel is most standard velocity .22 ammo will be subsonic so I can use cheaper ammo. Standard velocity ammo also functions the action more reliably than subsonic ammo. I install a Volquartsen Target Hammer in all my 10/22s for a huge improvement in trigger pull and break. I also installed a JG Bolt Lock on this rifle to allow single action silence by flipping a lever. The bolt lock holds the bolt closed and keeps it from cycling to minimize noise. Your rifle must be registered as a short barreled rifle with a Form 1 and tax stamp to legally install a barrel shorter than 16 inches.
Ruger Precision Rimfire 22LR With All Aluminum Suppressor

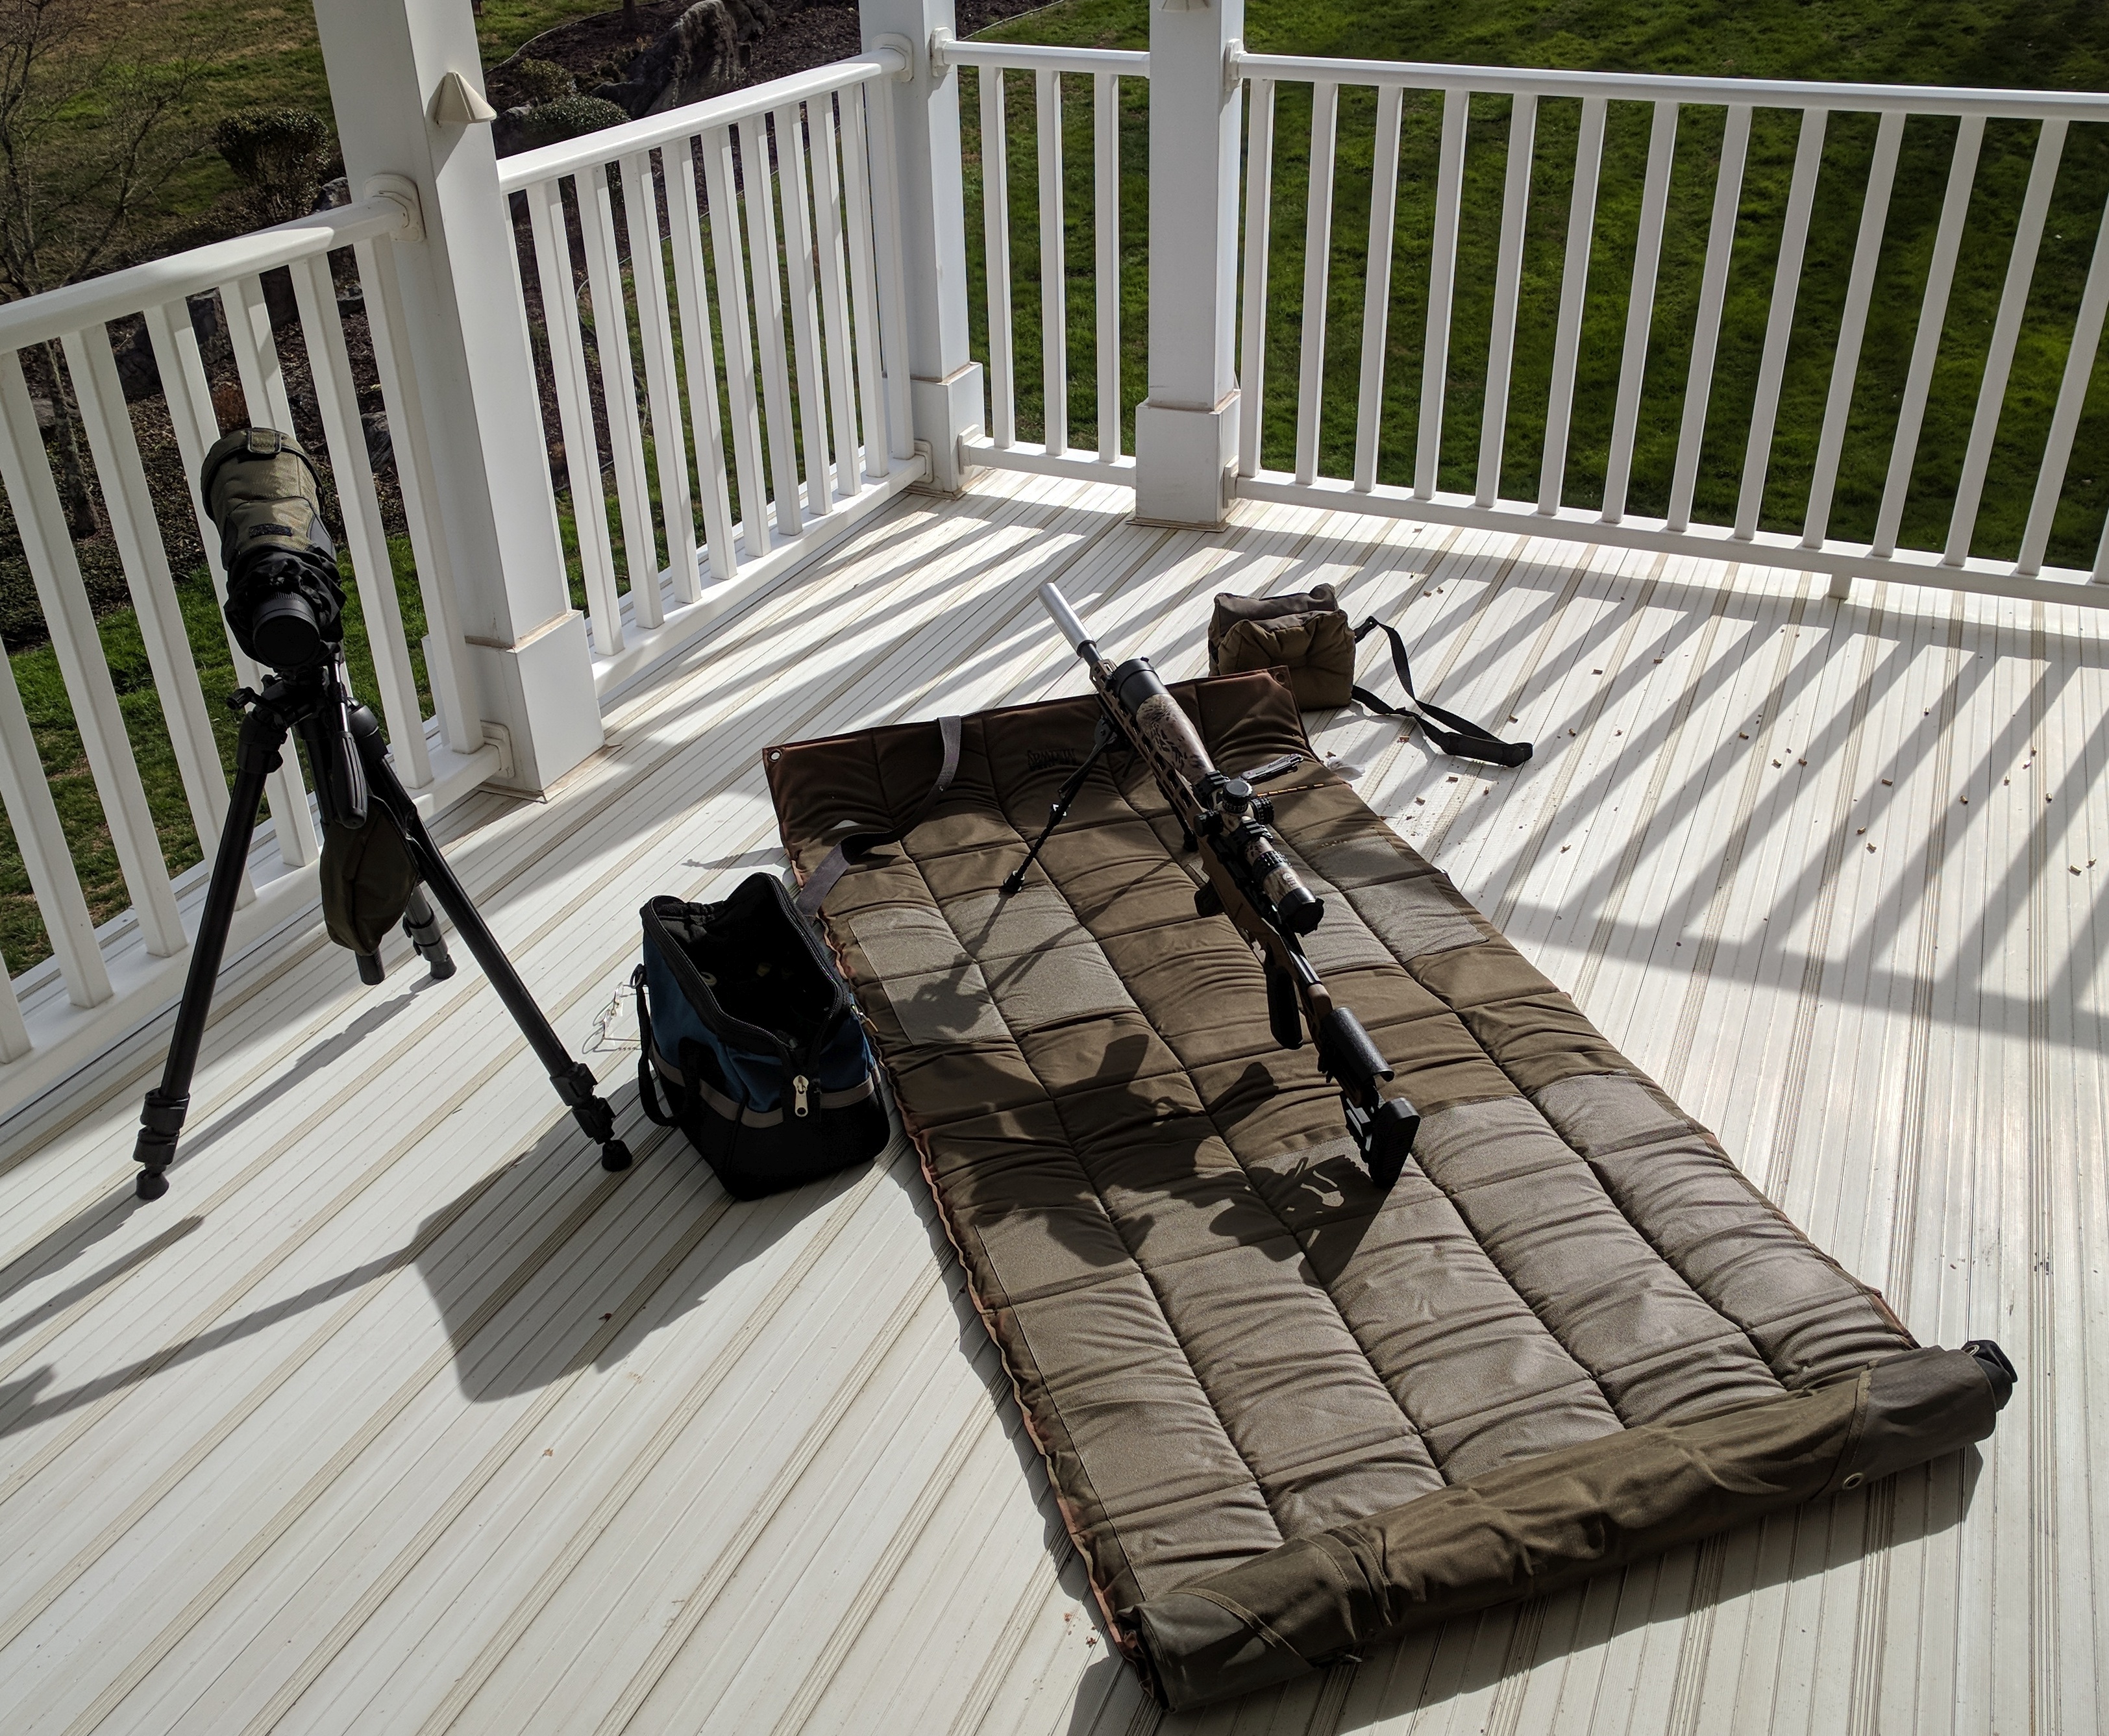
Nothin's more fun than long range subsonic .22 gong ringing. Shooting from the rear upper deck and the family doesn't even notice.
Another Ruger 10/22 with Suppressor
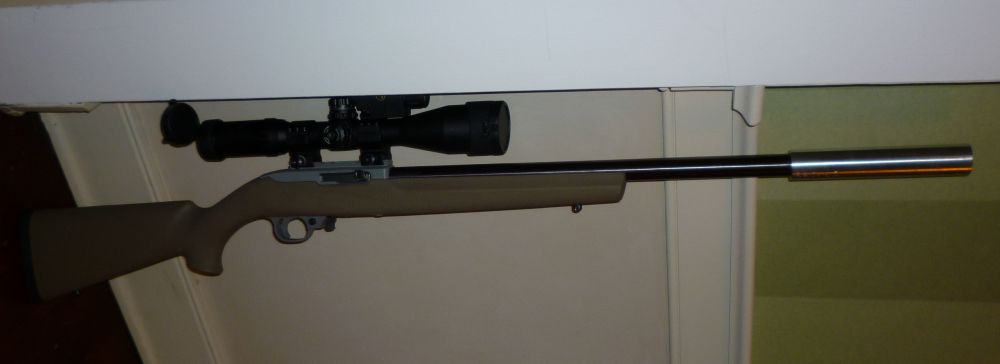
The .22 suppressor installed on my Ruger 10/22 with threaded 16" bull barrel. This rifle also has a Volquartsen Target Hammer and JG Bolt Lock.
Suppressor On Sig 1911-22
Since this .22 pistol uses blow back to function it will cycle with this no-booster suppressor mounted. Most semi-auto pistols are recoil operated and require a spring & piston "booster" to decouple the suppressor from the barrel to function. A pistol with its short barrel is typically louder than a rifle of the same caliber so I run my longer 7" suppressor on pistols.
Flashlight and Filter Suppressors
If you have a BATFE Form 1 and tax stamp you can legally build a suppressor using ebay "flashlight" and "filter" suppressors (This may no longer be true. The BATFE recently ruled on using flashlight and filter suppressor "kits" so check with the BATFE before building one). You typically buy an aluminum threaded tube with two end caps. One end cap is threaded to screw onto the barrel muzzle. The other cap will either have a hole pre-drilled or be solid and ready for you to drill to the bullet path diameter. There are even lightweight titanium flashlight and filter tubes available on ebay. Complete suppressor kits may be found on Walmart.com (online only), Aliexpress.com and Banggood.com. The kits include the aluminum tube, threaded end cap, "filter cup" baffles, spacer and end cap. Just drill the cups and end cap using the bullet path size drill bit and you're done. The spacer creates the "blast chamber" at the barrel end of the suppressor. Search for "1/2-28 filter" or "5/8-24 filter". It's super easy to complete these kits but you can still do hard prison time if you don't have a Form 1 and tax stamp.
You can purchase "C Cell Maglite" tubes that have a 1" inside diameter and can be purchased with a pre-threaded 1/2x28 end cap. These work well as 22LR suppressors. An ebay search for "C Cell tube 1/2x28" or "C Cell storage cups" or "C Cell filter cups" will work. Dorman 555-097 steel freeze plugs are 1" in diameter and should fit.
C Cell Tube
One end cap is threaded for 22LR at 1/2x28.
There are also "D Cell Maglite" tubes that are suitable for up to 308 Winchester (subsonic only) which can be purchased with many different barrel threads. For 308 or 300 Blackout you need a 5/8x24 thread. An ebay search of "D Cell tube" or "D Cell solvent trap" or "D Cell storage cups" or "D Cell filter cups" will work. I have also seen D cell Maglite M baffles referred to as "D Cell hiking stick storage cups". The tubes have a 1.350" inside diameter. NAPA Sealed Power SEP 381-3179 steel freeze plugs fit.
The larger diameter NAPA 4003 and WIX 24003 filters can be purchased with various barrel threads. An ebay search of "4003 filter 5/8x24" or "4003 filter cups" will find them. They're probably good only up to 308 Winchester but I've never tried a more powerful cartridge so I'm not sure. These filters have a 9" internal length. The inside diameter is either 1.8 or 1.75". Real NAPA or WIX filters have a 1.8" inside diameter. Some of the ebay clone filters have an inside diameter of 1.75" so verify what you have before you order freeze plugs or filter cups. The Dorman 555-098 freeze plug is 1.77"x.44" and will fit in the real NAPA or WIX 1.8" filters. The Dorman 555-034 freeze plug is 1.75" in diameter and .43" thick and fit well in the 1.75" clone filters.
4003 Filter
This filter comes with an end cap threaded for 308 or 300 Blackout at 5/8x24.
To build a flashlight or filter suppressor you may need to make baffles. Dorman steel automotive freeze plugs can be formed into baffles with some work and the cost is low at about 80 cents each. Call ahead and most auto parts stores can get you a box of 10 overnight. With a lathe you can spin the plugs and center drill a 3/16" hole. Drill from the cupped end so the concave shape will keep the drill bit centered. Then place the plug over a wrench socket that fits and use a large punch and hammer to enlarge the hole to the desired bullet path size. As you enlarge the hole the punch will also bend the plug into the desired "M" shape to make the baffle more efficient. The baffle will stick to the punch but you can tap alternating sides of the baffle with your hammer to knock it free. Use a bullet path size drill bit to verify the hole size as you enlarge the hole with the punch.
Forming a Freeze Plug Into a Baffle

Freeze plug is draped over a socket and a large punch is driven through the pre-drilled center hole. As you enlarge the hole, check its size occasionally with a bullet path sized drill bit.
I recommend putting four 3/16" holes around the bullet path hole in the first baffle (blast baffle). These holes allow some of the very high pressure blast wave to pass through and bleed some of the wave's energy.
Freeze Plug M Baffle
The notch in the bullet path hole keeps the gas from shooting straight down the center of the suppressor. When assembling these baffles you should line the slots up with one another for best performance and accuracy.
You can also purchase "flashlight storage cups" or "filter cups" that come in the form of an M baffle and work extremely well but they cost much more than freeze plugs. They come in C cell, D cell and 4003 filter sizes. You just have to drill the bullet path holes into the M baffles, notch the hole and slide them into the tube with the notches aligned. There are even storage cups made of steel which will hold up better than aluminum to supersonic rounds.
D Cell Storage Cup M Baffle
Just drill the bullet path hole and add a notch. I like to drill a hole about half the size needed to clear the bullet then use a punch to enlarge the hole to final size. The punch will push metal outward to form a sharp edge to catch gas. They come in C & D cell and 4003 filter sizes. C size works well for 22LR. D is big enough for 9mm and similar size rounds and 4003 is good for 300BLK and 308 Win (subsonic only).
A filter or flashlight spring can be used as a spacer to form the blast chamber area (first chamber the rifle gasses encounter). You can also cut aluminum tubing to form spacers to separate the baffles or you can simply fill the tube with baffles but that does add weight when using steel freeze plugs. Mixing freeze plug and M baffles can also work very well for sound suppression. If you plan to shoot supersonic rounds greater than 22LR I recommend a steel blast baffle (first baffle). You can add one steel freeze plug blast baffle to a suppressor full of aluminum storage cup M baffles to ensure longevity.
When drilling the bullet path holes in the baffles it's a good idea to elongate the hole in one direction. This sends the moving gasses off to the side to strike the next baffle wall instead of just shooting straight down the center of the baffles. This is a common feature of commercial suppressor baffles. A 1/4" rat tail (round) metal file works great for this. For aluminum baffles you can use a 1/4" drill bit to elongate the hole. Silencerco has done extensive testing of baffle skirt slot alignment and they have found that lining up the slots gives the quietest shots (especially 22LR and center fire rifle first round pop) and does not hurt accuracy.
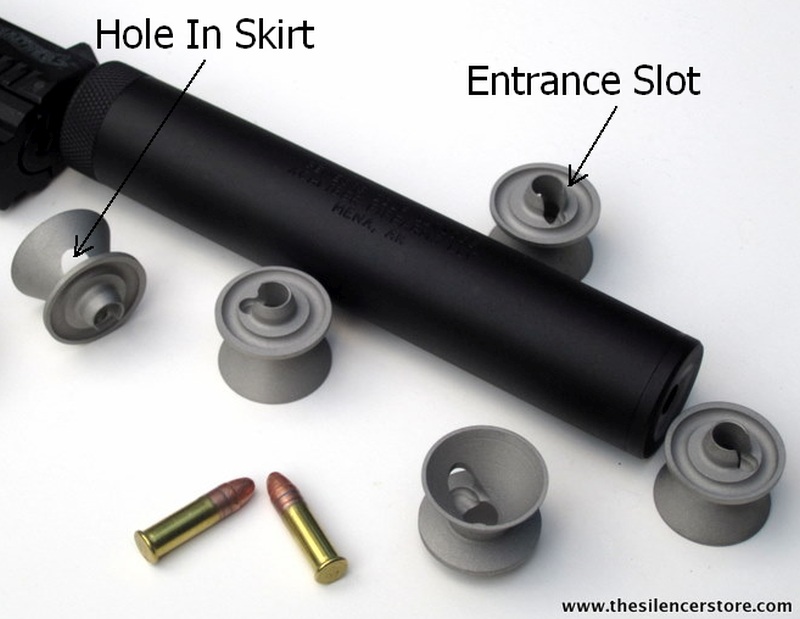
The XCaliber Genesis uses modernized K baffles with raised entrance fences which catch gasses and direct them away from the central hole. Note how the skirt hole is opposite the entrance slot in this suppressor baffle. Hot gasses entering the entrance slot push the main gas stream into the skirt hole to trap it between the baffle and suppressor wall. According to Silencerco research these baffles should be assembled with the entrance hole slots lined up with one another for quietest performance and accuracy. The Genesis is a very quiet .22 suppressor.
WARNING: Just because these Maglite and filter suppressors are easy to make doesn't decrease the severity of penalty for illegal possession. You can do hard prison time if you don't have a Form 1 and tax stamp for a suppressor.
Suppressor Design Tweaks
I recommend putting three or four 3/16" holes around the bullet path hole in the first baffle (blast baffle). These holes allow some of the very high pressure blast wave to pass through and bleed some of the wave's energy. This is a common feature in commercial suppressors.
You can make a suppressor quieter by putting a few drops of water or oil into the suppressor and it'll really reduce first round pop. First round pop is caused by the burning of cold dense air inside the suppressor--after the first shot the suppressor is filled with burned gasses that cannot burn when the next shot is fired. The downside is the liquid will mix with powder residue and stick to the suppressor interior and hasten the need for cleaning.
Placing a rubber washer between each baffle (freeze plug or storage cup) and between the last baffle and exit hole should help attenuate internal noise caused by reflection, vibration and resonance. Lowe's and Home Depot sell rubber washers in a variety of sizes. A suppressor cover or wrap can also reduce noise from suppressor vibration.
Some silencers of the past used felt washers between the last baffle and the exit hole to absorb the diminished shock wave.
Another technique of old was placing steel wool in the gas chambers but testing seems to confirm this isn't worth the trouble.
A thick piece of rubber sheet can be placed between the last baffle and exit hole to form a "wipe". Cut an "X" slit for the bullet to pass. The rubber will slow the exit of gas from the suppressor exit hole but may reduce accuracy.
I highly recommend you put a little anti-seize compound on the barrel, tube and end cap threads to make removal and disassembly easier.
To remove stuck baffles for cleaning a socket on an extension can be used to drive them out.
Don't forget that you must engrave your Form 1 information on the exterior tube of the suppressor.
Reducing First Round Pop
A gun barrel and suppressor are full of air when it is shot the first time so burning gun powder can enter the suppressor and burn the air inside which adds gas energy and prevents gas cooling inside the suppressor which generates noise. After the first shot the barrel and suppressor are full of burned gas--it can't burn again--so follow-up shots are quieter. First round pop can be reduced in several ways. Reducing the size of the blast chamber (first gas chamber the gas encounters) reduces the volume of air that the hottest gas encounters. This design has become relatively standard.
Adding a small amount of liquid, typically a few drops oil or water but spit works too, to the inside of the suppressor causes evaporative cooling inside the suppressor. This works surprisingly well and is known as shooting the suppressor "wet". The downside to shooting wet is it gums up the inside of the suppressor so cleaning is needed more frequently.
We can also eliminate first round pop by filling the suppressor and barrel with inert gas (gas that can't burn) such as helium. Balloon helium can be purchased at many party stores. To fill the suppressor we open the bolt or lock the slide open, spray the helium into the suppressor exit hole, tape over the exit hole then close the bolt or release the slide. The tape can be left in place for the first shot. Sealing the suppressor this way can keep enough air out of the suppressor to prevent first round pop for several days.
Removing Flash Hiders
Getting factory installed flash hiders and muzzle brakes off can be a pain in the butt without the right tools.
The standard wrench size for AR flash hiders is 3/4 inch but not all are standard.
For right-hand threaded devices, when looking down the barrel you turn the device counter-clockwise (left) to remove and clockwise (right) to tighten. Righty-tighty, lefty-loosey. Left-hand threaded devices will go the opposite directions.
The first thing I try is simply holding the rifle receiver between my knees and use a long 3/4" wrench on the flash hider and tap the wrench lightly with a metal hammer. About half the time this is all that's required to break the flash hider loose.
Many muzzle devices have high temperature thread locker like Loctite Red on their threads. If you find a really stubborn flash hider it probably has high temp thread locker on it. Applying a torch to the muzzle device (not the barrel) until cherry red will release the thread lock and allow removal but be advised using a torch may mar the finish of the muzzle device. Be cautious of the hot barrel and flash hider.
If you plan to do a lot of AR flash hider/muzzle brake/suppressor work I highly recommend the $83 Geissele Automatics Reaction Rod. You put the Reaction Rod in a vice then slide the AR upper on the rod. The rod is the same diameter as an AR bolt so it fits snugly. The bar has lugs that lock into the barrel lugs to keep the barrel from turning. This holds the barrel securely while you torque on muzzle devices so only the barrel is torqued and not the upper receiver.
Geissele Automatics Reaction Rod
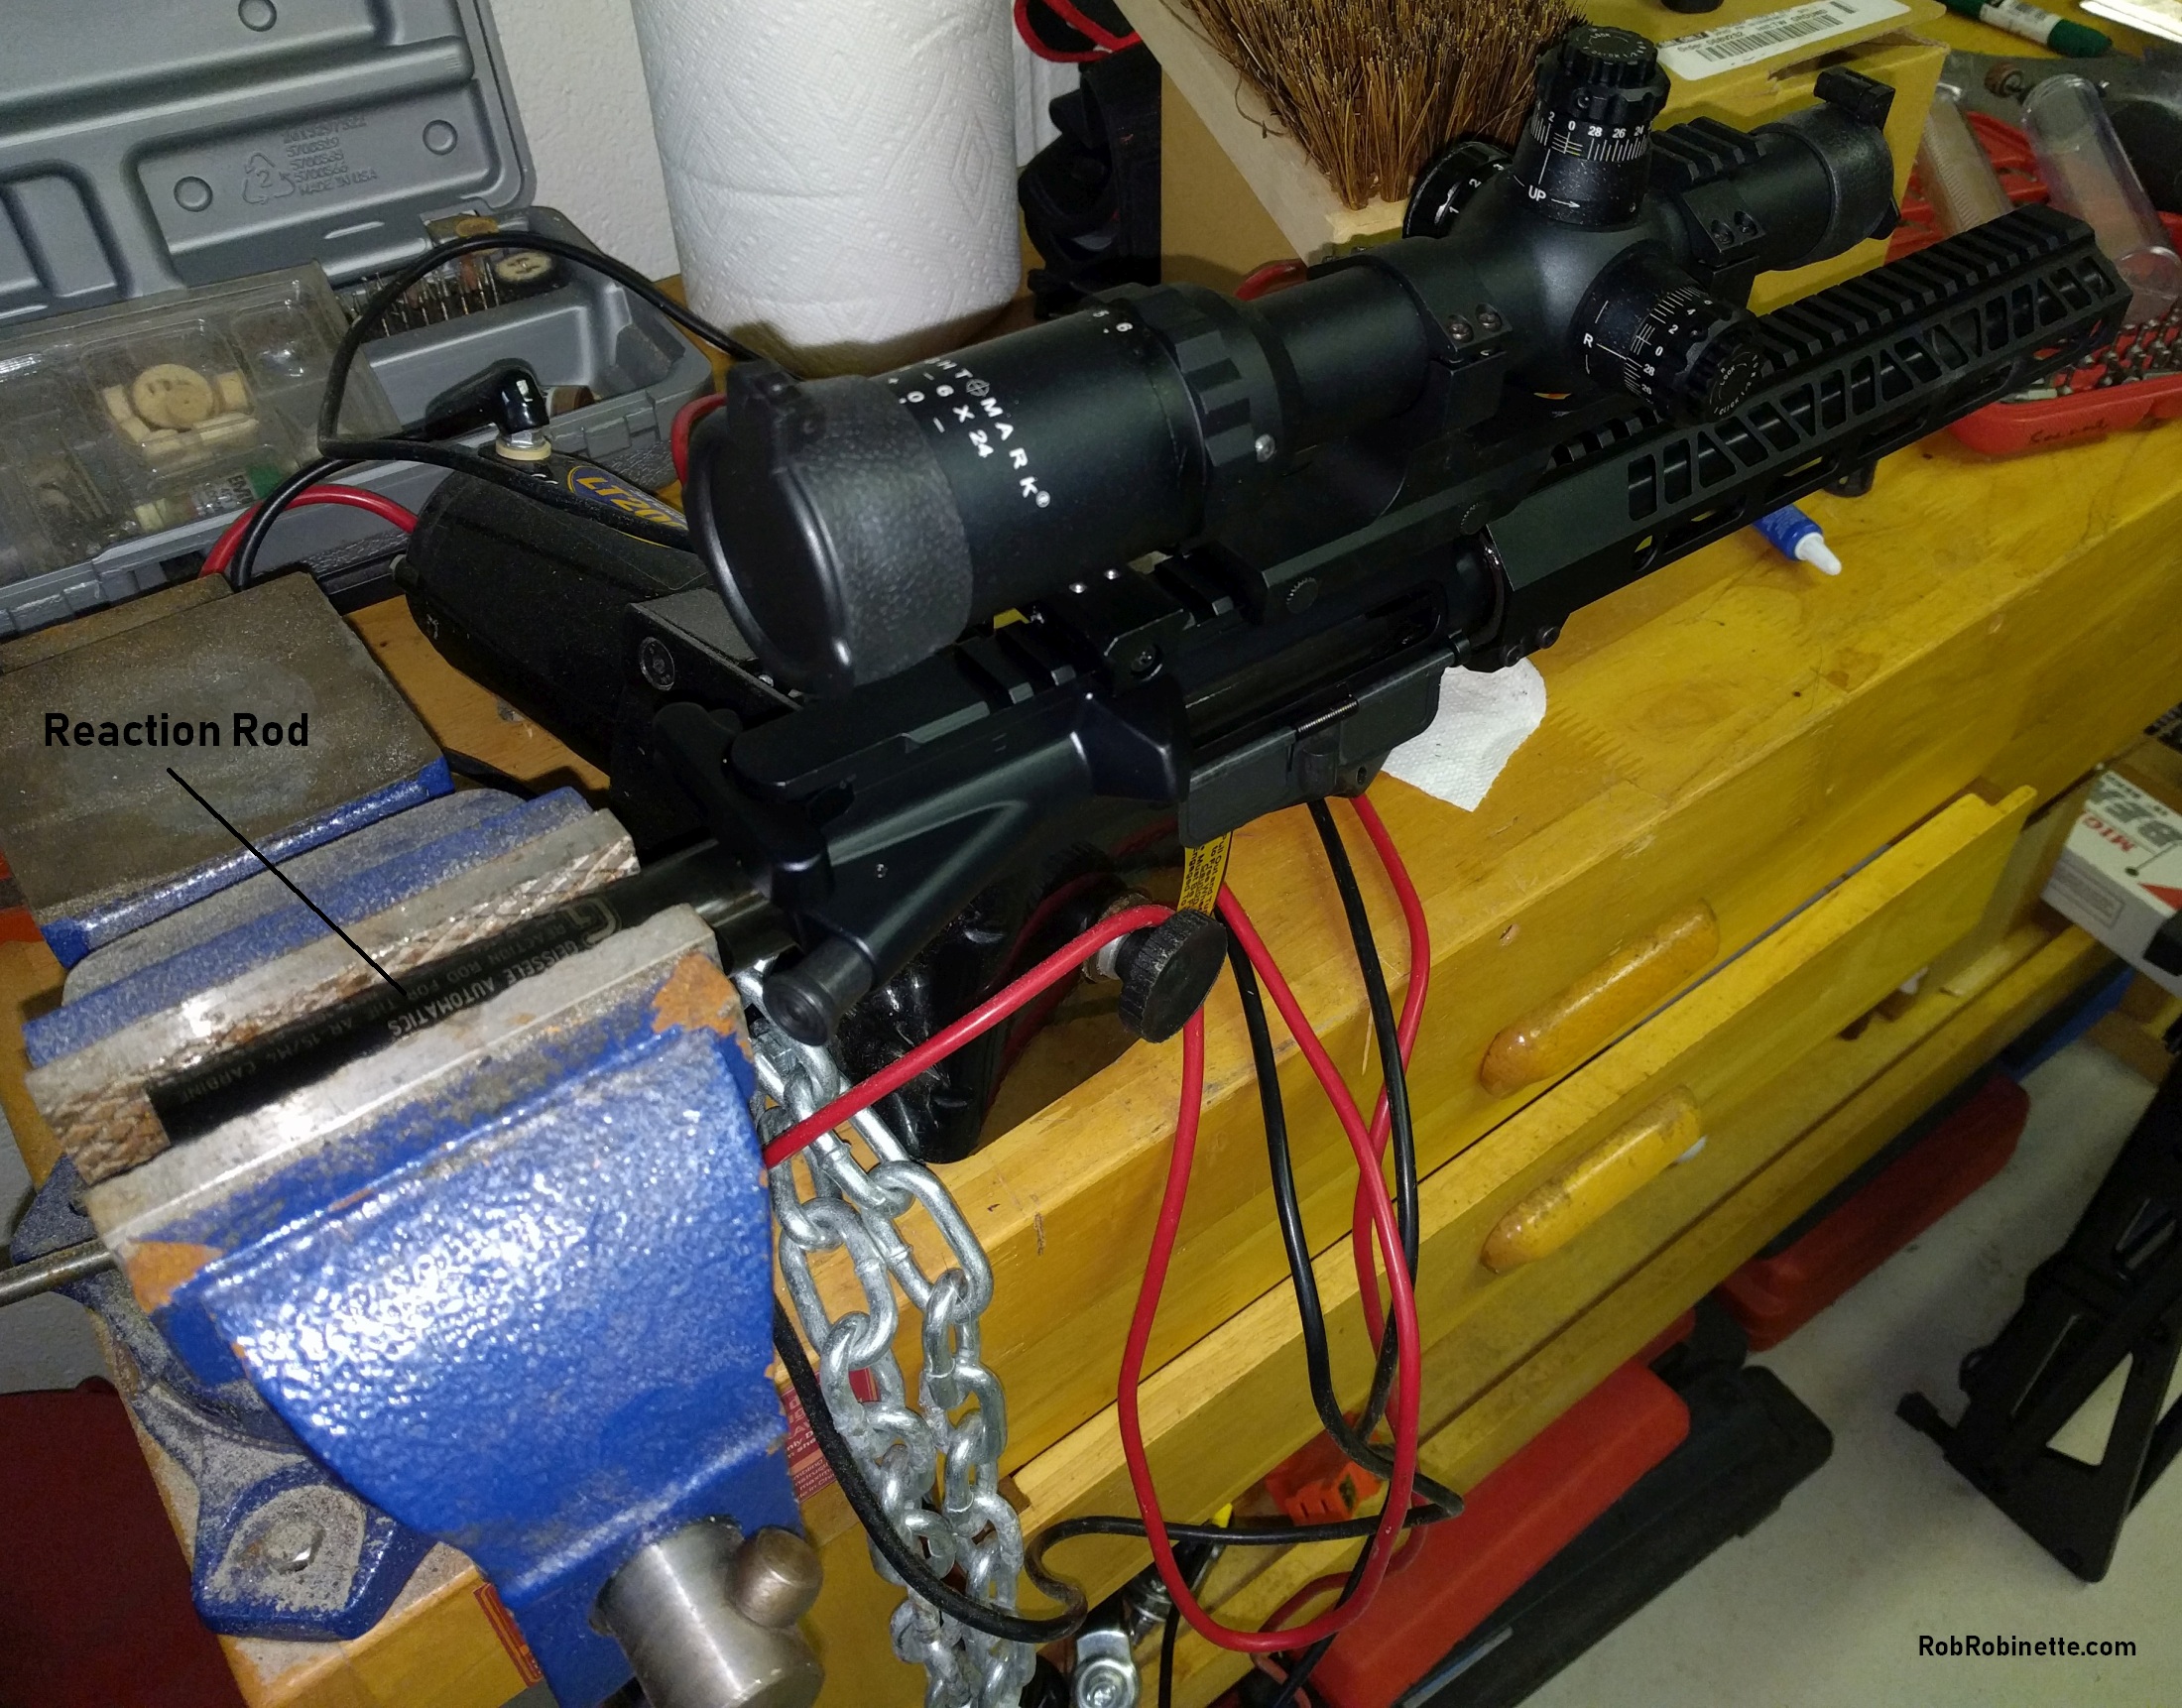
AR upper on Reaction Rod.
I do not recommend using a standard AR upper vice block to remove muzzle devices because you can damage the upper receiver and/or gas tube.
These aluminum barrel vice jaws along with leather jaw pads work great to hold the barrel fast without damage or marring. I use this method on my hunting rifles and Tavor bullpups.
Aluminum Barrel Vice & Leather Inserts
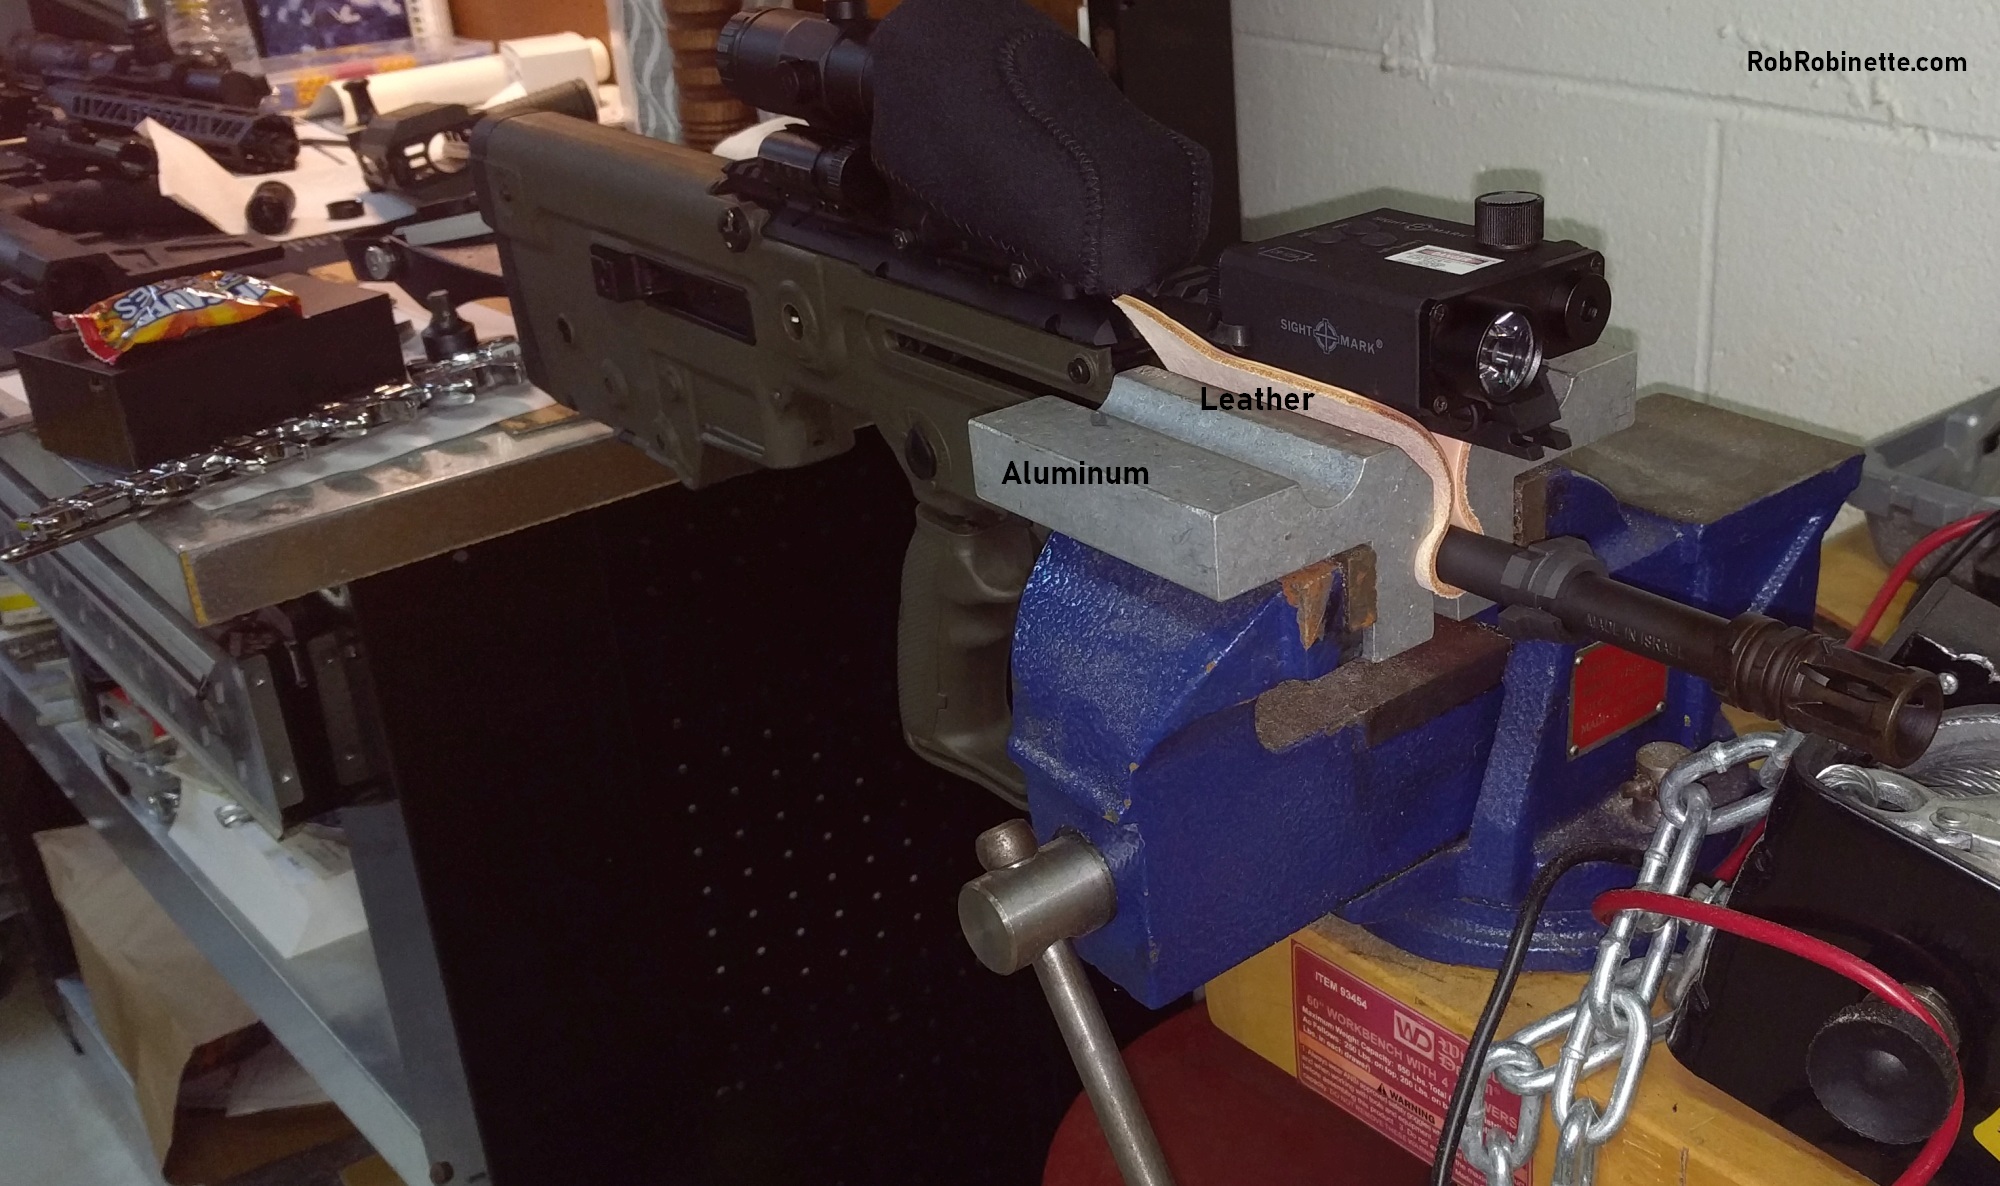
If you have easy access to the barrel then aluminum and leather vice inserts will hold the barrel fast for easy muzzle device work with no barrel marring. The Tavor user manual shows how to remove the front shroud for barrel access. This 5.56mm Tavor X95 has standard 1/2"x28 right-hand muzzle thread. The flash hider was locked into position using a 3/4" lock nut. The 9mm Tavor X95 has an odd 1/2"x36 right-hand thread. The 300 Blackout Tavor X95 uses standard 30 cal 5/8x24 right-hand thread.
You can use an impact driver with a 3/4" crowfoot wrench (3/8" drive) and extension to help remove stubborn flash hiders. Place the extension on the impact driver then put the crowfoot wrench on the extension and place it on the flash hider's 3/4" flat side. Use a gloved hand to help keep the crowfoot on the flash hider and take your time using short impact bursts. I've done this but I nicked the barrel so I don't recommend it except as a last resort. Painters tape then several layers of duct tape on the barrel can offer some protection.
3/4 Inch Crowfoot Wrench

This wrench plus a short 3/8" drive extension on your impact wrench can help break loose stuck flash hiders.
Remove all washers and lock nuts from the rifle muzzle because they can throw off suppressor alignment. The best alignment usually comes from seating the suppressor directly against the muzzle thread shoulder.
Bullet Diameters in Inches and MM
Cartridge |
Diameter Inch |
MM |
Other Cartridges With Same Bullet |
.22LR |
.222 |
5.64 |
|
.223 & 5.56 |
.224 |
5.7 |
(I know it's called 5.56 but it's not) 224 Valkyrie |
.243 & 6mm |
.243 |
6.17 |
6mm Creedmoor |
25-20 & 257 Roberts |
.257 |
6.53 |
|
6.5mm & 264WM |
.264 |
6.7 |
6.5 Creedmoor, Grendel, Carcano, Japanese, 264 Win Mag |
270 Win |
.277 |
7.04 |
6.8 SPC |
280 Rem |
.284 |
7.21 |
7mm-08 Rem, 284 Win, 7mm x57 Mauser |
308 Win & 7.62 |
.308 |
7.82 |
I know it's called 7.62 but it's not. 7.5mm Swiss (303 Savage is .311) |
7.62x39 |
.312 |
7.92 |
AK-47, SKS |
32 ACP |
.312 |
7.93 |
(32-40 is .324) |
8mm, 325 WSM |
.323 |
8.2 |
8mm x 57, 8mm Rem Mag, 325 Win Short Mag |
338 Laupa Mag |
.338 |
8.59 |
340 Wby Mag, 338 Win Mag |
375 H&H Mag |
.375 |
9.53 |
|
380 Auto |
.355 |
9.02 |
(9mm Short, should be called 355 Auto) |
9mm & 357 Sig |
.355 |
9.02 |
9mm Parabellum, 9mmx19, |
38 Special |
.359 |
9.12 |
357 Mag (should be called 36 Special) |
40 S&W & 10mm |
.400 |
10.16 |
(40 S&W should be called 10mm Short) |
416 Rigby |
.416 |
10.57 |
|
44-40 Win |
.428 |
10.87 |
|
44 Mag |
.430 |
10.92 |
|
45 ACP |
.451 |
11.46 |
|
45-70 |
.458 |
11.63 |
458 Win Mag, 450 Marlin, 460 Wby Mag |
470 Nitro Express |
.475 |
12.07 |
|
500 S&W Mag |
.500 |
12.7 |
|
50 BMG |
.510 |
12.95 |
50 Alaskan |
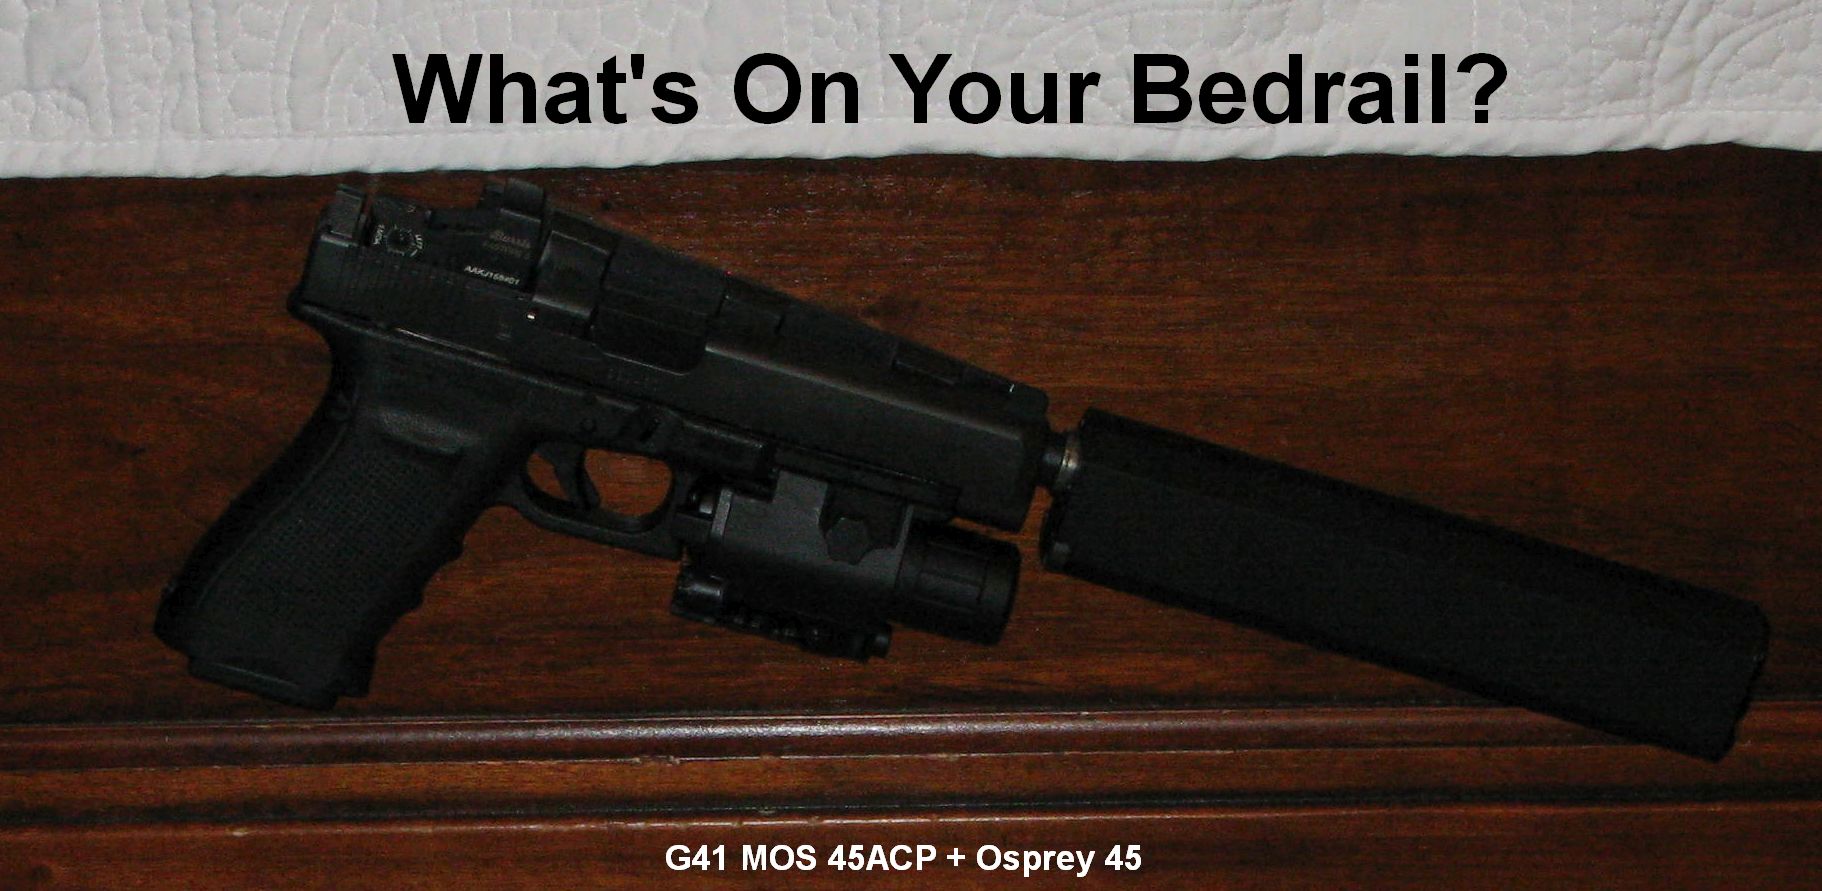
Long slide Glock G41 MOS (modular optic system) 45 ACP with Osprey 45 suppressor, Burris micro red dot sight, Tru-Glow tall see-over-the-suppressor co-witness night sights and combo flashlight/green laser. The pistol is held to the bed rail by a plastic covered gun magnet. A suppressed weapon is ideal for home defense because firing an unsupressed weapon inside your home without hearing protection will freakin' hurt. 45 ACP 230gr hollow point ammo is subsonic--you don't need to buy expensive "subsonic" ammo.
Warning: You must have a BATFE Form 1 with tax stamp before you begin to legally build a suppressor. National Firearms Act (NFA) rules apply and you can do hard prison time for violating the law.
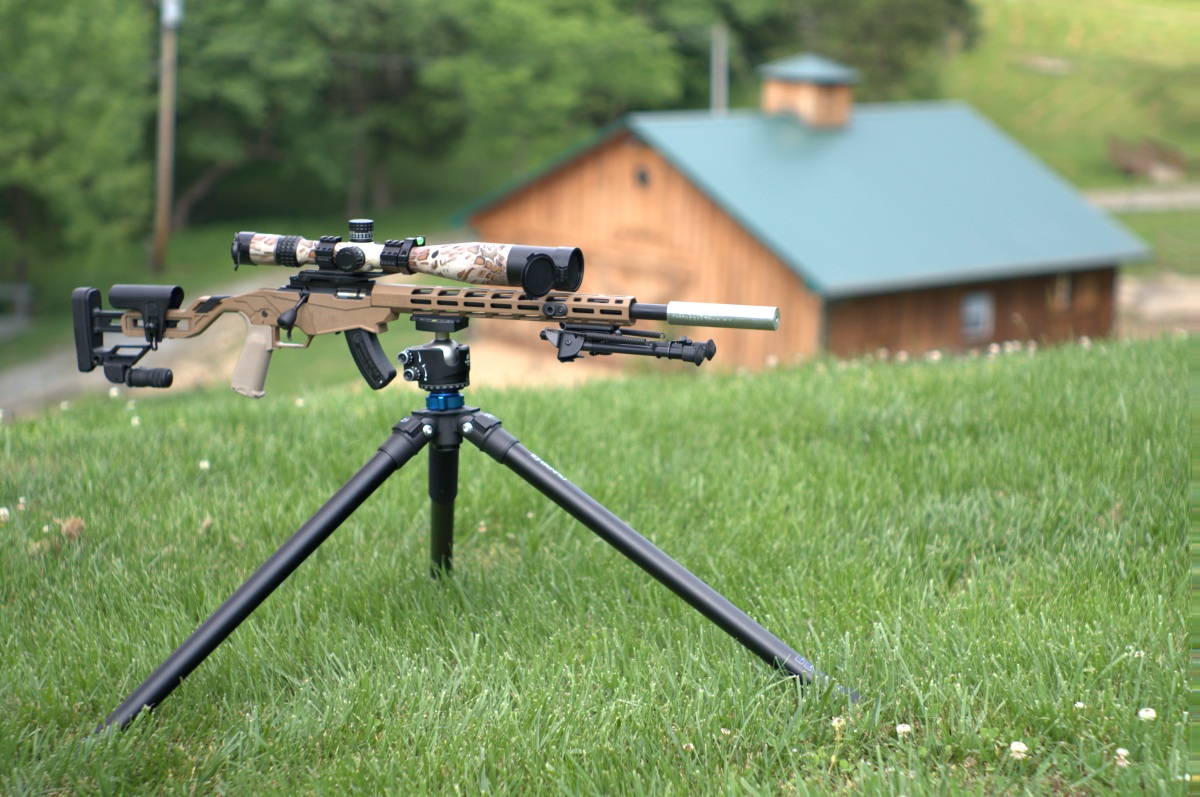
Ruger Precision Rimfire with M-LOK Arca-Swiss plate clamped into LeoFoto LH-55 ball head and heavy duty tripod.
By Major Rob Robinette
US Army and Air Force (Retired)
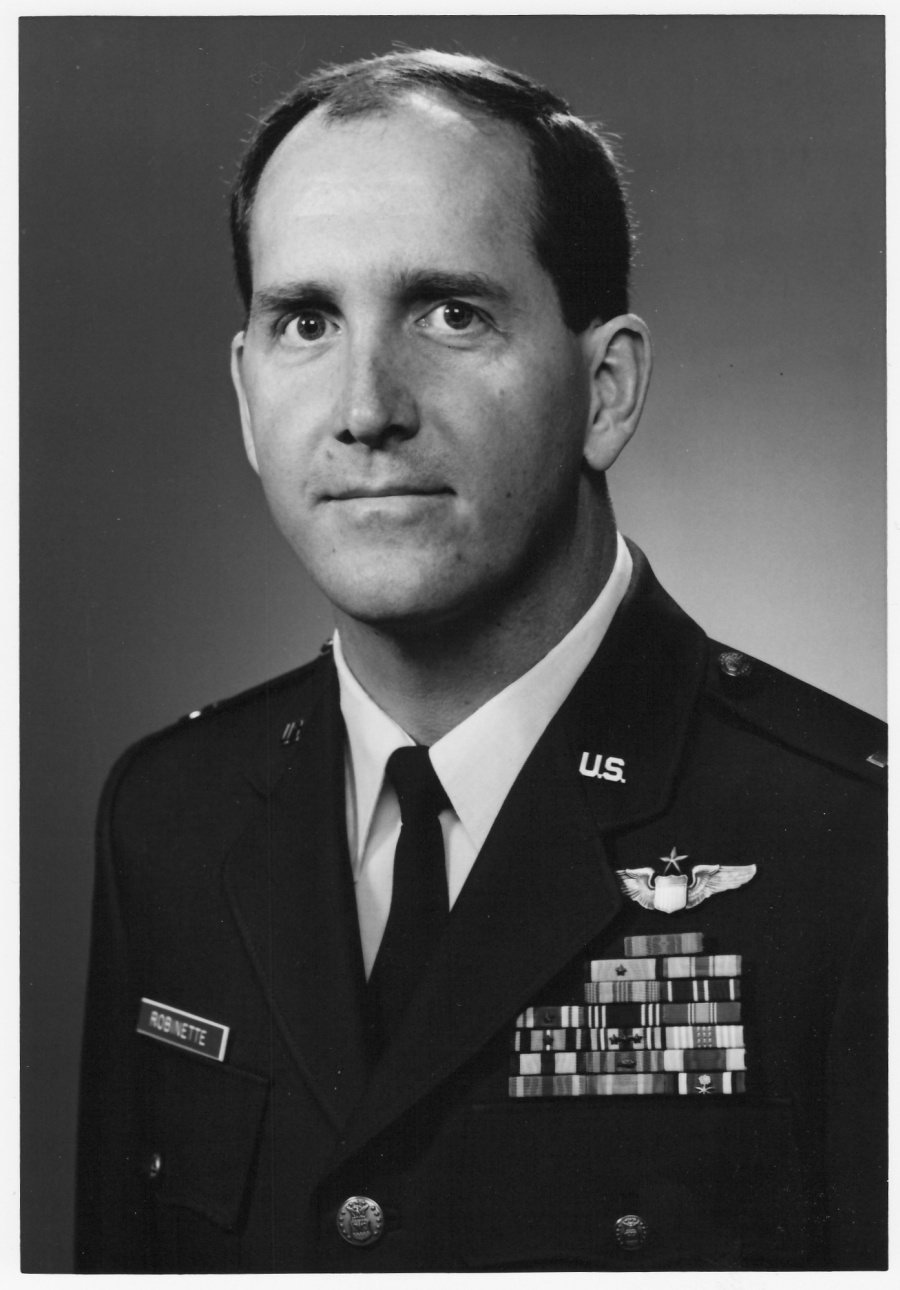
Major Robinette was a Battalion Marksmanship Champion, Squadron Rifle Team Captain, Range Officer and F-15 pilot. Rob also spent 10 years as a federal law enforcement officer. He holds a Federal Firearms License and is the owner of Nolichucky Guns. He enjoys all forms of rifle and pistol use.