[ Build a Suppressor ] [ 300 Blackout ] [ Gun Recoil Calculator ] [ QuickLOAD ]
M16 4-Way Selector Install
and everything you ever wanted to know about 3 and 4-way burst kits
By Major Rob Robinette
WARNING: You must have a BATFE Form 4 with tax stamp to legally own a machine gun. National Firearms Act (NFA) rules apply and you can do hard prison time for violating the law.
If you are interested in installing a burst fire control group in an AR-15 it is not only illegal but impossible due to the differences in the fire control group wells--there is no room for the auto sear. The BATFE have ruled that no M16 auto or burst parts can be installed in a non-NFA registered lower. To do so is to create an illegal machinegun and can lead to hard prison time.
UPDATE May 2022: Colt 4-way selectors are available on gunbroker.com for $110.
UPDATE Jun 2016: I can no longer find a source for a Colt or DPMS
4-way fire control group or lower receiver parts kit. The Colt 4-way parts are
no longer in production and I could not locate a source for the Colt 4-way
selector. As of June 2016 all the other 4-way Colt parts were still available
but without the selector they won't do you any good.
I own a National Firearms Act registered M16 and wanted to install a 4-way selector (SAFE,
SEMI, 3-round BURST, full AUTO). The 3-round burst comes in handy when
running a high cyclic rate upper such as 22LR or 9mm. I couldn't find any info on the web about the
4-way kits and it took me forever to track down someone that sold the kits. I
finally found
Specialized Armament
that sold
the Colt 4-Way Lower Parts Kit
for $295 (complete lower parts kit) or just
the 4-way fire control group for $276 plus shipping.
DeltaTeamTactical.com sells the M16A2 burst parts for $130
DSK Armory sells the
Colt 4-way fire control group for $260 shipped and the
DPMS 4-way fire control group for $150
shipped.
Some M16 owners have expressed concern with removing the selector stops from their very valuable M16 lower receivers (typical prices for NFA registered M16s run from $10,000 to $20,000). At least one selector stop must be removed to allow the selector lever to move to the 4th position at 6 o'clock. There's also the issue of the added complexity of the 4-way system and its effect on reliability. The trigger pull on a 4-way fire control group is also slightly heavier in SEMI & AUTO due to the extra disconnector spring which is compressed during the trigger pull.
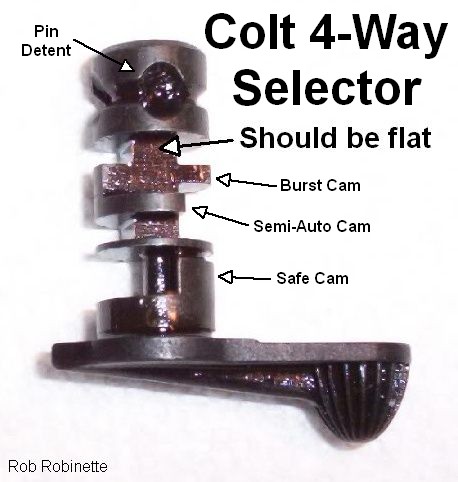
The Colt 4-Way Selector
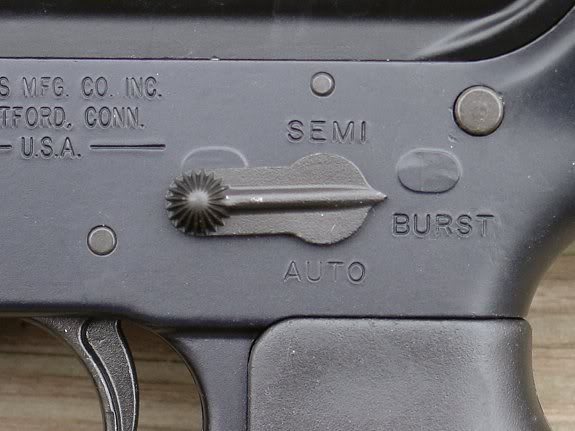
Note the filed-down selector stops.
If you already have a 3-way burst kit you can convert it to a 4-way by installing the four Colt 4-way specific parts: Auto Sear, both Disconnectors and the Selector for $145. I don't believe it's possible to get these individual 4-way parts from DPMS.
These are my favorite books on the AR-15, M16 and M4:
How the 4-Way Selector Works
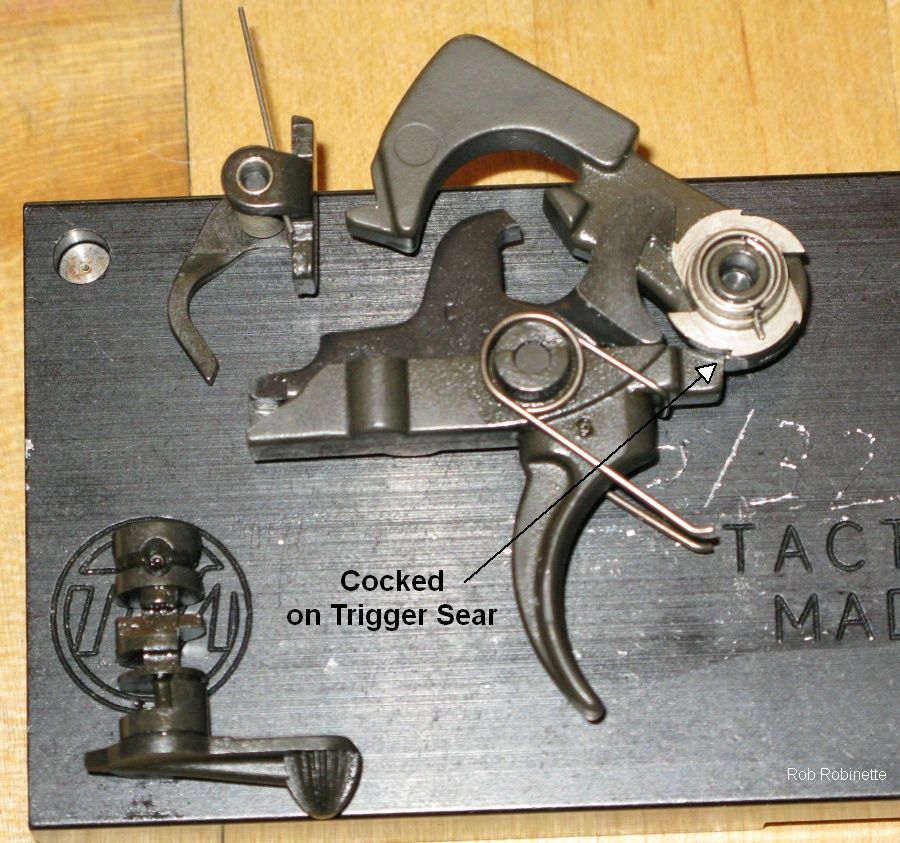
The Colt 4-way selector has SAFE and SEMI in the standard positions, 9 o'clock and 12 o'clock respectively. BURST is at the 3 o'clock position and AUTO is at 6. For the SAFE position the 4-way selector works the same as all AR-15s, the selector cam contacts the trigger and prevents it from moving.
In SEMI the selector cam rotates the auto sear away from the hammer so auto sear will not capture the hammer. The selector cam also contacts the burst (right) disconnector's tail locking it out (see first photo below). This prevents movement of the burst cam and reduces the likelihood of getting a less than 3-round burst with the first burst trigger pull. (This is different from the 3-way burst fire control group where the burst disconnector is always free to ratchet the burst cam, even when firing semi-auto.) The semi-auto disconnector is free to move with the trigger so it can capture the hammer and end the firing sequence if the trigger is held to the rear. Note that during a SEMI trigger pull you have to overcome the tension of the burst disconnector spring which adds to the trigger pull. This is different than the 3-way burst fire control group where the burst disconnector is never locked out.
4-Way Fire Control Group
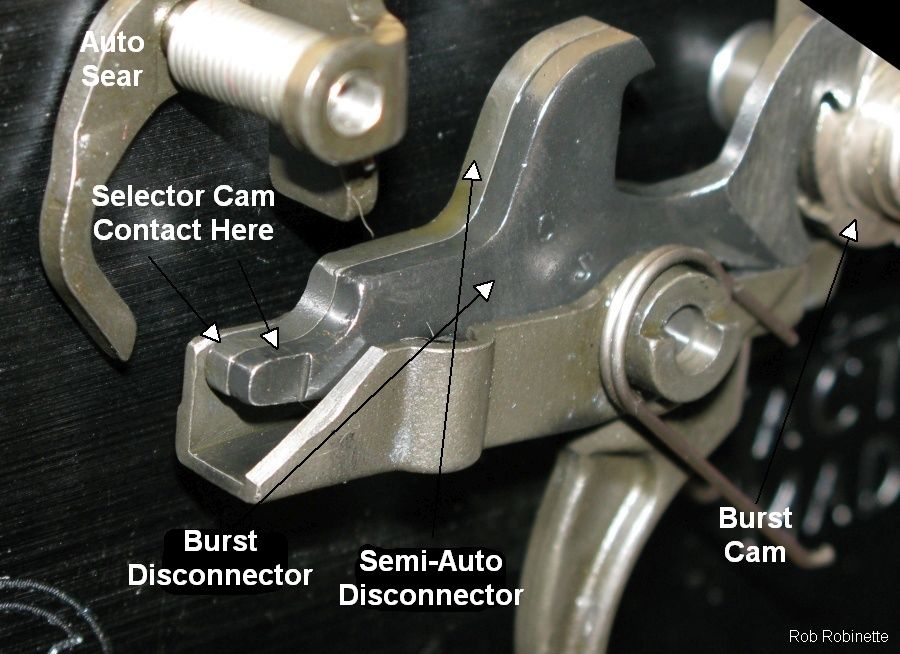
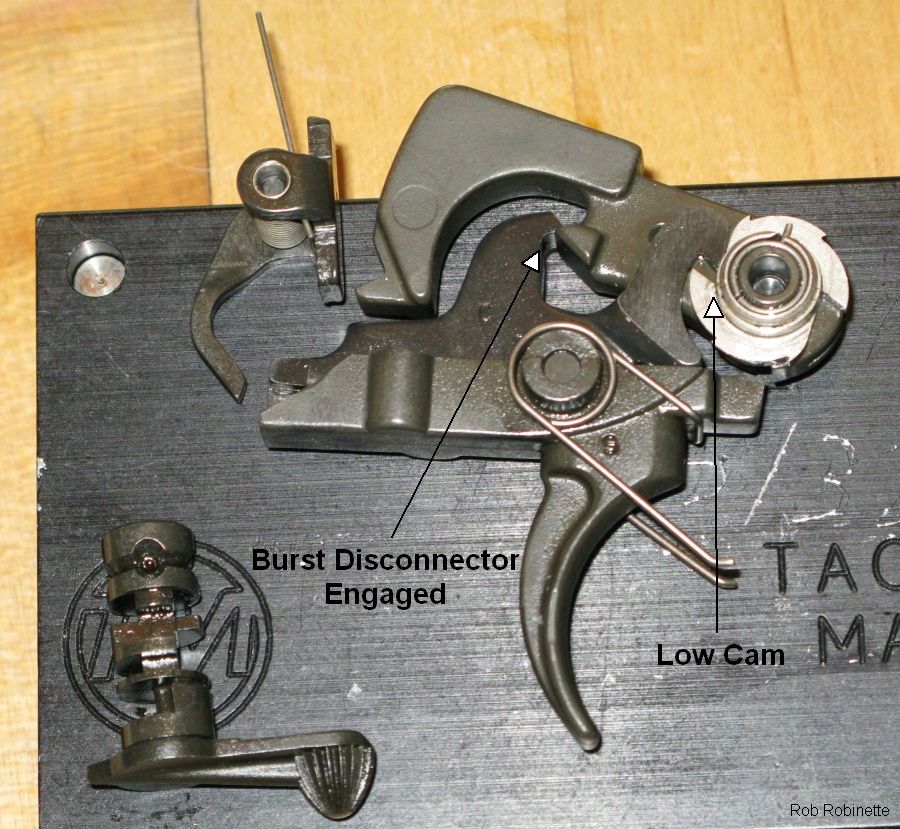
When BURST is selected the selector cam rotates the auto sear into position to capture the hammer. The selector cam also contacts the semi-auto (left) disconnector and locks it out. The burst (right) disconnector is free to move with the trigger and ratchets the burst cam 1/6 of a turn each time the hammer goes forward. Every 3/6 of a turn (3 shots) a low spot on the cam allows the burst disconnector to move forward and capture the hammer and end the firing sequence if the trigger remains to the rear.
Note: The first trigger pull when BURST is selected may fire 1, 2 or 3 shots depending upon the starting position of the burst cam, but all subsequent trigger pulls will fire 3 rounds if the trigger is held to the rear. Also, if you release the trigger quickly it is possible to fire less than 3 rounds. If you do fire less than 3 rounds the next trigger pull will complete the 3 round burst. For example, if you pull the trigger quickly and fire only 1 round, the next trigger pull will fire no more than 2 rounds.
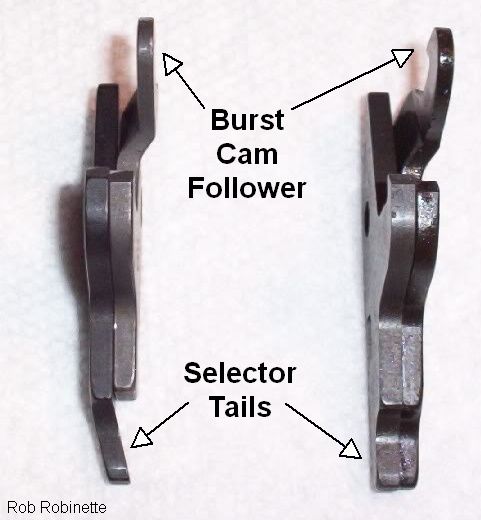
Colt 3-Way Burst Disconnectors on Left, Colt 4-Way on Right
Here is an excellent YouTube video with an animation of how Semi, Auto and Burst works in an M16.
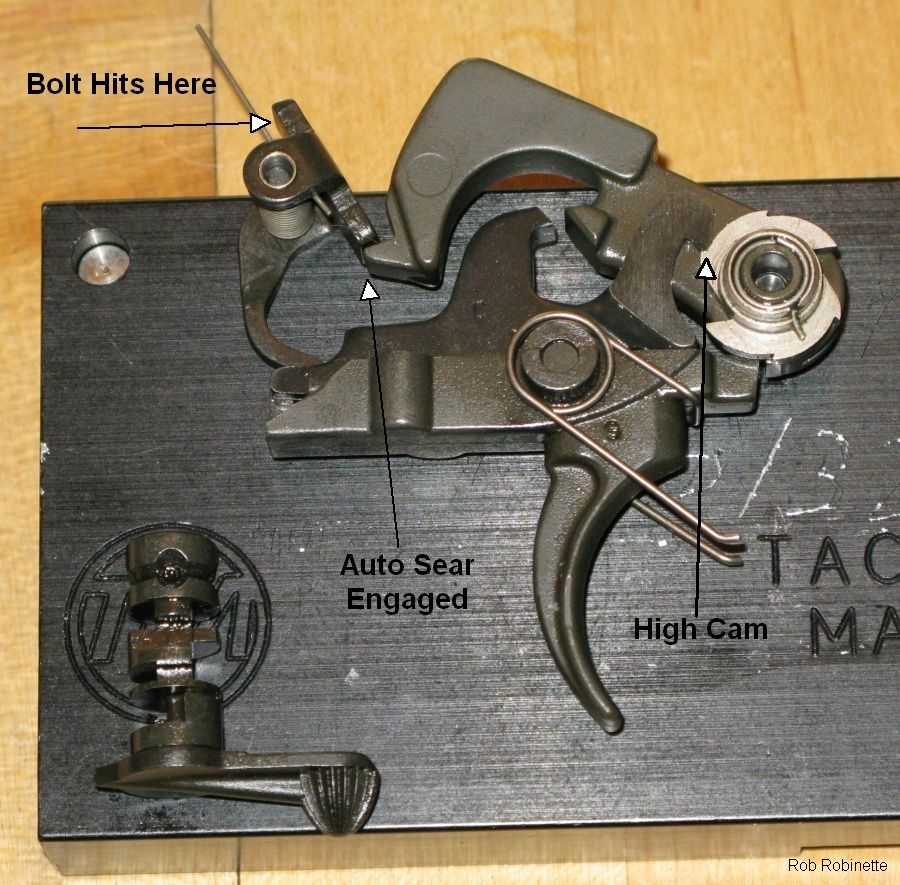
In full AUTO the selector cam rotates the auto sear into position to capture the hammer. The selector cam also contacts both disconnector tails locking them out which prevents them from capturing the hammer so the rifle will continue to fire while the trigger is pulled to the rear. The already heavy AUTO trigger pull is even heavier because both disconnector springs are compressed during the trigger pull.
In summary, when the burst disconnector is locked out you get semi-auto fire. Lock out the semi-auto disconnector and you get burst fire. Lock out both disconnectors and you get full auto.
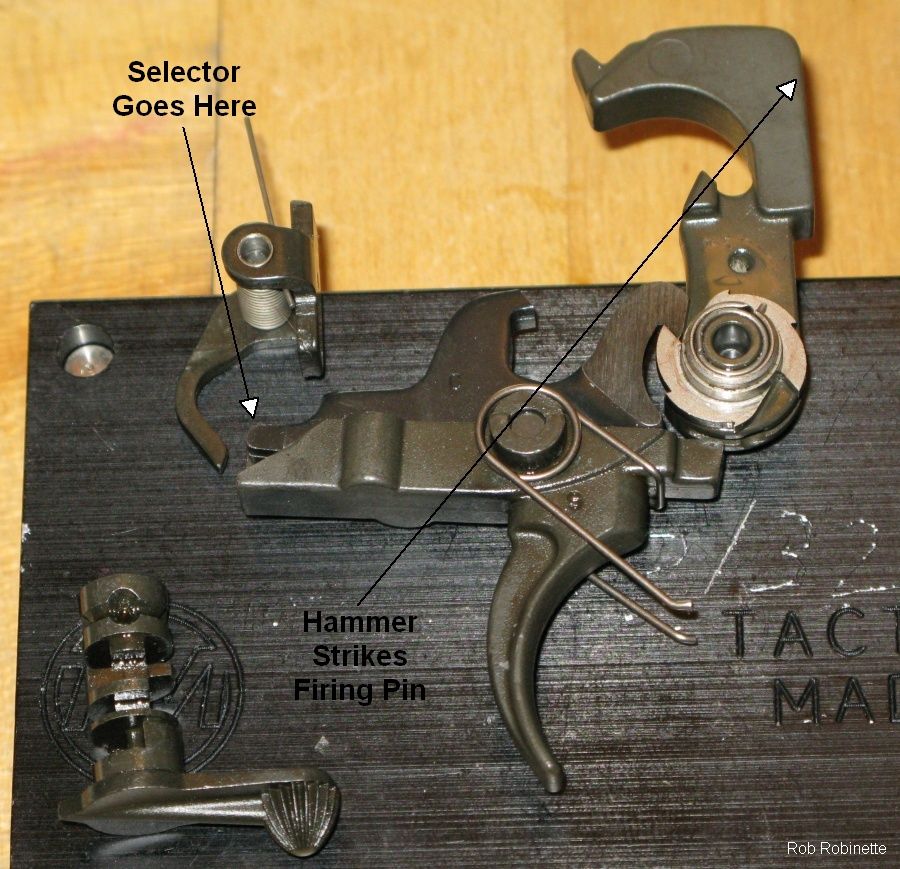
M16 4-Way Fire Control Group Uncocked
Cocked with Trigger Sear Engaged
Auto Sear Holding Hammer Until Bolt Moves Forward to Release Sear
Burst Disconnector on High Cam, Can't Engage Hammer
Burst Disconnector on Low Cam & Engaged
The M16A2 uses a burst 3-way selector with SAFE, SEMI, and BURST positions. It differs from the 4-way kit in three ways. A 3-way burst kit uses a standard full auto selector so it has no 4th position, the burst disconnector has no "tail" to ride the selector cam (so the burst disconnector is always free to ratchet the burst cam and engage the hammer) and the auto sear is slightly different--the 4-way auto sear has a thin, curved selector cam follower. You can convert an M16A2 to normal full-auto mode by following the instructions in the next section.
Convert 3-Way Burst to Full-Auto
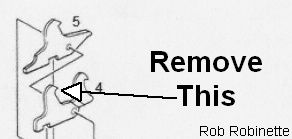
You can convert a burst 3-way selector (SAFE, SEMI, and BURST) to a normal full-auto selector (SAFE, SEMI, AUTO) by simply grinding off the burst disconnector's hammer engagement hook.
Burst Disconnector Hammer Hook
The BURST position will then function as full-auto because the burst disconnector will never capture the hammer and the rifle will fire as long as the trigger is held to the rear. The SEMI function is not affected by this modification. I recommend you purchase a replacement burst disconnector for the modification and leave your original burst disconnector alone so you can switch back to 3-round burst. Specialized Armament sells the 3-way burst disconnector.
You can quickly swap a normal and modified burst disconnector by pushing the trigger pin halfway out from the right side of the receiver just enough to free the burst (right) disconnector. Swap the disconnectors and push the trigger pin back into position.
Convert 3-Way Burst to 4-Way
If you already have a 3-way burst kit you can convert it to a 4-way by installing the four Colt 4-way specific parts: Auto Sear, both Disconnectors and the Selector. I can no longer find a source for the 4-way selector. I don't believe it's possible to get these individual 4-way parts from DPMS.
Installing the 4-Way Fire Control Group
Removing the Selector Stops
I knew the standard M16 selector stops were a problem because
they prevent the selector from traveling to the 6 o'clock position which is
required to get to AUTO, the 4th selector position. I saw pictures on the web of the
DPMS 4-way kit that does not require the removal of the selector stops
and it comes with an optional label that fits under the selector lever. The
selector lever is raised to clear the selector stops. The kit is a relative
bargain at $150 shipped from DSK Armory.
DSK requires you fax or email a copy of your M16 BATF Form 4 to purchase the
4-way kit. Note the DPMS selector positions are different than the Colt's.
You can convert a DPMS 4-Way Kit to a flush fitting Colt style by swapping out the extended DPMS 4-way selector and auto sear for the Colt 4-way selector ($45). and auto sear ($35).
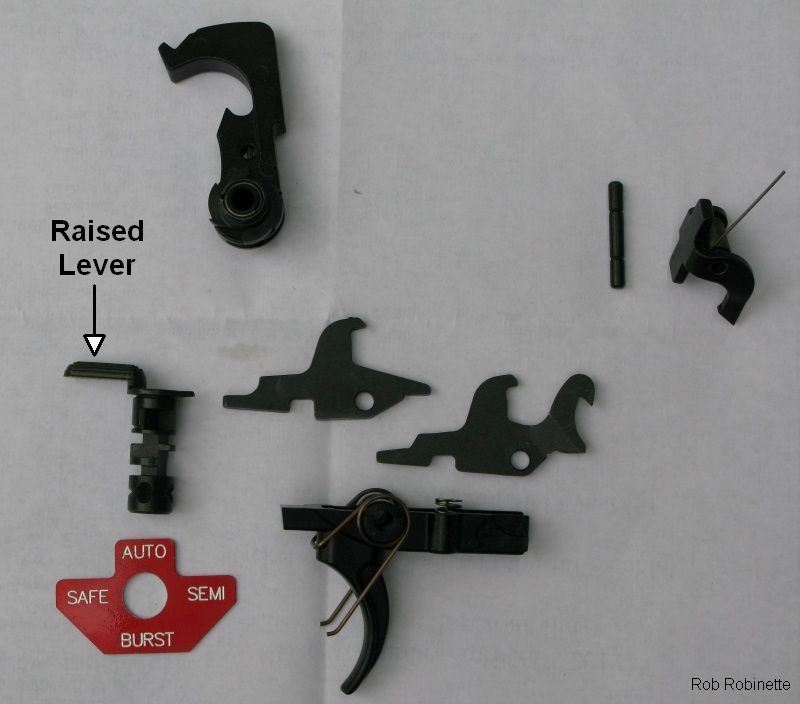
![]()
DPMS 4-Way Kit with Raised Selector Lever to Clear Selector Stops
Note the nonstandard stubby Auto Sear upper right (hammer spring is not shown but included)
The Colt 4-way kit requires the removal of at least one of the selector stops. Luckily I have a milling machine in the shop so I carefully milled off both stops using a 1/2 inch end mill. I used a Tactical Machining AR jig to hold the lower receiver in place during the machining. The end mill left perfectly smooth, shiny ovals where the selector stops were removed. My M16 lower is in mediocre shape and I plan to have it refinished anyway. I used some Birchwood Casey Aluminum Black to temporarily cover the bare metal where the selector stops were.
Milled Off Selector Stop, After Aluminum Black on Right
Assembling the Colt 4-Way Fire Control Group
Start by assembling the trigger group. Install a standard trigger spring. The silver disconnector spring goes on the right side of the trigger, the black disconnector spring goes on the left. The double hook disconnector goes on the right side of the trigger, the single hook goes on the left. You can cut a spare trigger pin in half to make an assembly pin to hold the trigger and disconnectors together during assembly. This makes it much easier to drive the trigger pin through the trigger and disconnectors. As you drive the trigger pin in during assembly the half-pin will be driven out the other side of the receiver.
Next assemble the hammer group. Put the burst cam spring inside the burst cam. The spring extension goes into the slot in the burst cam. The spring extension goes in first so it will fit deep into the burst cam slot. Install the burst cam and spring onto the right side of the hammer. Make sure the cam spring is fully seated and flush with the cam. The ridge on the burst cam goes outward. With the cam installed install the hammer spring.
Burst Kit Assembly Instructions
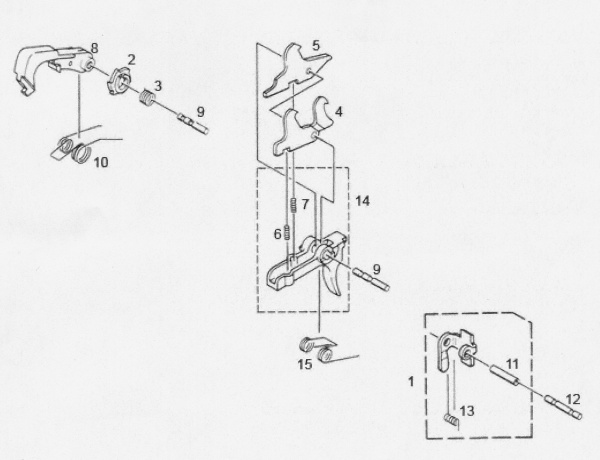
1 Auto Sear Assembly (4-way specific) [diagram above shows 3-way burst auto sear]
2 Burst Cam (burst specific)
3 Burst Cam Spring (burst specific)
4 Burst Disconnector (right, 4-way specific) [diagram above shows 3-way burst disconnector]
5 Semi-Auto Disconnector (left, 4-way specific)
6 Burst Disconnector Spring (right, silver, burst specific)
7 Semi-Auto Disconnector Spring (left, black, burst specific)
8 Hammer (burst specific)
9 Hammer & Trigger Pins (standard)
10 Hammer Spring (burst specific)
12 Auto Sear Pin (standard 1/8" pin)
14 Trigger (burst specific)
15 Trigger Spring (standard)
16 Selector (not shown, 4-way specific) [check your Colt selector for defective milling, see below]
Note that only 4 parts are different from a 3-way burst kit: Auto Sear, both Disconnectors and the Selector
Installing the 4-Way Fire Control Group Assemblies
The 4-way trigger is a little more difficult to install because the trigger pin has to get through two disconnectors. Using a short assembly pin (1/2 of a trigger pin) to hold the trigger and disconnectors together will make the install easy. If you don't use an assembly pin insert a punch through one of the lower receiver's trigger holes and through the trigger assembly to hold everything in place while you fit the trigger pin in from the other side. Take your time and move the punch around while pushing the trigger pin and it will eventually slide through. Applying some downward pressure with a finger on the disconnectors will often help get the trigger pin through.
Put the selector in place. The burst disconnector's forward hook makes the hammer install a little more difficult. Use a thin punch to depress the rear of the burst disconnector to move the burst disconnector's forward hook to the rear to give you room to fit the hammer in front of it.
Install the auto sear using a standard 1/8 inch sear pin.
Ideally the only modification to an M16 lower receiver required to install this Colt 4-way selector kit is to remove one or both selector stops. Due to differences in manufacturer specifications your M16 may or may not need additional modifications. I installed the trigger assembly in my David Company M16 lower and found my first problem. A burst trigger is wider than a normal trigger to make room for the two disconnectors. My M16's trigger well wasn't wide enough to accommodate the extra wide trigger. It rubbed the right side of the well. I had to widen the trigger well by milling out a few hundredths using a 1/2 inch end mill.
When I installed the hammer I realized I had another problem. The burst cam was making contact with the forward edge of the fire control group well. It was so tight the cam would not turn. I had to mill out the forward edge and corners of the fire control group well to make room for the burst cam. A 3/8 inch end mill did the trick by making the corner a smaller radius.
I got all the parts installed and ran the function check and found problem # 3. I could not pull the trigger when AUTO was selected. After closely examining the trigger to selector interface I realized the selector cam had a small nub that was hitting the right side of the trigger. DSK Armory confirmed that about 25% of their stock had the defective selector. Colt has been informed of the milling defect.
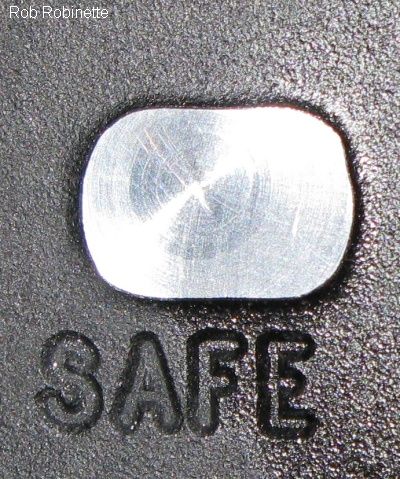
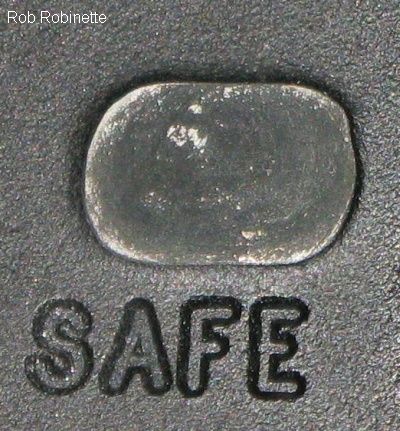
Defective Colt 4-Way Selector on Left, Correct Selector on Right
(thanks to DSK Armory for the picture on the right)
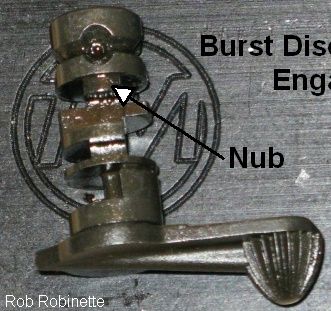
If your Colt 4-way selector is defective and has the nub you can replace it, mill off the nub, or simply remove some metal from the right side of the trigger where it meets the selector to allow the trigger to be pulled (see photo below). A grinding wheel did the trick in short order. The left side of the trigger was left unmolested because it contacts the selector in the SAFE position to lock the trigger.
Trigger Mod for AUTO Position
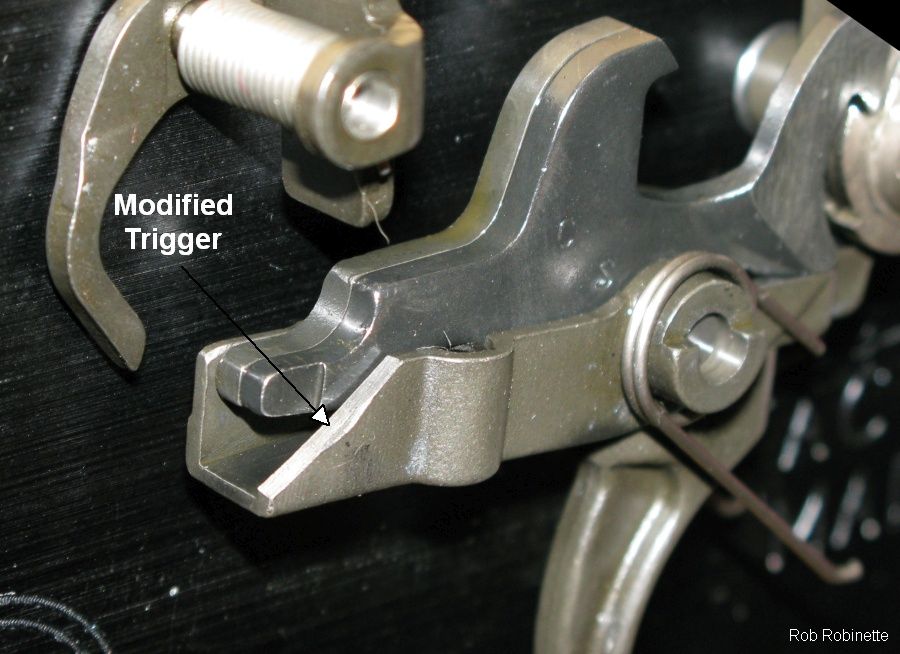
I removed some metal from the trigger tail to make the defective Colt 4-way selector function properly.
4-Way Function Check Performed on the Lower Receiver (no upper in place)
SAFE
1. Push the hammer back and down to the cocked position. The trigger sear should engage and hold the hammer.
2. Place the selector lever on SAFE. Pull the trigger to the rear, the hammer should NOT fall.
SEMI
1. Place the selector lever on SEMI.
2. Pull the trigger to the rear and hold. The hammer should fall. Don't allow the hammer to strike the forward edge of the fire control group well. Install a hammer block or carefully control the hammer's forward movement with a gloved hand.
3. While holding the trigger to the rear, push the hammer back and down to the cocked position. The semi-auto disconnector should capture the hammer.
4. Release the trigger. The hammer should jump from the disconnector to the trigger sear as the trigger resets.
5. Pull the trigger to the rear. The hammer should fall.
BURST
1. Push the hammer back and down to the cocked position. The trigger sear should engage and hold the hammer.
2. Place the selector lever on BURST. Pull the trigger to the rear and hold. The hammer should fall.
3. While holding the trigger to the rear, cycle the hammer back and down. The burst disconnector or auto sear should capture the hammer.
a. If the auto sear captures the hammer release it by hand. The purpose of the auto sear is to hold the hammer until the bolt closes. Releasing the auto sear by hand simulates the bolt moving forward and releasing the auto sear. The hammer should fall.
b. Repeat this up to 3 times until the burst disconnector captures the hammer.
4. With the hammer captured by the burst disconnector release the trigger. You should see the hammer jump from the burst disconnector to the auto sear.
5. Release the auto sear by hand. The hammer should jump to the trigger sear.
6. Pull the trigger to the rear and hold. The hammer should fall.
7. While holding the trigger to the rear, cycle the hammer back and down, the auto sear should capture the hammer so release it by hand and the burst disconnector should capture the hammer on the third cycle. This simulates firing the 3-round burst.
8. Release the trigger. The hammer should jump from the burst disconnector to the auto sear.
9. Release the auto sear by hand. The hammer should jump to the trigger sear as the trigger resets.
10. Pull the trigger. The hammer should fall.
AUTO
1. Push the hammer back and down to the cocked position. The auto sear should capture the hammer.
2. Release the auto sear by hand. This simulates the bolt moving forward and releasing the auto sear. The hammer should jump from the auto sear to the trigger sear.
3. Place the selector lever on AUTO.
4. Pull the trigger to the rear and hold. The hammer should fall.
5. While holding the trigger to the rear, cycle the hammer back and down, the auto sear should capture the hammer so release it by hand and the hammer should fall. Repeat this at least 4 times. This ensures the burst disconnector does not capture the hammer. Neither of the disconnectors should capture the hammer while the trigger is held to the rear.
6. Push the hammer back and down to the cocked position. The auto sear should capture the hammer.
7. Release the trigger.
8. Release the auto sear by hand. The hammer should jump from the auto sear to the trigger sear as the trigger resets.
9. Pull the trigger. The hammer should fall.
After I modified the trigger the above function check worked properly in all 4 positions. After such a painful installation I understand why there's so few M16s with 4-way selectors but It's pretty cool to have semi-auto, 3-round burst and full-auto a thumb flick away. I hope this helps anyone that's been contemplating a 4-way fire control group.
Sourcing the Parts
UPDATE: The Colt 4-way parts are no longer in production and I could not
locate a source for the 4-way selector. As of June 2016 all the other 4-way Colt
parts were still available.
UPDATE May 2022: Colt 4-way selectors are available on gunbroker.com for $110.
The easy way is to order the complete (small pin) Colt
4-Way Lower Parts Kit from Specialized Armament for $275
Out of stock and out of production by Colt
http://www.specializedarmament.com/catalog/AR_15_Fire_Control-298-0.html
DSKArmory also sells the Colt 4-way fire control
group for $260 shipped to LE/Military/NFA/FFL only. Out of stock
and out of production
The hard way, order just the 4-Way specific parts for way too much. Individual parts prices have skyrocketed:
SELECTOR, 4-WAY Product ID : SP63714 $150 Out of stock and out of production by Colt ***
AUTOMATIC SEAR ASSY, 4-WAY (with spring & pin) Product ID : SP63712 $125.00
DISCONNECTOR, (0.155), 4-WAY, (LEFT/SEMI) Product ID : SP63716 $50
DISCONNECTOR SPRING, AUTO, SEMI, BURST, (LEFT/SEMI) - BLACK Product ID : SA26302 $4
DISCONNECTOR, (0.155), 4-WAY, (RIGHT/BURST) Product ID : SP63715 $75
You may be able to substitute SP62334 Disconnector, Automatic for the Right/Burst Disconnector
DISCONNECTOR SPRING, BURST, (RIGHT/BURST) SILVER Product ID : SA26301 $4
HAMMER & HAMMER PIN RETAINER ASSY, (0.155), BURST & 4-WAY Product ID : SP64561 $65
HAMMER SPRING, BURST & 4-WAY Product ID : SP64558 $5
TRIGGER, (0.155), BURST & 4-WAY Product ID : SP64641 $45
DPMS 4-Way Kit
I can no longer find a source for the DPMS 4-Way kit.
Convert a 3-Way Burst Kit to 4-Way
If you already have a 3-way burst kit you can convert it to a 4-way by installing the four 4-way specific parts: Auto Sear, both Disconnectors and the Selector. Since individual parts prices have doubled and tripled in price it is cheaper to buy the complete lower parts kit if you can find one.
SELECTOR, 4-WAY Product ID : SP63714 $150 Out of stock and out of production by Colt *** (were available on gunbroker.com for $110 in May 2022)
AUTOMATIC SEAR ASSY, 4-WAY (with spring & pin) Product ID : SP63712 $125.00
DISCONNECTOR, (0.155), 4-WAY, (LEFT/SEMI) Product ID : SP63716 $50.00
DISCONNECTOR, (0.155), 4-WAY, (RIGHT/BURST) Product ID : SP63715 $75.00
You may be able to substitute SP62334 Disconnector, Automatic for the Right/Burst Disconnector
Here's the link to the individual parts: http://www.specializedarmament.com/catalog/AR 15 Fire Control-298-0.html
Here's another full auto trigger option for the M16, the Geissele Super Select-Fire (SSF) Trigger with two stage semi-auto and single stage full auto trigger.
This is my current trigger and it's fantastic--a very crisp and light semi-auto trigger pull for accuracy but pretty normal full auto trigger pull.
By Major Rob Robinette
US Army and Air Force (Retired)
Major Robinette was a Battalion Marksmanship Champion, Squadron Rifle Team Captain, Range Officer and F-15 pilot. Rob also spent 10 years as a federal law enforcement officer. He holds a Federal Firearms License and is the owner of Nolichucky Guns. He enjoys all forms of rifle and pistol use.