S2000 Compression & Leak Down Tests
By Rob Robinette
A compression test is an easy way to asses the mechanical health of an engine. The engine's valves, piston rings, cylinder walls and head gasket must all be in good condition to hold compression. A leak down test will allow you to troubleshoot a low compression cylinder. Jump to Leak Down Test
Compression Test
Special Tools: Besides the compression tester you will need a 5/8" (16mm) spark plug socket. In a pinch you can use a 5/8" or 16mm deep socket with some duct tape inside to keep the spark plug from falling out.
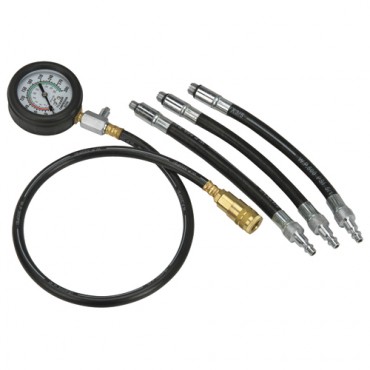
Compression tester from Harbor Freight for $26
Preparation
The engine should be warm when doing a compression or leak down test but it can be done on a cold engine but the compression will read lower and leak down will be higher. Do as much prep work as you can before you start the engine and warm it up. Remove the spark plug cover with a 10mm socket for the front bolt and TDC sensor bolt located near the firewall. Use a hex wrench to remove the 4 hex head bolts and remove the cover.
It's a good idea to have a battery charger hooked up to keep from draining the battery while spinning the engine for the test
Get your 5/8" spark plug socket and 6 inch extension ready and find the 14mm adapter for the compression tester
Find the #2 electrical fuse (15 amp Fuel Injection) located under the dash in the main fuse box--don't pull it now, just make sure you can identify it
Get your compressed air hose into position (used to blow out the spark plug holes)
Go for a short drive or idle the car until the radiator cooling fan comes on to fully warm the engine.
Shut down the engine
Pull the #2 electrical fuse to prevent fuel from being sprayed into the engine when running the test
Remove the 4 10mm bolts that hold the coil packs on the spark plugs
Remove the coil packs
Blow out the spark plug holes with compressed air to remove any dirt before pulling the plugs
Remove all the spark plugs and put them in order so you can inspect them later and know which cylinder they came from. They should be a nice cocoa brown color. You should also check their overall condition and set the gap.

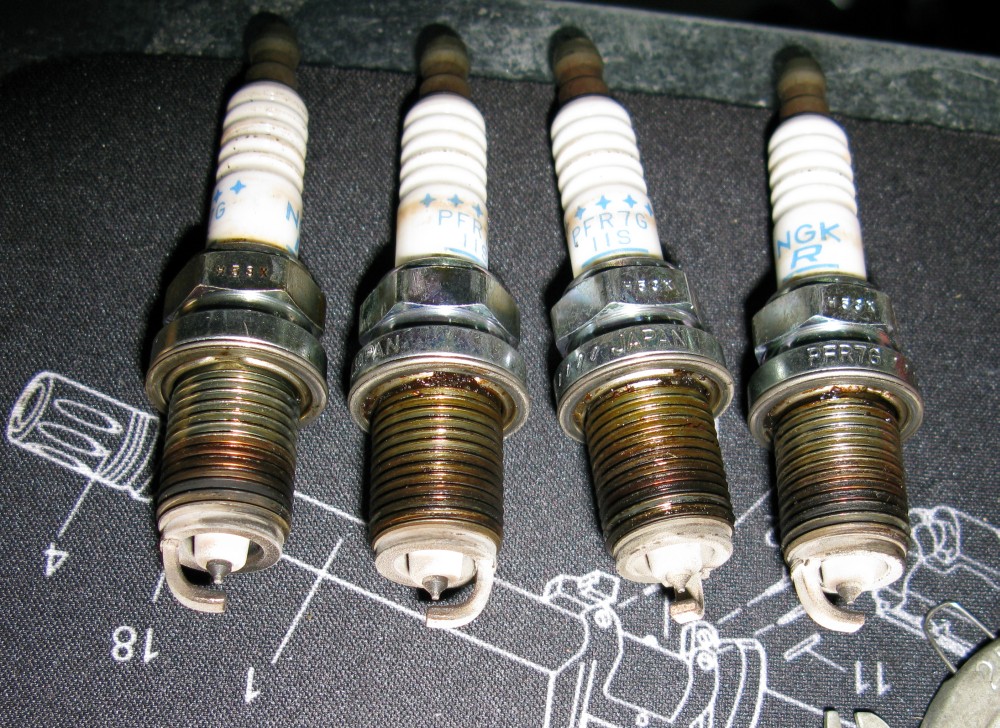
Spark Plugs Have Cocoa Brown Color and Electrodes Aren't Worn
But Rubber Oil Seals Are Leaking On Cylinders 2, 3 & 4
Install the Compression Tester
Insert the compression tester's 14mm adapter and hose (compare it to a spark plug for sizing) into the spark plug hole and hand tighten
Note: If the hose comes with a separate 14mm adapter make sure it is tightly secured, you don't want it to unscrew and stay in the spark plug hole
Attach the compression gauge and reset it to zero
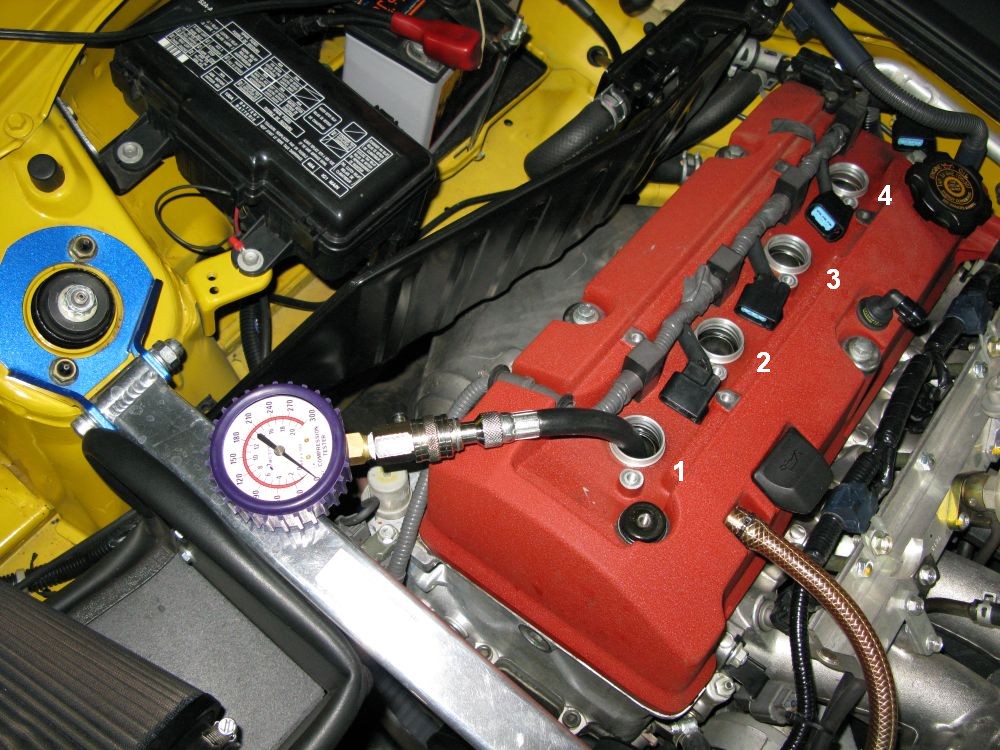
Compression Gauge Attached to Cylinder # 1
With the throttle fully open crank the engine for about 7 seconds
The highest pressure pulse will read on the gauge (the needle sticks at highest point until reset)
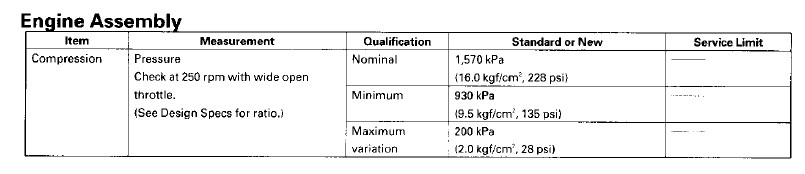
My readings were 254 to 258 on all 4 cylinders with a warm engine
Normally the cooler the engine the lower the compression will read
It's a good idea to retest the cylinder you started with to verify the gauge is consistent
Remember to reset the gauge to 0 before testing again
If one or more cylinders are identified as having 28psi less compression than the others, you can do a leak down test to troubleshoot the bad cylinder(s) to determine what is causing the low compression (piston rings, valves, cylinder wall or head gasket)
Leak Down Test
A leak down test will allow you to troubleshoot a low compression cylinder. A leak down gauge is a flow meter that will tell you how much leakage you have and what is leaking. The car needs to be fully warmed up and all 4 spark plugs pulled just like the compression test above but instead of spinning the engine with the starter you set Top Dead Center (TDC= piston full up and all valves closed) for the cylinder you want to test and pressurize the cylinder with compressed air and measure the air leakage.
Special Tools: Besides the leak down tester you will need an air compressor and 5/8" (16mm) spark plug socket
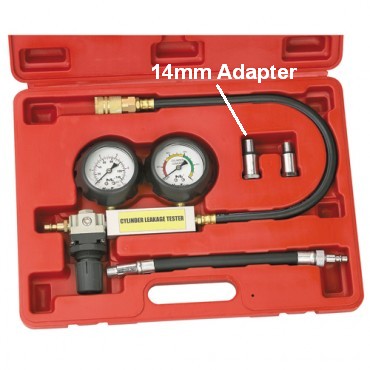
I purchased this leak down tester from Harbor Freight for $40
It works great
Finding Top Dead Center (TDC)
An easy way to set TDC without removing the valve cover is to put a thin clean rod or dowel down through the spark plug hole to rest on top of the piston. It needs to be long enough to protrude so you can see it rise and fall. I used a 12 inch piece of TIG welding rod. Put the transmission in neutral and use a 19mm socket and wrench on the crankshaft bolt to turn the engine clockwise (while facing the engine from the front of the car) slowly. The rod will rise and fall. When it gets to its highest point the piston is either at the top of the compression or exhaust stroke (50% chance of being right). TDC is the top of the compression stroke. If you can't get above about 95% leak down then the piston is probably at the top of the exhaust stroke with the exhaust valves open and dumping the air pressure. Turn the crank 180 degrees until the rod is at the top of its stroke again and you'll be at TDC.
Once TDC is found for cylinder # 1, moving to TDC for the other cylinders is as follows:
180 degrees more clockwise turn of crank gives TDC for # 3, 180 more gives TDC for # 4, 180 more gives TDC for # 2 (so do the cylinders in this order)

Wrench and 19mm Socket Used to Turn Crankshaft Clockwise to Find TDC
With TDC set remove the rod/dowel and install the leak down tester's 14mm adapter and hose. Make sure the 14mm adapter is on tight so it doesn't come off and stay in the spark plug hole.
Adjust your air compressor's regulator pressure to below 100psi
Turn the leak down tester's regulator knob out full counter-clockwise (closed)
Attach the air compressor hose to the leak down tester
Turn the leak down tester's regulator knob slowly clockwise to set 0% on the right (leak down) gauge
Note: This must be done before connecting the leak down tester to the engine--there will be 0% air flow because the leak down tester isn't connected (see picture below). The directions that came with my Harbor Freight tester had this wrong.
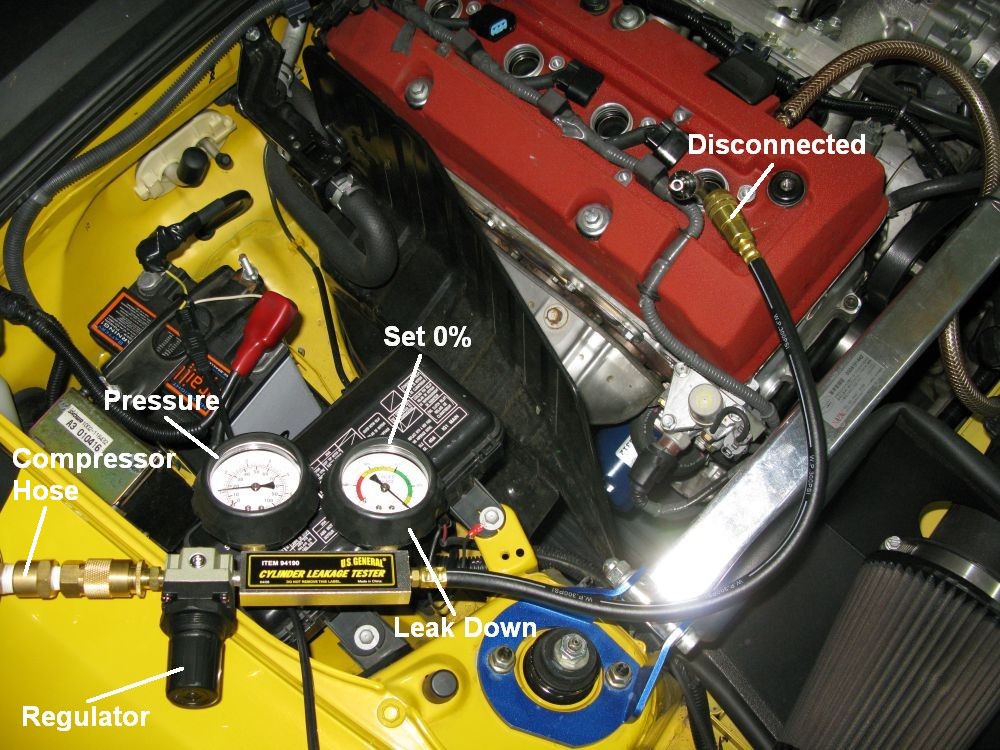
Setting 0% On the Leak Down Tester
Leak Down Tester Attached to Compressor Hose (left) But Not Attached to Engine (upper right)
Leak Down Gauge (right gauge) Set to 0% Using Leak Down Tester's Regulator Knob (lower left)
With 0% set on the leak down gauge, attach the leak down tester to the cylinder hose, air will begin to flow into the spark plug hole. The more air that leaks the higher the reading on the right (leak down) gauge
My # 1 cylinder that registered a compression of 254psi (very strong) had a 5% leak down with a warm engine which is also very strong
Move the engine's crankshaft 180 degrees and repeat the test on the next cylinder in order 1, 3, 4, 2.

Leak Down Tester Now Connected to Cylinder # 1 With Leak Down Gauge Reading 5%
Troubleshoot
If one or more cylinders are identified as having 15% to 30% greater leak down loss than the others, you can listen for escaping air pressure during the test to diagnose the problem. Use a hose to your ear or a mechanics stethoscope to listen for airflow.
Air escaping at the following locations indicates a potential problem:
1. Oil dipstick tube indicates pressure escaping from the cylinder into the oil jacket. This usually indicates stuck, burned or worn rings or cylinder walls.
2. Radiator filler opening bubbles or sound indicates pressure escaping into the coolant jacket. This can indicate cracked cylinder walls or damaged head gasket. In case of a damaged head gasket, often two or more adjacent cylinders will show the same problem.
3. Adjacent cylinder indicates a damaged head gasket.
4. Tail pipe indicates burned, stuck or worn exhaust valve.
5. Carburetor or fuel injector intake indicates stuck, burned or worn intake valve.
Important Considerations About Compression Loss Testing
1. There will always be some compression loss past piston rings, even in a new engine. You will never see a 0% leak down, and this lost pressure should be audible at the oil dipstick port due to air leaking past the piston rings.
2. If the Leakage Gauge shows very high or 100% compression loss, the cylinder may not be at Top Dead Center (TDC) on the compression stroke. Check to be sure the cylinder is at TDC, so the valves are closed.
3. A “good” reading will show compression loss of all cylinders at about the same rate. A large difference of 15% to 30% comparing one cylinder to the others indicates a problem.
4. Leakage rate readings may vary by up to 10% when taking repeated readings of the same cylinder. Piston position and engine temperature can cause variable readings. Take several readings and average the results for a recorded reading for each cylinder.
5. Diagnosing an engine problem with a leak down tester involves using a listening device. A length of hose or a mechanic’s stethoscope are suggested.
6. The lower the sound pitch of escaping pressure indicates a larger leak. Small leaks will typically make a higher pitched sound.
7. If the vehicle has multiple problems, the leak down tester may show only the most pronounced problems. A large problem may overwhelm a smaller problem during testing.
On reassembly don't forget to remove the wrench on the crank shaft bolt!