S2000 Suspension Bushing Replacement
by Rob Robinette
Replacing old worn suspension bushings is a good way to tighten up the handling feel of your car. The OEM S2000 bushings don't slide when the suspension arms move, they stretch. They are locked into position when tightened and the rubber bushings stretch when the arms move. This is why the Honda Workshop Manual says you need to jack up the wheel hub to running height before tightening bushing mounts--if you don't the bushings will be pre-loaded when you lower the car off the jacks.

You basically have four options for bushing replacement: Replace the entire upper and lower suspension arms from Honda which come with new bushings (expensive but relatively easy), replace the bushings with Powerflex Street bushings, replace them with Powerflex Race (black) bushings, or replace them with Energy Suspension bushings (available in black or red). Be prepared, replacing suspension bushings is very labor intensive.
Of all the S2000's bushings the front lower control arm compliance bushing is the most likely to fail. This is the bushing on the camber adjuster. You can get a pretty good look at this bushing by removing the front wheel and shining a flashlight down onto the rubber part of the bushing. Torn compliance bushings are pretty common and are the only damaged bushings I've discovered on my car. All of the upper arm bushings I removed were in good shape with no tears or degradation. Several companies will sell the compliance bushing separately. I replaced my compliance bushings in 2010.
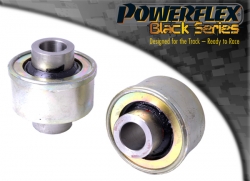
Powerflex Race Compliance Bushing
Powerflex Race and Energy Suspension bushings are rated nice firm 95A in hardness. I do not know the hardness rating of the Powerflex Street bushings. Pricewise the Powerflex are quite a bit more expensive than the Energy Suspension bushings. The Powerflex bushings are purchased separately for upper front, lower front, upper rear, lower rear, front lower compliance, rear toe arm and shock absorber bushings. The Energy Suspension kit comes in two kits, front control arm bushings ($111) and rear control arm bushings ($118) but they include the compliance, toe arm and shock absorber bushings so keep that in mind when comparing prices.
S2000 Bushings Available as of March 2017
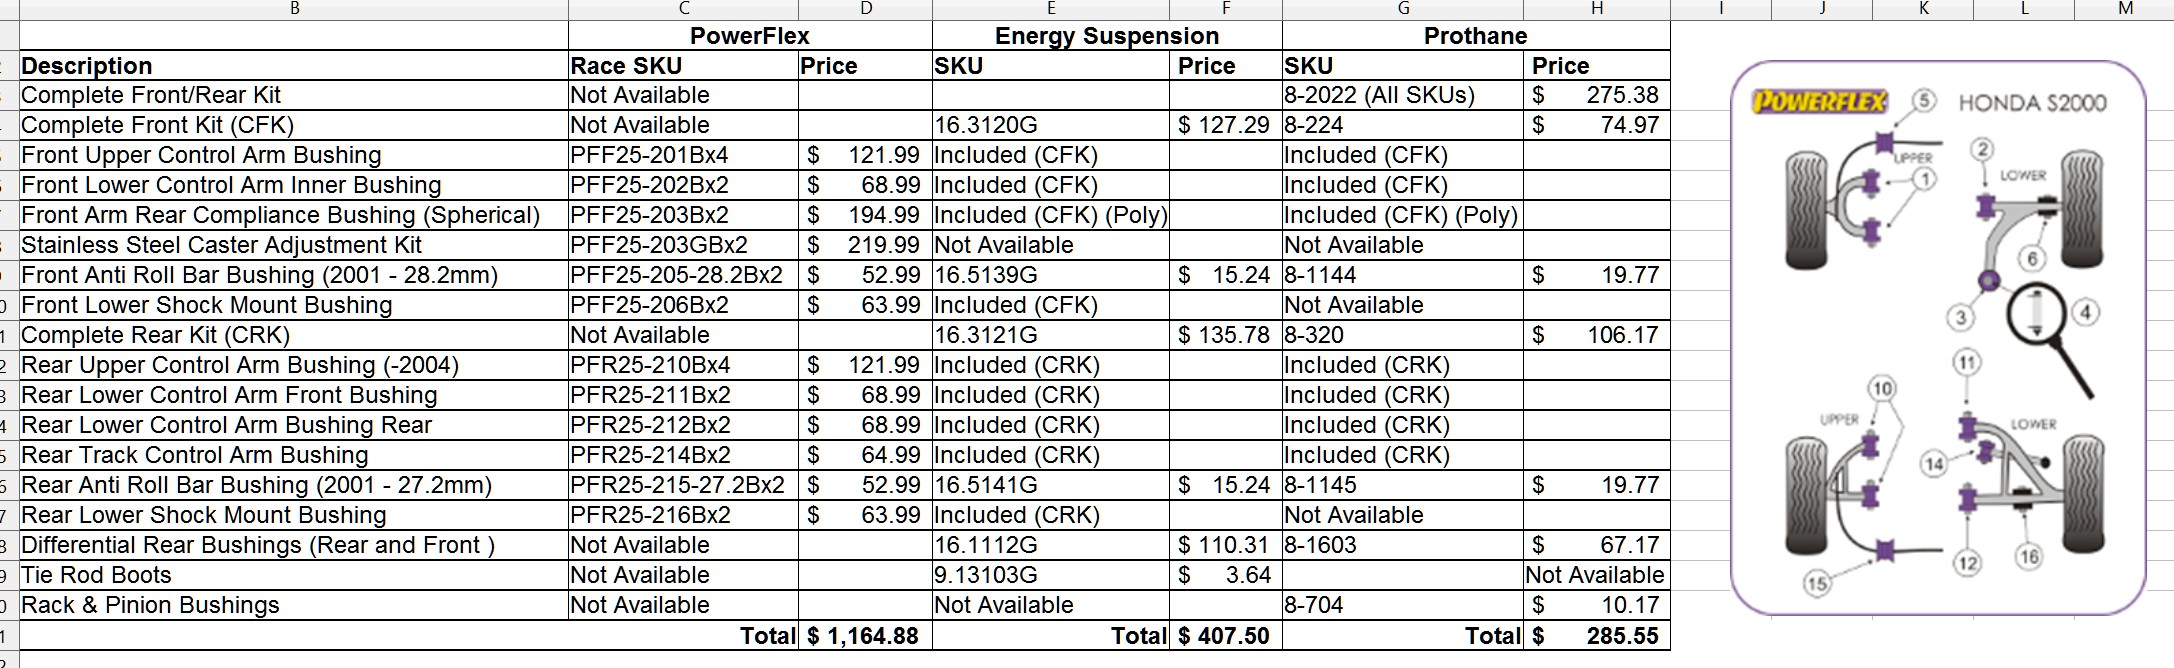
Chart by Brandon Bruce
I chose to go the piecemeal route starting with all the upper control arm bushings. I purchased one each Powerflex Race bushing set for the upper front and upper rear control arm bushings from GT Motoring. GT Motoring has the entire Powerflex line of bushings available for the S2000. I took the piecemeal approach so I could get started during racing season. I plan to do the much more labor intensive lower control arms this winter. I have rear bump steer correcting toe arms with high quality bushings so I won't need to replace these. If you are running the stock front anti-roll bar (sway bar) I highly recommend you replace the stock bushings with 95A bushings because it will help balance the car's handling. I don't recommend replacing the rear sway bar bushings with firmer bushings because it can add to the S2000's over steer tendencies.
With the upper control arms the entire old bushing is pressed out but the lower arm bushings are different with Energy Suspension bushings because you have to use a torch and heat the old bushings until the rubber releases from the metal bushing caps and outer metal shell. You then remove the center part of the bushing but leave the outer metal shell in place. You also have to remove all the old rubber and then polish up the surface the new bushing will ride against--it's a messy pain in the butt.
Powerflex lower arm bushings are installed by pressing out the entire old bushing--you don't leave the old bushings' outer metal shells in place. This is the main reason the Powerflex bushings are more expensive than the Energy Suspension bushings. I'll document the lower bushing swap when I do it this winter.
You can always split the labor between yourself and a shop by removing the suspension arms yourself and taking them to a shop to have the old bushings removed and the new ones installed. Visit the shop beforehand and show them the installation instructions to make sure they are willing and able to do it.
You can probably get away with not doing an alignment when replacing just the front and rear upper arms, but because you have to remove the suspension adjusters to remove the lower arms you will definitely need an alignment after the lower arms are reinstalled.
The official Energy Suspension instructions are available here: S2000 Front Bushings - S2000 Rear Bushings
Special Tools Required
Propane or acetylene torch to remove lower control arm bushings
Torque wrench that can read up to 98 foot-pounds.
Ball joint remover
Press with correct size bushing drivers and receiver cups to remove old bushings. All four upper arms use the same size bushing driver and receiver cup, but the rear toe arm needs a different size driver and cup.
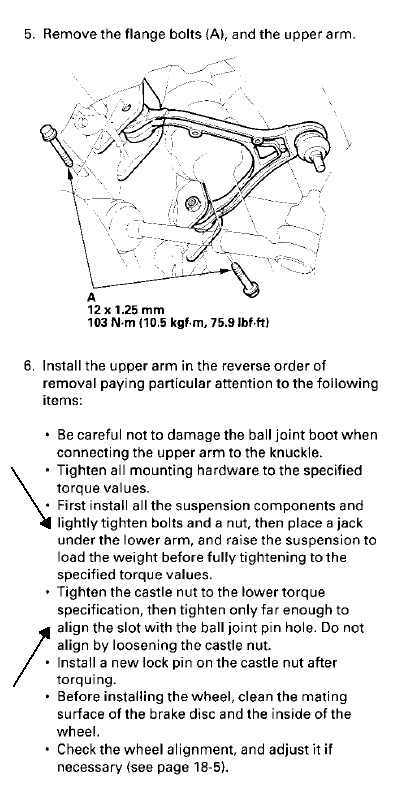
Front Lower & Upper Arm Removal/Installation
From the 2000 - 2003 Workshop Manual
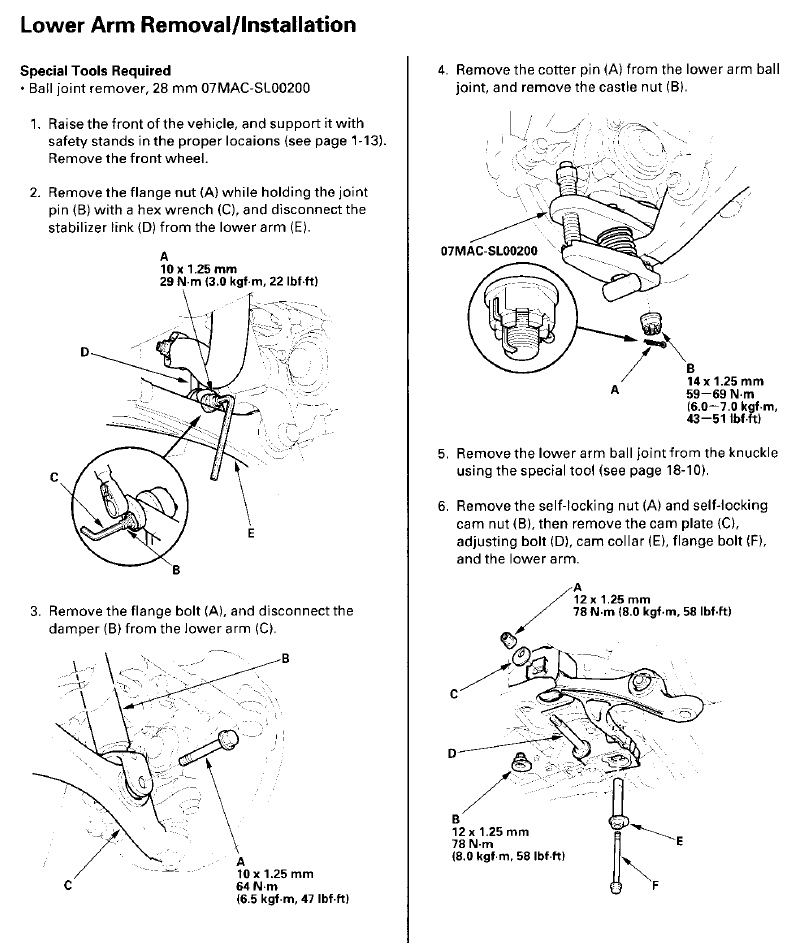
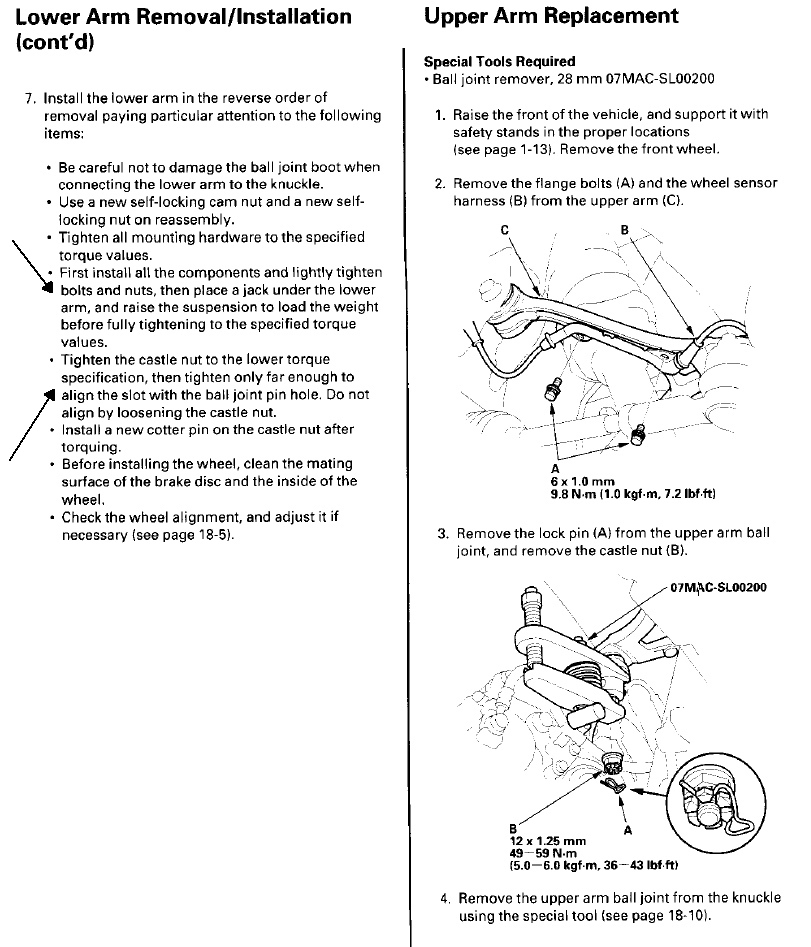
Cliff Notes Version of Above Instructions
Front Upper Arm
Remove 2 10mm bolts securing ABS line to the upper arm
If you are going to completely remove the upper arm then pop the upper ball joint
Remove 2 17mm bolts securing the upper arm to the chassis
If using an "in place" press - support the wheel hub, don't let it pull on the brake or ABS lines
Swing upper arm around for access
Front Lower Arm
Disconnect front sway bar
Disconnect shock absorber lower mount
Pop the lower ball joint
Remove the two suspension adjuster bolts that secure the lower arm to the chassis
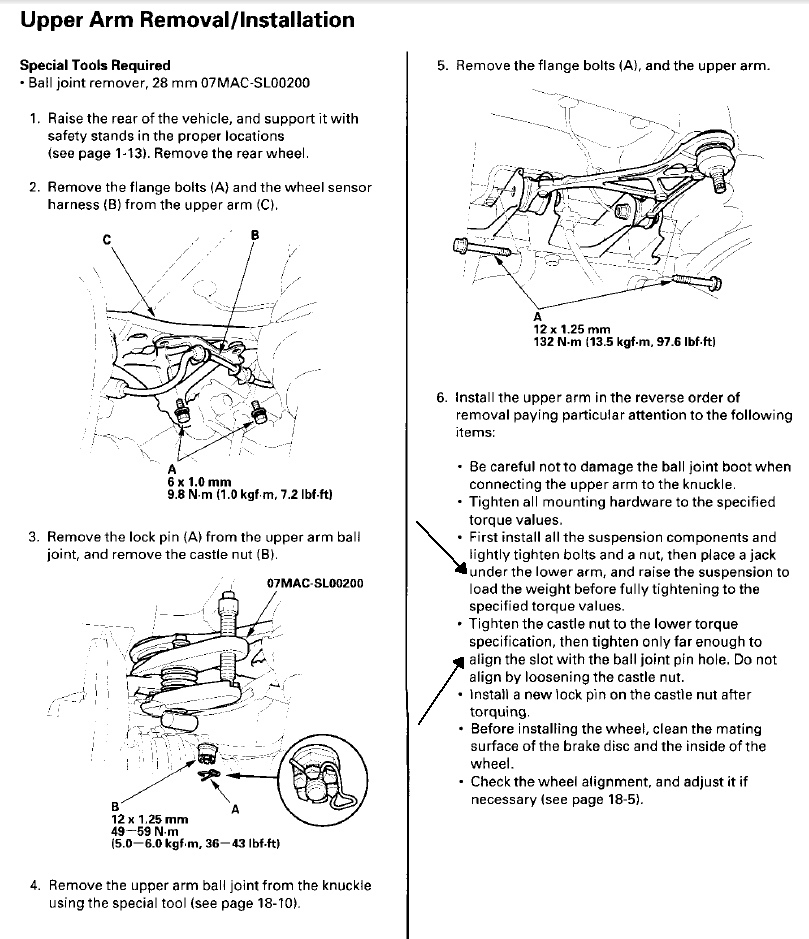
Rear Lower Arm Removal/Installation
Ball Joint Separator on Front Lower Ball Joint
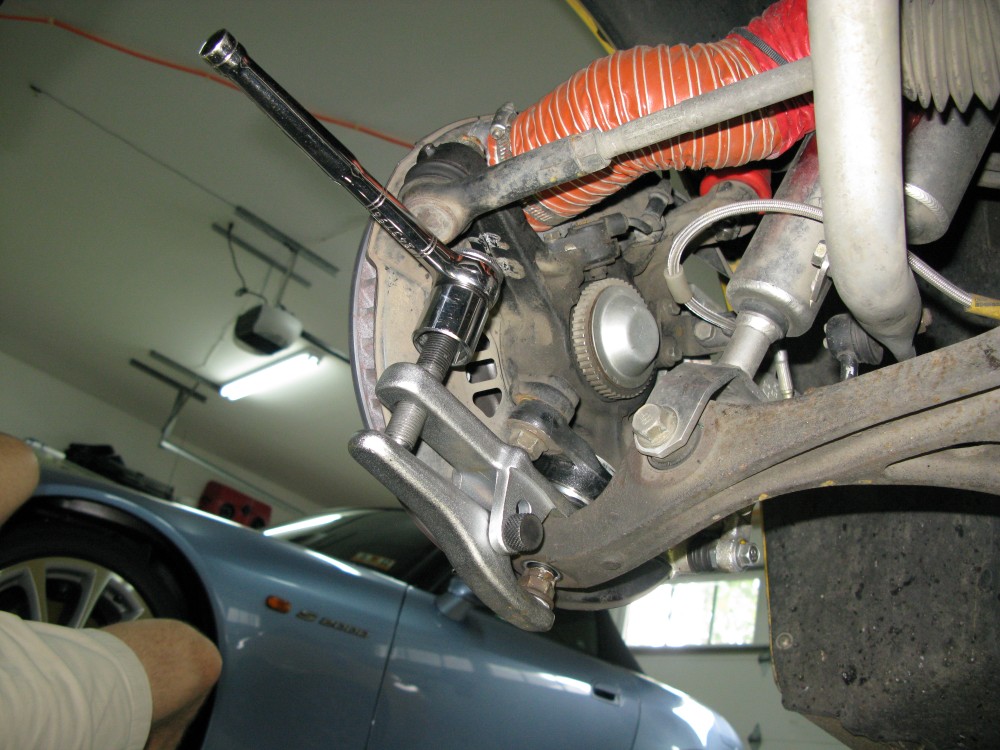
Turn the ball joint's castle nut upside down to prevent damage to the ball joint's threads. Grease the separator tool so it will slide under the ball joint boot without damage. Lube the tools threads. Be ready for loud "pop!"

Cliff Notes Version of Above Instructions
Rear Upper Arm
Remove 2 10mm bolts securing ABS line to the upper arm
If you are going to completely remove the upper arm pop the upper ball joint
Remove 2 17mm bolts securing the upper arm to the chassis
If using an "in place" press - support the wheel hub, don't let it pull on the brake or ABS lines
Swing upper arm around for access
Rear Lower Arm
Disconnect rear sway bar
Disconnect shock absorber lower mount
Pop the lower ball joint
Remove the two bolts that secure the lower arm to the chassis
Rear Toe Control Arm

Energy Suspension Instructions for Front & Rear Upper Control Arm Bushings
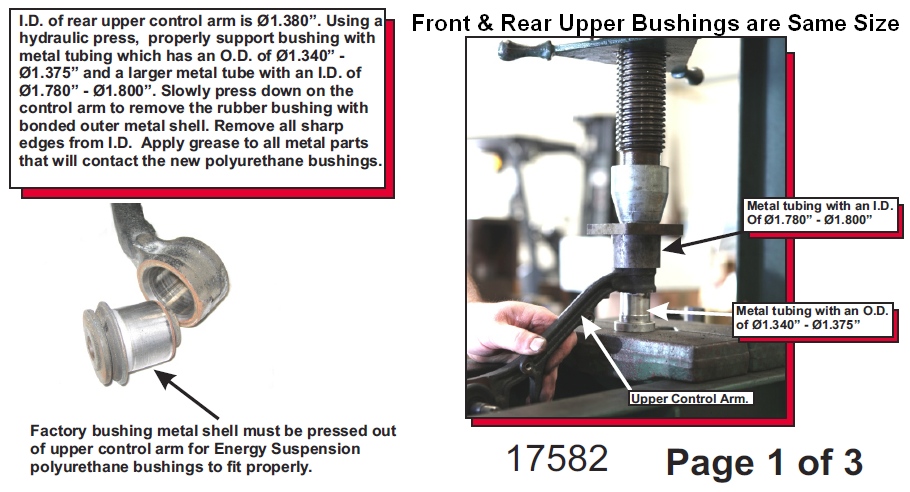
The front and rear upper arms are exactly the same size and use the same procedure to press out the old bushings. You can completely remove the control arms and use a press like in the picture above or you can use an "in place" press like I detail below.
Trimming Face of Socket Used to Press Out Old Bushings
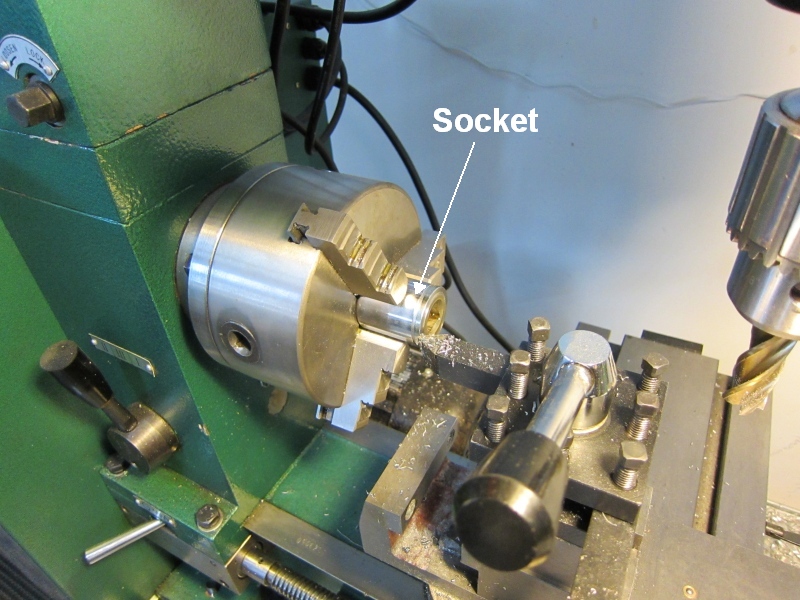
I found a 1" socket that had the exact size called for to press out the old bushings. It measured 1.35 inches in outside diameter (must be 1.34" to 1.375"). I trimmed the face of the socket flat so it would support the bushing better than the original angled face. You could do this with a belt sander, grinder or file too. The socket is still fully functional as a 1" socket.
Homemade "In Place" Press
Note I left the upper ball joint in place and swung the upper arm out for easy access.
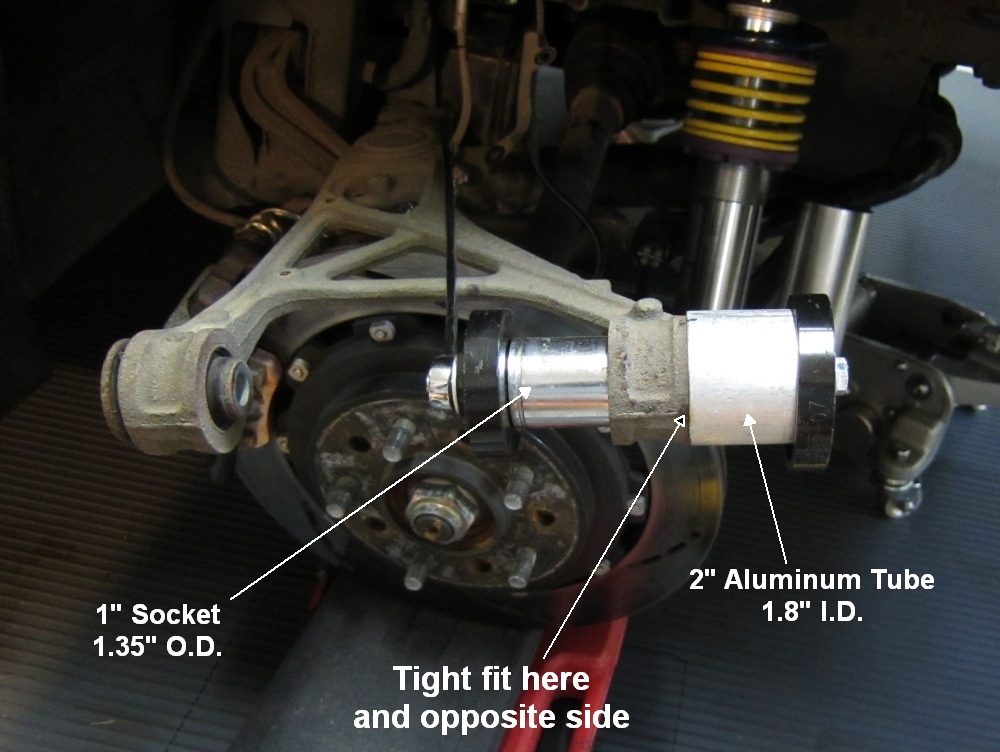
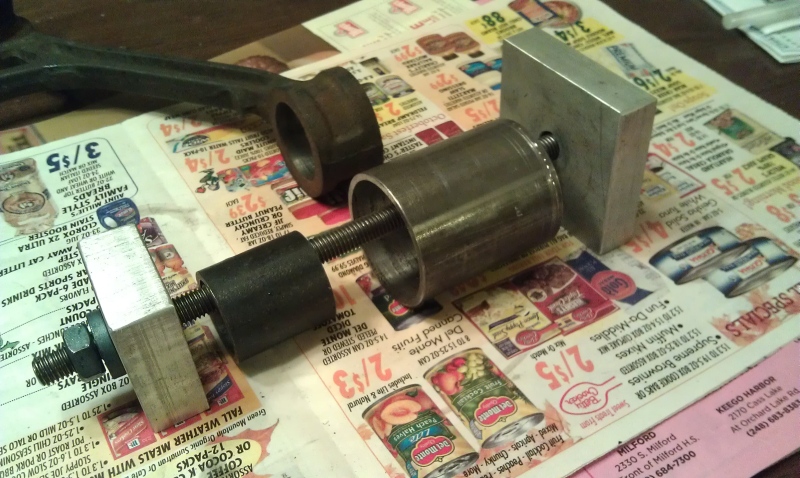
I constructed this "in place" bearing press so I wouldn't have to pop the ball joint to completely remove the upper suspension arm to place it on a hydraulic press. This "in place" press can be used to remove the front and rear upper arm bushings (but the rear toe arm needs different size bushing driver & receiver cup). The press consists of a 6 inch long 3/8" bolt (bolt must be small enough to fit through bushing) & nut with washers, a bushing driver (1 inch socket was the right size) that drives the bushing out, a 1.5" long section of 2" aluminum or steel tube with a 1.8" inside diameter to act as the "receiver cup" (must be 1.78" to 1.8" I.D.) and two black metal end caps that came from a bearing press kit.
Tightening the bolt will press the socket inward to drive the bushing out (to the right in pic above) into the aluminum tube receiver. The end caps have to be strong because of all the force it takes to drive the old bushings out. Heating the arm around the old bushing with a torch would probably make it easier to break them loose although I didn't have to do that to get them out.
The aluminum receiver cup was a little too big and was slipping off the side of the arm so I "ovaled" the cup by lightly hammering it until I got a tight fit over the old bearing at the outside edge and inside edge of the upper arm (see pic above). A 2" steel tube would be better and last longer. I destroyed one aluminum tube receiver on the 6th bushing so I cut another 2" section and finished the job.
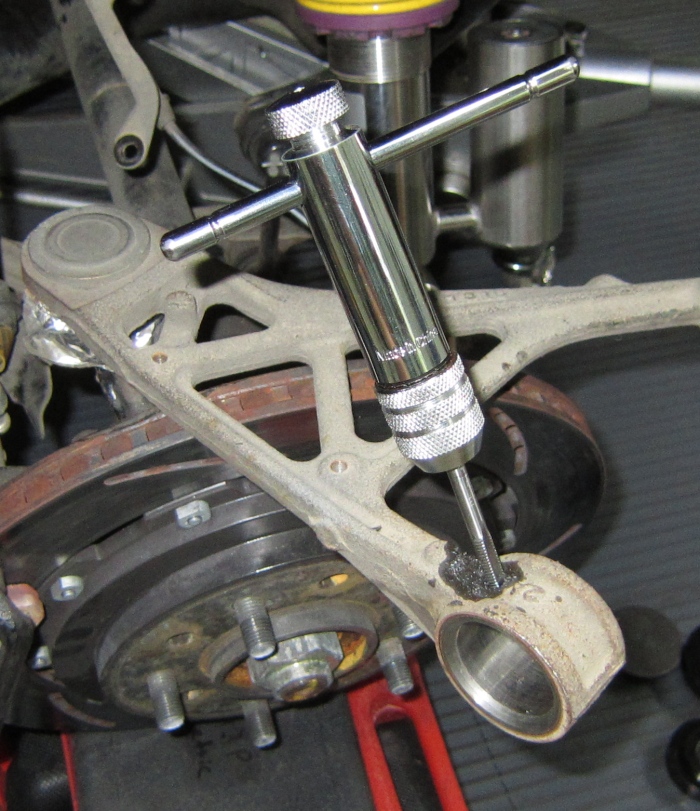
Another "In Place" Bushing Press
Using a Ball Joint Press to Remove the Bushing

This is another way to remove the bushings. You still need the bushing driver (socket) and receiver tube used with the "in place" press above. You can also completely remove the upper arm and use a standard hydraulic press but again you still need a driver and receiver cup.
Upper Rear Bushings Pressed Out

File and polish the sides of the bearing socket because these surfaces will be sliding against the new bushings as the arm moves. Smooth all metal corners that will contact the new bushings.
Front Upper Arm Bushings Removed

Zerk Hole, #5 Drill Bit (0.2055" or 13/64" works too)

The upper arm was surprisingly easy to drill using a hand held drill but using some oil to cool the drill bit doesn't hurt.
Tapping the Zerk Hole with M6 x 1.0mm Tap
Tapping the zerk hole was very easy too due to the soft metal. I sourced the M6 x 1.0mm grease zerks and tap from Amazon. Remember to oil the tap while cutting.
After tapping the zerk hole I used a very thin round rat tail file to clean up the inside edge of the hole. I also used a small rounded edge file to smooth out all the edges that will make contact with the bushing. I polished the upper arms' bushing cups' inside and side surfaces with steel wool then cleaned up with compressed air and WD-40 before coating the bushing cups with grease. Don't wait to lube up the bushing cups as they will begin to rust immediately after polishing and cleaning.
Contents of Powerflex Upper Rear Bushing Kit

Bushings & grease for both rear upper control arms. Note the thick and thin bushing halves. Make sure you have 4 thick and 4 thin bushing halves before you dismantle your suspension. No S2000 specific instructions were included in the kit. The front and rear upper arm kits have the exact same parts.
Pressing In the New Bushing Sleeve
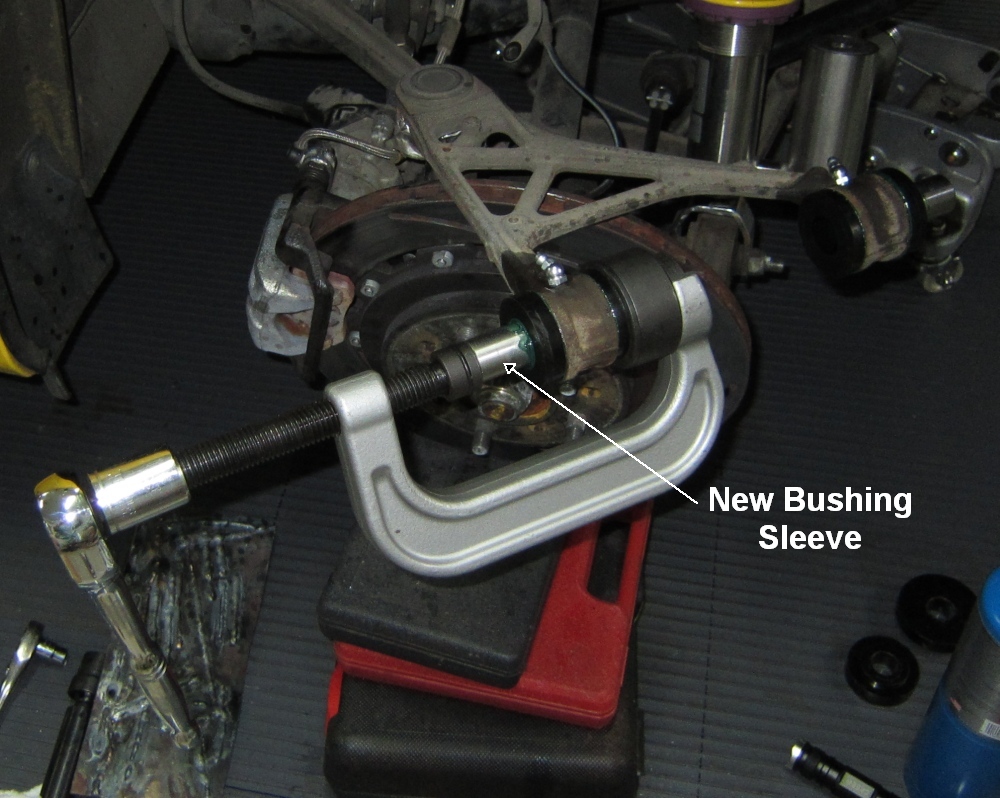
Powerflex recommends you grease up and install the bushing halves first, then slide the sleeve into place. The greased sleeve didn't want to go in by hand so I used a press.
Upper Arm Bushing Installed
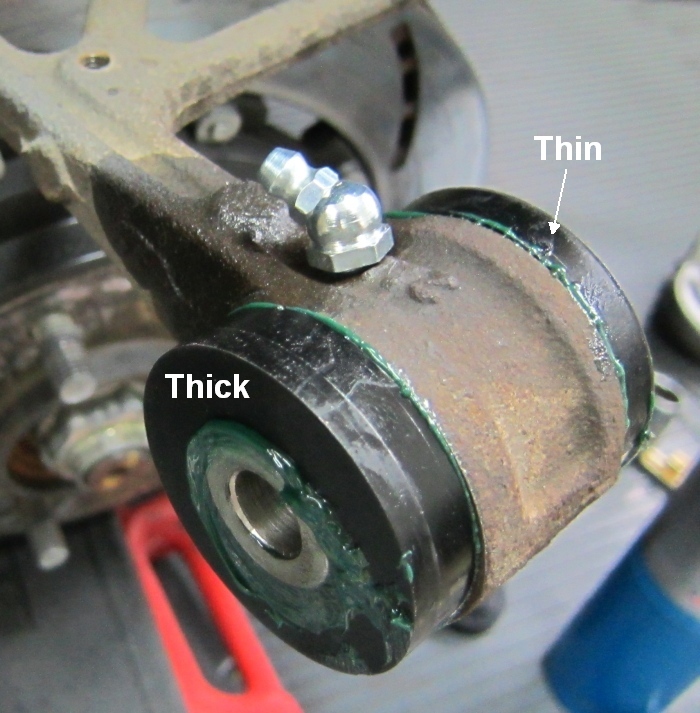
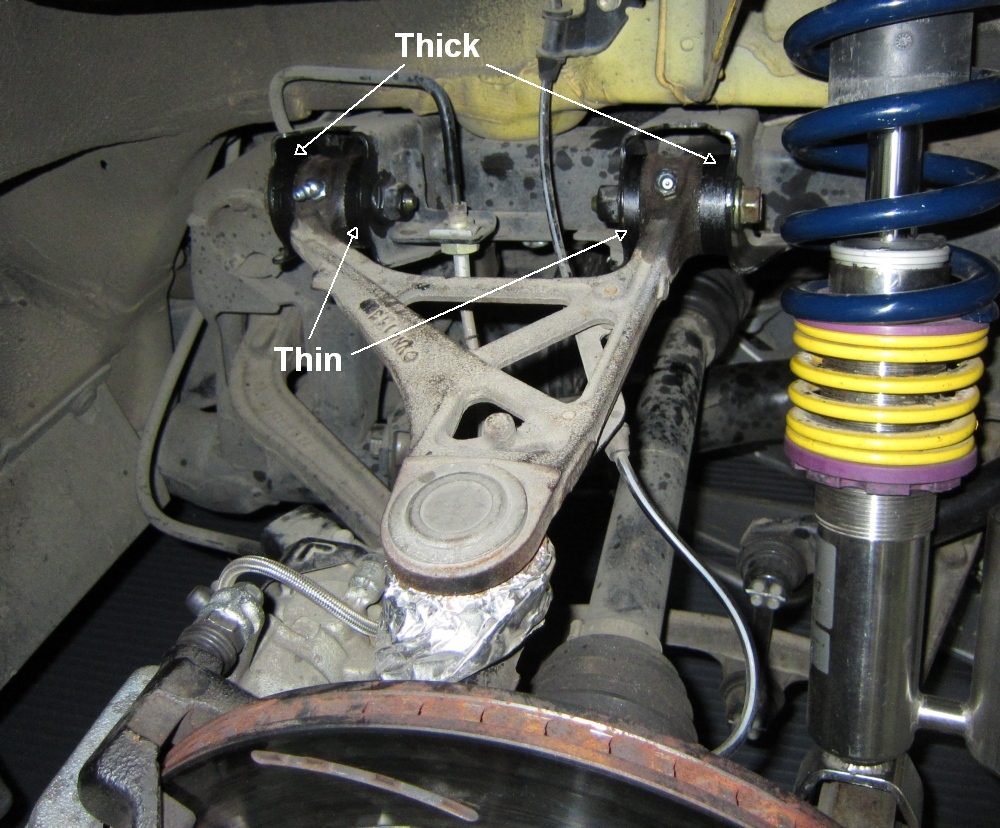
Note: The two halves of the bushing are not the same. The thick halves go on the outside of the arm and the thin halves go on the inside.
Rear Upper Arm Complete
I cleaned the chassis brackets with WD-40 before sliding the upper arm back into position. Don't forget the ABS line 10mm bolts torqued to 7.2lb-ft. The 17mm front upper arm bolts get 76lb-ft and the rear upper arm bolts get a whooping 98lb-ft.
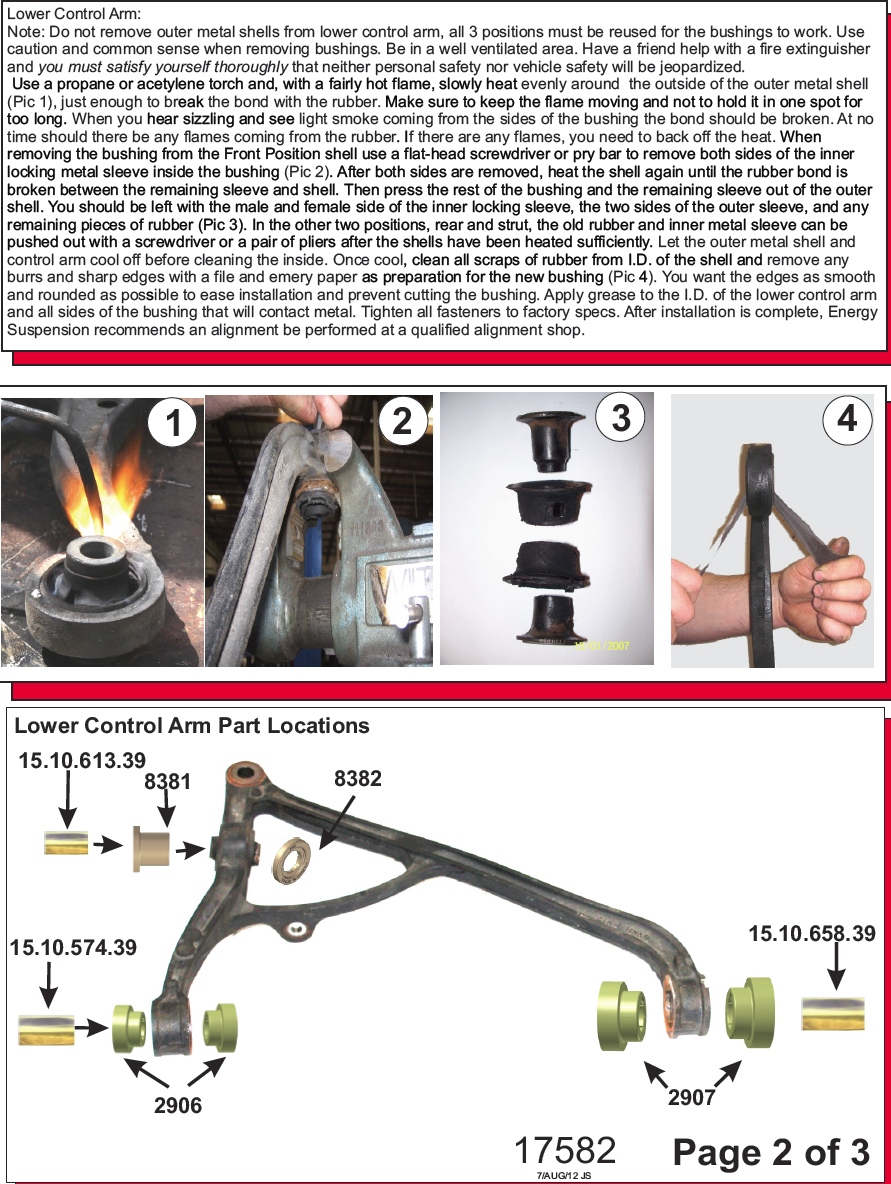
Energy Suspension Front Lower Arm Instructions
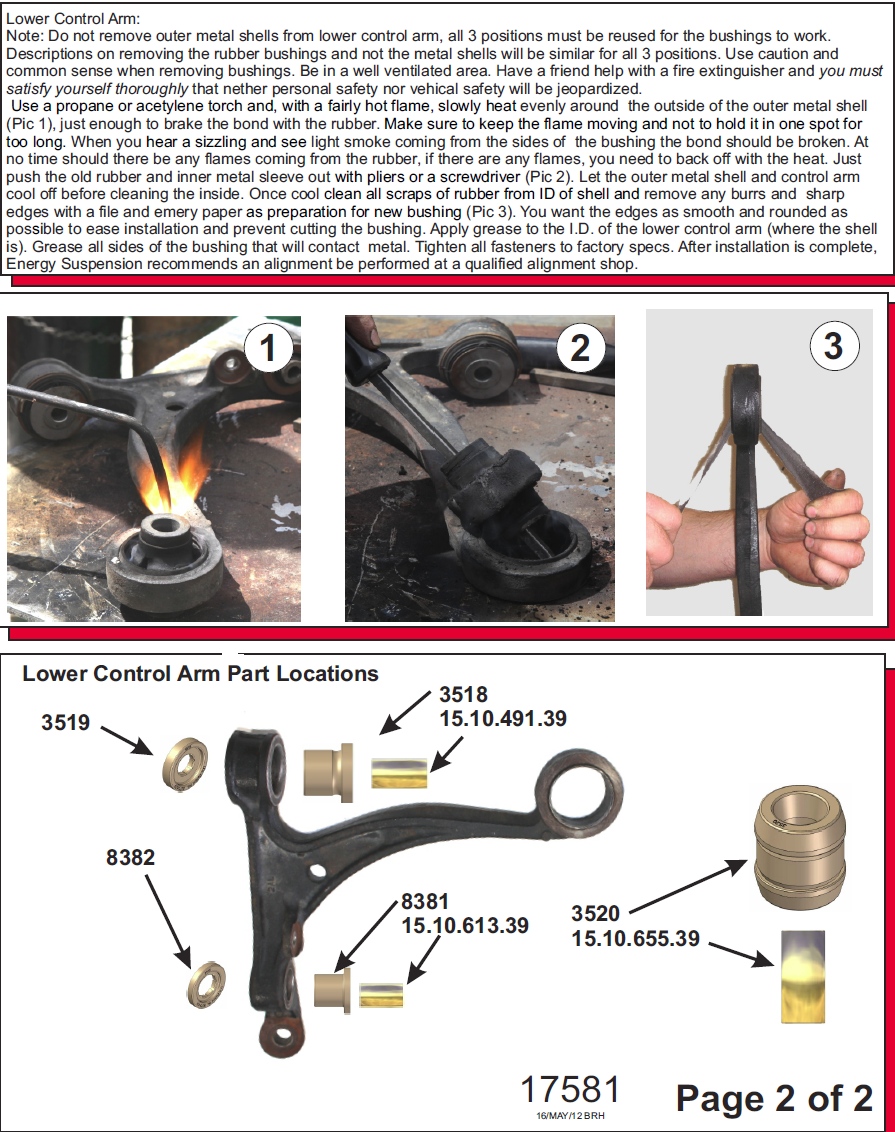
Note that unlike the upper arms you do NOT remove the old bushings' outer metal shell for Energy Suspension bushings. For Powerflex bushings you press out the entire old bushing including the outer metal shell.
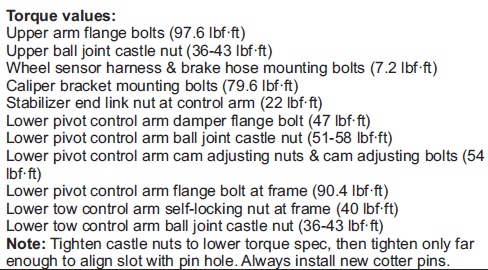
Front Suspension Torque Values

Note that the upper front and upper rear arm flange bolts have different torque specs.
Energy Suspension Rear Lower Control Arm Instructions
Energy Suspension Rear Toe Control Arm
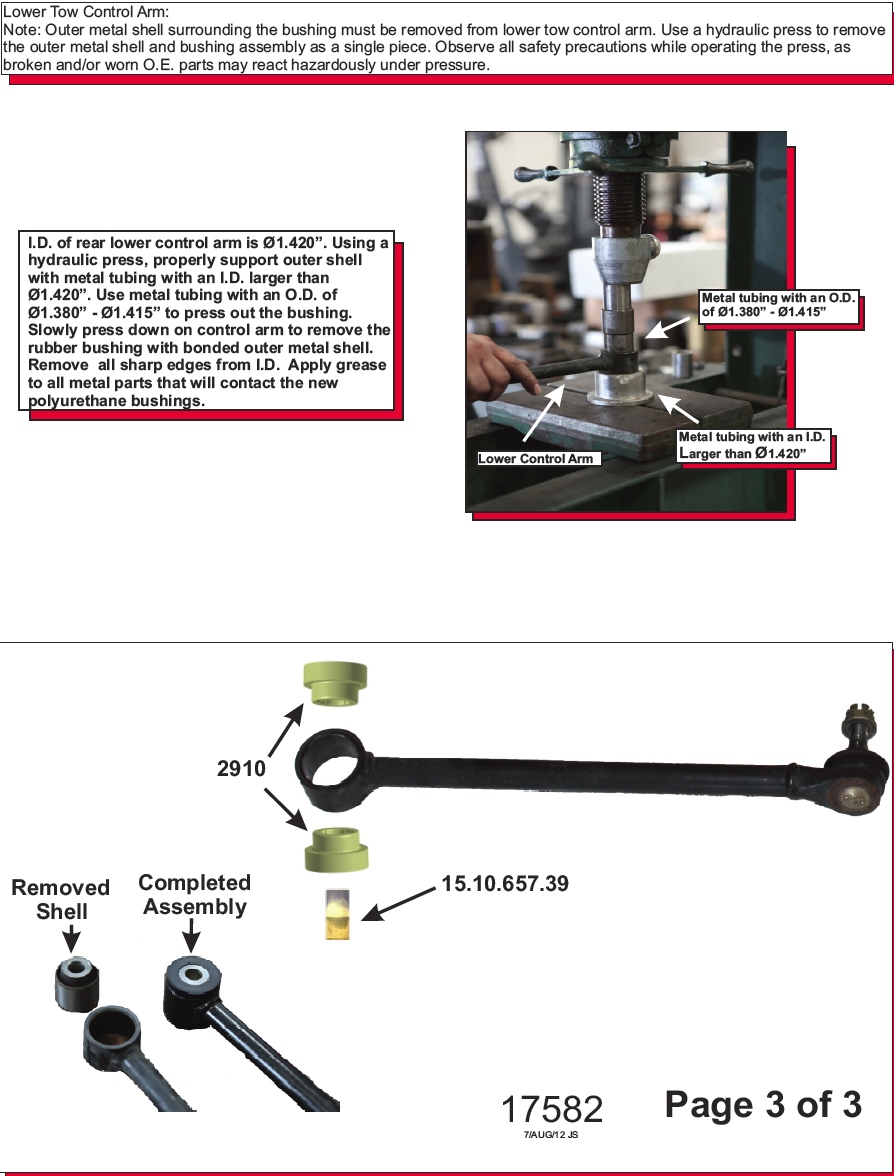
Note the rear toe arm needs a different size busing driver and receiver cup compared to the upper arms.
Rear Torque Values
Grease Zerks
To keep these expensive bushings quiet and happy I bought 6mm grease zerks to install so I can easily grease the bushings in the future. I ordered the zerks and the correct size 6mm x 1.0mm metric taps from Amazon. A #5 drill bit (0.2055" or 13/64" bit) is used to drill the zerk hole. Put something in the bushing socket to keep the drill bit from breaking through and damaging the bearing surface--I used a 1" diameter aluminum bar. Oil the tap and cut the threads and make sure to clean up all the metal flakes and clean up the bottom edge of the zerk hole so it won't cut or damage the bushing. I put a little thread locker on the zerks' threads and screwed them in.
Check all the bushing socket metal corners that will contact the bushings for smoothness before installing them--sharp edges may cut and damage the bushings. I used a rounded file to smooth out all the metal edges. You should also polish up the bearing socket with some steel wool before greasing them up and inserting the new bushings. Be sure and grease up the bare metal bushing sockets as soon as you finish cleaning them as they will begin to rust immediately. Since Powerflex supplied such a small amount of their special grease I applied it directly to the new bushings outer surfaces and applied high temp grease on the bushing sockets.
Powerflex recommends you install the bushings first then insert the new bearing sleeve. I had to use a press to push the sleeves into place. After getting the arms installed and torqued I pumped the bearings full of grease using a grease gun--don't pump the grease into the zerks until you get the arms bolted onto the chassis.
Enjoy your new suspension.