The Racecar Related How-To's:
[ Harness Install ] [ Wing Install ] [ Remove A/C ] [ Oil Cooler ] [ FireSuppress ] [ CutoffSwitch ] [ Race Exhaust ] [ Differential ] [ Corner Balance ] [ Catch Can ] [ Roll Centers ] [ Front Bump Steer ] [ Alignment ] [ Shock Tuning ] [ Aerodynamics ] [ Cat Remove ]
Building an S2000 Racecar
By Rob Robinette
Introduction
Building a racecar is expensive and it's usually cheaper to buy one rather than build one from scratch. RacingJunk.com is a great place to find a racecar for sale. I would also recommend you take a good look at Showroom Stock Miata (SSM) and Spec Miata (SM) race cars. They are excellent race cars and are much more economical to race. Also you'll always have other cars to play with on track at every track day or race. S2000 race cars are pretty rare.
That being said, why did I build an S2000 race car? Because I had an emotional connection to my car and wanted to take it to the next level. I was also used to running lap times much faster than the typical Spec Miata and had been warned about how hard it is to drop down in performance and still enjoy the track.
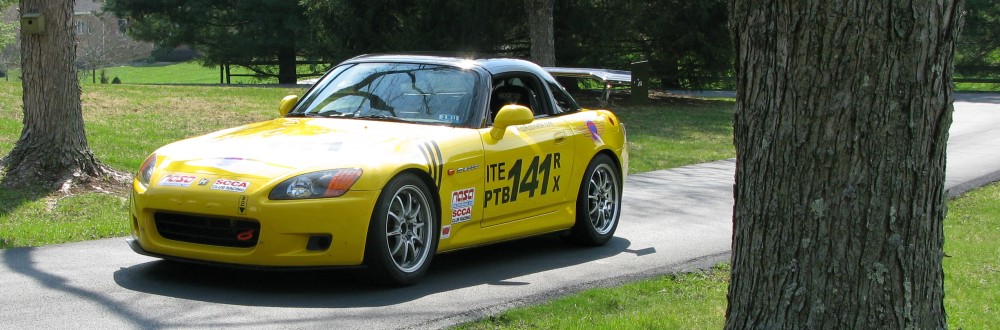
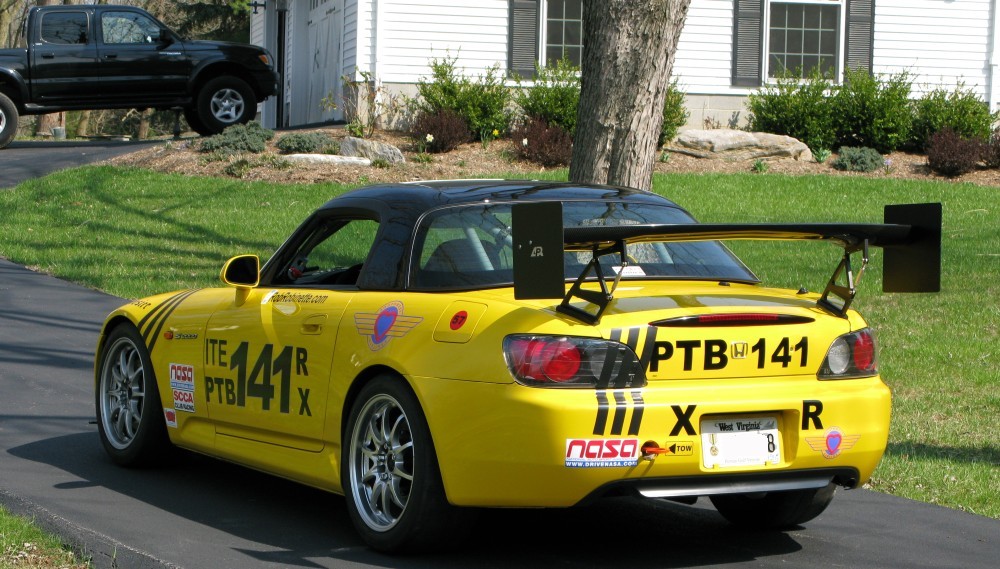
If you do decide to build an S2000 racecar you'll need to be familiar with the competition rules before you begin to modify your car so you can build the car to meet them and avoid costly do-overs. I recommend following both SCCA and NASA rules and regulations to give the car the most flexibility and value. Most S2000s run in NASA's Honda Challenge 1 (H1) and the SCCA's Touring 3 (T3) divisions. They can also run in NASA's Performance Touring B or C (PTB or PTC) and the SCCA's Super Touring U (STU) or Improved Touring E (ITE). I chose PTB in NASA and ITE in SCCA because of the modifications already made to my car before I decided to race it. If I were building the car from scratch I'd build the car to run in PTC and T3.
SCCA General Competition Rules
NASA Club Codes & Regulations
Wheel-to-wheel racing requires a lot of specific equipment and modifications.
You'll need:
A full roll cage
Hard top - Normally must be the factory Honda top. You can run topless but have to deal with the rain and you'll need arm restraints
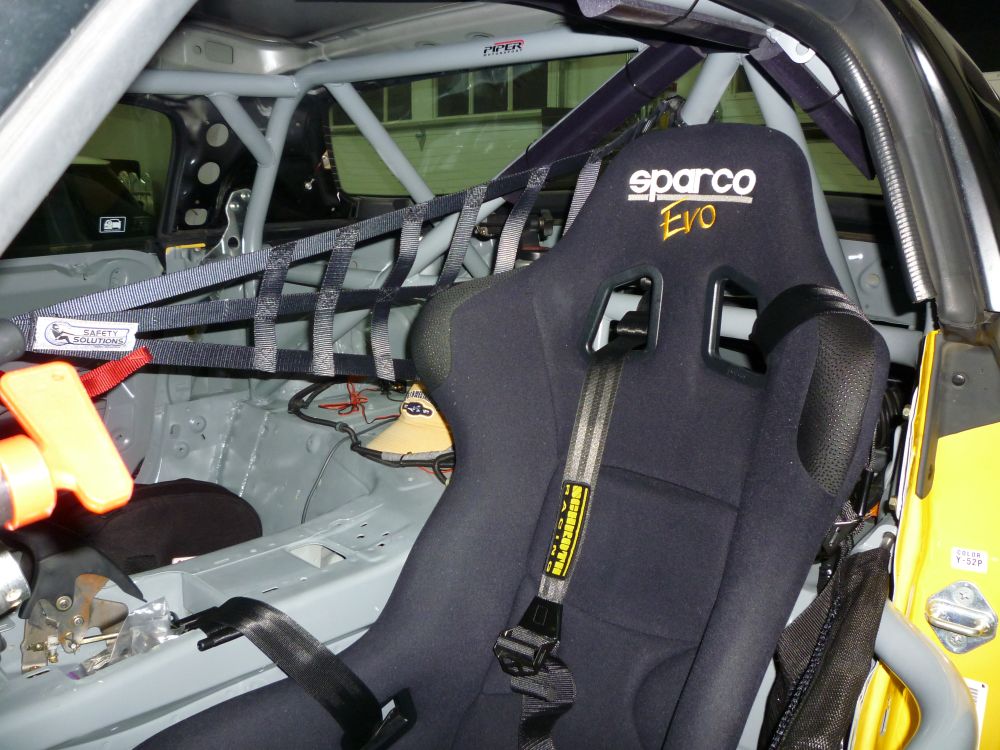
Racing seat
Seat back brace if seat has no FIA sticker
Racing harnesses - See the how-to
Electrical cutoff switch - wired to kill engine, alternator and battery
Window net
Right side net (or halo seat)
Fire extinguisher or system
Fuel test port
Disabled steering wheel lock
Airbags removed
Toe hooks front and rear
Driver suit, gloves, shoes, Nomex socks & underwear
SA2000 or higher rated helmet and Hanns device - a motorcycle helmet does not meet these standards
You should also consider removing the air conditioning - see the how-to
Recommended Reading
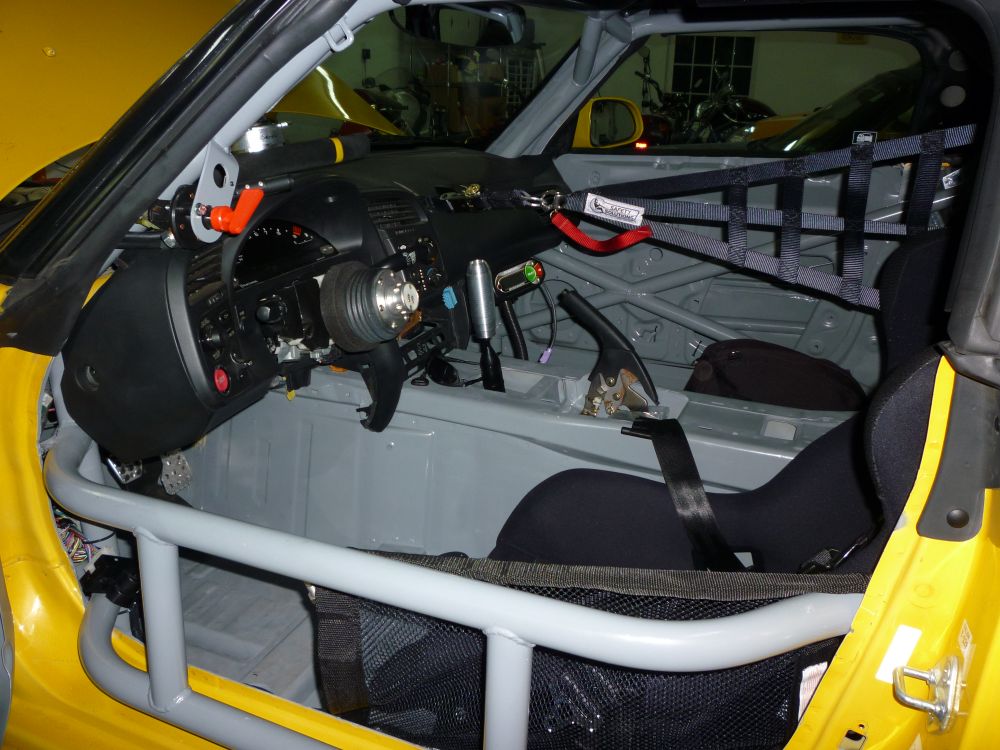
Electrical Kill Switch Welded to Roll Cage
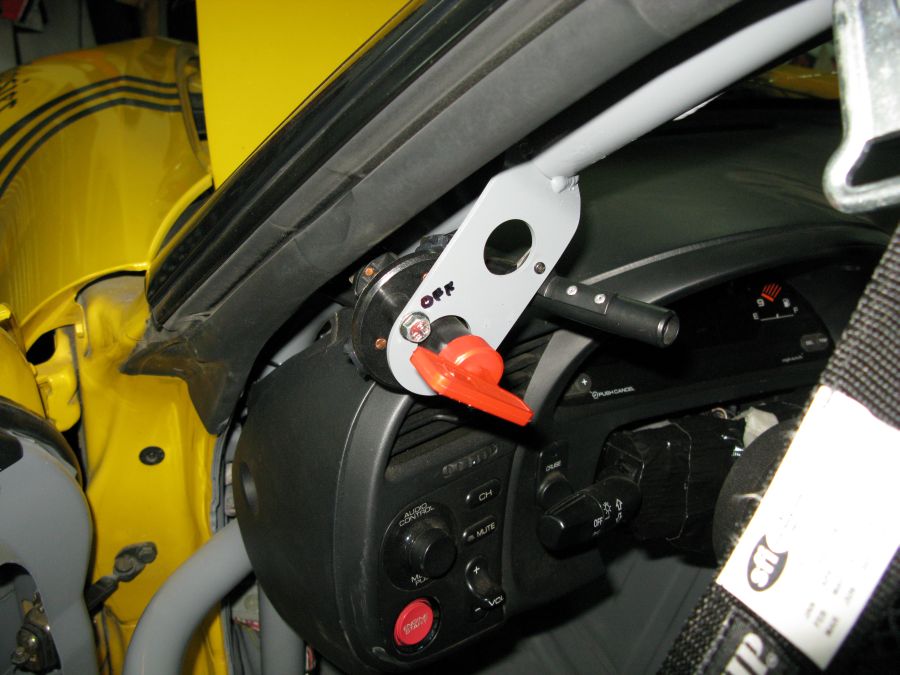
The electrical kill switch must cut power from the battery and alternator which will shut down the engine when turned to the OFF position. The switch must be accessible by the driver and from outside the car. I had this switch installed by the roll cage builder, Piper Motorsports. Since the dash has to come out for the roll cage installation it makes sense to install the kill switch at the same time. There are thick electrical cables running from the engine bay to the switch.
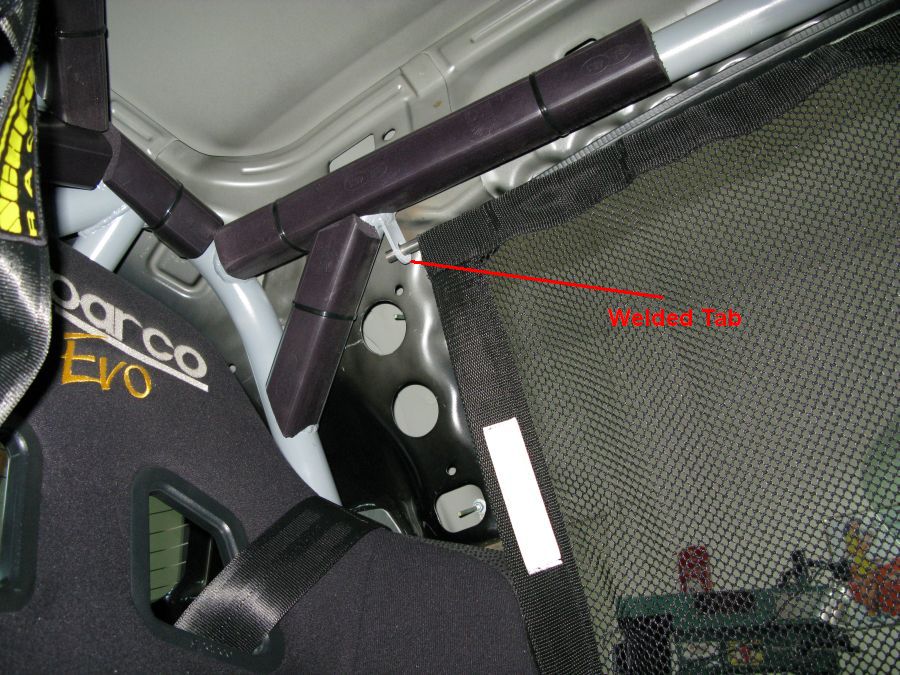
Side Net Rear Attachment Points on Roll Cage
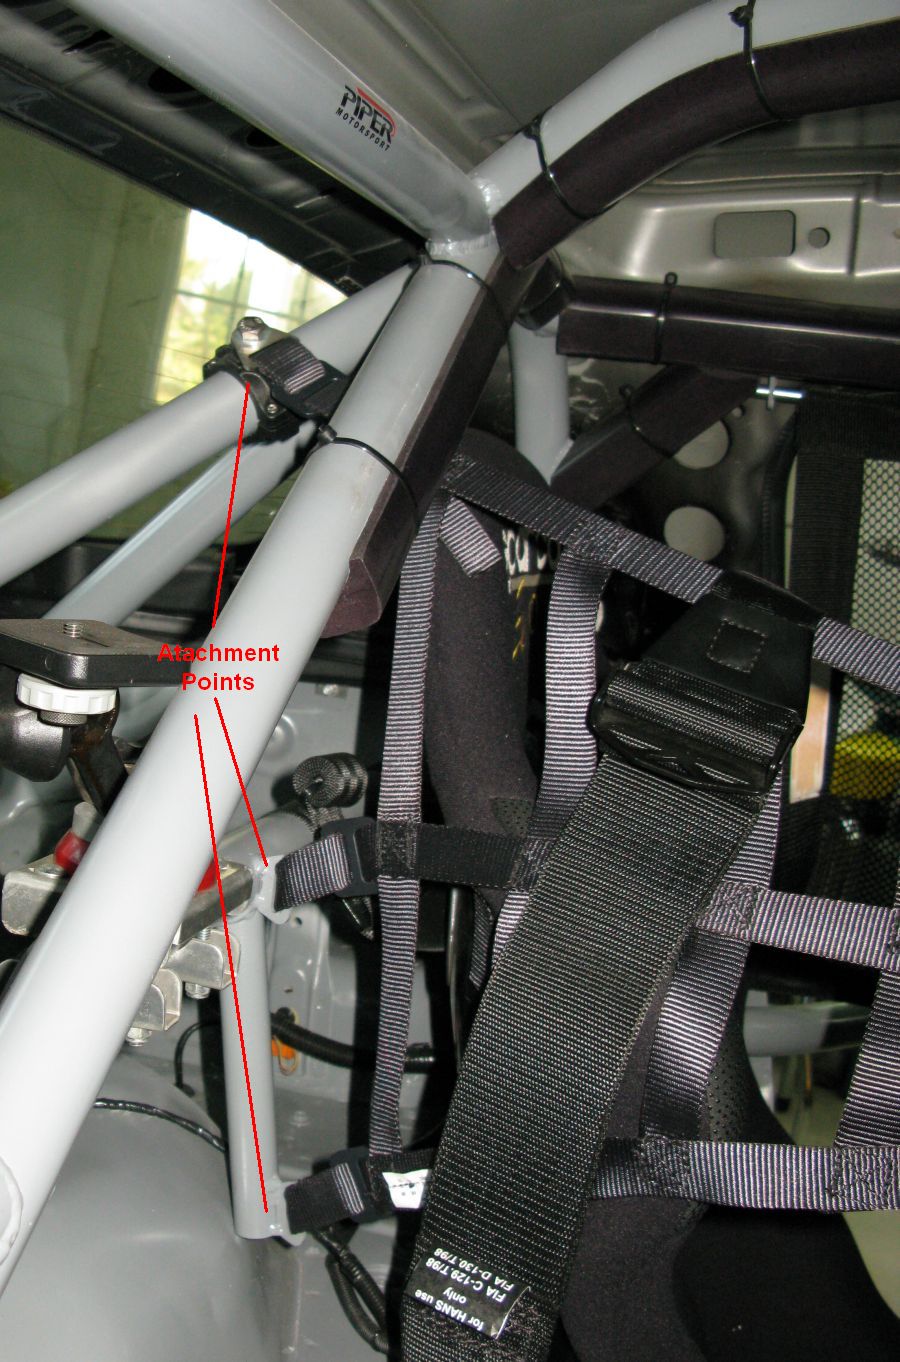
I had the roll cage builder install the side net. You want the upper strap to run across the center of your helmet to support your head in a side impact. They welded a vertical extension bar to mount the two lower rear net attachment points. The upper point is clamped to the roll cage.
Side Net Front Attachment Through Slit in Dash to Support Bar
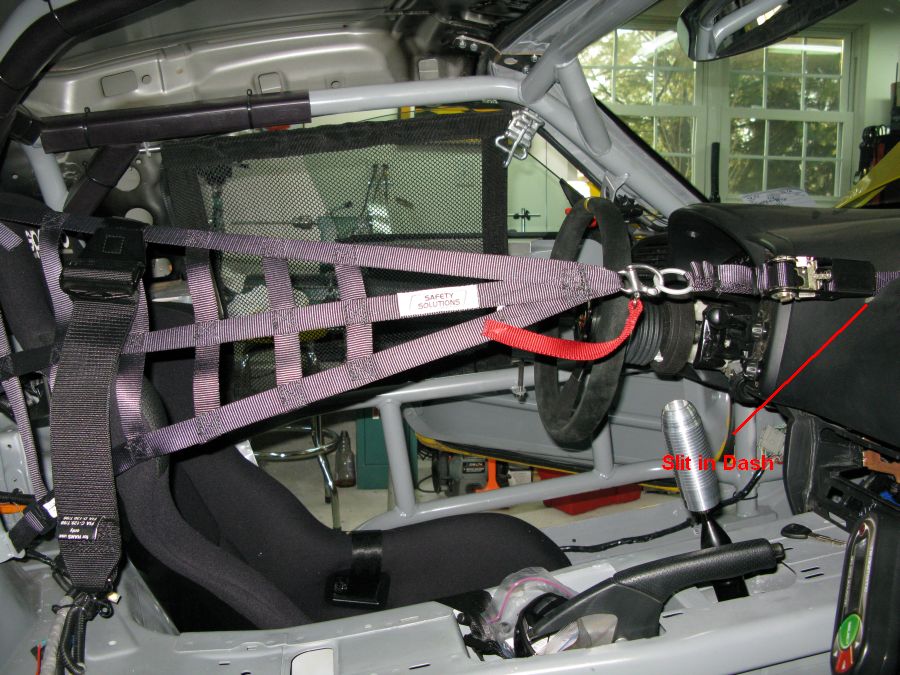
My cage builder cut a slit in the dash and attached the front of the side net to the stock reinforcement bar that runs under the dash. I have also seen it run through the air vent (just to the left of the net above) and attached to the same bar. Since the dash will have to come out for the roll cage installation it makes sense to install the net at the same time.
You should also consider a left side net. Many new race cars are running with two side nets to help restrain the head and shoulders in a side impact.
Window Net Tabs
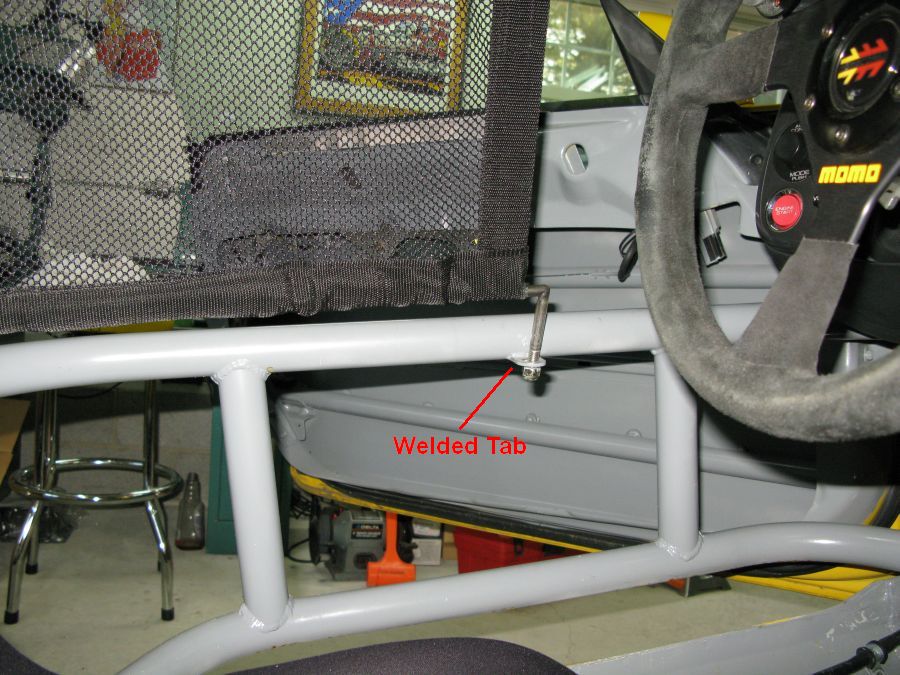
The window net installation is easy if you can weld in the mounting tabs. I had my cage builder install them.
Window Net Tabs

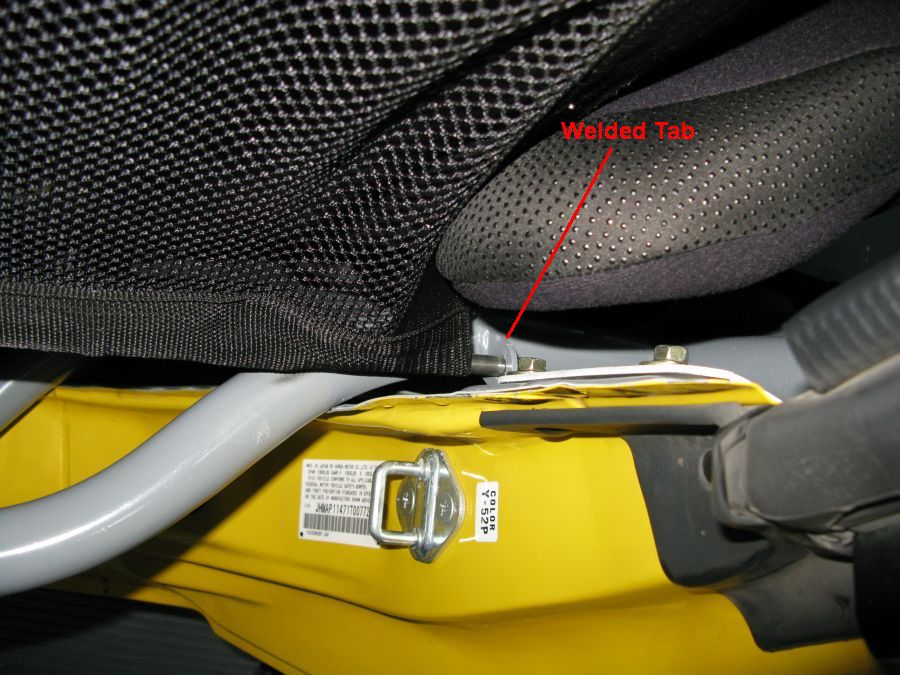
Fuel Test Port Added at Fuel Pressure Regulator
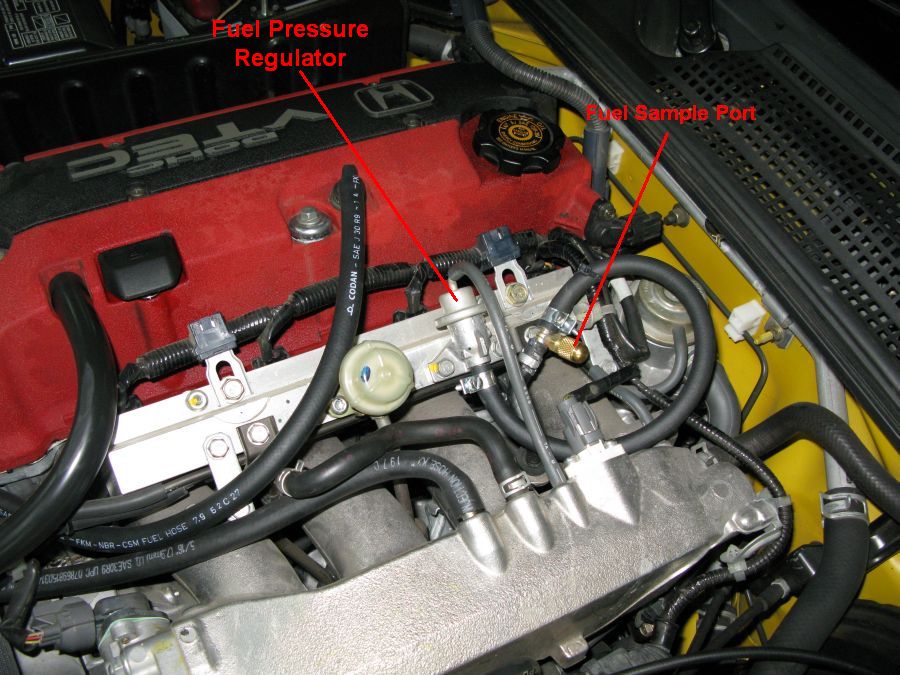
You are required to be able to give race officials a fuel sample taken from between the fuel tank and engine. I purchased my test port, test port tool, fuel injection hose and hose clamps from http://www.fuelports.com/ I disconnected the fuel line from the fuel pressure regulator (let the engine cool and cover the hose with a rag when you disconnect it because a little fuel will spray), pushed the test port on that hose, then put a 10 inch length of 1/4 inch fuel injection hose on the other end of the fuel port and looped it around to the fuel pressure regulator.
Fuel Sample Port Tool Tie-Wrapped Into Place
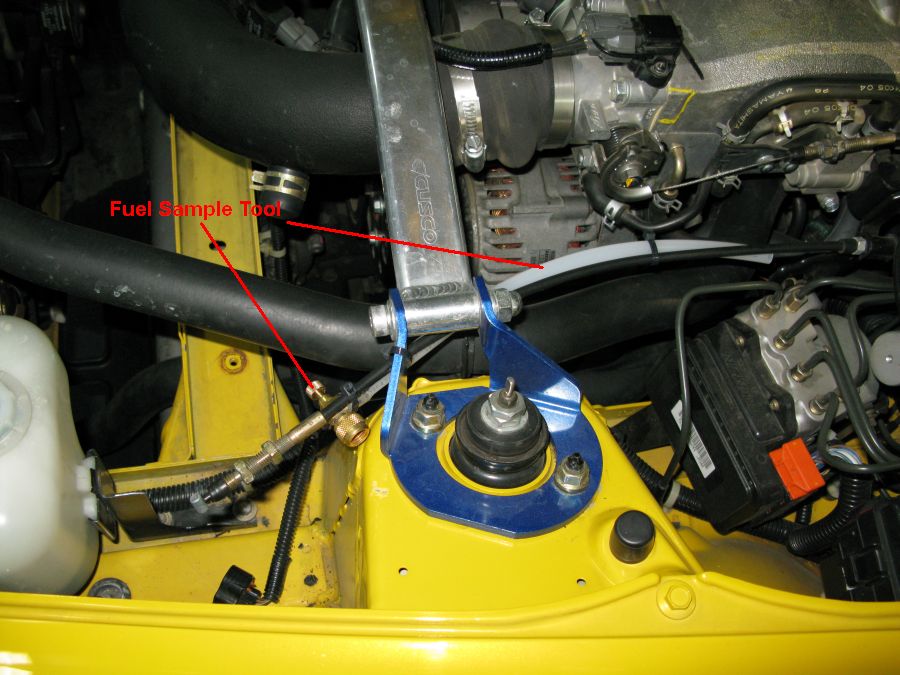
You must be able to provide a fuel sample in impound after a race so you have to have the fuel sample tool available to draw the sample. I zip-tied the tool to the cruise control line.
Steering Wheel Lock is Behind Golden Round Cover
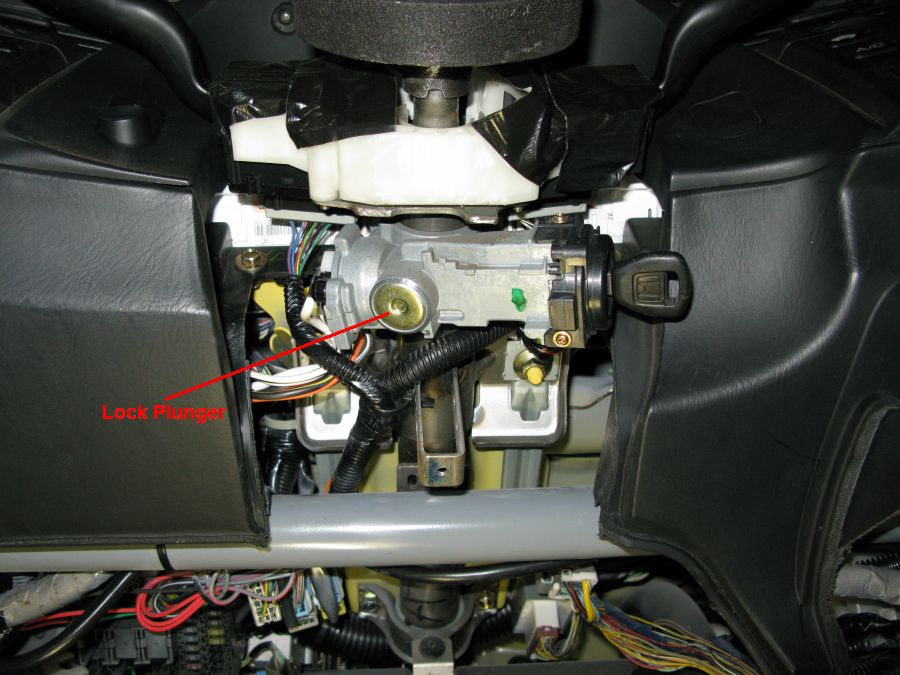
The steering wheel lock must be disabled. The bolts holding the ignition key assembly are one-time use and you can chisel them off or use a broken bolt remover to get them out. But the easy way to disable the wheel lock is to leave the assembly in place and drill a hole in the gold colored lock plunger cover, put a screwdriver or punch in the hole to pry off the cover. Remove the plunger spring and epoxy or JB Weld the plunger in the down position (the lock plunger will not come out without removing and disassembling the ignition switch). With the lock plunger epoxied in place you'd have to have a triple failure for the lock to engage: the key lock would have to fail along with the epoxy coming loose and the lock plunger would have to bounce up and engage as you're turning the wheel just right.
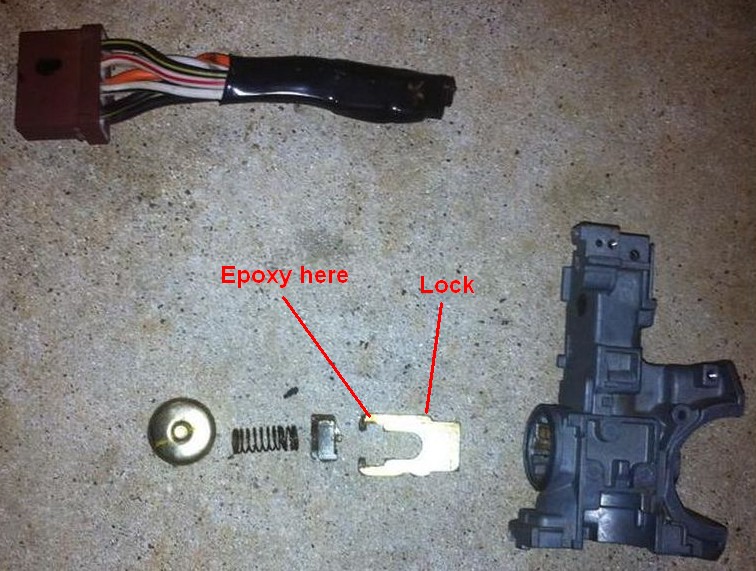
Steering Wheel Lock and Ignition Switch Bypass Pigtail
This pic was taken by Strat. You do not have to disassemble the lock to disable it.
If you are like me and running the stock ECU then you have to keep the ignition switch and key because the car's demobilizer will keep the car from running if it doesn't sense the correct key in the ignition. If you have an aftermarket ECU you can completely remove the ignition switch. If you do this you can use the kill switch to power on the car, use the start switch to start it and the kill switch to shut it down.
With an aftermarket ECU you can bypass the ignition switch by building a pigtail like the one in the picture above. Cut the large wires on the ignition switch and follow them to their connector, disconnect it and remove the harness. Solder the wires into two connections: White, Black/Yellow and Orange together; and White/Black, White/Red and Black/Red together. Plug this pigtail back in and it's just like the key is turned to run. The starter button is ready for use. You can disable the car by removing the pigtail. I want to thank s2ki's Strat for the picture above and the info in this paragraph.
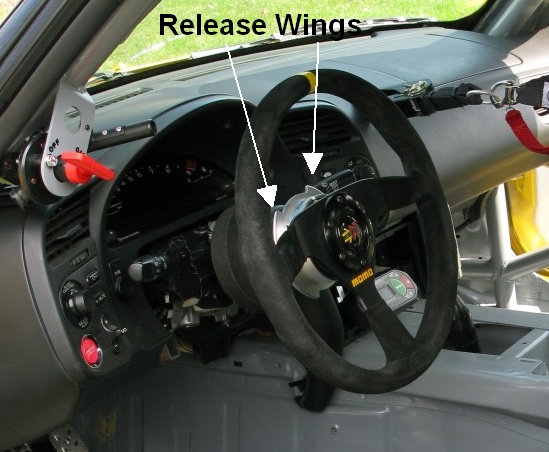
Steering Wheel & Quick Disconnect
There's two main reasons to install an aftermarket steering wheel. The stock steering wheel looks like crap after the air bag is removed and it's not possible to install a steering wheel quick disconnect with the stock wheel. A steering wheel quick disconnect will make getting into and out of a caged car much easier. Foot well maintenance is easier too with the steering wheel out of the way. I have a Momo wheel that is almost flat with about 1 inch of dish. It's diameter is within an inch of the stock size. I tried a 2 inch smaller wheel and it was too small, too hard to keep the steering smooth and the smaller wheel blocked the RPM display for me (I'm tall at 6'2").
My quick disconnect is an NRG low profile in silver but I wish I had gone with black. It has two "wings" you grab with your fingers to remove it. It comes off easily using one hand. I used a generic ebay hub adapter to mount the quick disconnect & wheel. The NRG quick disconnect does have wiring provisions for the horn but the cruise control module will have to be removed. It is possible to attach the module to the hub so it stays with the hub when you pull the steering wheel.
Steering Wheel on Dash, Adapter Hub & Quick Disconnect

You have to take into account the thickness of the adapter hub + quick disconnect + steering wheel dish to figure out where the wheel will end up. Mine ended up about 2 inches closer to me than the stock wheel and it's just about perfect. A truly flat steering wheel (no dish) would have ended up about 1 inch closer to the driver compared to the stock wheel. If you don't use a "low profile" disconnect you could end up with the steering wheel too close to your body.
Intake Screen
You'll be running nose to tail with a lot of r-compound shod race cars and lots of crap will get thrown up into your radiator. Do yourself a favor and install some chicken wire in the nose intake to prevent radiator damage and leaks. I picked up the wire mesh on ebay and used tin snips to cut it to fit. I used zip-ties to hold it in place.
Other Equipment and Race Preparation
Here's an inexpensive racing exhaust.
Here's info on improving the S2000's Aerodynamics.
Here's how to remove the catalytic converter.
Here's an easy catch can installation.
Here's a pedal modification to make heel-toe downshifts easier.
Remove the airbags Start by disconnecting the battery, you don't want to risk setting one of these off by accident. The steering wheel airbag removal is straightforward and you can run the stock steering wheel with a hole where the bag was. The passenger side airbag can be unbolted from below and pushed out the top of the dash. Be careful not to damage the dash cover because it can be put back into place and the dash will look completely normal.
Tow hooks are required on the front and rear of the car to make it easy for the tow truck to pull you out of the gravel traps. You can use the stock tow hook and purchase a second one for the other bumper. I'm running J's Racing hooks, but folding tow hooks are required by some race organizers.
Removable Windows
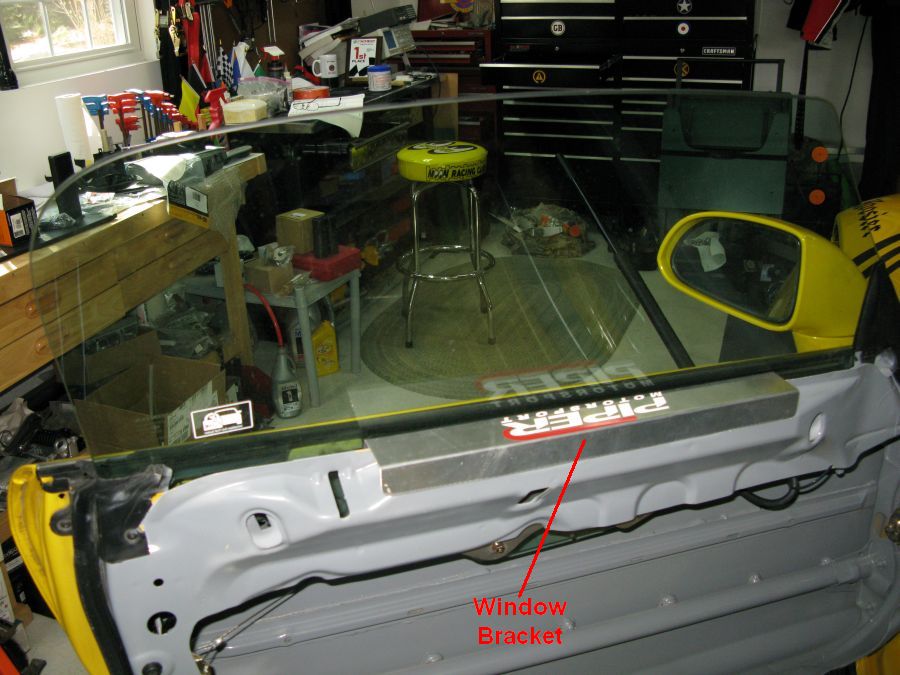
I had NASCAR bars installed on the driver side to maximize hip room and make entry/exit easier. This necessitated the removal of the window, window channel and motor. My cage builder offered to make an aluminum bracket to allow installation of the window to keep the elements out while trailering or off-track driving. I did the same thing on the passenger side so I could drop some weight but still put the passenger side window in place when needed.
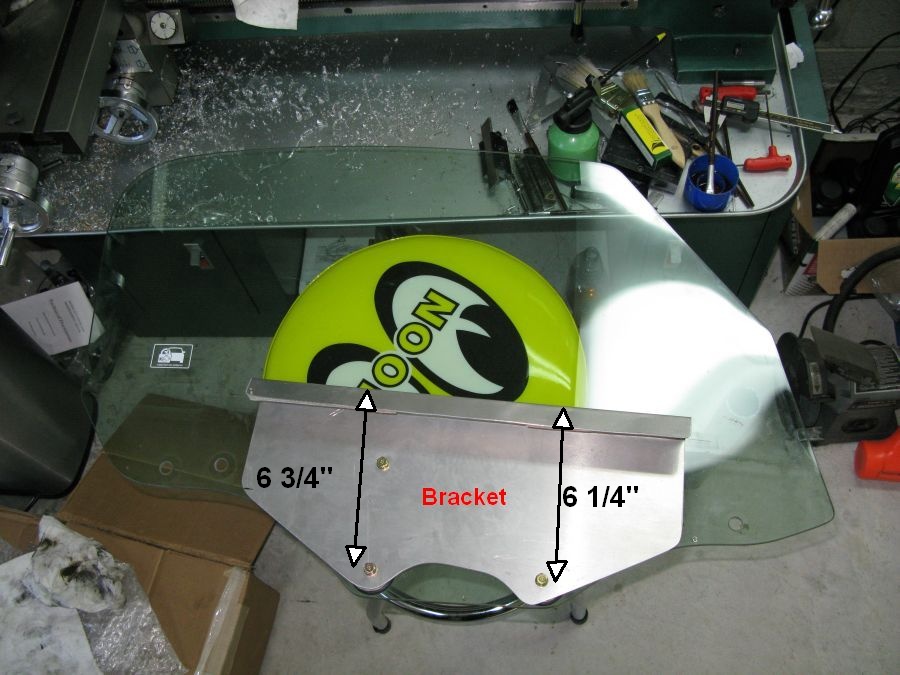
The dimensions shown below are the exact distance from the lower bolt hole centers to the upper-outside edge of the bracket. I bent the bracket over the edge of my workshop table using a rubber mallet. I used 1/8 inch thick aluminum but thinner would probably be strong enough. I used the stock window hardware to secure the bracket to the window.
Window Holding Bracket
I also recommend adding brake ducts to cool the front brakes when running r-compound tires, here's the brake duct how-to.
A rear wing and front splitter will help the S2000's handling qualities by reducing high speed lift. Here's a how-to for installing the APR GTC-200 wing. After getting used to the wing I ran a time trial with the wing removed and I was 1.8 seconds per lap slower--the wing really makes the rear stick in high speed corners. Check the Honda Challenge rule book about wing mounting--the wing can't extend beyond the footprint of the car so it's not possible to run the 2.5 inch risers with the APR 200 wing.
EDIT: I no longer recommend adding a baffle to the stock oil pan. They crack their welds and can actually cause an engine failure. I recommend getting an aftermarket oil pan like this Canton that have extra capacity and oil traps.
S2000 track cars of all years will benefit from a
baffled oil pan.
Race compound tires and long sweeping corners allow enough lateral g-force to
cause the oil in the oil pan to slosh to the side and allow oil starvation. Even
short pressure drops during high power and rpm will cause engine damage. Baffled
oil pans prevent the free movement of the oil in the oil pan to keep the oil
pickup submerged in oil. You can purchase a ready made pan from several sources,
or purchase just the baffle and have it welded into your oil pan. I picked up my
baffle from eBay for $85 and spent $40 for TIG welding. Since both the oil pan
and baffle are aluminum you must use the TIG welding process to secure the
baffle.
An oil cooler is another addition you should consider because of the very high oil temps seen in the S2000. Many S2000 track engines have been lost to spun main and rod bearings caused by oil overheating and breakdown. Oil temperatures of normally aspirated but hard driven S2000s can reach 300 degrees F. An easy way to check the temp is to shoot the oil pan with an IR thermometer a few minutes after a track session. I believe I lost my second motor to excessive oil heat and breakdown.
You'll need an oil filter sandwich adapter that has an out and in for oil flow to the cooler. I chose the Mocal adapter with a built in 180 degree F thermostat but their 200 degree adapter would probably be a better fit for street driven S2000s. Your oil lines must be at least 1/2 inch inside diameter to keep the oil pressure drop to a minimum. AN hoses are your safest bet for the cooler lines. AN-8 hoses have a 1/2 inch inside diameter, but most people use AN-10 with a 5/8 inch inside diameter for oil coolers which is my recommendation but some even use AN-12 with 3/4" inside diameter. Mount the cooler in front of both the radiator and air conditioning heat exchanger.
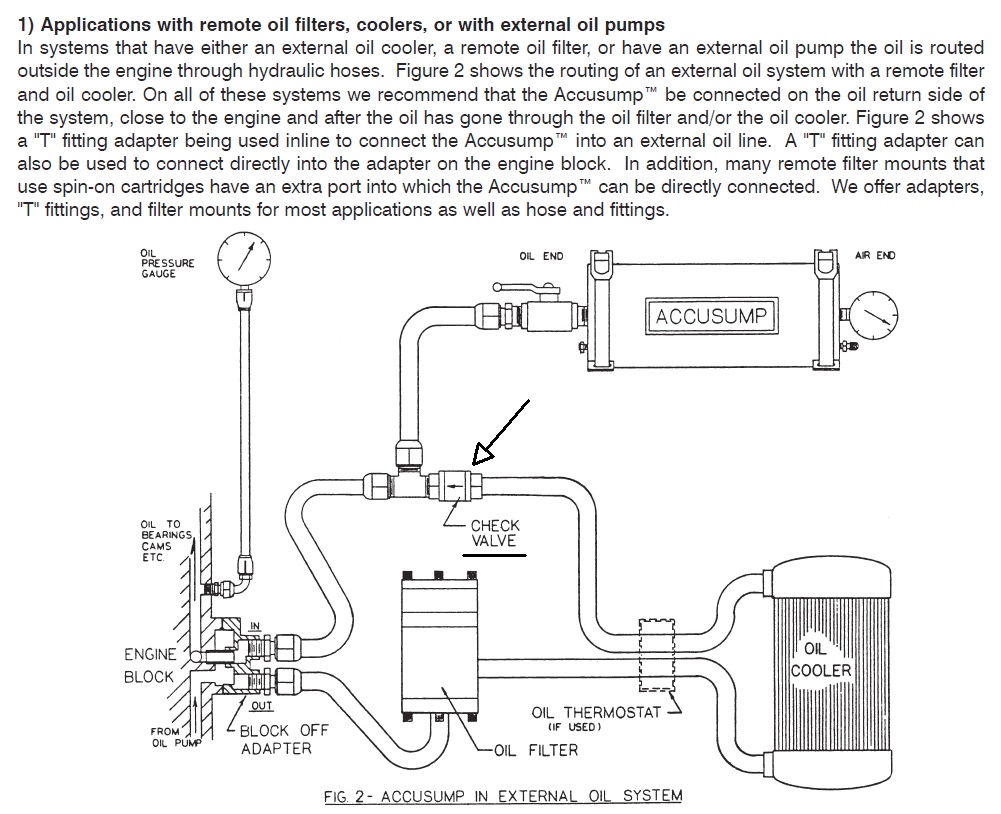
Another oil system upgrade is the Accusump oil accumulator. It stores oil pressure and steps in to supply oil pressure during short duration fluctuations. Installation requires a sandwich adapter that goes between the engine and oil filter. If you have an oil cooler you would install the Accusump into the return line. I haven't installed an Accusump but I am considering it as a future upgrade. Check the rule book before adding an Accusump because it's not allowed in some race divisions.
Accusump Oil Accumulator Installation - Note the Check Valve
Another addition that can save an engine is an oil pressure warning light. I added a warning light because I don't care what the oil pressure is as long as it's not low. A bright warning light can get your attention where a gauge reading low pressure can go unseen. You should also consider adding an oil temperature gauge because there's very little additional work to add both gauges versus just one.
I installed a 3 port oil filter sandwich adapter to install the oil pressure and oil temperature probes. The adapter simply screws on between the engine and oil filter. The adjustable oil pressure warning light switch completes a ground connection when the oil pressure is below the set level. I set mine to the max of 24psi. The S2000 idle oil pressure is around 35psi so the warning light will only come on when the oil pressure is abnormally low.
I tapped into the driver foot well fuse box for the 12 volts needed for the light. I taped the warning light to my shift light. The shift light is bright yellow, the oil pressure warning light is bright red. The warning light's ground wire runs through the firewall to the oil pressure switch on the sandwich adapter. A short ground wire runs from the oil pressure switch to a convenient bolt on the engine block.
The one chassis reliability upgrade I recommend is to have the front suspension upper arm mounts re-welded to the body on AP1 cars. AP2 cars come with a nice seam weld from the factory but they have failed too. The trailing edge of the trailing upper arm mount is the most common point of failure. The AP1 mounts are only spot welded in place and are known to crack and fail under the stress of hard track use. Mine began to fail after a year or so of heavy track use. At the very least keep an eye on the mounts and inspect them every time you remove the front wheels.
Here's a racing harness install how-to Racing harnesses have to be replaced five years from the date shown on the label.
A head and neck restraint system (HANS Device) is required by NASA and the SCCA. Your neck is the weak spot when running with a helmet and a good racing harness. A HANS device will help prevent whiplash type injuries to your neck, spine, and brain stem. I do a lot of instructing in cars with stock three-point harnesses so I chose the R3 which has a chest strap to provide support without a tight racing harness.
You can also save weight and reduce complexity by removing the air conditioning system.
Here's how to install roll center adjusters to raise the roll center to reduce chassis roll.
Here's how to install a front bump steer kit to move the front wheels' camber curve back to stock.
Here's how to adjust the alignment.
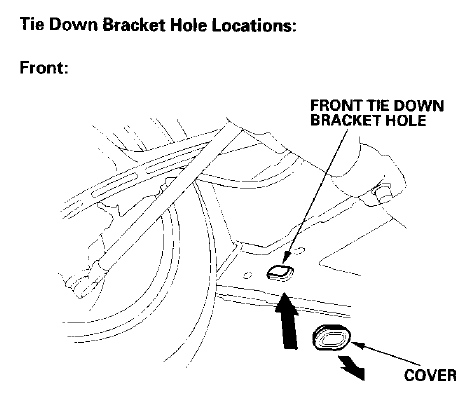
Here's what you need to properly tie down an S2000 on a flat bed or trailer: Four CA13 T-hooks: http://www.awdirect.com/tie-down-hooks-ca13/hooks/
T-Hook Tie Down
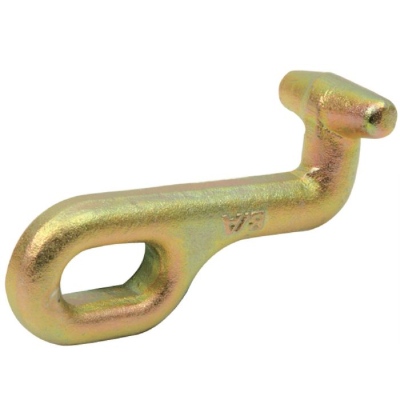
The hooks fit into four oval shaped bracket holes in the underside of the car near the wheels. The holes are covered with oval shaped rubber plugs. You should never use the suspension a-arms to strap the car down.
Trunk Latch Wire Attached to Key Bellcrank
The S2000 comes with a nice Torsen (geared TORque SENsing) limited slip differential (LSD). The problem with Torsen type differentials is if a driven wheel gets too light or comes off the ground it acts like an open differential and spins the raised wheel while delivering no torque to the wheel on the ground. Many S2000 racers and time trialers disconnect or remove their rear anti-sway bar to prevent the inside rear wheel from lifting and spinning. I ran for over a year like that but was limited by under steer so mid-season 2010 I reconnected the rear sway bar and immediately went faster but also suffered with inside wheel lift and spin and the resulting lack of drive out of corners, especially bumpy corners. Inside wheel spin is very hard on drive-line components and can destroy the differential, output shafts and axels.
In March 2011 I took the plunge and purchased a used differential with an OS Giken clutch type limited slip differential. I shipped it and a set of lower 4.44 gears to Puddy Mod Racing and had the diff and LSD rebuilt. The OS Giken differential should keep the rear locked when the inside rear wheel comes off the ground and allow for much better drive out of corners. The Giken unit requires no break in and once filled with OS Giken fluid it is good to go with no required fluid changes. See the differential upgrade how-to here.
Late 2010 Track Season with Mongo Splitter & Roll Cage
2011 In SCCA ITE and NASA PTB Racing Trim
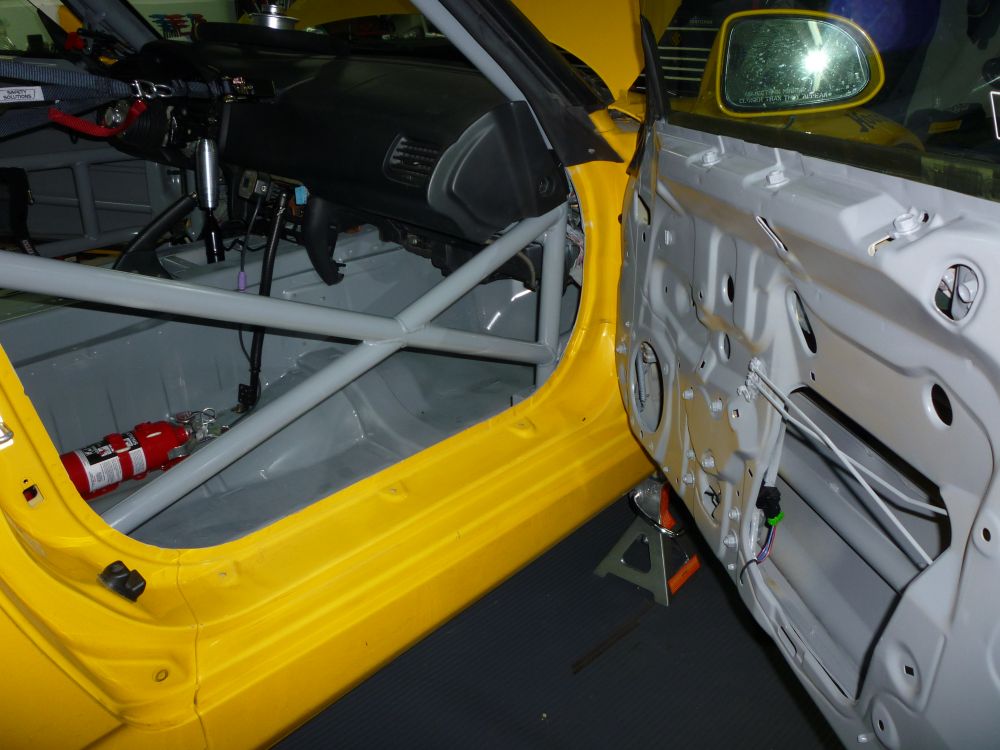
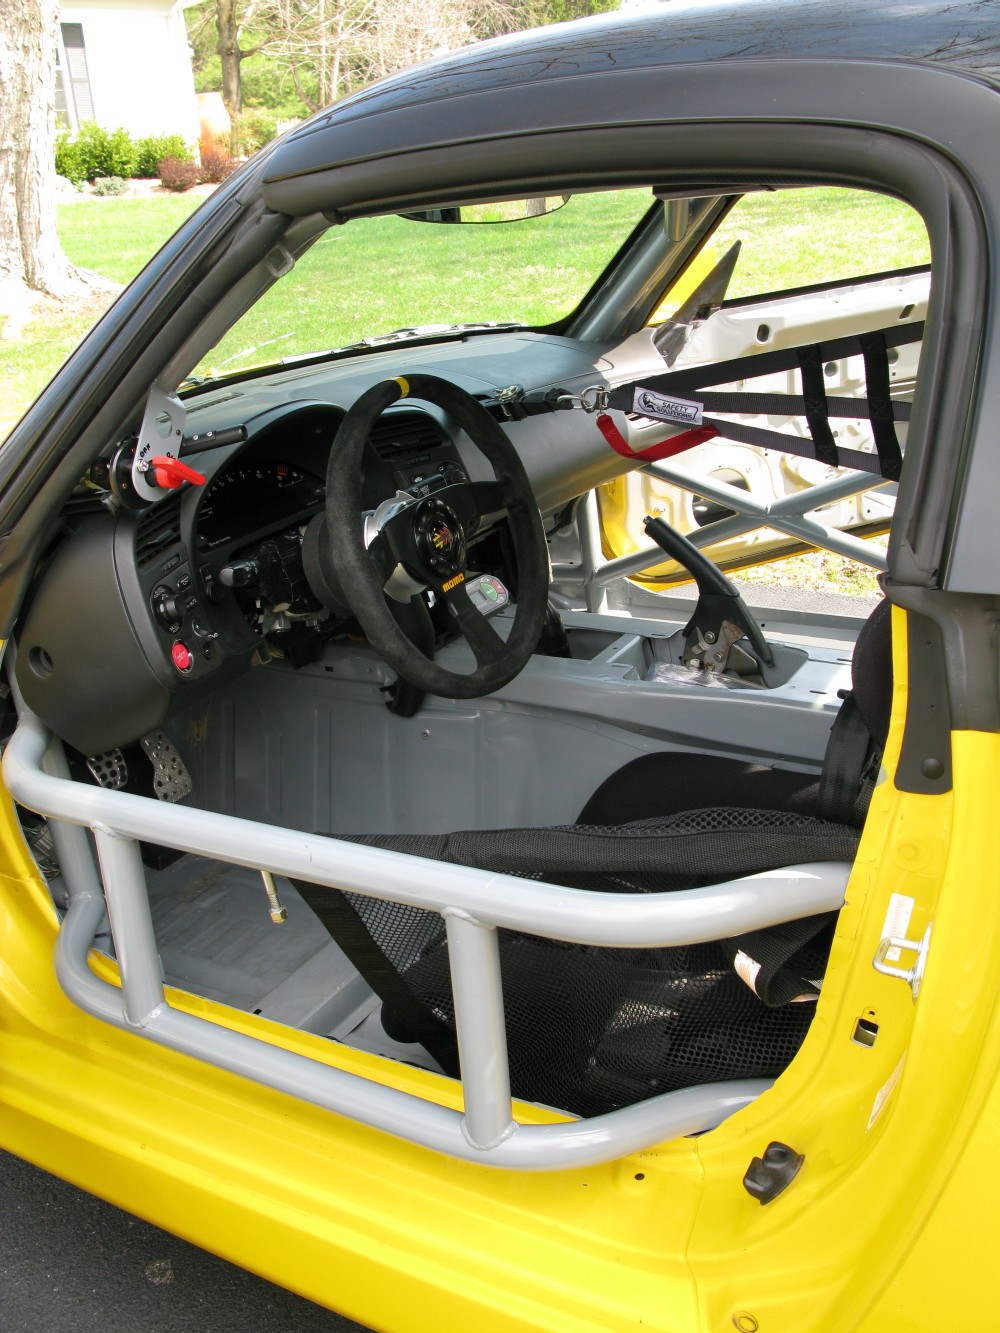
The Roll Cage
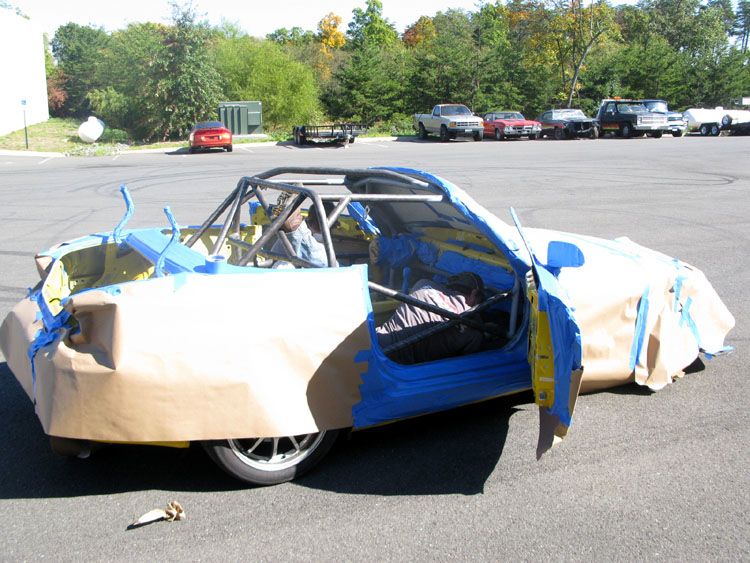
You can run competitive time trials with NASA and the SCCA with just a roll bar, but if you want to race wheel-to-wheel you'll need a full roll cage. I don't know if the Cusco Steel bolt-in roll cage would meet racing specs, but it's the only bolt-in cage I could find for the S2000. Another option is to have your roll bar extended by welding in a halo bar, front legs, and side bars to create a roll cage. Racers normally have a roll cage custom fabricated by a roll bar specialist for around $3500. Adding an SCCA approved roll cage is a point of no return for a track car because of all the surgery required to the dash and interior trim. It's very difficult to remove a welded-in roll cage and revert the car to stock form.
Be sure and use a reputable shop to build your roll cage. The SCCA and NASA are very particular in the quality of welds and type of materials used in roll cage construction. People have spent thousands of dollars for a roll cage only to find it doesn't meet specs.
I broke down and had Piper Motorsports (near Virginia's Dulles Airport) fabricate a roll cage. I went with the minimum size 1.5 inch tubing throughout to minimize the weight, especially high weight and to maximize headroom.
October 2010 Prepping for the Roll Cage


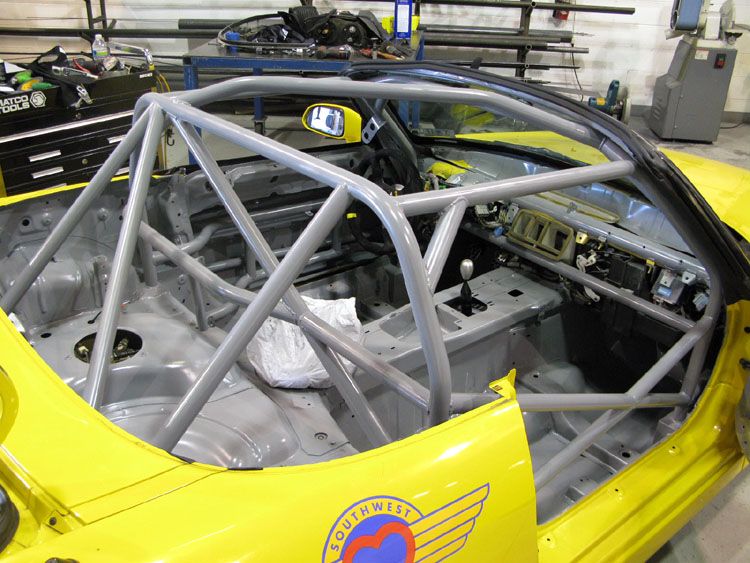

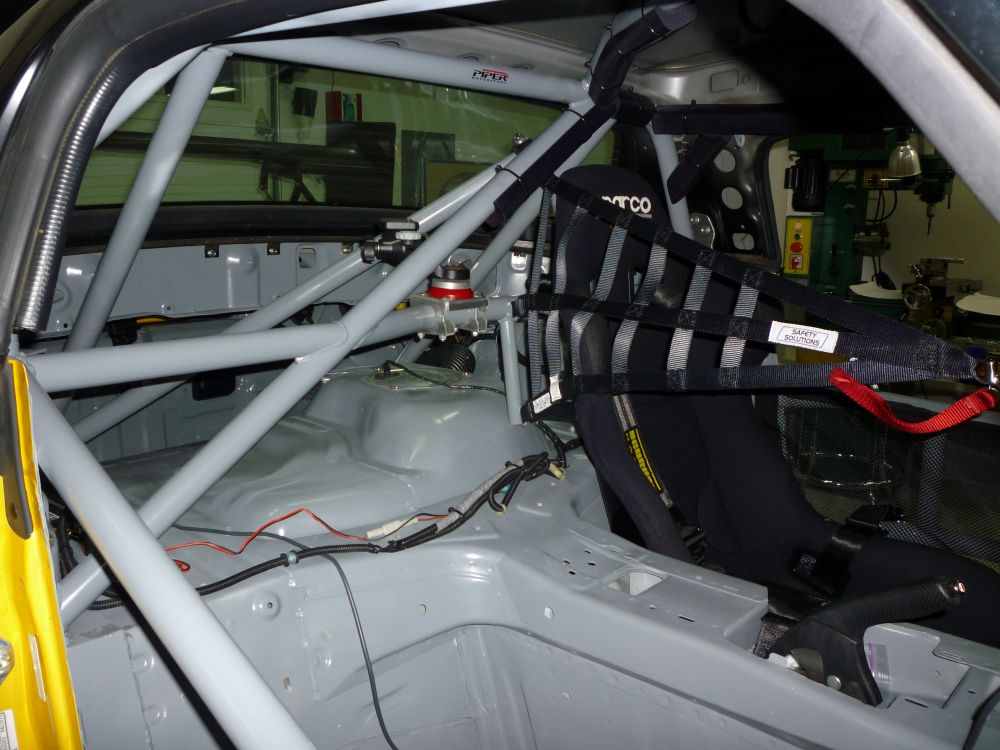
NASCAR Bars on Driver Side Only
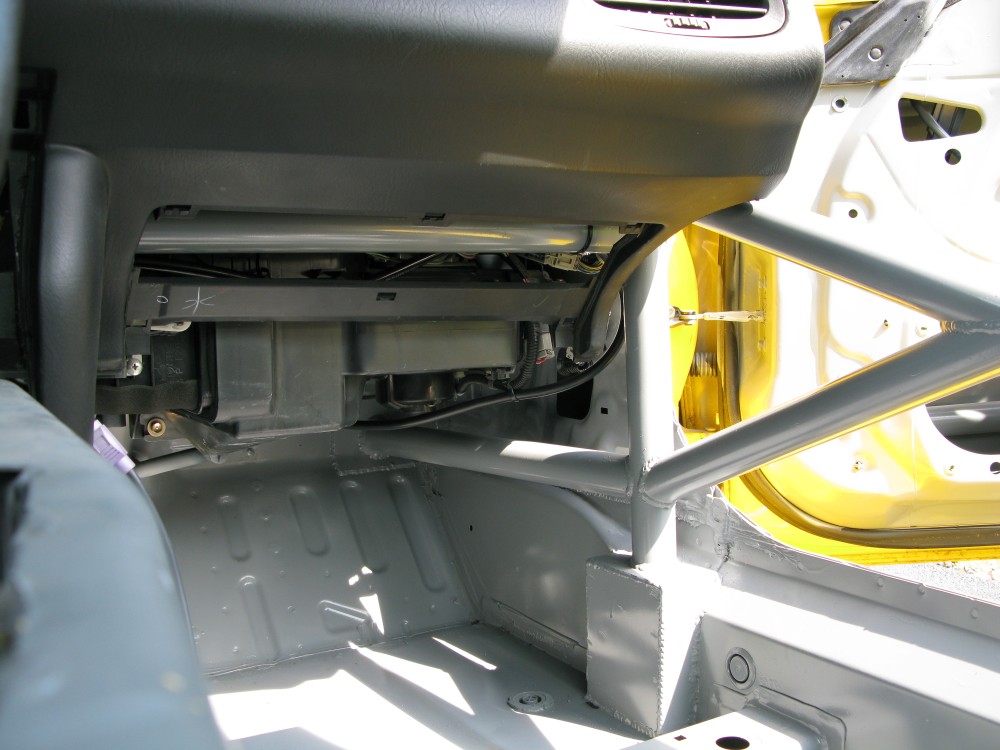
Passenger Foot Box and Under-Dash Support
Driver Foot Box
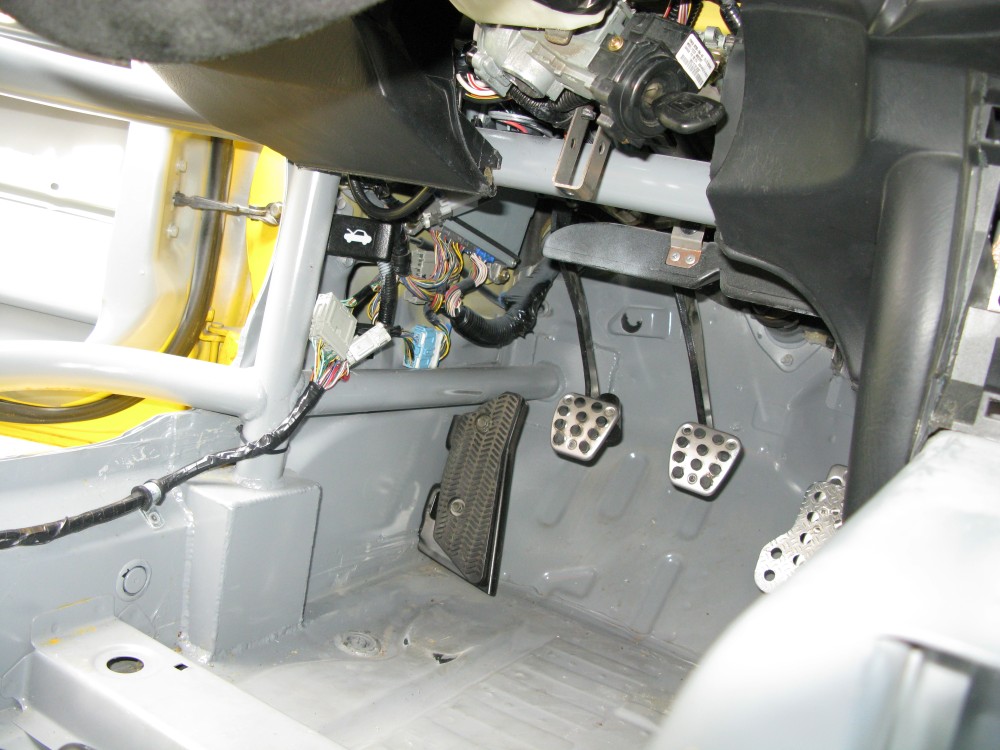
This is my one regret on the cage. The protruding "box support" interferes with my left leg. If the support was flush to the wall it would be much more comfortable, and safe.
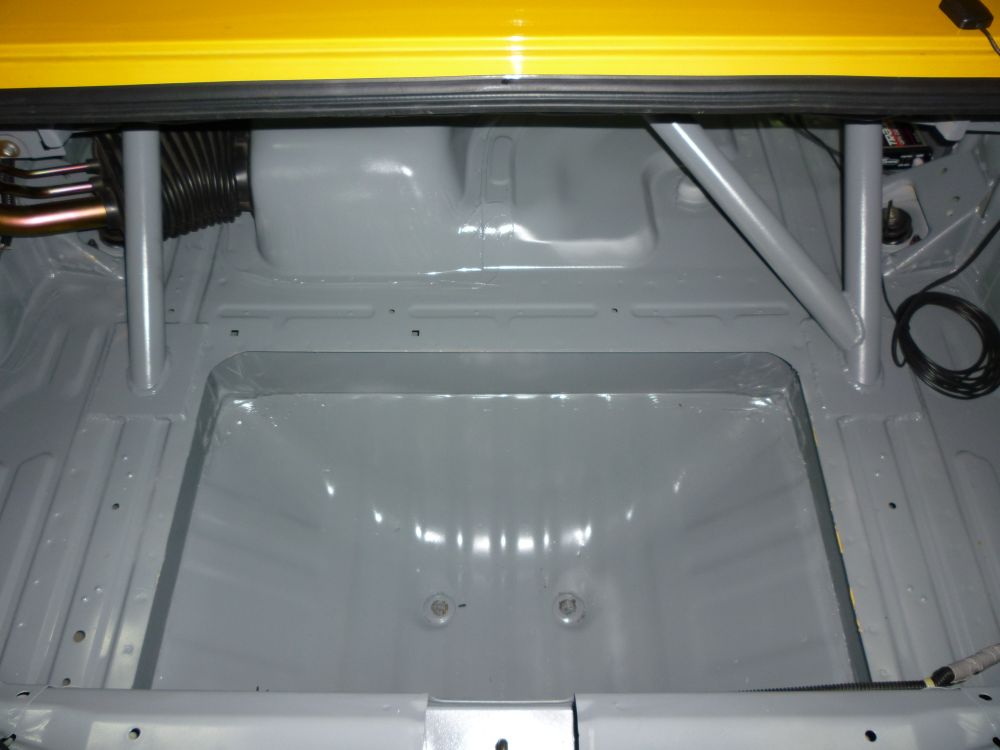
Trunk
Building an S2000 racecar isn't cheap or easy but I personally believe it's worth it.
Rob Robinette