Aventon Pace 500 & 350 Info & Maintenance
By Rob Robinette
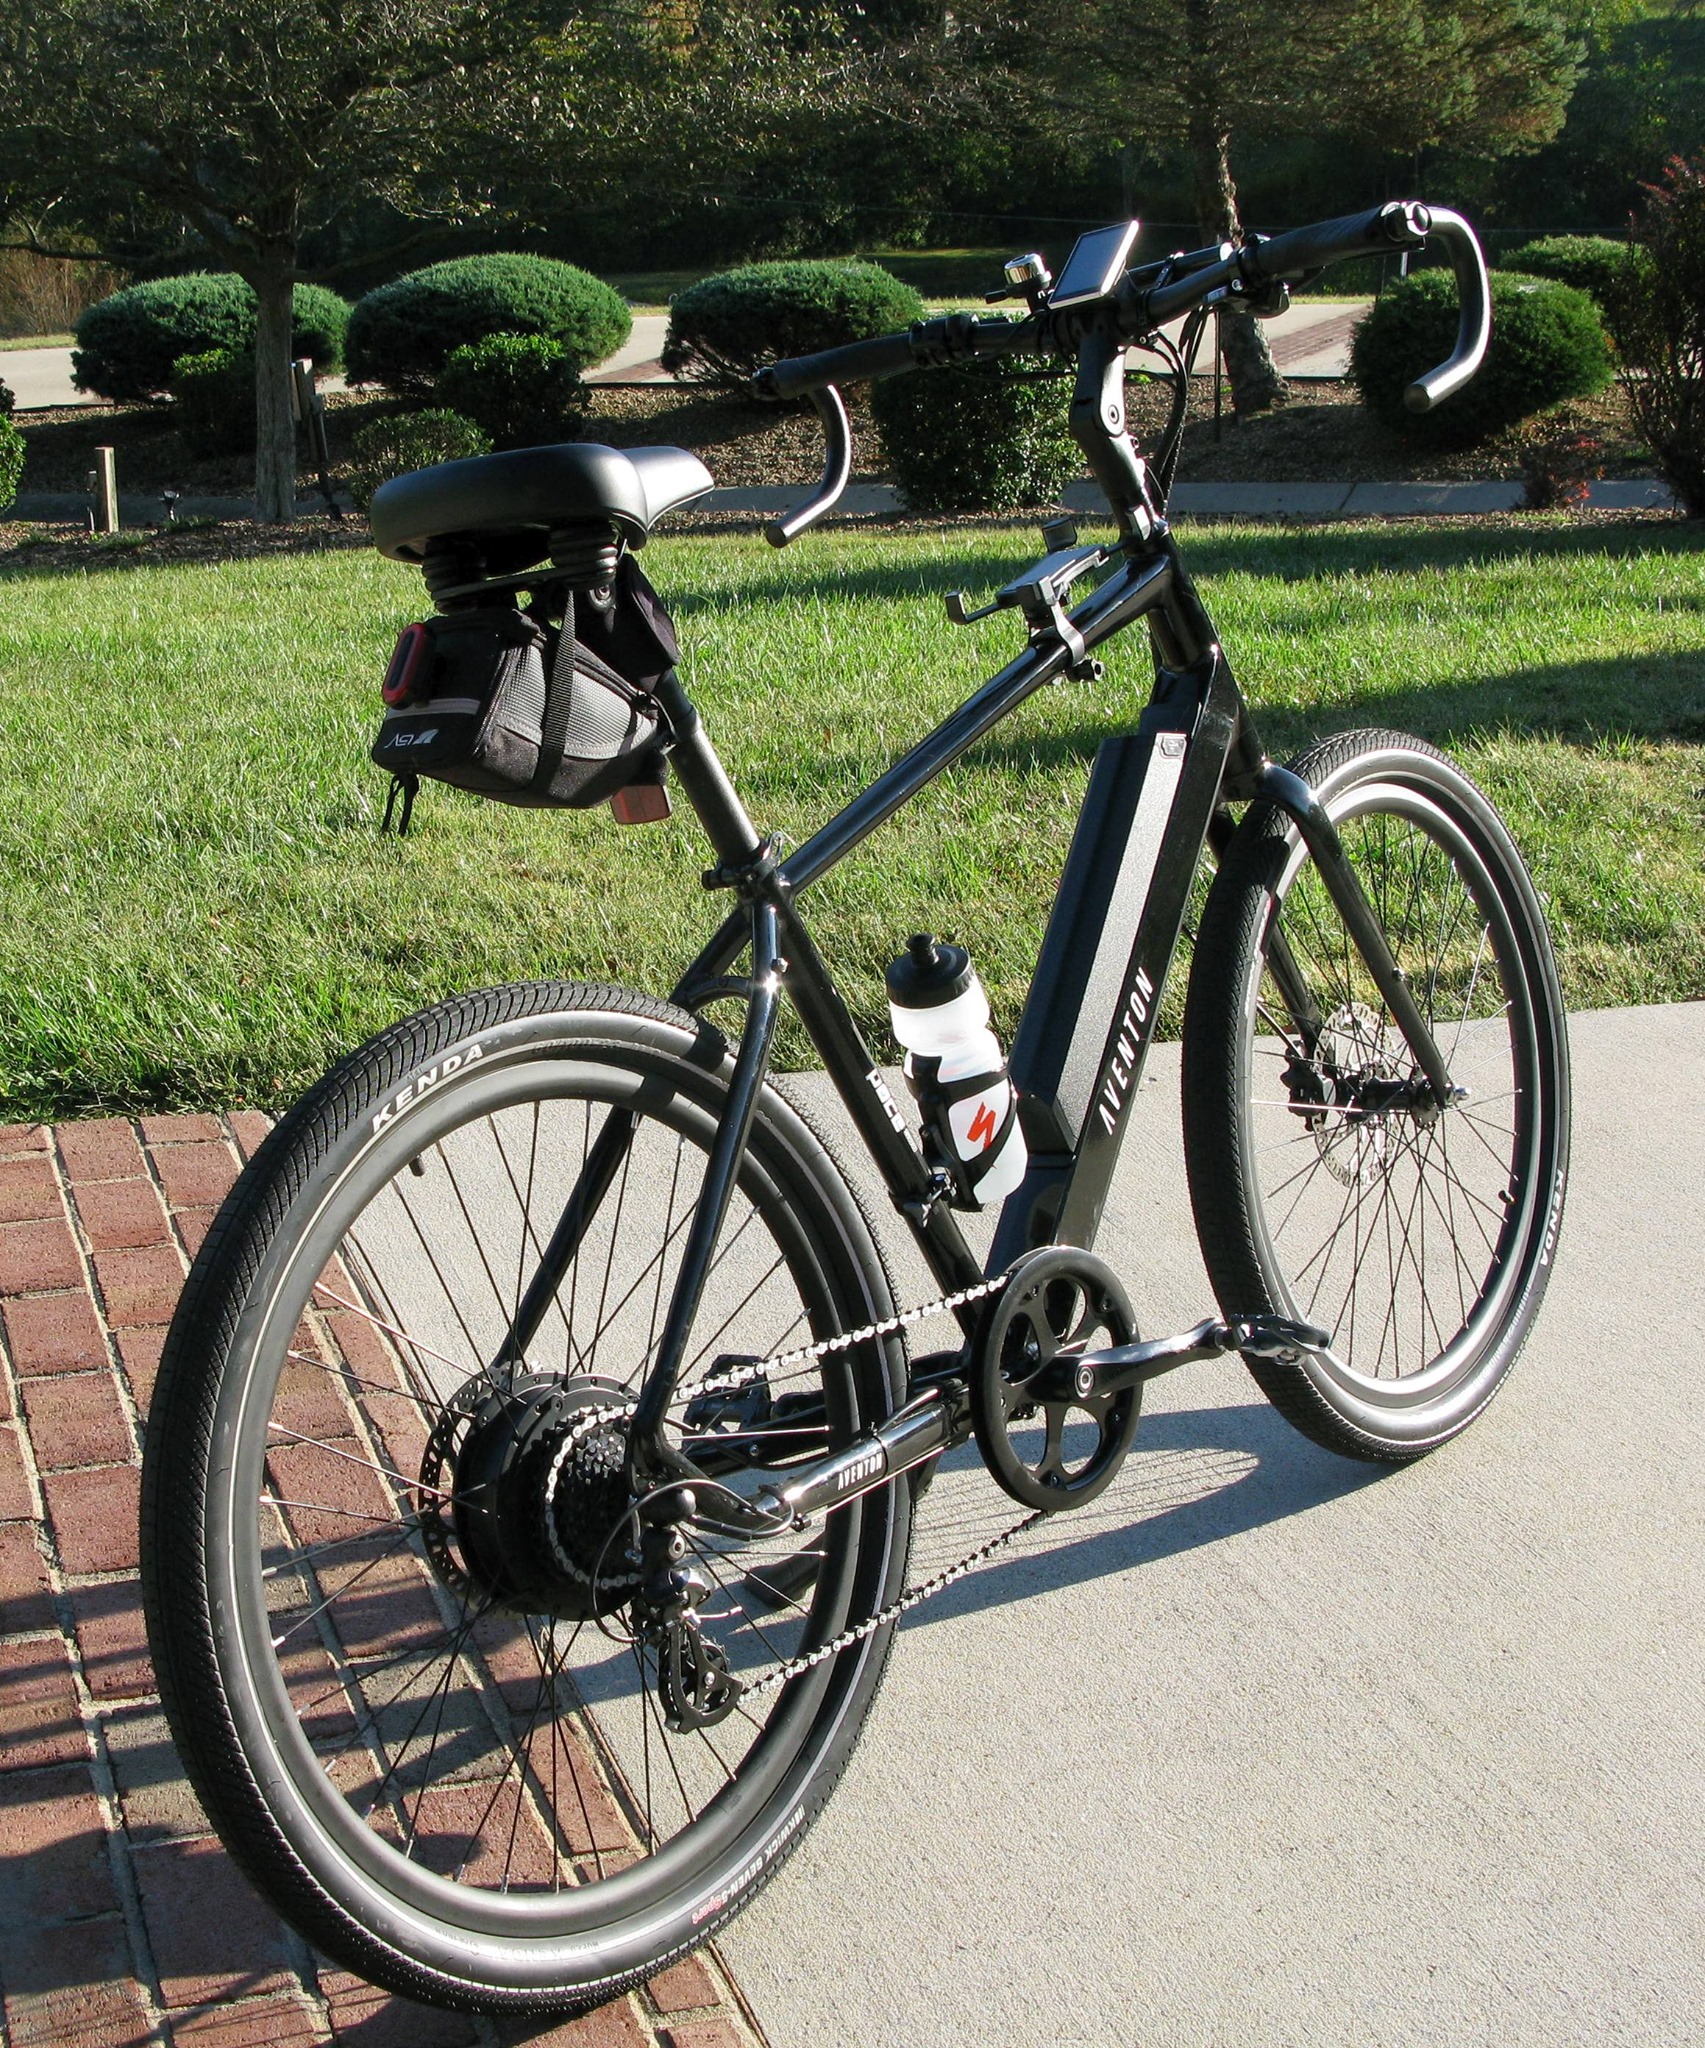
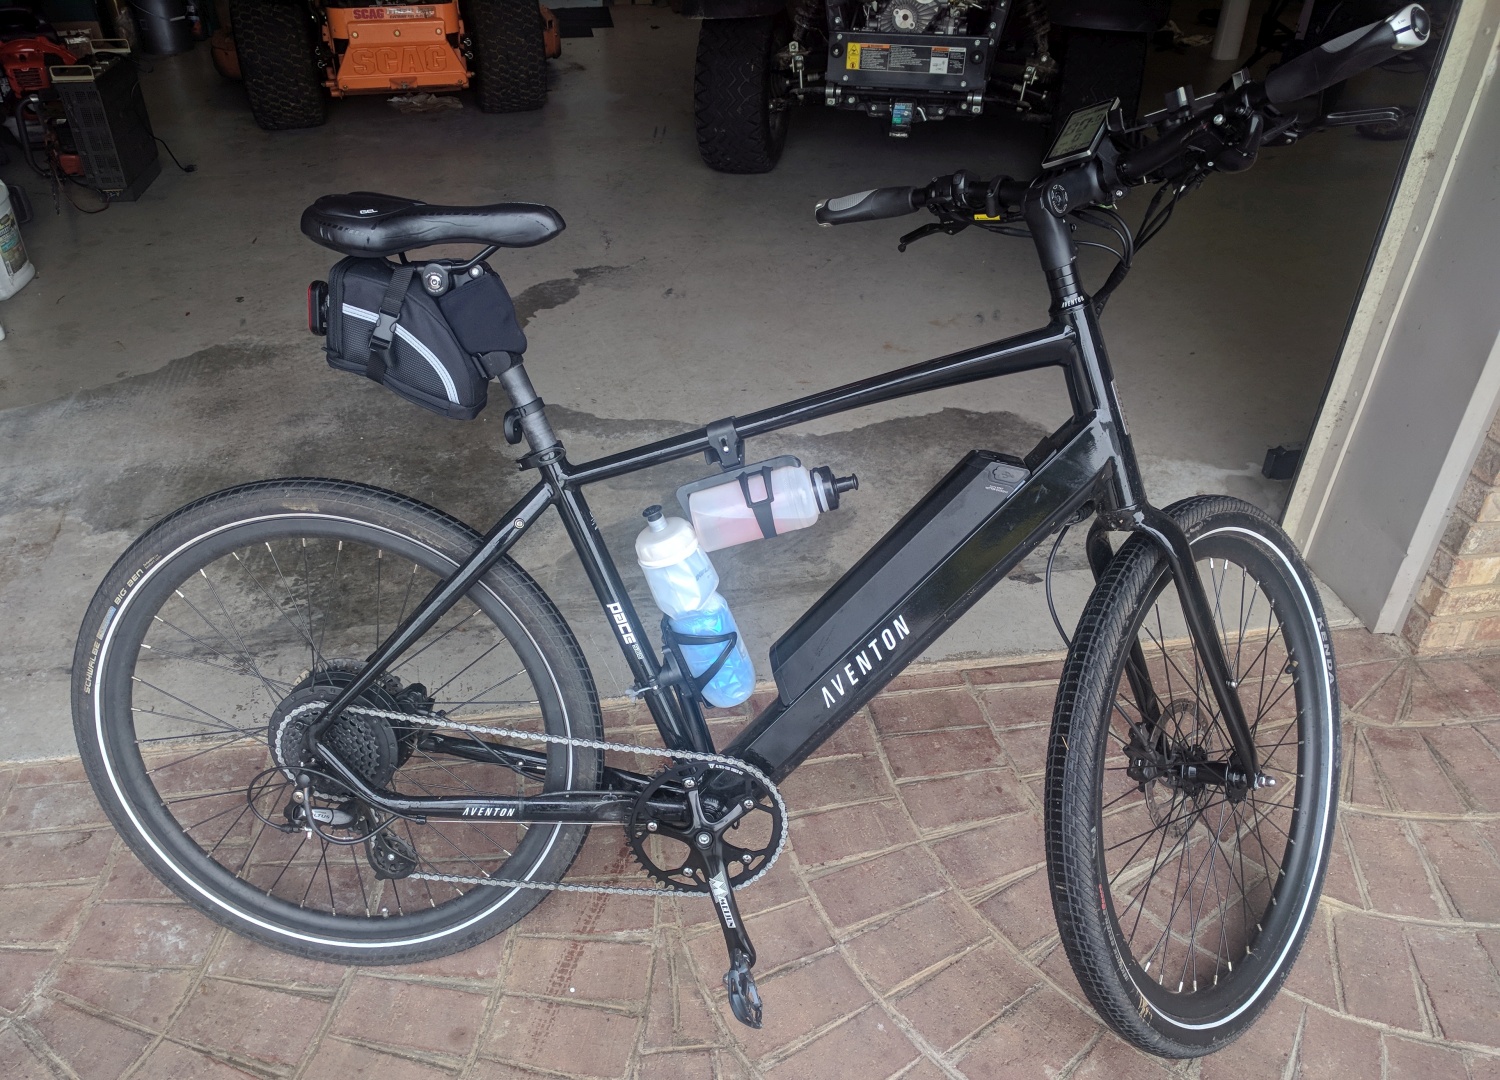
My Pace 500 with a straight handlebar with drop-bar bar-ends added. I carry my tools and spare cash in the large under-seat bag.
I put a couple of hundred miles on a KTM electric mountain bike while vacationing in Hungary in 2019 and really liked it. It was a $6000+ bike but I didn't care--I wanted one for my own. When I got home to the USA I started searching and was disappointed to find KTM doesn't sell their electric bikes here so the search continued for an ebike. After doing lots of research I ended up buying a $1499 Aventon Pace 500 street cruiser style electric bike and love it. I put 1000 miles on it in the first four months and I lost 25lbs due to the exercise and fresh air. I got so into shape I decided to get a non-electric road bike and ended up with a BikesDirect.com Motobecane Immortal Disc Pro SL carbon fiber gravel bike. It was an amazing value and I put 1000 miles on it in about four months too.
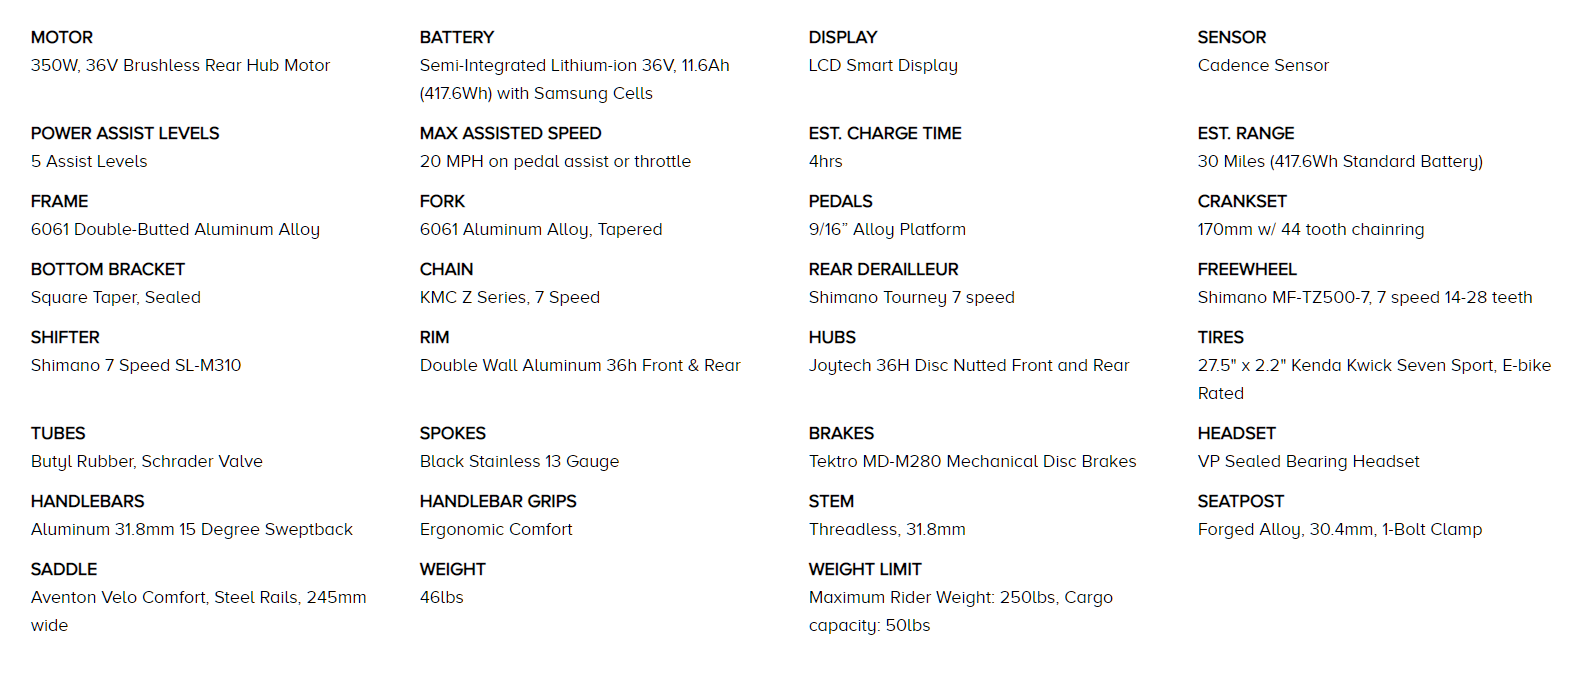
The Pace 500 is a lightweight (47 lbs), minimalist (no suspension, no fenders, no racks) ebike. It has a simple cadence sensor (tells computer that you are pedaling) and powerful 750 watt rear hub drive motor. I weigh 240 lbs and have ridden my Pace 500 up steep, rock and gravel mountain roads without any problems. The addition of a throttle is a bonus and comes in handy when you don't want to pedal at all. The only issue I've had with the 500 is two broken rear spokes. That happened around the 400 mile point (I have over 1,500 miles on it now). I contacted Aventon by email and they sent me replacement spokes at no charge and I did the repair myself. I highly recommend the Pace 500 because it is an excellent value and one of the lightest ebikes available. Light weight is important because many people have trouble getting a 75 lb bicycle up onto a bike carrier. Removing the battery makes lifting ebikes much easier.
Table of Contents
How to Replace the Chainring, Crankset & Bottom Bracket Bearing
Recommended Tools and Accessories
Pace 500 General Info
Download the Owner's Manual.
The Pace 500's powerful motor has a history of breaking spokes so keeping them tight is a must. I use this $10 Spoke Wrench which fits both 12 and 13 gauge spokes. I use this $29 Spoke Tension Gauge which is a nice copy of the $82 Park Tool TM-1 gauge.
Pace 500 conventional frame seatpost is 31.6mm. The Pace 500 & 350 step-through frame seatpost is 30.4mm. Suntour makes a nice $93 NX suspension seatpost in 31.6mm. To install an NX seatpost in a step-through Pace 500 or 350 you will need to buy a 27.2mm seatpost and add this $9 27.2mm to 30.4mm seatpost shim (I had to do the same thing on my wife's Aventon Aventure step-through).
Good replacement tires, slightly taller and quieter than stock: Schwalbe Super Moto-X 27.5x2.4" (or 2.8" wide) tires, Schwalbe Marathon E Plus 27.5x2.0. Best flat proof tour tire made in my opinion. Very long lasting. Very durable. Very quiet. My Pace 500 came from the factory with Kenda Front 27.5x2.2 Tire 30 - 50 psi. I installed a rear Schwalbe Big Ben Race Guard 27.5x2.0 35 - 70 psi. Due to the double wall rims the Pace 500 & 350 need 48mm long Schrader valve tubes in 27.5 x 2.1 - 2.35 size. Standard length Schrader valves are too short.
Crankset is 42T (42 teeth), 44T or 46T (new bikes have a 46T) chainring and 170mm crank arms. Bottom bracket cartridge is a common BB73, 73mm x 127.5mm square taper, available on ebay and at Aventon.com. To remove the crank you will need an 8mm hex key and a Park Tool CCP-22 Square Taper Crank Puller. To remove and torque the bottom bracket you will need a Park Tool BBT-22 bottom bracket tool (20 spline). The required bottom bracket torque is 435-608 inch-pounds (43 lb-ft). Once you re-install the crank arms, torque the crank bolts to 305-391 inch-pounds (25 - 32.5 lb-ft).
Pace 500 Gearing With 42 Tooth Chainring
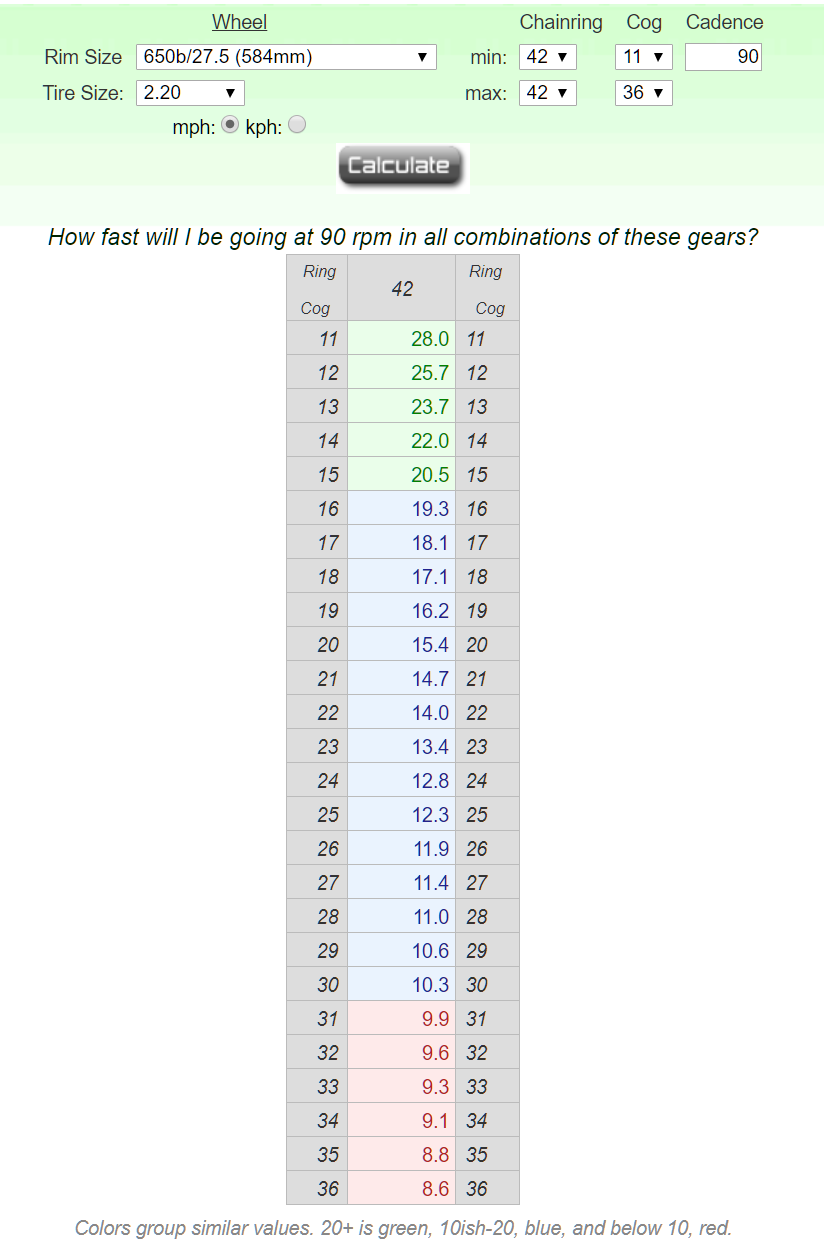
When pedaling at a cadence of 90 rpm the Pace 500 will go from 8.6mph in first gear to 28 mph in 8th gear. The Pace 500 now comes with a larger 46 tooth chainring. The Pace 350 has one less gear so its gearing if different.
Battery: Charger takes it up to 54.2v, dies around 42v.
Pace 500 Battery Voltage to % Battery Left
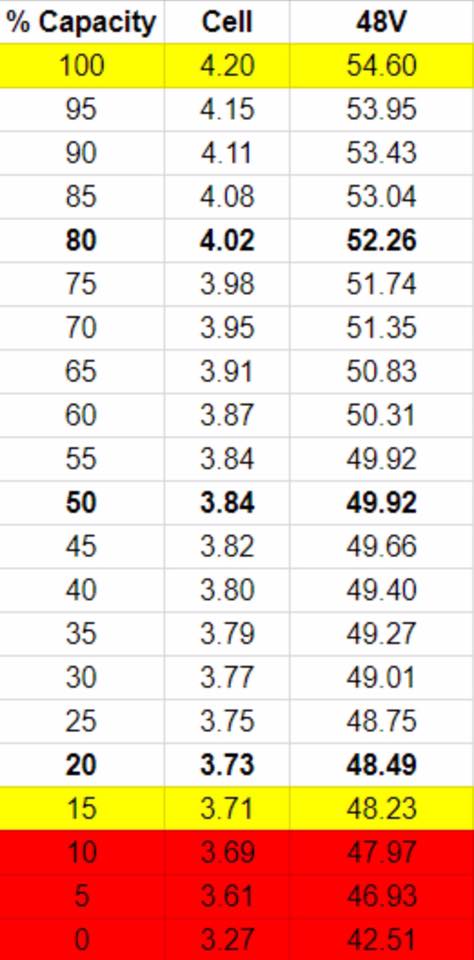
You can see the battery voltage on the bike display by tapping the controller power button to step through pages until the voltage is shown. The Pace 350 uses a 36v battery so this chart does not apply to the 350.
Spokes are 13 gauge, round stainless steel 2.3mm x 198mm drive side, 199mm non-drive side, with higher tension on the drive side. Park Spoke Tension Gauge 28 (107kgf) on drive (chain) side rear, 24-25 (68-76kgf) non-drive side and front wheel.
Pace 500 & 350 13 Gauge Spoke Tension
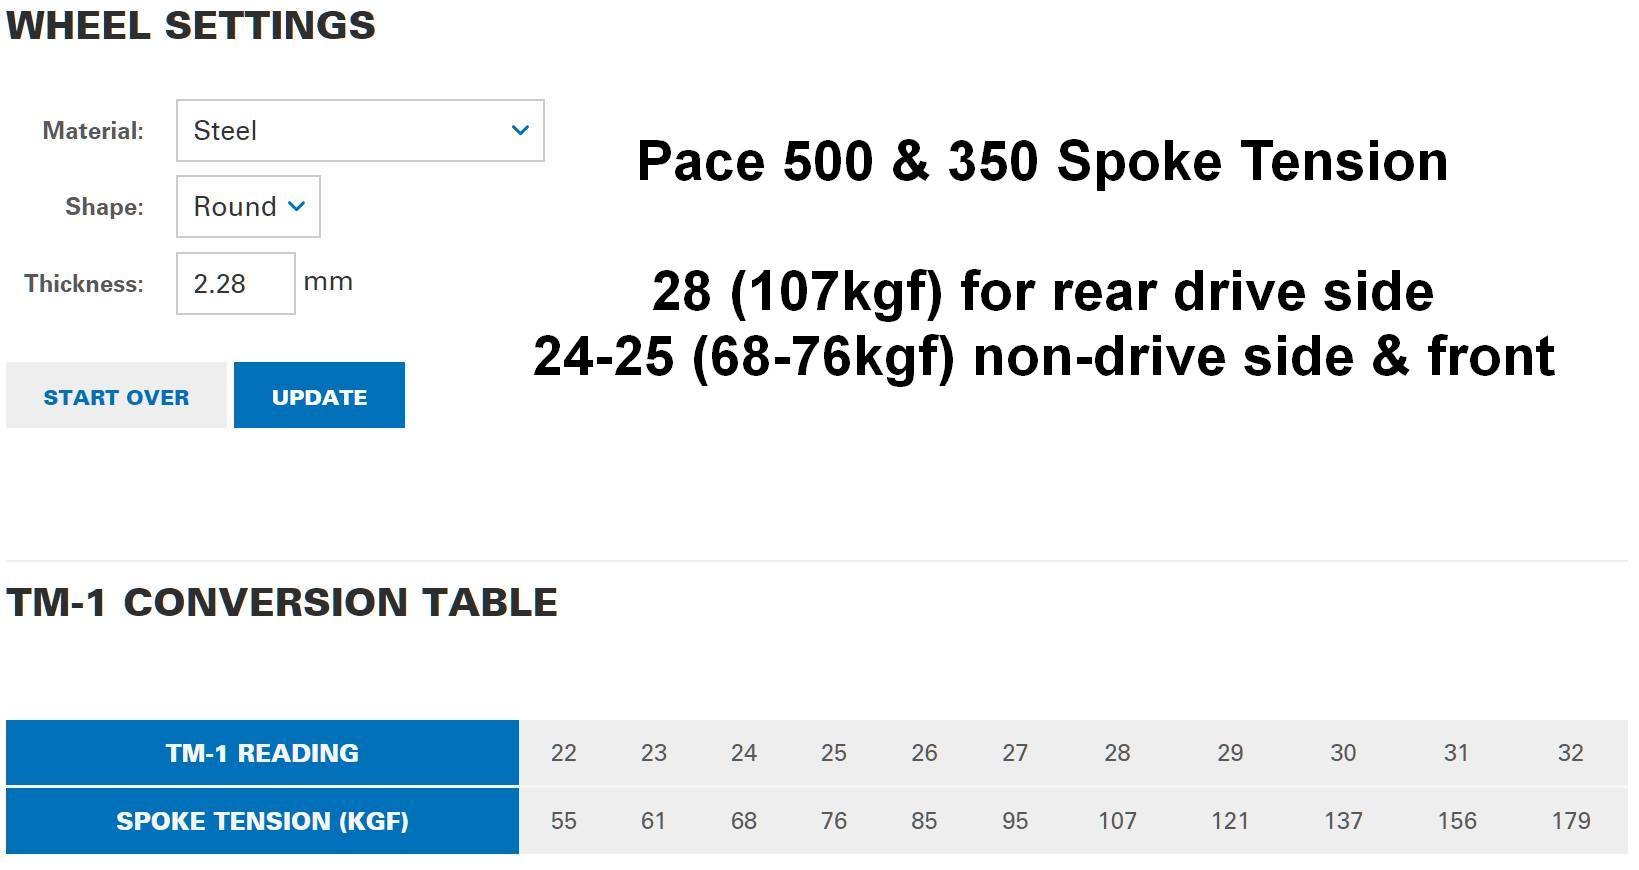
Early Pace 500 & 350 bikes came with 13 gauge spokes front and rear. Later bikes were upgraded to thicker 12 gauge spokes. If your bike has noticeably thicker spokes in the rear wheel then use the chart below to set the rear spoke tension. This chart is for use with the Park Tool TM-1 Spoke Tension Gauge.
Newer Pace 500s have thicker 12 gauge, round stainless steel spokes 2.6mm x 198 drive side (chain side), 199 non-drive side in the rear wheel. If your rear spokes are noticeably thicker, then use 12 gauge specs of 33 (106kgf) on the rear chain side, 29 (65kgf) on brake disc side.
Pace 500 & 350 Rear Wheel 12 Gauge Spoke Tension
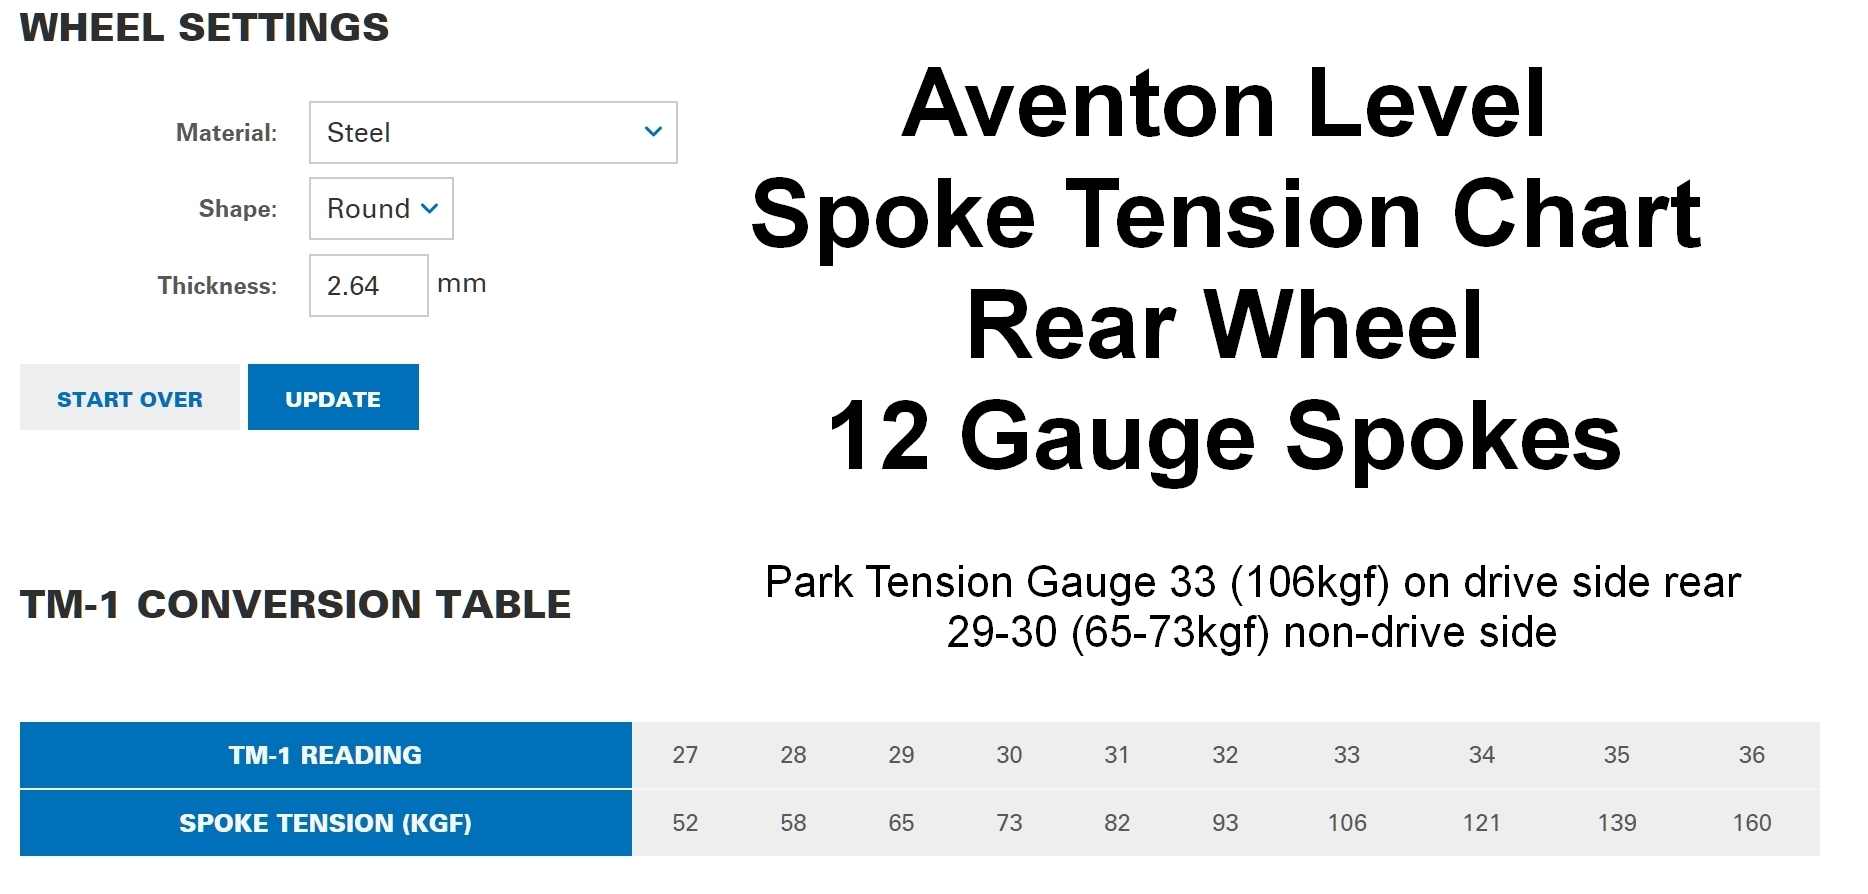
If your Pace has noticeably thicker spokes in the rear then use this chart and set 33 (106kgf) on the rear chain side spokes and 29 (65kgf) on the brake disc side. This chart is for use with the Park Tool TM-1 Spoke Tension Gauge.
Pace 500 & 350 Specs From Aventon Website
Pace 500 Conventional Frame Specs

The Pace 500 Step-Through Frame has slightly different specs such as the seat post diameter. The Crankset Chainring (front chain sprocket) is most likely not a 42T (42 teeth). My Sept 2019 Pace 500 came with a 44T and recent buyers are saying it now comes with a 46T chainring. The extra teeth slightly raise the gearing of all 8 gears.
Pace 350 Step-Through Specs
Replacing a Broken Spoke
I found a second broken spoke on the rear non-drive side (brake disc side) of my Pace 500. The first broken spoke came about 6 months and 400 miles ago. I was able to replace this one without removing the wheel, tire tube or the brake disc which I did last time. Here's how I did it:
Caution: If part of the spoke is still in the spoke nipple (silver part at the rim) do not unscrew the spoke from the nipple until you're doing the repair because the nipple will fall into the rim and then you'll have to pull the tube Schrader valve out of its rim hole and turn the wheel until the nipple falls out of the valve hole.
Start by deflating the tire and use a bike tube valve tool to remove the Schrader valve core to completely deflate the tube. Rotate the tire so the broken spoke is high and to the rear for easy access. Keeping the broken spoke high will prevent the nipple from falling down into the rim.
Remove the broken spoke at the hub and thread the new spoke into the hub. Pay attention to the spoke pattern—at the hub the spokes alternate, being threaded from the inside and outside. I have heard that new rear wheels with thicker 12 gauge spokes are laced differently so look carefully at the spoke pattern before inserting the new spoke. I was able to thread the new spoke in by running it through a large hole in the brake disc between the braking surface and the hub.
Hold the spoke nipple with pliers and unscrew the other part of the broken spoke from the nipple--do not allow the nipple to fall down into the rim.
At the broken spoke pull the tire and tube off to the side of the rim. I had to use a plastic tire iron to get the tire off the rim enough to get access to the spoke nipple (see picture).
Slide the rim tape off to the side so you can see into the rim nipple hole. Use the broken spoke to hold the nipple in place by threading the broken spoke into the nipple from the outside of the rim (see picture). This will allow you to control the nipple so you can lift it enough to thread the nipple onto the new spoke. Once you get the new spoke threaded into the nipple, hold the nipple with pliers and unscrew the broken spoke. Screw the new spoke into the nipple as far as you can by hand.
Put the rim tape back in place and push the tire and tube back into place.
Install the Schrader valve core and inflate the tire.
Tighten the new spoke to match its surrounding spokes.
The Pace 350 & 500 use 13 gauge steel, black, j-bend spokes, 198mm in length on the drive side (chain side), 199mm on the non-drive side (brake disc side). Newer Pace 500s have thicker 12 gauge spokes in the rear (but same lengths). 13 gauge round steel spokes are 2.3mm diameter, 12 are thicker at 2.6mm. The Aventon Level rear wheel uses the thicker 12 gauge steel spokes. It’s best to get replacement spokes from Aventon but a bike shop can custom make correct size and length spokes. The shop may have to order the blank black spokes and then cut them to size and thread them.
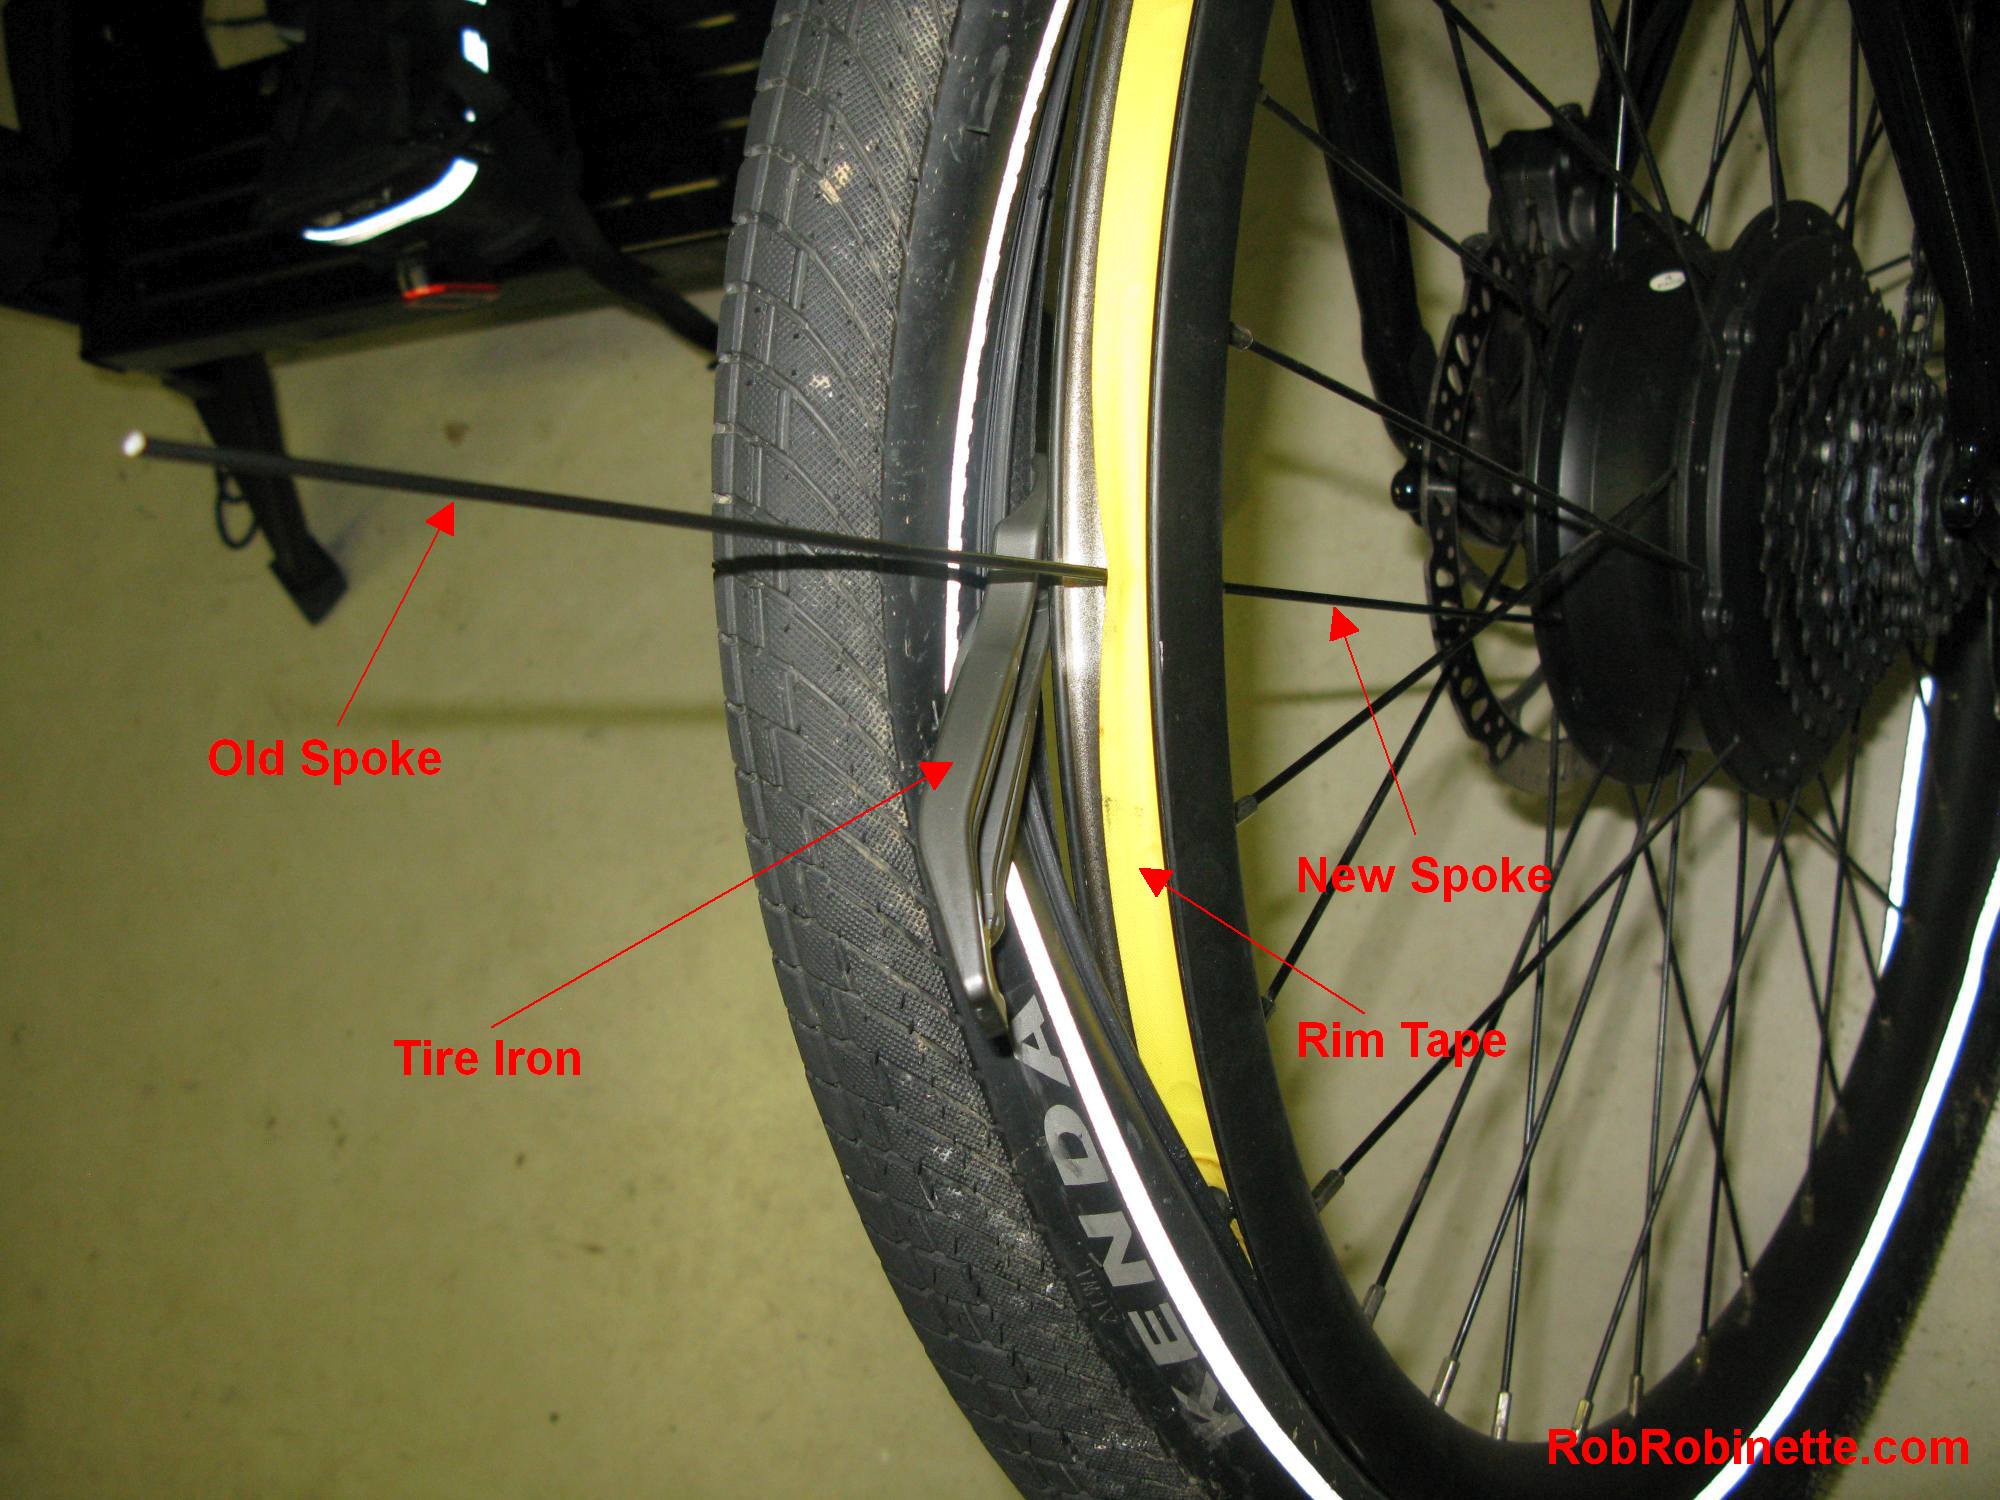
The old, broken spoke outside the wheel threaded into the outside of the
nipple so you can control and manipulate the nipple. The new spoke is installed
and threaded into the inside of the nipple, a plastic tire iron holds the tire
and tube off to the side of the wheel and the yellow rim tape moved to the side.
You can also use this technique to plug a tube hole. If you can see the
hole/nail/screw/thorn then pull the tire off to the side, pull the tube out and
patch the hole. Feel around inside the tire to make sure there isn't anything
sharp still inside.
Replacing the Crankset, Chainring and Bottom Bracket
The Pace 500 comes with either a 42T (42 teeth), 44T (my bike) or 46T (new bikes) chainring mounted on a Chinese generic, non-standard 170mm crankset. I wanted to add a larger oval chainring to increase the bike's top end speed. I like oval chainrings because they even out the pedaling power pulse. I went with a $68 Pass Quest 130 BCD oval 48T (48 teeth) chainring. 130 BCD means 130mm Bolt Circle Diameter. I paired the chainring with a $36 Keenso Bike square taper crankset 170mm, 130 BCD. The crank and chainring must match and these both use 130 BCD.
Pass Quest Oval Chainring on Keenso Bike Crankset
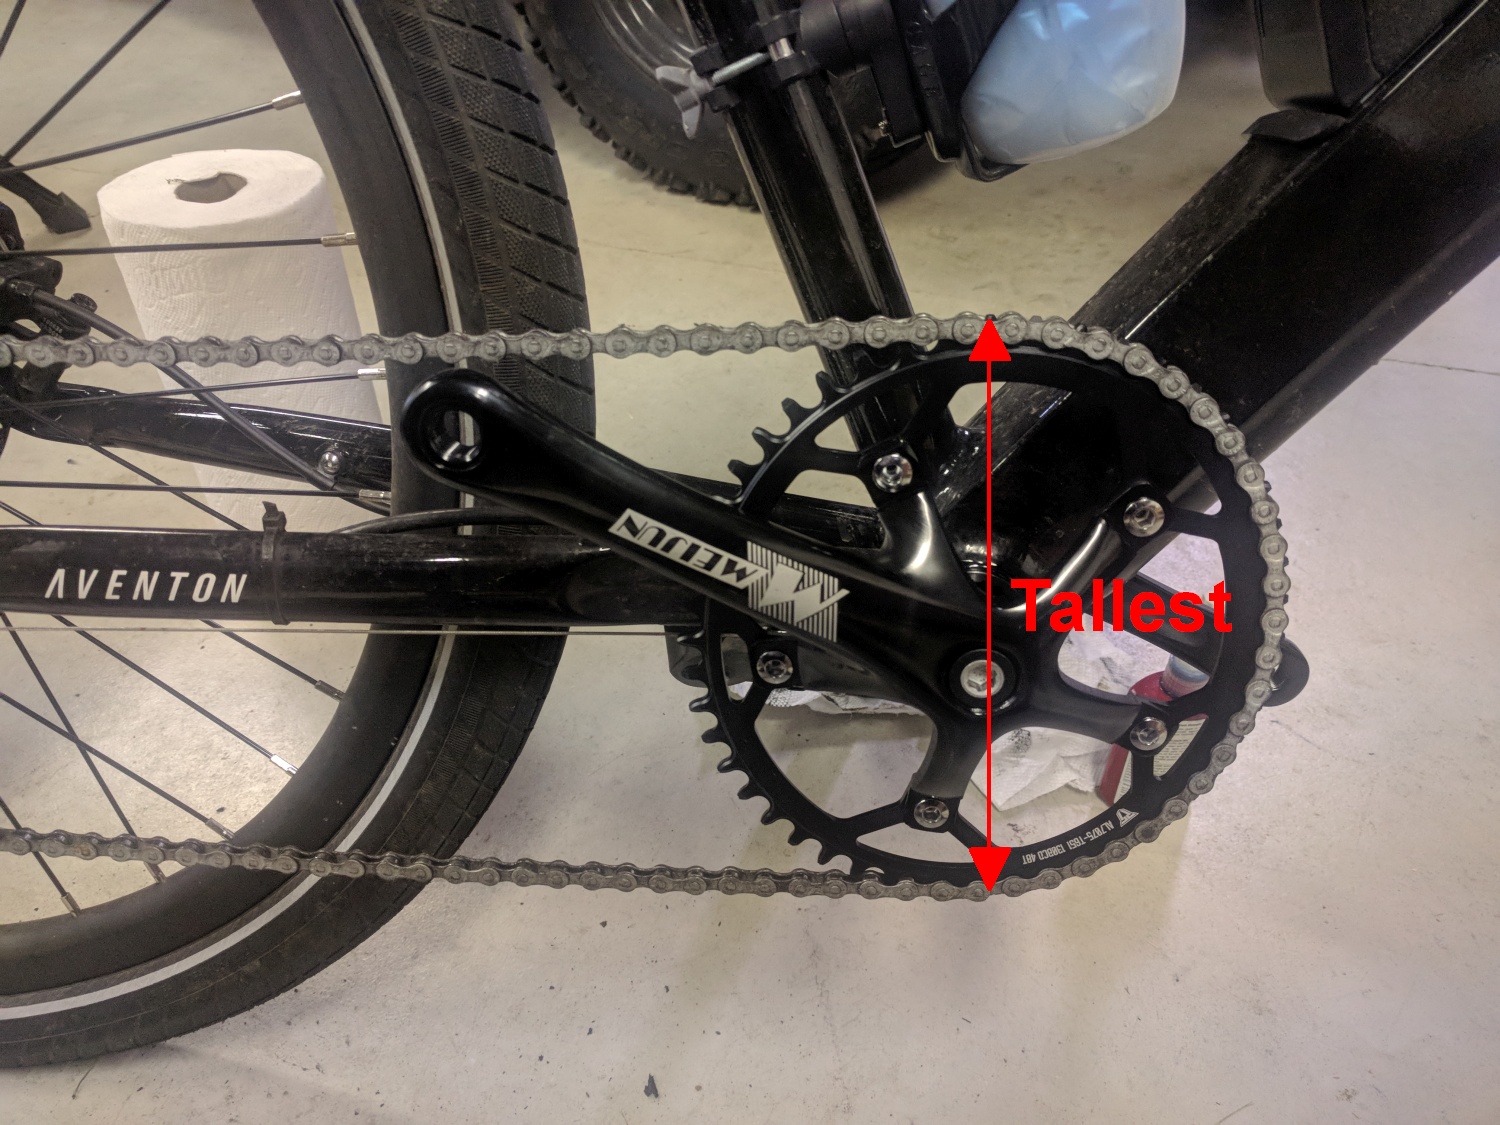
Pass Quest Oval 48T Chainring mounted on the Keenso Bike Crankset. Crank arms are 170mm long--the same as the original cranks. The crankset and chainring are both 130 BCD. Mount the chainring as in the picture, with the right crank slightly above horizontal and the tallest part of the chainring vertical (red arrow). You can mount the chainring inside or outside the sprocket mount but mounting it inside as shown above will put the sprocket in the proper position to line up with the rear sprockets.
Since I had to take the crankset off I decided I might as well replace the bottom bracket cartridge bearing too because I had over 1500 miles on the bike. The bottom bracket cartridge is a common BB73, 73mm x 127.5mm square taper, and was only $24 delivered from ebay.
I didn't do this but another Pace 500 owner replaced not only his front chainring sprocket but he also replaced the rear sprocket cassette with a wider range 8-speed 11-42T Shimano compatible cassette (11 tooth high gear, 42 tooth low gear) which kept his low gear closer to stock. The stock cassette is an 11-36T so the new low gear is 6 teeth larger and quite a bit lower than stock. He had to add a few links to his chain and added a Goat Link derailleur extender which was required to make the stock derailleur work with the new, larger diameter cassette. The Pace 500 stock chain is the KMC Z72 8-speed 1/2x3/32" (Same as KMC Z8.1) which comes with 116 links.
Start by removing the pedals using the Aventon Pedal Wrench that came with the bike. The left pedal has left-handed threads so clockwise to remove. The right pedal has normal right-hand threads so counter-clockwise to remove.
8mm Hex Wrench to Remove Bolt
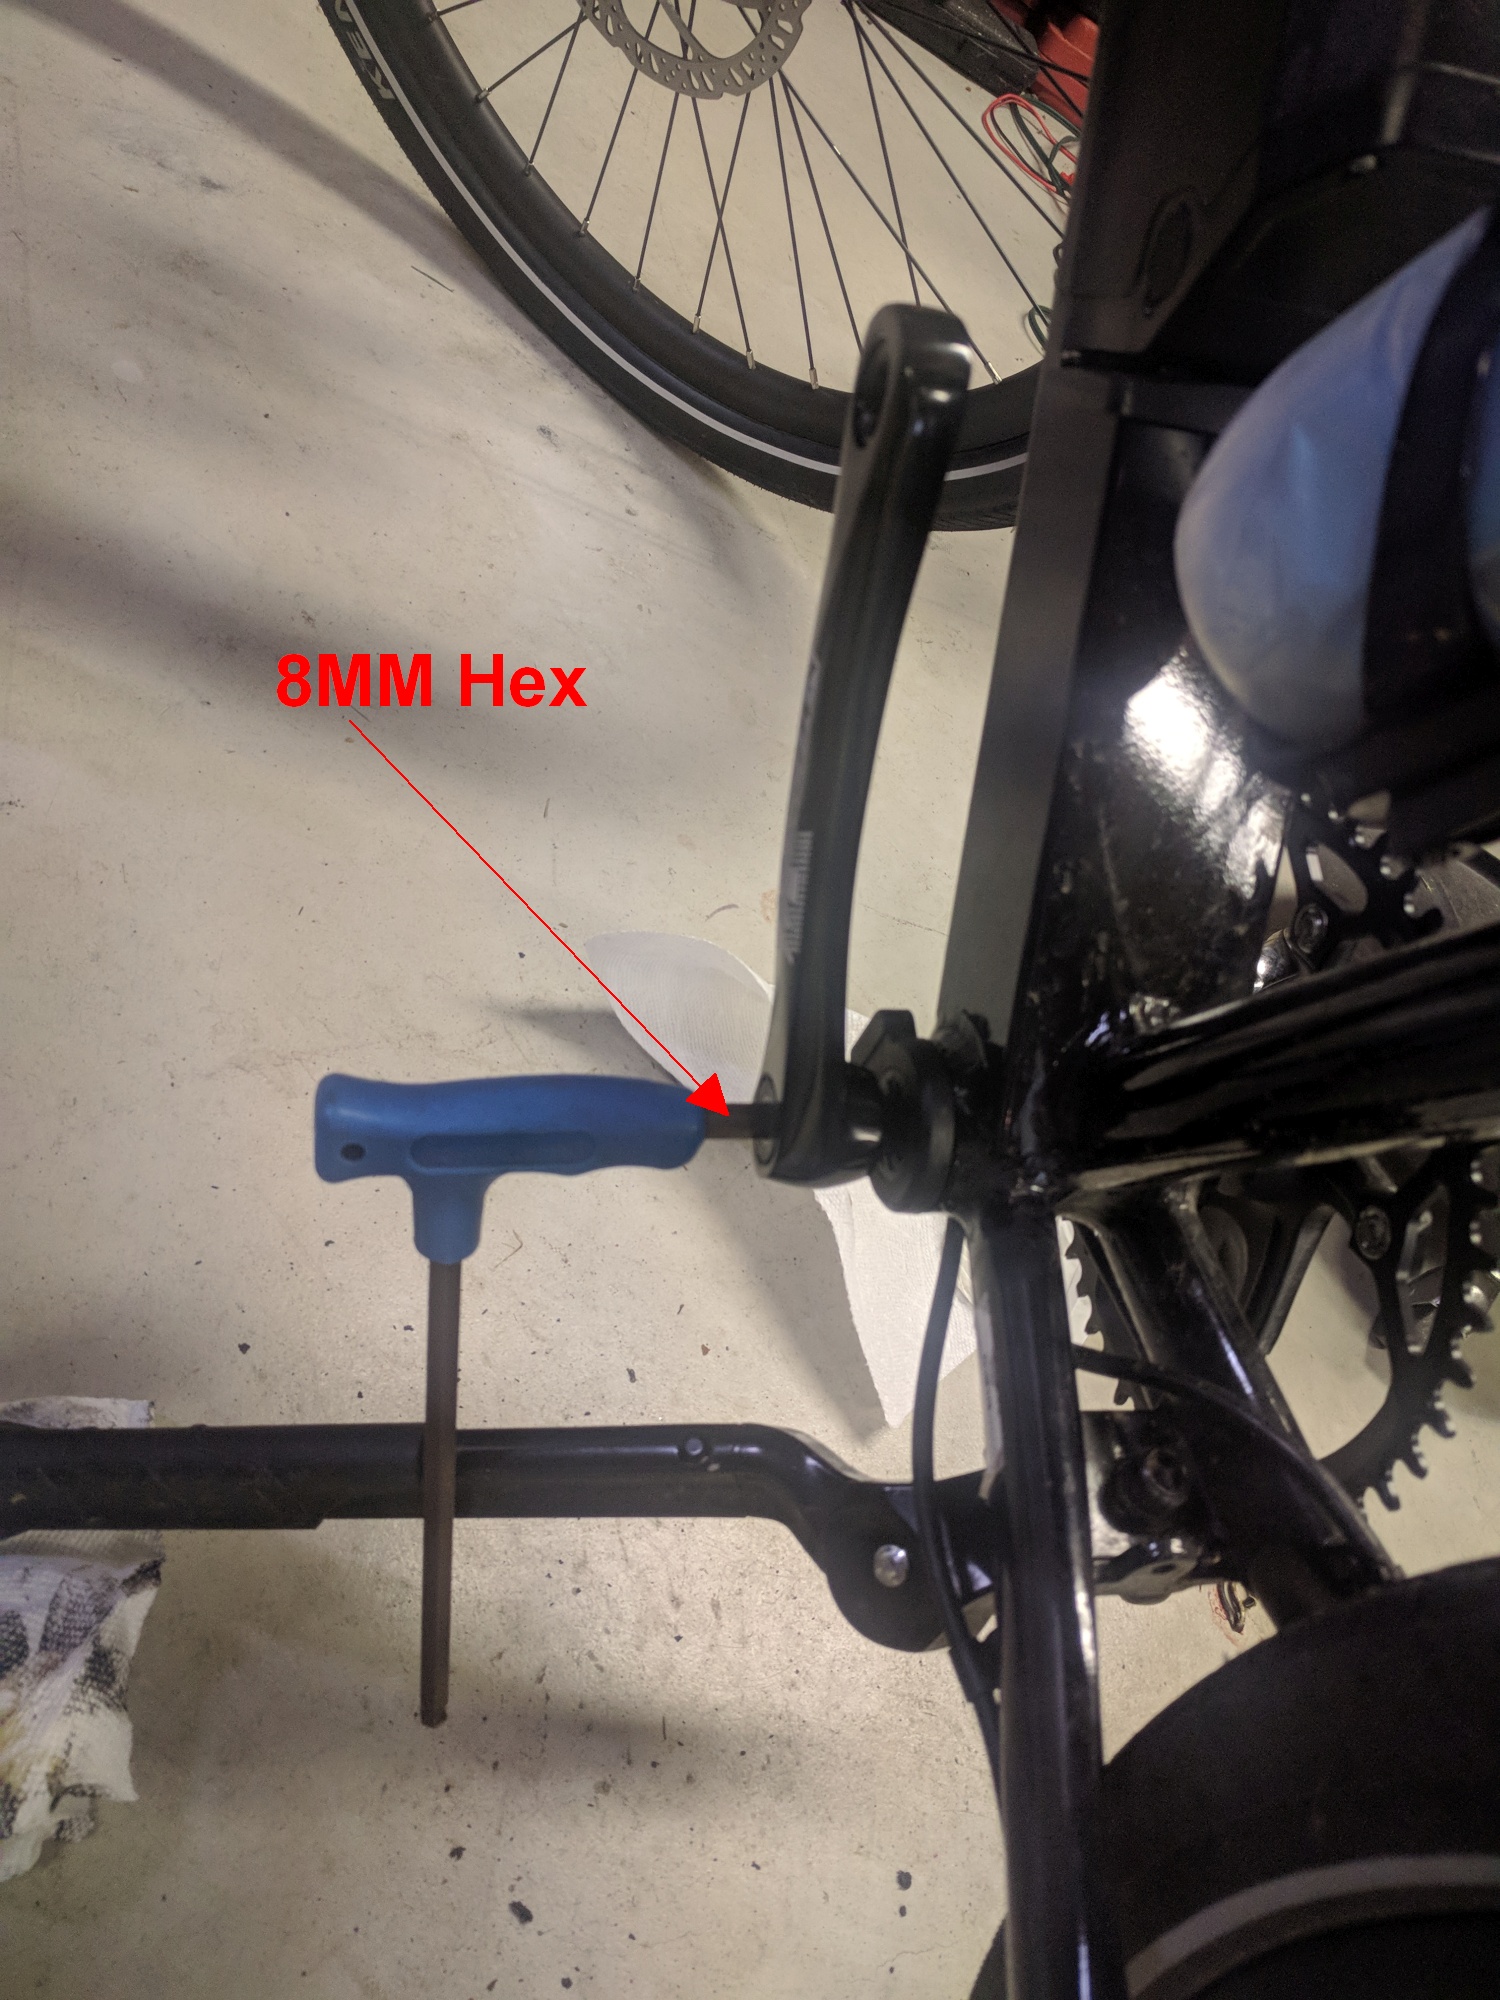
Use an 8mm hex wrench to remove the crank bolts as shown above. Both sides are normal right-hand threads so counter-clockwise to remove the crank bolts.
Crank Puller to Remove Crank
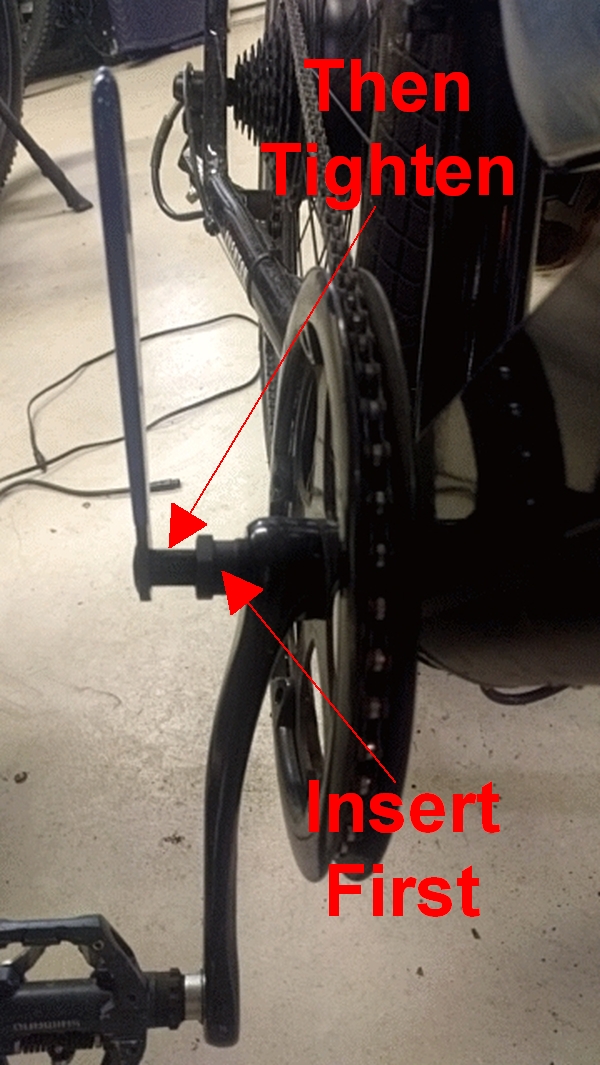
Park Tool CCP-22 Crank Puller for Square Tapered Bottom Brackets is required to pull the crank arms off. Unscrew and remove the wrench's large nut and screw it fully into the crank arm bolt hole. Screw the wrench into the large nut. Both parts of the wrench have normal right-handed threads. The wrench will push the crank arms off the bottom bracket. You may need to use a mallet to help the wrench along.
If you are not replacing the bottom bracket cartridge bearing then skip down to Installing the Crank Arms.

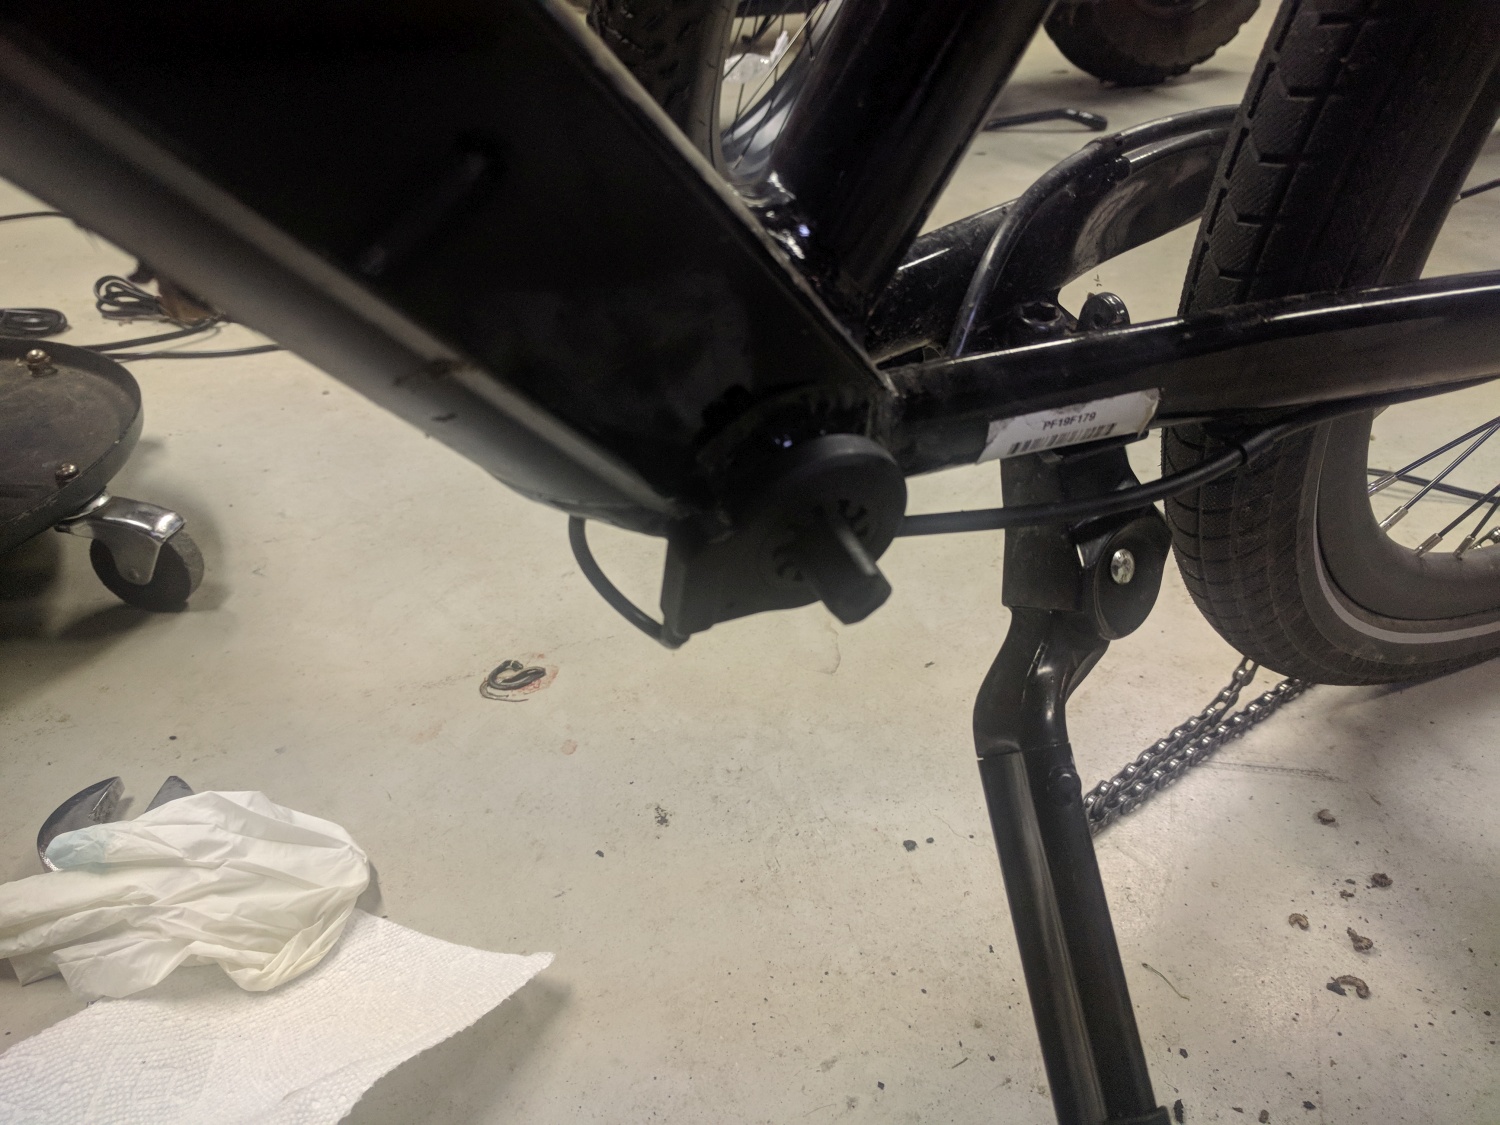
Pull the cadence sensor outward to remove. The sensor's teeth match up to the bottom bracket teeth.

Park Tool BBT-22 Bottom Bracket Tool 20 Spline being used to remove the old bottom bracket cartridge bearing. The bottom bracket has left-handed threads on the right side (shown above) so turn clockwise to loosen. The left side of the bottom bracket has normal right-hand threads so counter-clockwise to remove. Remove the old bottom bracket cartridge and clean the bottom bracket hole threads. Put some Loc-Tite Blue on the bottom bracket hole threads (both sides) and spread it around. If you don't have Loc-Tite Blue then anti-seize paste or grease is better than nothing.
Bottom Bracket Cartridge Bearing
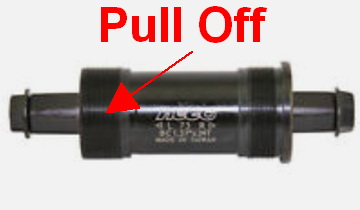
The bottom bracket cartridge is a common BB73, 73mm x 127.5mm square taper. Pull the new bottom bracket cartridge removable threaded end off (shown above) and install the new bottom bracket. Insert it from the drive (right) side of the bike (left hand threads so counter-clockwise to tighten) and hand tighten. Use only hand power to start the bottom bracket cartridge into the bottom bracket hole so you do not cross-thread the threads. Install the removable end of the bottom bracket on the non-drive side, teeth outward (left side has normal right-hand threads so clockwise to tighten). Torque the drive side to 43 lb-ft using the BB tool then torque the other side to 43 lb-ft.
Torque Bottom Bracket to 43 lb-ft
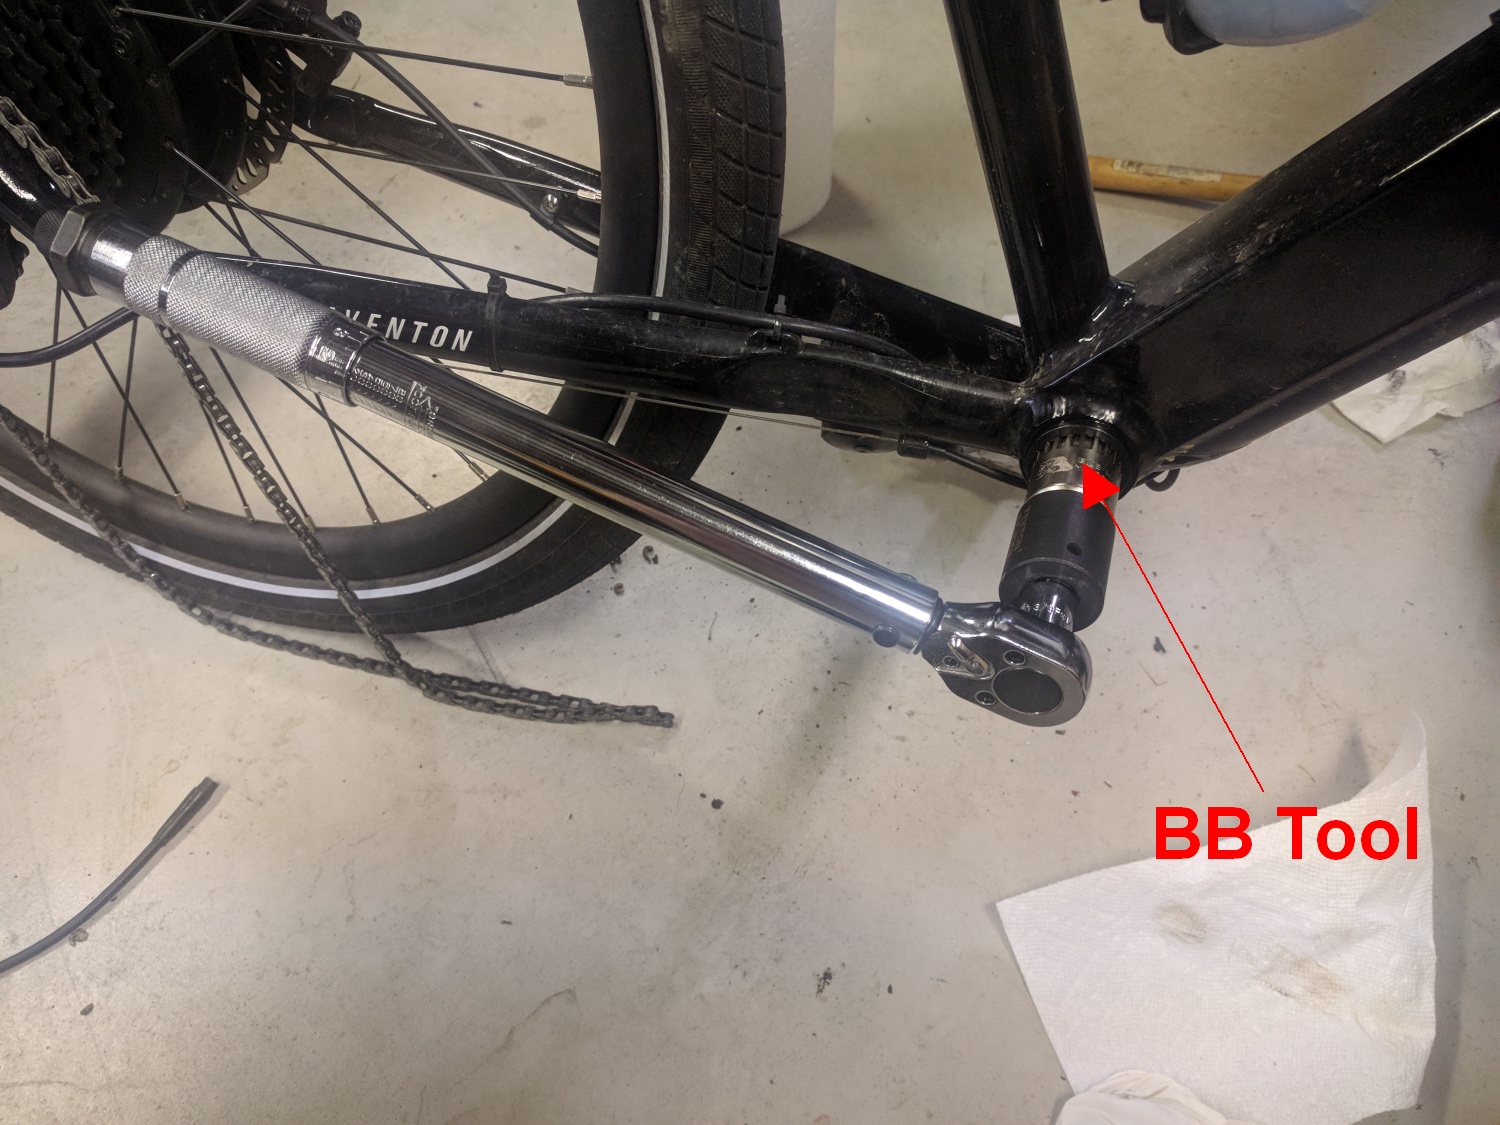
Once again use the BBT-22 Bottom Bracket Tool on a torque wrench to tighten the bottom bracket to 43 lb-ft of torque. Torque the drive side first then the other side.
Line up the cadence sensor teeth with the bottom bracket teeth and push fully into place.
Install Crank Arms
I reused the original 8mm hex crank bolts because they look better than the bolts supplied with the new bottom bracket. As you tighten the crank bolt the crank arms will slide into position. Torque the crank bolts to 25 - 32.5 lb-ft. Install the pedals and remember the left pedal has left-hand threads so counter-clockwise to tighten it. Be careful not to cross thread the pedals.
Adjust the Derailleur
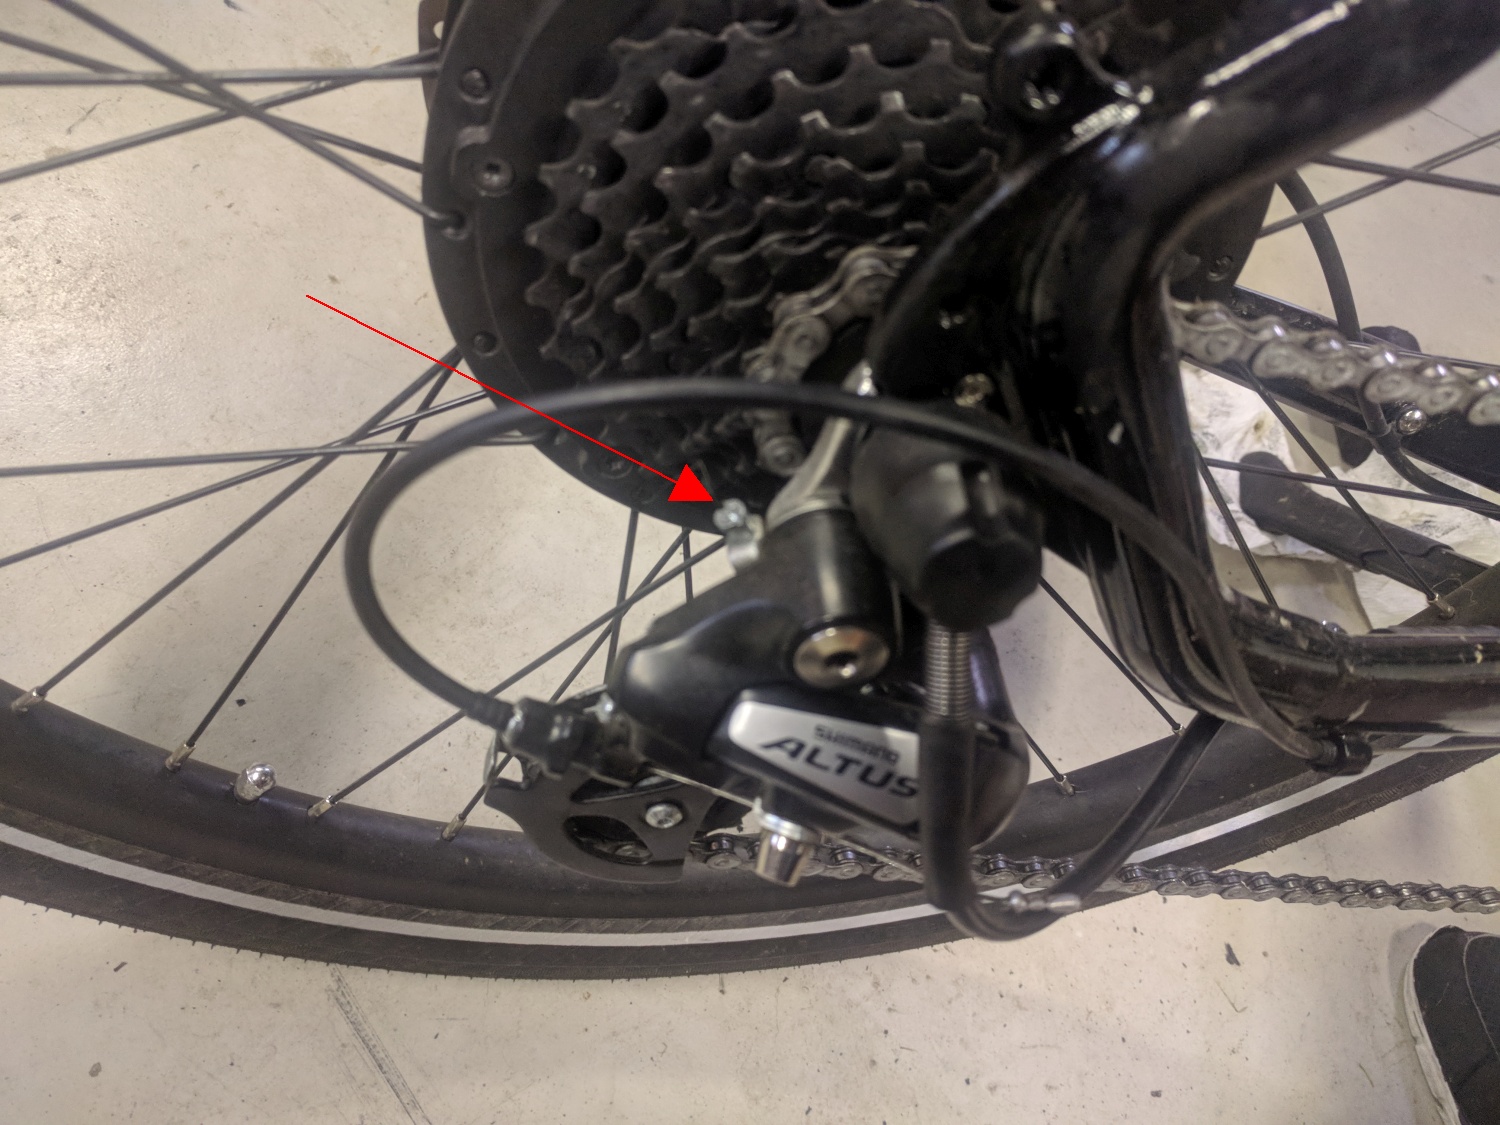
Turn this derailleur screw 2 to 3 turns clockwise to move the derailleur forward to allow the chain to fit on the largest (lowest) gear. I could not get into first gear until I made this adjustment. A 4 link longer chain (44T to 48T) would be optimal but the original chain fits and runs well after this adjustment. If you go with a chainring with more than 48 teeth you may have to buy a longer chain or add links to the original chain.
New Crankset & Oval Chainring
The bike is in first gear. Note the derailleur is stretched forward but the stock chain length does work well with the larger diameter 48T oval chainring. The lower water bottle mount came with the bike. The upper water bottle mount is from Amazon (2 for $10).
My Favorite Bike Tools & Accessories
My favorite phone holder. I now have it mounted on my handlebar.
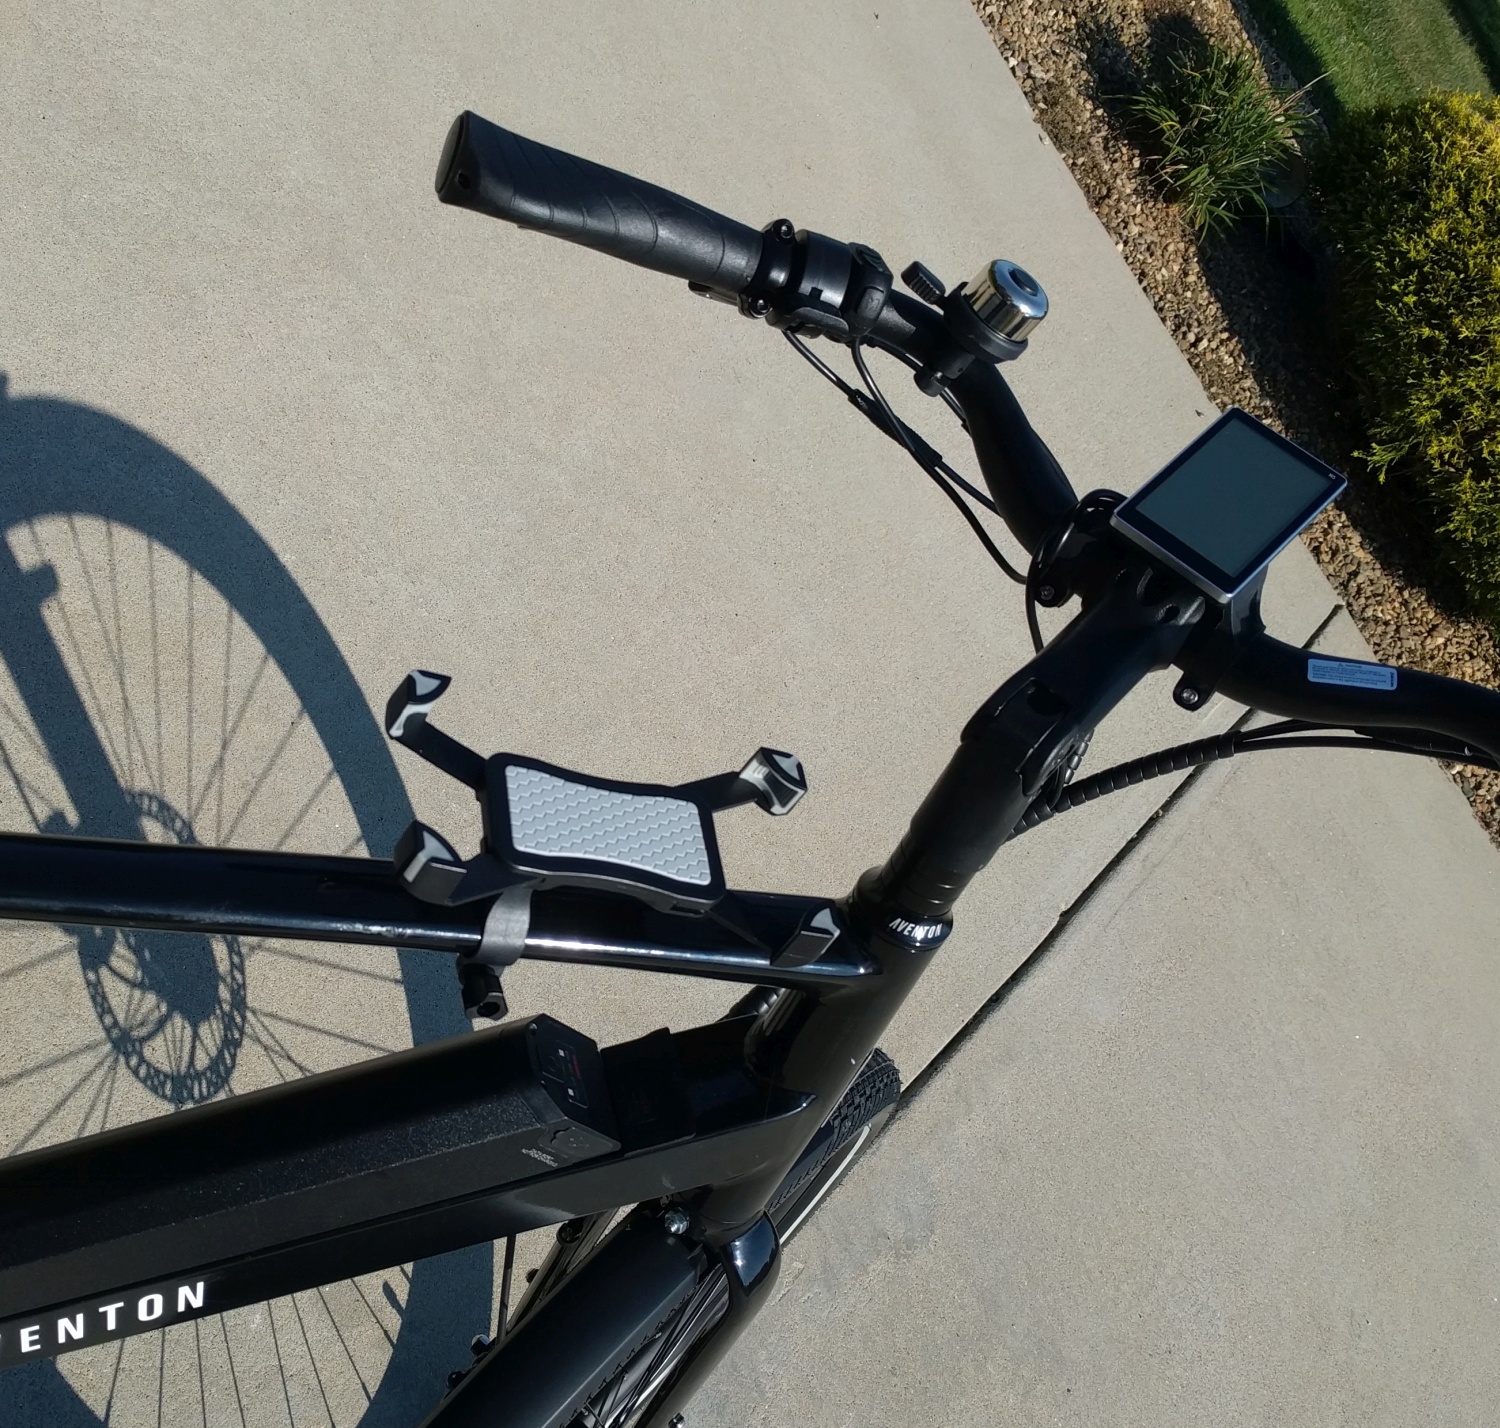
This phone holder works well on the top tube or on the handlebars.
My favorite bike helmet is this $38 Victgoal from Amazon. I really like the removable visor and eye shield. The helmet is very easy to adjust to your head size.
I mounted this $14 helmet-mounted mirror so I can see traffic approach from the rear, which is the biggest threat to our safety. I am not a fan of handlebar mounted mirrors because road vibration can make them unusable.
I like these $100 Shimano PDEH500 dual use pedals. One side is for normal shoes, the other side of the pedal has clips for SPD clipless bike shoes. Using clipless bike shoes keeps your feet securely on the pedals, positions the ball of the foot on the pedals so you get a calf workout and allows you to exercise the top of your thighs by pulling upward on the pedals.
These are my favorite $10 warm weather riding gloves.
$18 Handlebar Extension for adding accessories such as a bike computer and pepper spray.
$15 Handlebar Mounted Pepper Spray for unruly animals & humans.
$10 for two water bottle holders from Amazon. I wanted two bottle holders for longer rides.
I carry my bike tools and spare cash in this $18 large under-seat bag.
This is how I clean my chain.
I use Finish Line Dry Chain Lube and apply it with this applicator.
Recommended Bike Tools
This $120 Bikehand maintenance stand is rated at 55 lbs so it works well for the Pace 500 & 350.
This $65 Bikehand tool kit has most of the specialty tools needed to completely disassemble and maintain your bike.
$10 Tire Levers to pull the tire on and off the rim for tube repair/replacement.
$10 Tube Patch Kit for on-the-road repairs.
$16 CO2 Inflator to inflate tires after a flat.
$10 Spoke Wrench fits 12 and 13 gauge spokes.
$29 Spoke Tension Gauge is a nice copy of the $82 Park Tool TM-1 gauge. It makes it easy to verify proper spoke tension to prevent spoke breakage.
Bike Computer
I love this $410 Wahoo Elemnt Bolt bike computer. I use it on my Pace 500, my Motobecane carbon fiber road bike and on my Motobecane electric mountainbike.
The Elemnt Bolt computer works with my $193 Garmin Varia RTL515 Radar unit to alert me of approaching traffic from the rear. The Elemnt Bolt beeps and even shows how many cars are approaching on its display. The RTL515 also has a bright flashing red light to help drivers see me on the road. I love this thing and feel naked when riding without it.
I use this computer mount on my other bikes so it's easy to move the Elemnt Bolt computer from bike to bike.
I wear this $12 heart rate monitor strap which works with the Element Bolt computer. It will display your heart rate and upload heart rate data to Strava.
This $40 cadence sensor tells the Elemnt Bolt computer how fast you're pedaling.
I use this $40 Bike Speed Sensor with the Elemnt Bolt computer for accurate speed display and tracking.
Pace 350 $20 Adjustable Steering Stem allows you to swing the handlebars up and closer to the rider to customize the riding position. You will also need a thin stem spacer to allow headset bearing preload. The Pace 500 comes with an adjustable steering stem.
By Rob Robinette