Build a Pi Time Server With GPS & Kernel PPS
Updated August 2024 - Raspberry Pi OS Bookworm uses ntpsec (secure ntp) that is not compatible with the ntp portion of this guide. This guide works with OS Bullseye and older.
By Rob Robinette K9OJ
Not too long ago only high-dollar commercial GPS units supplied a highly accurate pulse-per-second (PPS) time signal but now it's a common feature in inexpensive GPS chips. We can easily pair a $35 raspberry pi with a $10 GPS card with PPS to create a highly accurate network time server with complete independence from the internet. You can then build a network time display to show this uber-accurate time anywhere there is a WiFi signal.
I created this webpage because the GPS/PPS time server info I found online was incomplete or out of date. Hopefully the info here will help get you up and running quickly and easily.
Contents
Set Client Computer to Use Pi Time Server
Add a Time Server to the ntp.org Pool
Give the Time Server a Static Address
GPS and PPS Tuning With Chrony
Raspberry Pi Network Time Display
Pi Time Server
The Raspberry Pi OS since the Stretch release has kernel PPS (Pulse Per-Second) support built in. I did not have to compile the kernel, ntp or cgps to get kernel PPS working with a Raspberry Pi. I simply installed the time server software using apt install. Kernel PPS is more accurate with less latency than standard PPS and orders of magnitude more accurate than bare GPS so if you're going to build a time server you really should use kernel PPS as described below.
I used a $12 u-blox NEO-6M GPS card with built-in patch antenna to supply GPS and PPS time signals to a raspberry Pi 1, Pi 2 and Pi 3B+ running ntp and gpsd. I recommend you source your GPS card from reputable dealers like sparkfun.com and digikey.com because there are many Chinese made NEO clones available on aliexpress.com and ebay.com that do not perform nearly as well as a real u-blox NEO GPS.
PPS signal + GPIO18 input + kernel processed PPS handling = a very low latency and accurate clock source.
With only 5 push-on jumpers and no soldering to connect a GPS to a Raspberry Pi it's easy to build a time server that can feed all the computers on your network with extremely accurate time synchronization even with no internet connection. This little time server is ideal for Amateur Radio Operators using digital modes that require accurate time such as FT8. It's also a nice fit for isolated or remote locations such as repeater or telecommunication sites that require an accurate time source.
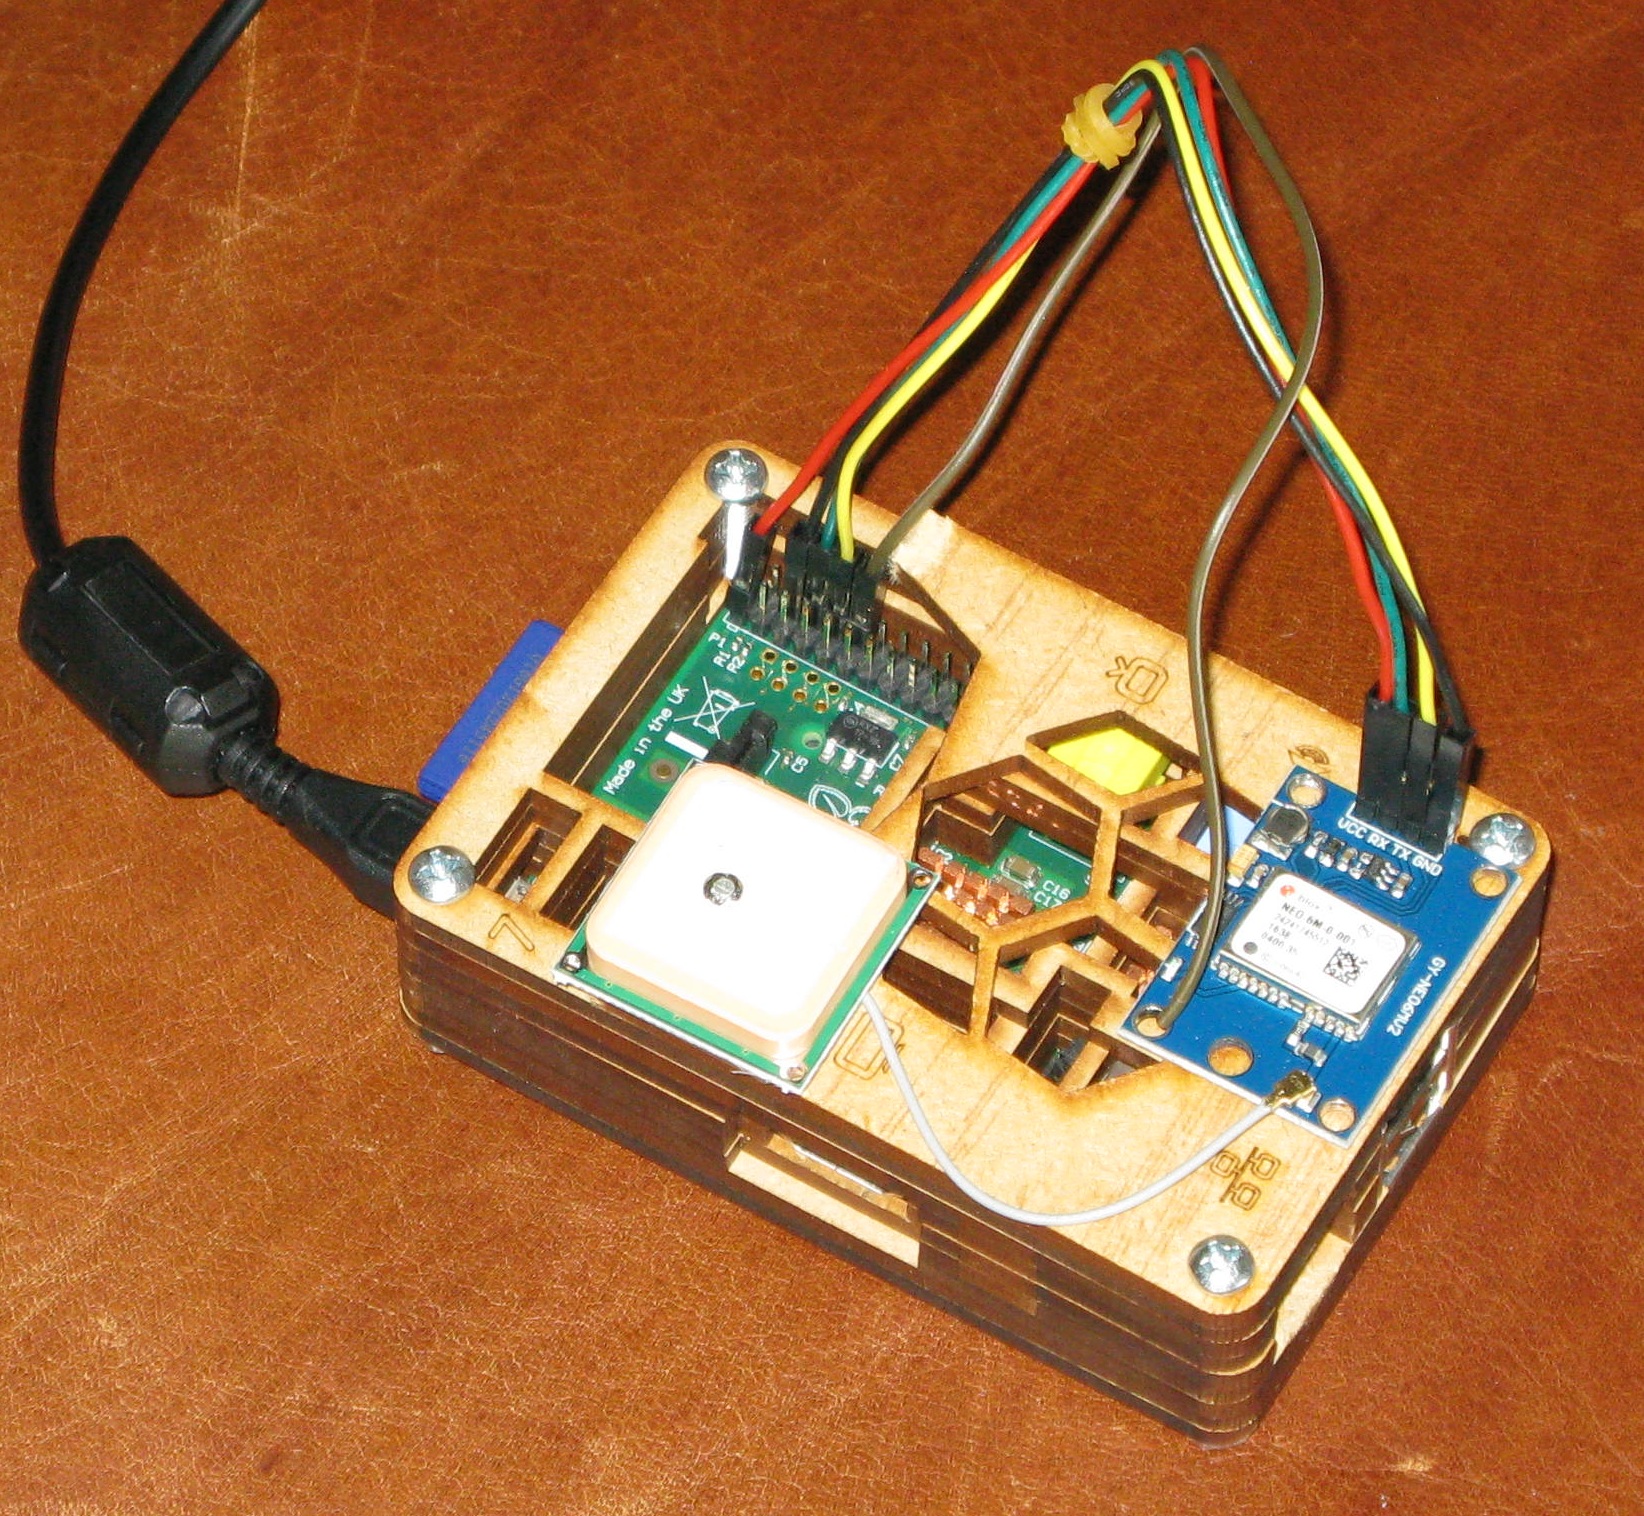
Raspberry Pi 3B+ with u-blox NEO-6M GPS and antenna. This GPS board didn't have a PPS output pin so I soldered the brown wire to a surface mount resistor with a direct connection to the NEO 6M PPS pin 3 (the black ball on the NEO 6M chip designates chip pin 1). 2.54mm female-to-female jumper wires were used to connect the GPS and Pi. VCC=3.3 volts, RX=receive data from pi, TX=transmit GPS data to the pi, GND=ground, PPS=pulse per second timing signal. I used 3M double-sided tape to attach the GPS and antenna. RFI from the Pi can reduce GPS reception so moving the GPS antenna away from your computer may help track more satellites.
This is the budget GPS board I recommend. It's a u-blox NEO-6M GPS with PPS, battery backup and built-in antenna with optional external antenna connector sold on ebay for $12 delivered. This performs the best of the four GPS boards I've tried and the battery backup gives you a very quick initial fix. It has a PPS output pin and a micro-USB port. Note the output pins are pre-soldered and ready for push-on jumpers (see below). The big white square on the circuit board is the built-in antenna but if you want to use an external antenna you can solder on the included SMA Female connector shown in place in the above pic. The NEO GPS chip, micro-USB port and flashing green "position acquired" LED are on the other side of the circuit board.
Sparkfun NEO-M9N GPS with SMA antenna connector $70, USB and UART interfaces, PPS and breakout connections can receive all nations' GNSS (Global Navigation Satellite System) satellites. This version with an SMA antenna connector requires a separate GPS antenna but will perform much better than the version with the built-in chip antenna.
I now use a $70 NEO-M9N GPS with an SMA antenna connector (see photo above) for my primary time server. It works really well in my attic. Unlike the NEO-6M that can only receive US GPS, NEO-M9N can also receive the Satellite Based Augmentation System (SBAS), European Galileo, Russian GLONASS and Chinese BeiDou satellites. This is the multi-band GPS antenna I recommend. You'll get significantly better satellite reception compared to the same NEO-M9N GPS with a built-in chip antenna. There is also a version of the NEO-M9N with a U.FL antenna connector.

4 inch (10cm) long 2.54mm female-to-female jumper wires (40 pieces) available here from ebay seller miniduino for $3 delivered. Five of these jumpers are all that's required to connect the GPS + PPS to a Pi.
I use both, a Pi 1B and a couple Pi 3B's as GPS time servers and all run fine at very low cpu usage. Any version of the Pi will work, including the Pi Zero. Ntp and gpsd generate very little cpu load so you don't have to dedicate a Pi to just time serving. If you have a Pi already running you can literally stick a GPS card to the case and it'll get the job done. One of my Pi 3B+'s runs rtl_sdr in the attic. An SDR (software defined radio) USB dongle with a 6 foot vertical dipole antenna is connected to the Pi and allows remote use of SDR software from my office on the first floor. Even with rtl_sdr streaming digital radio signals and simultaneously serving time the cpu load never exceeds 20%.
Be aware that other single board computers such as the Beaglebone, Odroid and Orange have different GPIO pinouts and may not support kernel PPS using ntp, chrony and gpsd like the Raspberry Pies. I highly recommend you stick with a true Raspberry Pi for your server.
Connect the Pi & GPS
If your GPS has a USB port you can connect it to your pi using a USB cable and a single jumper for the PPS. Connect the GPS PPS output to the pi's pin 12 (see diagram below).
To connect your GPS using a serial port see photo above and connect your GPS to your Pi. The pin numbers are the physical pin location. Don't confuse them with the GPIO numbers. We will use GPIO18 located on physical pin 12 to receive the PPS time signal:
GPS Pin.......Raspberry Pi Pin
GPS VCC → 3.3V Power Pin 1 (this
powers the GPS)
GPS GND → Ground Pin 6 (power and signal ground reference)
GPS RX → GPIO14 / TXD Transmit Data Pin 8 (optional
Pi→GPS communication)
GPS TX → GPIO15 / RXD Receive Data Pin 10 (GPS time
and position data)
GPS PPS → GPIO18 / PPS Input Pin 12 (PPS pulse-per-second signal)
Note how the GPS transmit data pin is connected to the Pi's receive data pin.
Pi Pinout
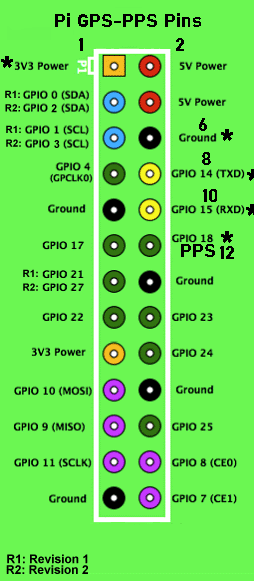
Pin 1 is at top left, Pin 2 is at top right, odd numbers on left, even on right. The pinout of pins 1 to 12 are the same for all Raspberry Pi models.
I used 3M double-sided tape to secure the GPS card and antenna to the top of the Pi case. You can also drill holes in the pi case and install PCB standoffs.
I recommend you connect your time server to your network using an ethernet port to reduce network latency and jitter.
When describing GPS output below I will use "GPS" for the GPS NMEA position and time data stream and "PPS" for the pulse-per-second signal.
Pi 1, Pi Zero and Pi Zero W CPU Limitations
For low horsepower Raspberry Pies like the Pi 1, Pi Zero and Pi Zero W I recommend you set the Pi to boot to the console and not the desktop to keep the cpu load down. This section does not apply to the Pi Zero W 2 which runs very well as a time server. I discovered my Pi 1 was running a cpu load of 1.35 with only the timeserver running because I had it set to boot to the desktop even though it was a headless system that I occasionally used VNC to access the desktop. Even with no display attached the damn screensaver was running full time and using up the cpu! Use the command uptime to see the cpu load. A load of 0.15 means the cpu is running at 15% of capacity. My Pi 1 runs at around 0.08 load when booted to the console and running as a time server. The Pi Zeroes are more powerful than the Pi 1 so they should run an even lower cpu load.
To boot a Pi to the console run sudo raspi-config from the command line and select Boot Options and select one of the boot to console options.
If you need to access a remote desktop through VNC you must ssh into the Pi first and run vncserver :1 from the command line, then use VNC to access the :1 desktop. When done, exit VNC, open an ssh terminal and issue sudo killall vncserver to end VNC and save some cpu load.
Does the GPS Need to Be Near a Window?
I was worried about having to place my time server outside or near a window to ensure GPS satellite reception but I was pleasantly surprised to find I could get a good 3D fix and serve time from deep inside my home. I permanently placed the time server in a windowless attic with some ham radio gear and it has no problem keeping a solid 3D fix. Note that for initial GPS position I had to place all my GPSs outside (powered by USB power brick) for about 15 minutes. Once that initial fix was made the GPSs performed fine inside the house and in the attic.
Get Your Raspberry Pi Up to Date
I recommend you run this upgrade sequence before installing the time server software.
sudo apt update
sudo apt full-upgrade (this can take a while)
sudo rpi-update
sudo reboot
You should set a static IP address for your time server so your client computers have a fixed address to get time updates.
Ensure the serial port is available to the GPS
You need to edit these two files to ensure the GPIO serial port is not in use (ignore this if you connect your GPS using USB):
sudo nano /cmdline.txt
Delete this part of the first line: console=serial0,115200 and change any mention of ttyS0 or ttyAMA0 to tty1
Save your edits with ctrl-o <return> then exit with ctrl-x
sudo nano /boot/config.txt
Change any mention of ttyS0 or ttyAMA0 to tty1 and add the following lines to the end of the config.txt file:
enable_uart=1 # Enable the hardware serial port
dtoverlay=pps-gpio,gpiopin=18 # Listen for the GPS PPS signal on gpio18
init_uart_baud=57600 # Set the serial port baud to 57600. The NEO GPS chips can run at up to 115200 baud. The NEO M9N GPS can track so many satellites that it puts out a huge amount of data so it's default is 57600 baud. Some older GPSs use only 9600 or even 4800 baud.
The following three steps are for the Pi3B+ newer model pi's including the Pi4 and 5:
dtoverlay=disable-bt # if you want to disable Bluetooth, choose this OR the next line to keep Bluetooth but move it off the main serial port.
dtoverlay=miniuart-bt # you must include this line to move Bluetooth to another serial port because Bluetooth uses the serial port the GPS needs.
dtoverlay=disable-wifi # only if you want to disable WiFi which may help GPS reception.
Save your edits with ctrl-o <return> then exit with ctrl-x
Add pps-gpio to /etc/modules File
sudo nano /etc/modules
pps-gpio # Add this line to the file
Save your edits with ctrl-o <return> then exit with ctrl-x
Reboot: sudo reboot
To make sure the GPS is sending data over the serial port run this to show GPS NMEA output straight from the serial port: sudo cat /dev/serial0
NOTE: If you don't see any NMEA messages streaming out try sudo cat /dev/serial1 [the pi 1 & 2 used ttyAMA0 and ttyS0 for the serial port name]
We should see GPS NMEA messages streaming out. Data will flow even before the GPS gets a position fix. Hit <ctrl>-c to exit.
If you don't see the GPS data then troubleshoot the GPS-to-serial interface connection. Don't proceed until you can see the GPS data.
Software Package Installation
Install the time server software:
sudo apt install ntp gpsd gpsd-clients pps-tools
Configure gpsd
sudo nano /etc/default/gpsd
START_DAEMON="true"
USBAUTO="false" # Change this to "false" even if you're using a USB
connected GPS
DEVICES="/dev/serial0 /dev/pps0" # OR
DEVICES="/dev/ttyAMA0 /dev/pps0" if using a USB connected GPS
GPSD_OPTIONS="-n"
gpsd will now auto start with the GPS & PPS configured.
Configure ntp
I wanted to add a time server to the ntppool.org time server pool and to do that you must be running ntp (not chrony) so the following ntp configuration uses the ATOM kernel PPS driver for the seconds beat and the NMEA GPS driver for the date and time.
I commented out all the time sources in the ntp.conf file and added these settings to the end of the file:
sudo nano /etc/ntp.conf # and make the following changes:
If the above opens an empty file try: sudo nano /etc/ntpsec/ntp.conf
pool us.pool.ntp.org iburst noselect
broadcast 192.168.1.255
# GPS NMEA driver
server 127.127.28.0 minpoll 4 maxpoll 4 prefer
fudge 127.127.28.0 time1 0.09 refid GPS stratum 0
# kernel PPS driver
server 127.127.22.0 minpoll 4 maxpoll 4
fudge 127.127.22.0 flag3 1 time1 0.005 refid kPPS
127.127.22.0 is the ATOM kernel PPS driver
127.127.28.0 is the NMEA driver
"time1" is offset in seconds but keep in mind that offset reported by ntpq -p is in milliseconds.
I recommend you start with "time1" settings of 0.09 for GPS and 0.005 for PPS. After extensive tuning these values are spot-on for my NEO GPS M9N cards and the Pi3.
With these settings ntp will serve time update requests from clients and also broadcast time updates.
Verify gpsd and ntp Are Working
Reboot with sudo reboot and give the GPS a few minutes to gain a 3D fix. You can verify a 3D fix by using the cgps command. If cgps shows data flowing at the bottom of the display but no position data then the GPS doesn't have a fix yet. Most GPS boards have an LED that will flash once per second when it has a fix. Two of my GPS boards have a red flashing LED and one has a green flashing LED on the GPS chip side of the board signifying at least a 2D position and time fix.
It can take up to 30 minutes for a new GPS to get its first fix. I had to take all of my NEO-6 and NEO-7 Pi time servers outside to get their first GPS fix. Don't begin troubleshooting until the GPS board shows a 3D fix. I used a USB power brick to power the pi outside for it's initial fix. You don't need a network connection--when the GPS PPS led flashes once per second it has a good fix.
cgps # Show GPS fix info
Note: Use ctrl-s to pause the GPS data stream and ctrl-q to resume
lqqqqqqqqqqqqqqqqqqqqqqqqqqqq
x Time: 2018-09-18T20:04:37.000Z
x Latitude: 36.147821 N
x Longitude: 82.574643 W
x Altitude: 429.6 m
x Speed: 0.0 kph
x Heading: 0.0 deg (true)
x Climb: 0.0 m/min
x Status: 3D FIX (5 secs)
<---Shows the GPS has a good navigation and time fix
If gibberish shows up on screen try setting the serial port baud rate to 4800 or 9600. sudo nano /boot/config.txt and change: init_uart_baud=4800 and reboot.
The xxxGNSS two letter designators shown in cgps tell what satellite constellation is being received: GP: US GPS, SB: Satellite Based Augmentation System (Wide Area Differential GPS), GA: Europe Galileo, GL: Russia GLONASS, BD: China BeiDou, IR: India IRNSS, QZ: Japan QZSS, IM: Japan IMES
If you can't get a 3D FIX after an hour outside see the Troubleshooting section.
Once you have a 3D FIX run the ntpq -p command and you should see something similar to this:
remote.................refid.....................st...t...when...poll...reach..delay...offset....jitter
==============================================================================
us.pool.ntp.org.....POOL.................16...p....-.........64......0......0.000...0.000...0.004
192.168.1.255.....BCST..................16...B...-..........64......0......0.000...0.000...0.004
*SHM(0)..............GPS.....................0....l....14........16...377.....0.000...0.375...0.758
oPPS(0)..............kPPS...................0....l....13........16...377......0.000...0.002...0.004
+1.time.dbsinet...146.186.222.14....2...u....64........64....37....51.421....0.987...6.939
-clockb.ntpjs.or...193.190.230.65.....2...u....63........64....37....40.544...-0.635...8.630
-lithium.constan...216.218.254.202..2...u....63........64....37....51.586...-1.499...5.759
+chl.la.................127.67.113.92.......2...u....63........64....37....87.467....2.086...6.950
-mirror1.sjc02.s...162.213.2.253......2...u....62........64.....7.....84.516...-6.266..11.765
-lga1.m-d.net.......132.163.96.1........2...u....61........64.....7.....51.145....5.246....8.928
Offset is in milliseconds so a PPS offset of 0.002ms = 0.000002 seconds (2 millionths of a second!). See this for more info on ntpq output description.
We're looking for the GPS offset to stay below +/-200ms (0.2 seconds) and we need an asterisk in front of the GPS source which signifies ntp is using it as the primary time source. We also want to see an o in front of the PPS line which means ntp is using kernel PPS for the seconds beat. A positive offset indicates the local clock is fast. A negative offset indicates the the local clock is slow.
If there is nothing in front of a time source it means the time source has noselect in its ntp.conf line or it is unreachable. If after an hour the GPS line does not have a "*" in front of it see the troubleshooting section.
NOTE: If the GPS and PPS signals are not within 200 milliseconds (0.2 second) of one another the PPS signal will be ignored. See GPS Tuning to get the time difference under 200ms.
If Gpsd Will Not Auto Start at Boot
This seems to be a problem for the Pi 3B+ and this is how I got gpsd to run at boot:
We'll copy a file and then edit the copy. By editing this copy the change should persist with gpsd updates:
sudo cp /lib/systemd/system/gpsd.service /etc/systemd/system/gpsd.service
sudo nano /etc/systemd/system/gpsd.service
Change to:
[Install]
WantedBy=multi-user.target
Also=gpsd.socket
Then at the command line:
sudo systemctl enable gpsd
sudo systemctl daemon-reload
sudo systemctl restart gpsd
sudo systemctl unmask gpsd
sudo reboot
Verify gpsd started automatically by running ntpq -p a few minutes after the reboot and getting an "o" in front of the PPS line. Don't run cgps because that will cause gpsd to start.
Set Client Computers To Use Your Time Server
To set a Windows computer to time sync from your timeserver press the Windows "Start" button and type “Control Panel”, then click Control Panel. Click the search bar in the top-right of Control Panel and type “Date and Time.” Click "Set the time and date." Select the “Internet Time” tab and press “Change setting.” Enter your time server address (my time server is 192.168.1.79) ensure the "Synchronize with an Internet time server" box is checked and click the "Update now" button. You should get a "The clock was successfully synchronized . . ." message. Click the "OK" boxes.
To set most Linux computers to time sync from your timeserver you need to install ntp with sudo update and sudo apt install ntp. Edit the /etc/ntp.conf file and add your timeserver's address:
sudo nano /etc/ntp.conf
server 192.168.1.79 prefer # Enter your time server's IP address here
The prefer directive lets ntp know you prefer that server over other time sources.
Restart ntp: sudo systemctl restart ntp or just reboot the computer.
Pi 1B Time Server
Even the lowly Pi 1B works well as a GPS + PPS time server.
GPS & PPS Offset Tuning
After we get the GPS running with good GPS NMEA data we may need to adjust the GPS time source to match up with the PPS signal so the PPS signal will be recognized and used by ntp. Once we get the GPS offset nailed down we can then tweak the PPS offset for maximum accuracy.
NOTE: If the GPS and PPS signals are not within 200 milliseconds (0.2 second) of one another the PPS signal will be ignored. The ntpq -p command will show nothing from the PPS.
I didn't know about this limitation and it caused untold head banging while I tried to get the timeserver to use the PPS signal. We might need to adjust the GPS ntp.conf time1 (offset) value to get the GPS time within the required 200 milliseconds.
offset
This option can be used to compensate for a constant error. The specified offset (in seconds) is applied to all samples produced by the reference clock. The default is 0.0.
I recommend you start with these ntp.conf settings, they should get you close enough to get everything working:
sudo nano /etc/ntp.conf
#GPS
server 127.127.28.0 minpoll 4 maxpoll 4 prefer
fudge 127.127.28.0 time1 0.
125 refid GPS stratum 0#PPS
server 127.127.22.0 minpoll 4 maxpoll 4
fudge 127.127.22.0 flag3 1 time1 0.0
037 refid kPPSCalculate the GPS NMEA Offset
To calculate the GPS offset we must disable PPS by placing a # in front of the ntp.conf PPS line. We'll run the time server for a few hours and then compare the ntpq -p GPS offset to the average public time server offset.
Edit ntp.conf
sudo nano /etc/ntp.conf
server 127.127.28.0 minpoll 4 maxpoll 4 prefer
fudge 127.127.28.0 time1 0.1
25 refid GPS stratum 0#server 127.127.22.0 minpoll 4 maxpoll 4 <commented out with #
#fudge 127.127.22.0 flag3 1 time1 0.0037 refid kPPS <commented out with #
After a few hours of runtime we calculate the average public time server offset by adding all their offsets (use the offsets' + or - sign during the addition) then divide the total by the number of public servers:
ntpq -p
remote NP NR Span Frequency Freq Skew
Offset Std Dev
=================================================================
GPS
16
8 241
-0.583
77.794 0.001 4844us
time.richiemcintosh.com 23 12 47m +31.039 0.548 -0.125 675us
ha81.smatwebdesign.com 26 11 49m +31.754 0.471 -0.122 604us
up2.com 13 7 840 +32.788 1.331 -0.127 293us
rrcs-97-78-159-178.se.bi> 29 17 52m +32.595 1.646 -0.119 1987us
Offset is given in milliseconds.
Calculate average public server offset:
-0.125 + -0.122 + -0.127 + -0.119 = -0.493
-0.493 / 4 = -0.123 milliseconds public server average offset
Note: Don't use a public time server to calculate the average offset if it's way off compared to the others because it will throw off your average.
Now we subtract the public server average offset from the current GPS offset and use the result as the ntp.conf GPS offset.
Offset is in milliseconds, 0.123ms = 0.000123 seconds
Current GPS offset is 0.125 seconds: 0.125 - -0.000123 = +0.124877 is the new GPS offset
Add the Calculated Offset to ntp.conf
Edit sudo nano /etc/ntp.conf and remove the # from the PPS line. On the GPS line modify the GPS offset and we have our ntp.conf configuration:
pool us.pool.ntp.org iburst
broadcast 192.168.1.255
server 127.127.28.0 minpoll 4 maxpoll 4 prefer
fudge 127.127.28.0 time1 0.
124877 refid GPS stratum 0server 127.127.22.0 minpoll 4 maxpoll 4
fudge 127.127.22.0 flag3 1 time1 0.0
037 refid kPPSRestart ntp with sudo systemctl restart ntp
After a couple of minutes run ntpq -p
remote.................refid.....................st...t...when...poll...reach..delay...offset....jitter
==============================================================================
us.pool.ntp.org.....POOL.................16...p....-.........64......0......0.000...0.000...0.004
192.168.1.255.....BCST..................16...B...-..........64......0......0.000...0.000...0.004
*SHM(0)..............GPS.....................0....l....14........16...377.....0.000...0.375...0.758
oPPS(0)..............kPPS.....................0....l....13........16...377......0.000...0.012...0.004
+1.time.dbsinet...146.186.222.14....2...u....64........64....37....51.421....0.987...6.939
-clockb.ntpjs.or...193.190.230.65.....2...u....63........64....37....40.544...-0.635...8.630
-lithium.constan...216.218.254.202..2...u....63........64....37....51.586...-1.499...5.759
+chl.la.................127.67.113.92.......2...u....63........64....37....87.467....2.086...6.950
-mirror1.sjc02.s...162.213.2.253......2...u....62........64.....7.....84.516...-6.266..11.765
-lga1.m-d.net.......132.163.96.1........2...u....61........64.....7.....51.145....5.246....8.928
Offset is in milliseconds so 0.375ms = 0.000375 seconds
We're looking for the GPS offset to stay below +/-200ms and we need an asterisk in front of the GPS source which signifies ntp is using it as the primary time source. We also want to see an o in front of the PPS line which means ntp is using kernel PPS for the seconds beat. A positive offset indicates the local PPS synced clock is higher. A negative offset indicates the other clock is higher.
Calculate the PPS Offset
If you put your timeserver in the ntppool.org server pool then skip to the next section.
Tuning the PPS offset usually isn't necessary unless you need the highest accuracy. The PPS (time1) offset compensates for the time it takes for the PPS signal to flow through the wires between the GPS and computer and the processing time taken before sending the time signal out. I have found for GPS receivers mounted close to a Pi3 server like mine the PPS offset will only be -3 to -4 milliseconds. My Pi1's average offset was higher at -10ms so a slower computer may increase the delay between the actual PPS time and when the machine sends it out.
We adjusted the GPS offset above to get the GPS & PPS times close. Now we'll adjust the PPS offset to get our time server's time close to the average public time server time.
After a few hours of run time run ntpq -p and again calculate the average public time server offset. It will normally be a negative number around -2000us (-2000 microseconds = -2 milliseconds = -0.002 seconds).
Convert the offset to seconds: -2000us / 1,000,000 = .002 seconds (just shift the decimal point 6 places left)
Subtract the average public server offset from the current PPS offset:
Current PPS offset 0.0 - -0.002 = +0.002 PPS offset
Edit ntp.conf:
sudo nano /etc/ntp.conf
server 127.127.22.0 minpoll 4 maxpoll 4
fudge 127.127.22.0 flag3 1 time1 0.0
02 refid kPPSIf the average public server offset is negative (it normally is) then the PPS offset needs to be positive.
Restart ntp with sudo systemctl restart ntp
After an hour or so again run ntpq -p. The longer you let the server run the more accurate the result.
Calculate the average public time server offset again and verify it's closer to 0. You may want to repeat the procedure to get the average public server offset even closer to 0.
Note: When GPS has a * in front of it and PPS has an o as shown above, then offset math works like this:
To calculate a new GPS offset we subtract the ntpq -p GPS offset from the ntp.conf GPS time1.
To calculate a new PPS offset we subtract the ntpq -p average public time server offset from the ntp.conf PPS time1.
With these fine tuned offset values we'll get a quicker GPS lock and more accurate time server.
Tuning PPS Offset With ntppool.org Performance Graph
If you put your time server into the ntppool.org server pool (see see below) you can tune your PPS offset by using their performance graph and offset log.

Screen capture taken of one of my time server's ntppool.org performance graph during PPS offset (time1) tuning. The graph's left scale is "Offset" in milliseconds (green dots) and the right scale is the time server "quality score" (blue line). Green dots plotted above the 0 line are early meaning the clock is fast. Dots below the 0 line are late meaning the clock is slow. Note the Offset scale is logarithmic so as you get your offset closer to 0 the plot points will be more spread out. Click on "CSV log" at bottom-left to see the offset log.
With the PPS time1 (offset) set to 0.0, which gave me a good match to the average public time server offset, the graph above showed a consistent -4ms slow offset (left scale). Changing the PPS time1 from 0 to 0.0037 moved me close to a 0 average offset on the graph.
ntppool.org Offset CSV Log
Click on the "CSV log" link at the bottom-left of the ntppool.org graph page to see the offset log. At time 13:57:21 I changed my "time1" PPS offset from 0.0 to 0.0037 which dropped my average ntppool.org offset to less than 1 millisecond.
New Style NTP Pool Graph
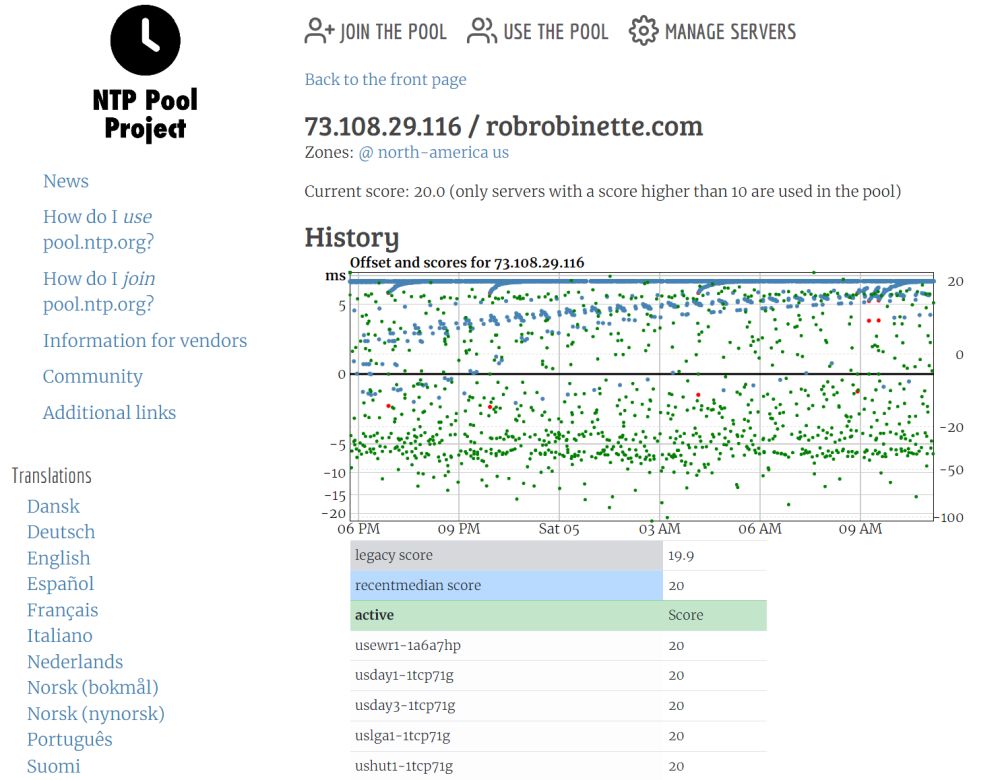
This shows that my GPS/kPPS time server is keeping its offset within a 25ms window which is very good considering offset spread is caused by differing network/internet delays. The CSV log link is at the bottom of the NTP Pool page.
Finding the Average ntppool.org Log Offset
We can download the ntppool.org CSV log file to an Excel or Libreoffice spreadsheet to easily calculate our exact average offset. Click on the "CSV log" link at the bottom of the ntppool.org performance monitoring graph page to open the CSV file. Right-click the log page and select, "Save as", and save it to your desktop. Open Excel and select, "Open file", and Excel will open the log file as a Comma Separated Values (CSV) file. Use the "AVERAGE" function to calculate the offset. For my log it was Average(C2:C201). My average offset was -0.0037 (-3.7ms).
Final configuration for Pi3+ ntppool.org:
sudo nano /etc/ntp.conf
pool us.pool.ntp.org iburst noselect
broadcast 192.168.1.255
# GPS NMEA driver
server 127.127.28.0 minpoll 4 maxpoll 4 prefer
fudge 127.127.28.0 time1 0.125 refid GPS stratum 0
# PPS driver
server 127.127.22.0 minpoll 4 maxpoll 4
fudge 127.127.22.0 flag3 1 time1 0.0027 refid kPPS
# time1 of 0.0027 = 2.7 milliseconds

Pi 3 with u-blox NEO 6M GPS + PPS.
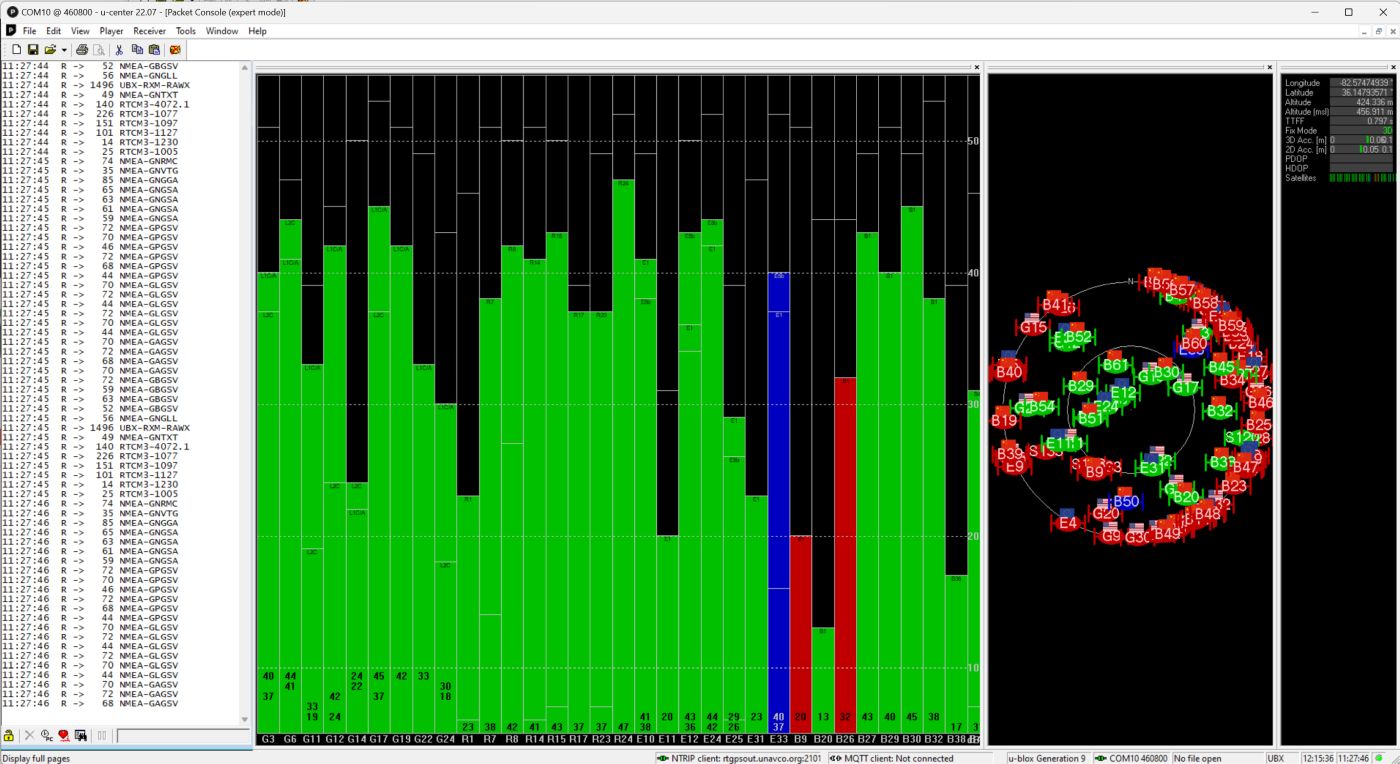
U-blox u-center GPS software showing a Sparkfun ZED-F9T Timing Breakout $300 GNSS receiver simultaneously receiving 30 GPS, GLONASS, Galileo and BeiDou navigation satellites. The ZED-F9T is good for +/- 2.5 nanoseconds of accuracy (2.5 billionths of a second). This is the ultimate time server GPS.
GPS Testing & Troubleshooting
Remember, if the GPS and PPS signals are not within 200 milliseconds (0.2 second) of one another the PPS signal will be ignored.
Don't bother troubleshooting until you are sure the GPS has a 3D Fix as shown with cgps.
All of my new time servers had to be run outside for a clear view of the sky for around 30 minutes to get the GPS card's first fix.
Show GPS fix info from the command line: cgps
Note: Running cgps will start gpsd if it is not already running. Use ctrl-s to pause the GPS data stream, ctrl-q to resume and ctrl-c to exit.
x Time: 2018-09-18T20:04:37.000Z
x Latitude: 36.147821 N
x Longitude: 82.574643 W
x Altitude: 429.6 m
x Speed: 0.0 kph
x Heading: 0.0 deg (true)
x Climb: 0.0 m/min
x Status: 3D FIX (5 secs)
<---Shows the GPS has a good navigation and time fix
If no time or latitude are shown then the GPS has no position fix. If gibberish shows up on screen try setting the serial port baud rate to 4800. sudo nano /boot/config.txt and change: init_uart_baud=4800 and reboot.
More GPS fix info: gpsmon This will work only if gpsd is running.
gpsmon /dev/serial0 This will work if gpsd is not running.
Show graphical GPS info from the desktop: xgps (included in cgps, just type xgps at the command prompt)
XGPS

Xgps is a graphical gps signal monitoring program that is included in gpsd. Just type "xgps" at the Linux or Raspberry Pi command line.
Show GPS NMEA output straight from the serial port: sudo cat /dev/serial0
This only works if gpsd is NOT running. Normally you'll get a "Device or resource busy" message.
Verify ntp is running: ps ax | grep ntp
27849 pts/0 S+ 0:00
grep --color=auto ntp
32080 ? Ssl 0:02 /usr/sbin/ntpd -p /var/run/ntpd.pid -g -u 113:116
Verify gpsd is running: ps ax | grep gps
17512 pts/0 S+ 0:00 grep --color=auto gps
22042 ? S<sl 2:26 /usr/sbin/gpsd -N
-n /dev/serial0 /dev/pps0
View gpsd related info in the syslog: grep -i gpsd /var/log/syslog
View gpsd related info in /var/log/messages: grep -i gpsd /var/log/messages
Use sudo netstat -lntp to verify port 127.0.0.1:2947 is open. gpsd uses this port to communicate with cgps, gpsmon and other programs.
Show time server info: ntpq -p
Verify PPS data is being used: sudo ntpshmmon and look for NTP0 (GPS) and NTP2 (PPS) output:
# Name Seen@ Clock Real L Prec
sample NTP2 1537149896.886960505 1537149896.003964638 1537149896.000000000 0 -20
sample NTP0 1537149897.387588561
1537149897.003964925 1537149897.000000000 0 -2
sample NTP2 1537149897.888042868 1537149897.003964925 1537149897.000000000 0 -20
sample NTP0 1537149898.389045452 1537149898.003964328 1537149898.000000000 0 -2
If NTP2 isn't listed then the PPS signal is not being used. If NTP0 is missing then the GPS signal is not being used. If you get a "timed out" error message gpsd is not using the PPS signal.
Verify PPS data stream: sudo ppstest /dev/pps0
If you get a timeout error then the PPS signal is not being used by the Pi.
Verify PPS driver is loaded: dmesg | grep pps and look for these two lines:
[111515.051742] pps
pps1: new PPS source serial0
[111515.051775] pps pps1: source
"/dev/serial0" added
Display a running clock with seconds: watch -t -n 1 date +%T (ctrl-c to exit)
Gpsd Will Not Auto Start at Boot
This seems to be a problem for the Pi 3B+ and this is how I got gpsd to run at boot.
We'll copy a file and then edit the copy. By editing this copy the change should persist with gpsd updates:
sudo cp /lib/systemd/system/gpsd.service /etc/systemd/system/gpsd.service
sudo nano /etc/systemd/system/gpsd.service
Change to:
[Install]
WantedBy=multi-user.target
Also=gpsd.socket
Save the file with ctrl-x
Then:
sudo systemctl unmask gpsd
sudo systemctl daemon-reload
sudo systemctl restart gpsd
sudo reboot
To verify gpsd is starting at boot, sudo reboot the server and after a few minutes run ntpq -p and verify the GPS and PPS signals are being used. Don't run cgps because that will start gpsd if it didn't auto start.
Miscelalaneous gpsd Troubleshooting Commands
Stop gpsd: sudo killall gpsd
Start gpsd: sudo gpsd -n /dev/serial0 /dev/pps0
Erase old gpsd sockets: sudo rm /var/run/gpsd.sock
Troubleshoot the Serial Port
List serial port details: ls -lh /dev/serial[0,1]
lrwxrwxrwx 1 root
root 7 Oct 3 11:55 /dev/serial0 -> ttyS0
lrwxrwxrwx 1 root root 5 Oct 3 11:55 /dev/serial1 -> ttyAMA0
NOTE: The GPS should be connected to /dev/serial0.
Show GPS NMEA output straight from the serial port: sudo cat /dev/serial0 or sudo cat /dev/serial1
This only works if gpsd is NOT using the GPS. With gpsd running you'll get a "Device or resource busy" message. You can sudo killall gpsd to use the sudo cat /dev/serial0 command.
NOTE: If you don't see any NMEA messages streaming out try sudo cat /dev/serial0 If that doesn't work try sudo cat /dev/ttyAMA0 and sudo cat /dev/ttyS0 because the correct serial port can be named serial0, ttyS0 or ttyAMA0 (zero, not "O").
If you see this error message: $GPTXT,01,01,01,NMEA unknown msg*58
This is caused by echo characters and can be fixed by turning off ttyS0 echo: stty -F /dev/serial0 -echo
View GPS NMEA output using minicom: minicom -b 57600 -o -D /dev/serial0
Set serial port baud: stty -F /dev/serial0 57600 (normally not needed because serial0 baud is set in /boot/config.txt)
Adding A Time Server To The ntp.org Pool
To place your GPS+PPS time server in the ntp.org time server pool you must have a static IP address (dynamic DNS isn't enough) and you must be running ntp.
You'll also need to port forward port 123 (UDP) in your firewall to your time server.
Then go to https://www.ntppool.org/en/join.html and follow the instructions to add your time server to the ntp.org pool.
Set a Static IP Address
You should use a static IP address for your time server so your other network computers will know its address.
sudo nano /etc/dhcpcd.conf
# Wired ethernet port
interface eth0
static ip_address=192.168.1.79/24 #put your time server address here
static routers=192.168.1.1
static domain_name_servers=192.168.1.1 75.75.75.75 8.8.8.8
# WiFi
interface wlan0
static ip_address=192.618.1.1.85/24 #put your time server address
here
static routers=192.168.1.1
static domain_name_servers=192.168.1.1 75.75.75.75 8.8.8.8
Save with <ctrl>-o <enter> then <ctrl>-x to exit then reboot.
Use Chrony Instead of Ntp
If you have an aversion to ntp you can use chrony instead but be aware that ntppool.org does not work with chrony.
Software Package Installation
Install the time server software:
sudo killall -9 ntp # stop ntp (don't worry if it's not installed)
sudo systemctl disable ntp # we don't want ntp to run and interfere with chrony. You can also remove ntp with sudo apt remove ntp.
sudo apt install chrony gpsd gpsd-clients pps-tools
Configure Chrony
Edit the chrony config file:
sudo nano /etc/chrony/chrony.conf
Note: Some versions of linux put the chrony config file at: /etc/chrony.conf
Add these lines to the end of the chrony.conf file:
pool us.pool.ntp.org iburst # If you are not in the US then use a time server pool from your country.
allow # This allows other computers to use your time server to synchronize their clocks.
broadcast 60 192.168.1.255 # The time server will broadcast time sync info every 60 seconds.
refclock SHM 0 refid GPS precision 1e-1 offset 0.2 noselect # This is the GPS NMEA clock source
refclock PPS /dev/pps0 refid PPS lock GPS precision 1e-9 offset 0.002 prefer # This is the kernel PPS signal locked to the GPS NMEA time
Save your edits with ctrl-o <return> then exit with ctrl-x
Notes: The PPS lock directive locks the PPS to the GPS signal so GPS NMEA will provide the date and time but the PPS will provide the seconds beat. The precision directives let chrony know the PPS signal is much more accurate than other time server sources. We'll use the GPS offset directive to tune the GPS accuracy below. prefer lets chrony know we want it to use the PPS (locked to the GPS NMEA) as the primary time source. We use noselect to keep the computer from using the GPS NMEA as primary time source. Note this is different from ntp which uses the GPS NMEA as primary when PPS is available.
sudo
chronyc sources
-v
210 Number of sources = 6
MS Name/IP address Stratum Poll
Reach LastRx Last sample
==================================================================
#- GPS
0 4
377 10
-39ms [ -39ms] +/- 101ms
#* PPS
0 4
377 11
+220ns [ +481ns] +/- 177ns
^? atl0.fairy.mattnordhoff.> 2
10 377 692
-3890us [-3895us] +/- 54ms
^? ntp1.wiktel.com
1 10
377 663 -7111us
[-7115us] +/- 32ms
^? ada.selinc.com
1 10
377 690 -1045us
[-1049us] +/- 46ms
^? PBX.cytranet.net
3 10
377 492 -5633us
[-5635us] +/- 70ms
The first number in the "Last Sample" column is the time offset. Note the GPS offset is in milliseconds (ms), the PPS is in nanoseconds (ns) and the other time servers are in microseconds (us). Also note the * in front of the PPS listing means it is being used as the primary time source. If a question mark is in front of a time source it means the time source has noselect in its chrony.conf line or it is unreachable. If after an hour the PPS listing does not have a "*" in front of it see the troubleshooting section.
chronyc sourcestats # show cumulative time server statistics
GPS & PPS Offset Tuning With Chrony
Although ntp is the most popular time program a lot of people still like to use Chrony instead. After we have the GPS running with good GPS NMEA data we need to adjust the GPS time source to match up with the PPS signal so the PPS signal will be recognized and used by chrony. Once we get the GPS offset nailed down we can then tweak the PPS offset for maximum accuracy.
IMPORTANT: If the GPS and PPS signals are not within 200 milliseconds (0.2 second) of one another the PPS signal will be ignored. The chronyc sources command will show nothing from the PPS.
I didn't know about this limitation so it caused untold head banging while I tried to get the timeserver to use the PPS signal. We must adjust the GPS chrony.conf offset value to get the GPS time within the required 200 milliseconds.
offset
From the chrony man page: This option can be used to compensate for a constant error. The specified offset (in seconds) is applied to all samples produced by the reference clock. The default is 0.0.
I recommend you start with these chrony.conf settings, they should get you close enough to get everything working:
Edit chrony.conf: sudo nano /etc/chrony/chrony.conf
refclock SHM 0 refid GPS precision 1e-1 offset 0.2 noselect
refclock PPS /dev/pps0 refid PPS lock GPS precision 1e-9 offset 0.002 prefer
Calculate the GPS NMEA Offset
To calculate the GPS offset we must disable PPS by placing a # in front of the chrony.conf PPS line and adding prefer to the GPS line. We'll run the time server for a few hours and then compare the chronyc sourcestats GPS offset to the average public time server offset.
Edit chrony.conf
sudo nano /etc/chrony/chrony.conf
refclock SHM 0 refid GPS precision 1e-1 offset 0.2 prefer
#refclock PPS /dev/pps0 refid PPS lock GPS precision 1e-9 offset 0.002 prefer <commented out with #
After a few hours of runtime we calculate the average public time server offset by adding all their offsets (use the offsets' + or - sign during the addition) then divide the total by the number of public servers:
chronyc sourcestats
Name/IP Address NP NR Span Frequency Freq Skew
Offset Std Dev
=================================================================
GPS
16
8 241
-0.583
77.794
-287ns 4844us
time.richiemcintosh.com 23 12 47m +31.039 0.548 -125ms 675us
ha81.smatwebdesign.com 26 11 49m +31.754 0.471 -122ms 604us
up2.com 13 7 840 +32.788 1.331 -127ms 293us
rrcs-97-78-159-178.se.bi> 29 17 52m +32.595 1.646 -119ms 1987us
Note how the public timeserver offsets are listed as milliseconds (ms) and the GPS offset is listed as nanoseconds (ns). You will also see microseconds (us or µs). Since the chrony.conf file uses seconds we have to do some conversions.
To convert ns to seconds we divide ns by 1,000,000,000 or simply shift the decimal point 9 positions to the left.
To convert us to seconds we shift the decimal point 6 positions to the left.
To convert ms to seconds we shift the decimal point 3 positions left.
Calculate average public server offset:
-125 + -122 + -127 + -119 = -493ms
-493ms / 4 = -123ms public server average offset
Note: Don't use a public time server to calculate the average offset if it's way off compared to the others because it will throw off your average.
Now we subtract the public server average offset from the current GPS offset and use the result as the chrony.conf GPS offset.
Current GPS offset is 0.2 seconds or 200 milliseconds: 200ms - -123ms = +323ms
Convert milliseconds to seconds: 323ms / 1,000 = 0.323 seconds (shift decimal 3 places left) = new GPS offset
Add the Calculated Offset to chrony.conf
Edit sudo nano /etc/chrony/chrony.conf and remove the # from the PPS line. On the GPS line replace prefer with noselect and modify the GPS offset and we have our chrony.conf configuration:
pool us.pool.ntp.org iburst
allow
broadcast 60 192.168.1.255
refclock SHM 0 refid GPS precision 1e-1 offset 0.323 noselect
refclock PPS /dev/pps0 refid PPS lock GPS precision 1e-9 offset 0.002 prefer
Notes: offset is in seconds. The GPS noselect ensures the computer will use the PPS (with GPS date, hour and minute) as its time source.
Restart chronyc and gpsd:
sudo killall -9 gpsd chronyd
sudo chronyd -r -s -m -f /etc/chrony/chrony.conf
sudo gpsd -n /dev/serial0 /dev/pps0
After a few minutes run chronyc sources
chronyc sources
210 Number of sources = 6
MS Name/IP address
Stratum Poll Reach LastRx Last sample
===============================================================
#? GPS
0 4 377
14 +28ms [ +28ms] +/- 101ms
#* PPS
0 4 377
13 -601ns [-1531ns] +/- 185ns
^- ntp4.doctor.com
2 10 377 860
-3632us [-3636us] +/- 54ms
^- static-72-87-88-202.prvd>
2 10 377 831
-3408us [-3412us] +/- 75ms
^- mta5.1strepublicwebsites>
2 10 377 722
-5816us [-5820us] +/- 59ms
^- ec2-35-171-237-77.comput> 2
10 377 839 -2381us
[-2385us] +/- 98ms
We're looking for the GPS offset to stay below +/-200ms and we need an asterisk in front of the PPS source which signifies chrony is using it as the primary time source. A positive offset indicates the local PPS synced clock is higher. A negative offset indicates the other clock is higher.
Calculate the PPS Offset
This step usually isn't necessary unless you need the highest accuracy because I have found for GPS receivers mounted close to the time server like mine the PPS offset will only be 2 to 3 milliseconds.
We adjusted the GPS offset above to get the GPS & PPS times close. Now we'll adjust the PPS offset to get our time server's time close to the average public time server time.
After a few hours of run time run chronyc sourcestats and again calculate the average public time server offset. It will normally be a negative number around -2000us (-2000 microseconds = -2 milliseconds = -0.002 seconds).
Convert the offset to seconds: -2000us / 1,000,000 = .002 seconds (just shift the decimal point 6 places left)
Subtract the average public server offset from the current PPS offset:
Current PPS offset 0.0 - -0.002 = +0.002 PPS offset
Edit chrony.conf:
sudo nano /etc/chrony/chrony.conf
refclock PPS /dev/pps0 refid PPS lock GPS precision 1e-9 offset 0.002 prefer
If the average public server offset is negative (it normally is) then the PPS offset needs to be positive.
Restart chronyc and gpsd:
sudo killall -9 gpsd chronyd
sudo chronyd -r -s -m -f /etc/chrony/chrony.conf
sudo gpsd -n /dev/serial0 /dev/pps0
After an hour or so again run chronyc sourcestats. The longer you let the server run the more accurate the result.
Calculate the average public time server offset again and verify it's closer to 0. You may want to repeat the procedure to get the average public server offset even closer to 0.
Note: When PPS is being used as the time server's time source (* in front of the PPS line in the chronyc sources output) offset math works like this:
To calculate a new GPS offset we add the chronyc sources GPS offset to the chrony.conf GPS offset.
To calculate a new PPS offset we subtract the chronyc sources average public time server offset from the chrony.conf PPS offset.
With these fine tuned offset values we'll get a quicker GPS lock and more accurate time server.
Build an Arduino Network Time Display
a.k.a. high precision WiFi Clock
We now have ultra-accurate network time so let's build a display that shows the current GPS kernel PPS time. I searched for a commercial network time display but the only ones I could find were uber-expensive but we can use a very inexpensive $3 Wemos D1 Mini ESP8266 microcontroller with built in WiFi and a $4 D1 Mini OLED Shield (.66" 64x48). Both are available on eBay and aliexpress. The network time display is updated every second. Of course you can use the following technique to build a display with a much larger display screen but this simple project will get you started. If you prefer to work with raspberry pi's then see this.
Network Time Display
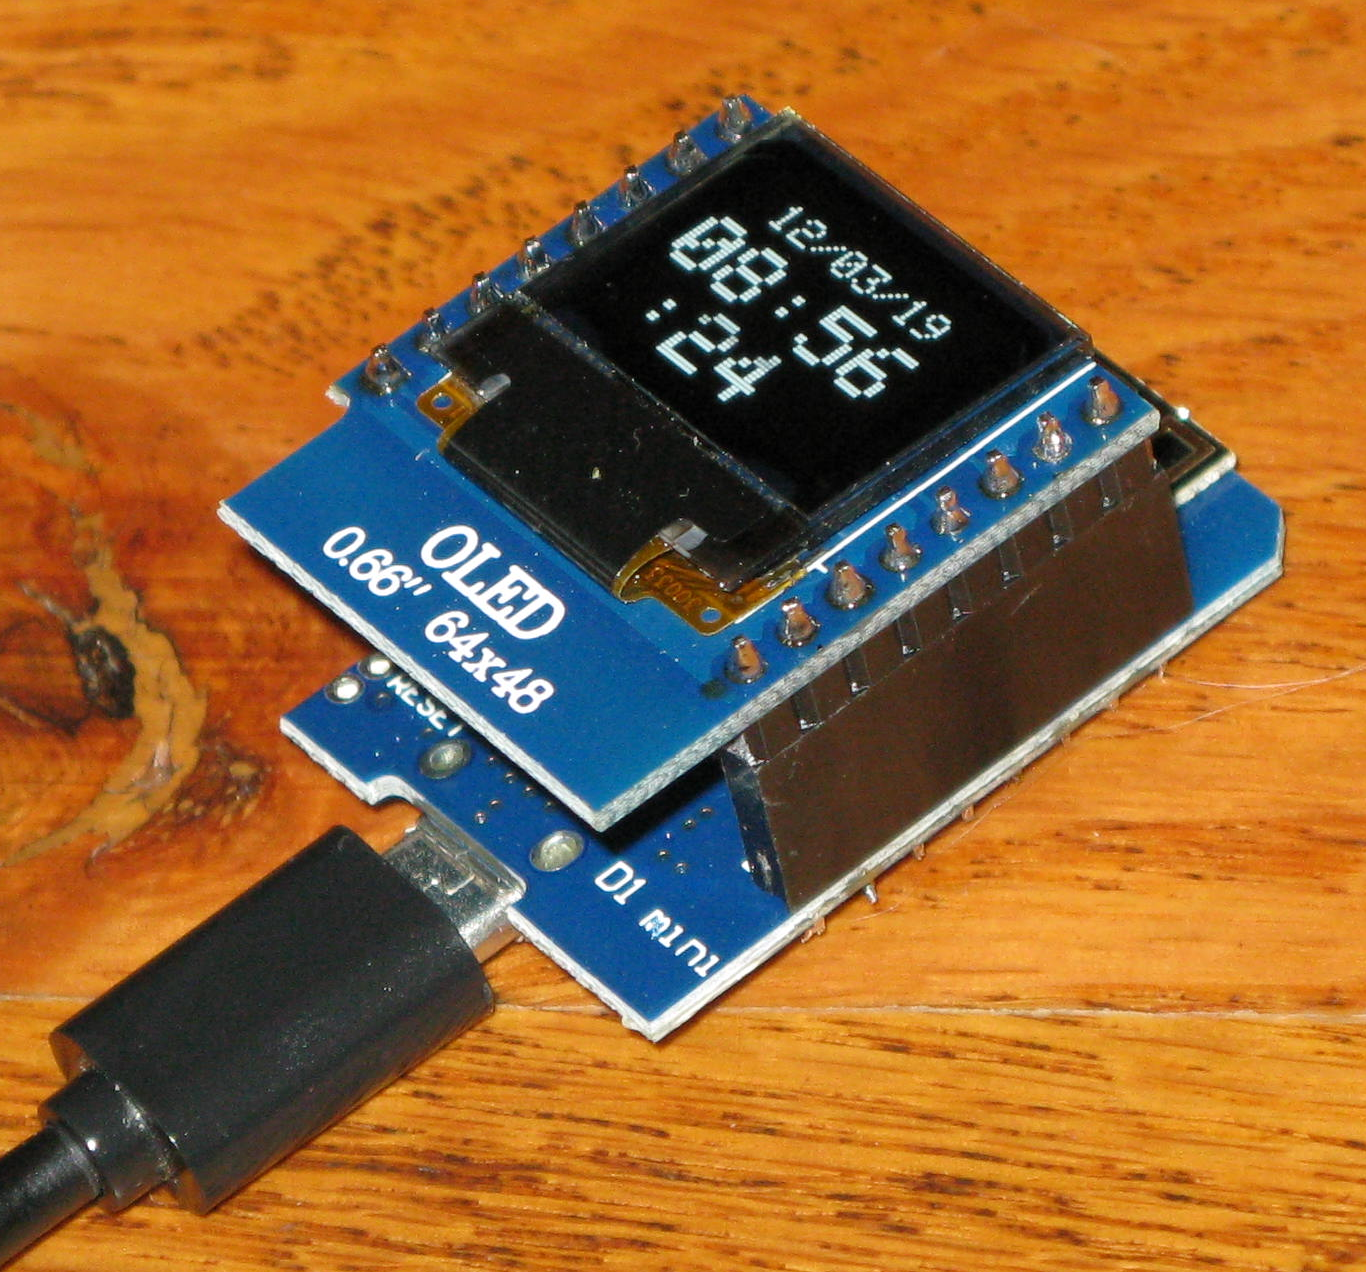
Date and time with seconds displayed. Once programmed we just power it up with a Micro USB cable and it runs. Note the female jumper pin block soldered to the D1 Mini and the male pin block soldered to the OLED shield.
Start by assembling the D1 Mini and OLED shield like it is in the Network Time Display picture above using the included male and female jumper pin blocks. Stack the boards then solder the OLED shield pins first, then turn the assembly over and solder the D1 Mini pins. Soldering the jumpers with the two boards assembled will ensure the pins and jumpers align correctly.
The D1 Mini connects to your computer by USB and the free Arduino IDE programs and flashes it. Once programmed the network time display will power on, connect to your WiFi network, get the current time and display the date and time on the OLED screen.
Wemos D1 Mini Microcontroller
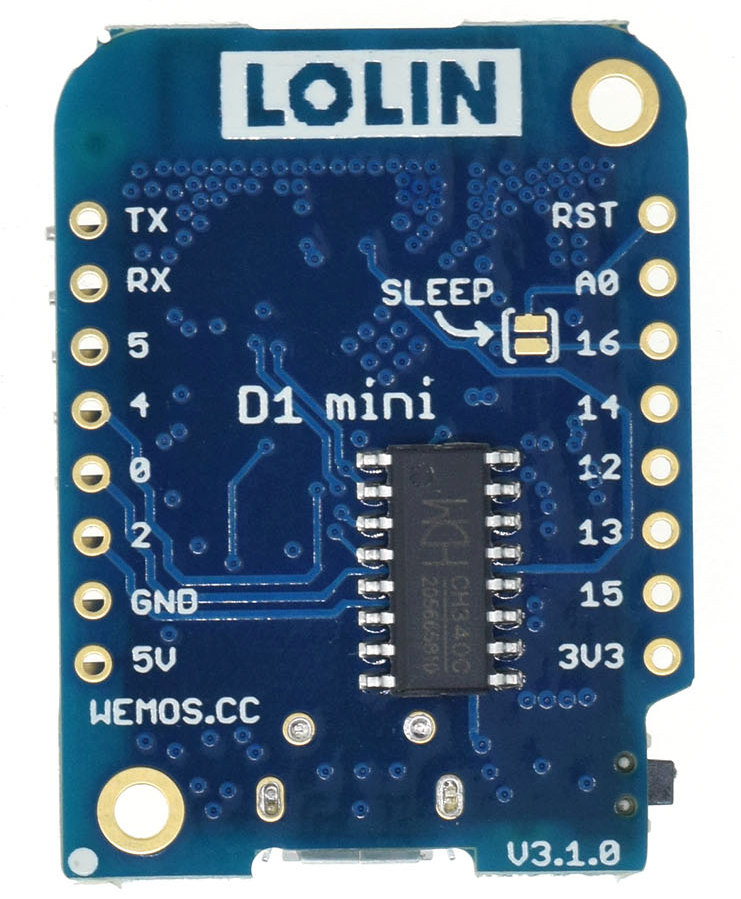
Solder female jumper pin blocks to the two rows of terminals. The OLED shield will plug into these two jumper blocks.
D1 Mini OLED Shield
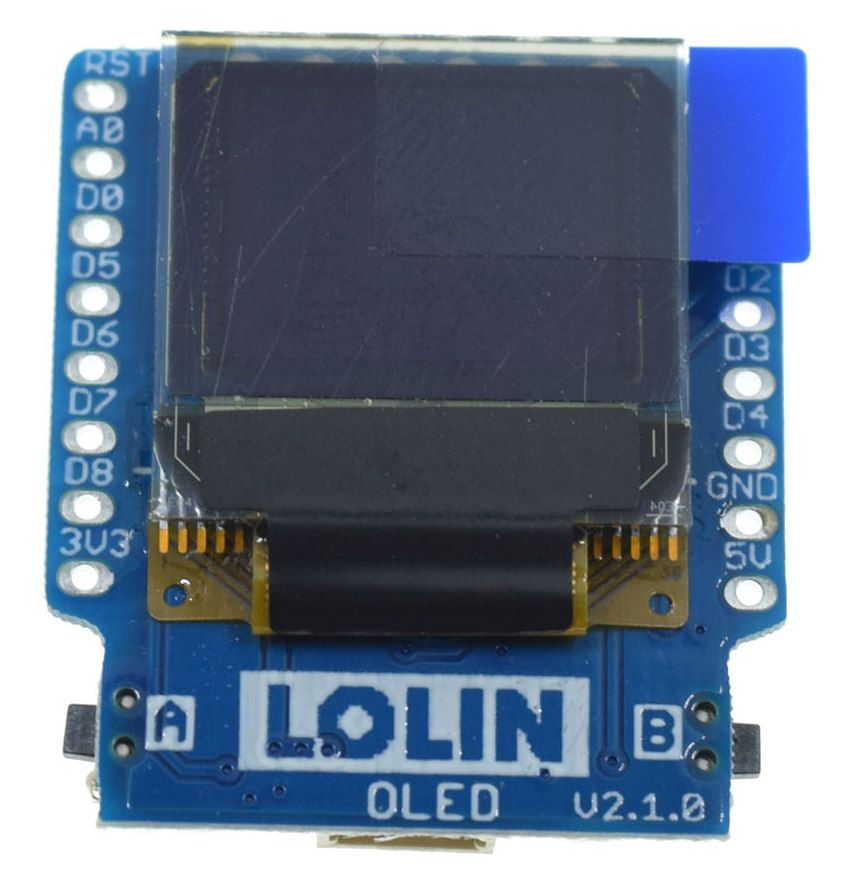
After soldering on the male jumper blocks the OLED shield (hat) will sit on top of the D1 Mini and display our network time. Match up the "RST" pin at top right to ensure the correct orientation of the shield on the D1 Mini.
The nice thing about the D1 Mini is it's built in WiFi and its Arduino compatibility. We can program and flash it using the Arduino IDE (click the link to download). We will use this Arduino program (sketch) to run the network time display: Network Display at github. Download Adafruit_SSD1306.cpp, Adafruit_SSD1306.h and the D1 Mini 8266 ino program file into one folder as shown below:
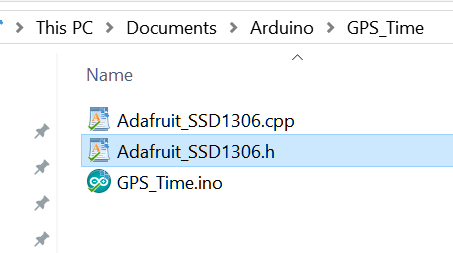
The three files needed to compile the network time display program. "GPS_Time.ino" is the renamed "ESP8266_TN008g_NTP_Time_OLED_and_WIFI_Manager_UK_Webserver_02.i.ino" file.
Open Window's Device Manager and expand the Ports (COM & LPT) section. Plug the assembled D1 Mini + OLED into your computer using a Micro USB cable. You should see a new COM port show up in Device Manager. If it doesn't show up try another usb cable (some are power only with not data). You might also need to download the CH340 serial port driver. Unzip the file and run the installer.
Device Manager
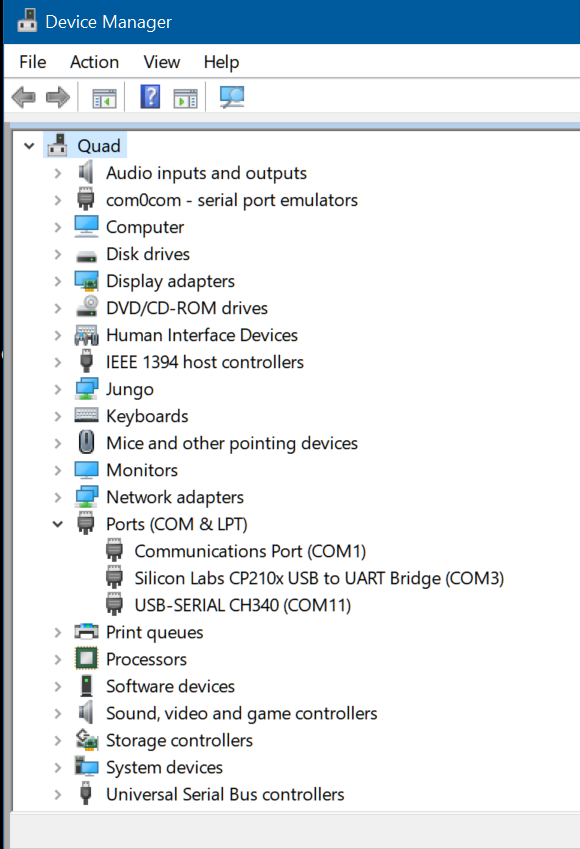
My D1 Mini is the "USB-SERIAL CH340 (COM11) port. If you plug the D1 Mini into a different USB port the COM port will usually change.
Note the COM port and run the Arduino IDE.
Select "Tools/Port" and set the COM port.
Select File/Preferences and copy and paste this text into Additional Boards Manager URLs: http://arduino.esp8266.com/stable/package_esp8266com_index.json
Select "Tools/Board" and select "LOLIN(WEMOS) D1 R2 & mini".
Select "File/Open" and open the ESP8266_TN008g_NTP_Time_OLED_and_WIFI_Manager_UK_Webserver_02.i.ino file.
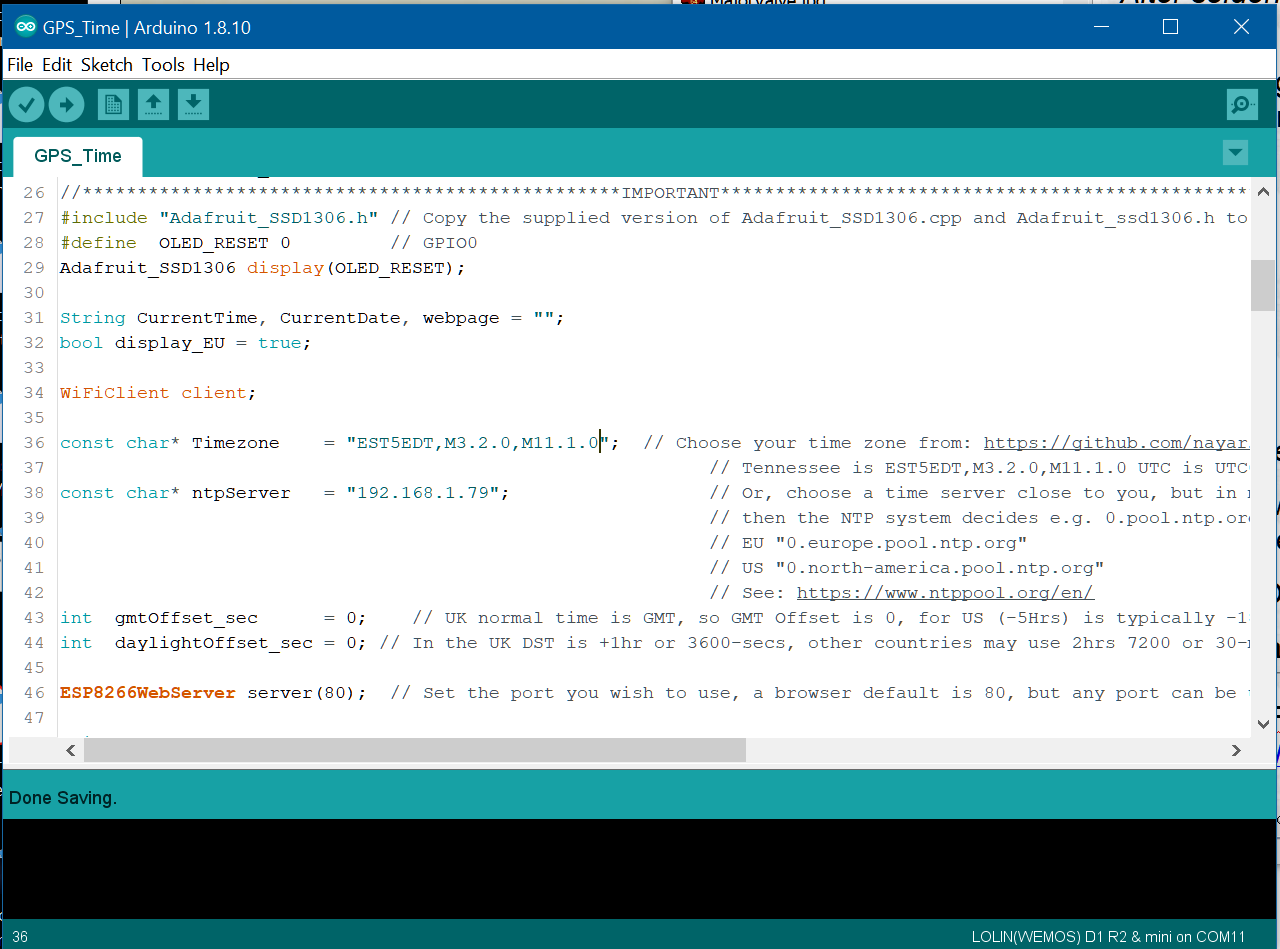
Set the Timezone and ntpServer constants and set the gmtOffset_sec and daylightOffset_sec to 0. For Universal Time Coordinated use "UTC0" as the Timezone.
We need to set the Timezone and ntpServer constants to our desired timezone and ntpServer address. Find your time zone here: Time Zone list. In the screen capture above I have USA Eastern time set and "192.168.1.79" is the IP address of my network GPS time server. If you don't have a local time server then use "0.north-america.pool.ntp.org" or the time server of your choice. To display UTC (Zulu time) use "UTC0" as the Timezone. Set the gmtOffset_sec and daylightOffset_set variables to 0.
Save the file and click the IDE right arrow (compile and send to Arduino) button and the program will compile and flash to the D1 Mini board.
The first time the board powers up it will create a WiFi access point called "ESP8266_AP". Connect to that access point using a computer with WiFi and open your web browser to address "192.168.4.1" and click on "Configure WiFi". Choose the WiFi network you want the board to use and enter the WiFi password. The D1 Mini will then join that WiFi network, get the time from your network time server and then display the current date and time as shown in the Network Time Display photo above. The time is updated by the network time server every second. Once programmed the D1 Mini requires only USB power and access to the WiFi access point specified in the program. To change to another WiFi access point simply edit the program and re-flash the D1 Mini.
Although the OLED shield display used here is very small we can use this technique to use a larger, more readable OLED display.
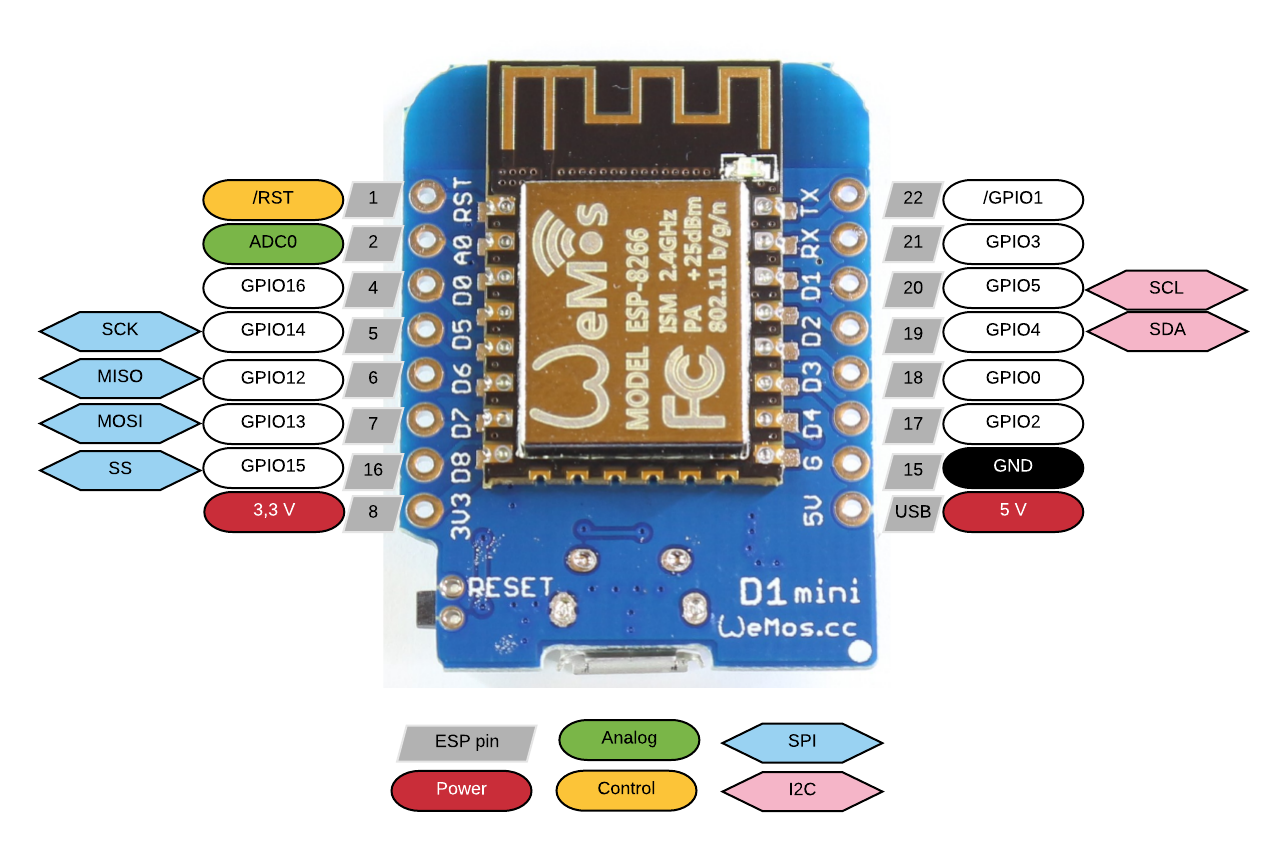
D1 Mini Pinout
Raspberry Pi Network Time Display
a.k.a. high precision WiFi Clock
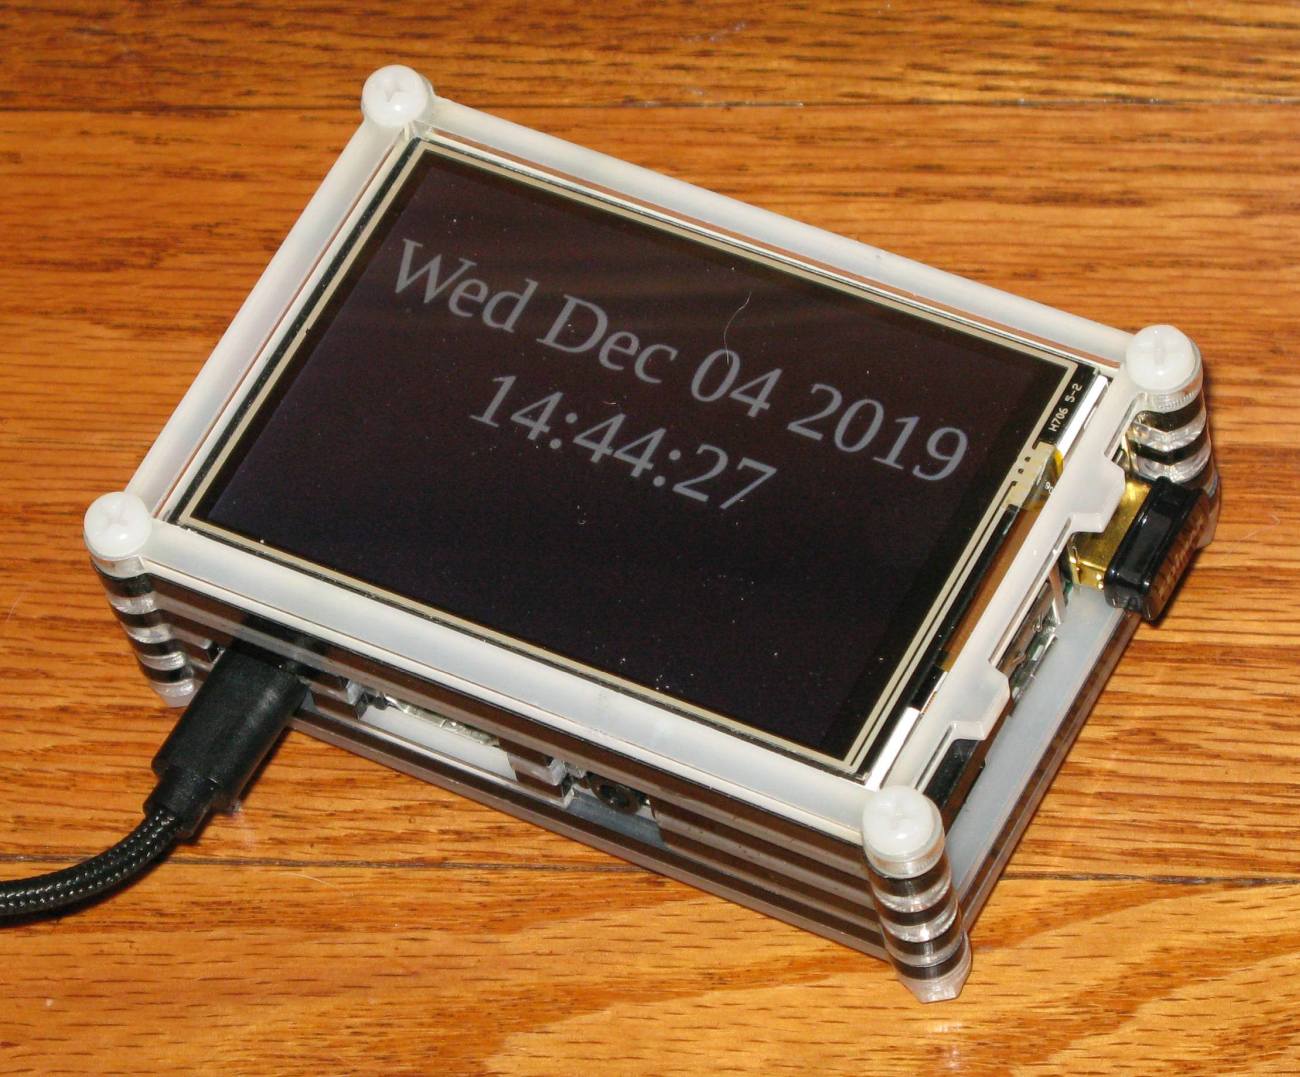
A raspberry pi with a 3.5 inch LCD display and case makes a very nice network time display.
Start by getting the pi up and running and booting to the desktop. Then physically install the LCD display and install the display driver so the LCD display will show the desktop. We then download the clock program and a little program that will hide the mouse pointer. Finally, we set the clock program for auto start and full screen. Optionally, we can flip the display upside down to put the power connector on the top of the display.
Raspberry Pi3B + 3.5" LCD Display As Network Time Display
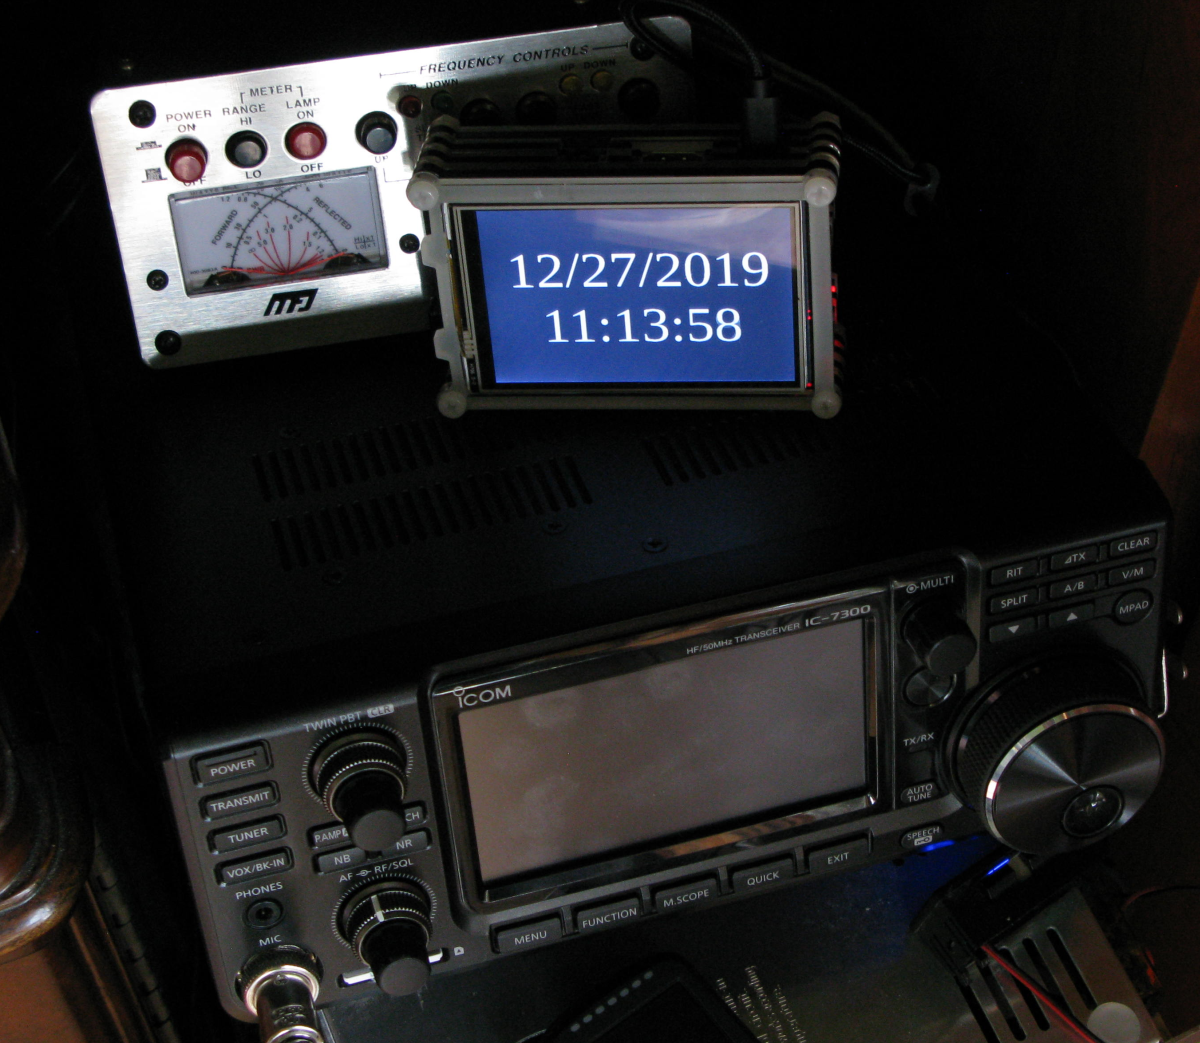
Modified date to allow larger font and rotated display to put the power connector on top. Use my modified uhr.html for this display output format.
Note the power connector at the bottom of the display. We can rotate the display 180 degrees to put the connector at the top so the display can stand upright.
3.5" LCD Touch Screen Install Drivers
This worked for my 3.5" screen
From the terminal command line:
cd ~
sudo rm -rf LCD-show
git clone https://github.com/goodtft/LCD-show.git
chmod -R 755 LCD-show
cd LCD-show/
sudo ./LCD35-show
When you have your raspberry pi booting to the desktop and displaying it on the LCD proceed with the following steps:
Download the Clock Program
From the terminal command line:
https://github.com/carli2/raspberry-projects/tree/master/clock
This will download two files: jquery.js and uhr.html
Use my modified uhr.html for "12/24/2019 20:14:22" large font display format as seen above in the first photo.
Hide the Mouse Pointer
From the terminal command line:
sudo apt update
sudo apt install unclutter
Auto Start the Clock Program
We will turn off the screensaver and screen blanker and run the clock program
From the terminal command line:
nano ~/.config/lxsession/LXDE-pi/autostart
#@xscreensaver -no-splash #
comment out so we don't start the screensaver@xset s noblank
@xset s off
@xset -dpms
@chromium-browser --incognito --kiosk /home/pi/Desktop/uhr.html
@unclutter -idle 0
#@point-rpi # comment this out or just delete it
Set the Time Server Client
From the terminal command line:
sudo nano /etc/systemd/timesyncd.conf
[Time]
NTP=192.168.1.79
# (set this to your desired timeserver, this is the address to my network time server)FallbackNTP=0.debian.pool.ntp.org 1.debian.pool.ntp.org 2.debian.pool.ntp.org
# (set this to your backup time servers)
Verify Network Time Updates
We can verify the pi is actually using network time by running this command:
From the terminal command line:
timedatectl
Local time: Wed 2019-12-04 21:54:14 EST
Universal time: Thu 2019-12-05 02:54:14 UTC
RTC time: n/a
Time zone: SystemV/EST5EDT (EST, -0500)
Network time on: yes
NTP synchronized: yes
RTC in local TZ: no
Rotate 3.5" LCD Touch Screen
This optional step will flip the screen upside down so the power connector is at the top so the pi will stand upright on a flat surface. This will rotate the display but will not rotate the touch screen.
From the terminal command line:
sudo nano /boot/config.txt
dtoverlay=tft35a:rotate=270 # (rotates display but does not rotate touch screen)
Comments and corrections are always welcome at robinette at comcast dot net. 73 de K9OJ
[ How to MFJ ] [ How Tube Amps Work ] [ How the 5E3 Deluxe Works ] [ 5E3 Deluxe Mods ] [ Deluxe Models ] [ Amp Troubleshooting ] [ 5F6A Bassman Mods and Info ] [ How the AB763 Deluxe Reverb Works ] [ AB763 Mods ] [ DRRI & 68 CDR Mods ] [ Tube Bias Calculator ] [ Overdrive ] [ Deluxe Micro Amp ] [ Bassman Micro Amp ] [ Champ Micro Amp ] [ My 5E3 Build ] [ Reverb & Tremolo ] [ SixShooter ] [ Spice Analysis ] [ VHT Special 6 Ultra Mods ] [ Telecaster Mods ] [ Android Tube Bias Calculator App ] [ The Trainwreck Pages ] [ Fender Input Jacks ] [ B9A Prototype Board ]