2024 Yamaha WR250F
Tame the Hard Off-Idle Hit - Install Comp ECU and CCU to de-tune the low end
Uncorking
Standard uncorking of the 2020 to 2025 WR250F involves removing the throttle stop screw, removing the exhaust restrictor, and removing the intake restrictor. Many dealers do some or all of these three steps before delivery. My WR250F came with the throttle stop removed (but screw hole still open), but the intake and exhaust restrictors were still in place.
Running the stock ECU with the exhaust restrictor removed (normal uncork) is considered safe and everyone does it.
I didn't do any dyno testing so I can't be sure removing the restrictor actually flows better but it should and the bike definitely sounds better.
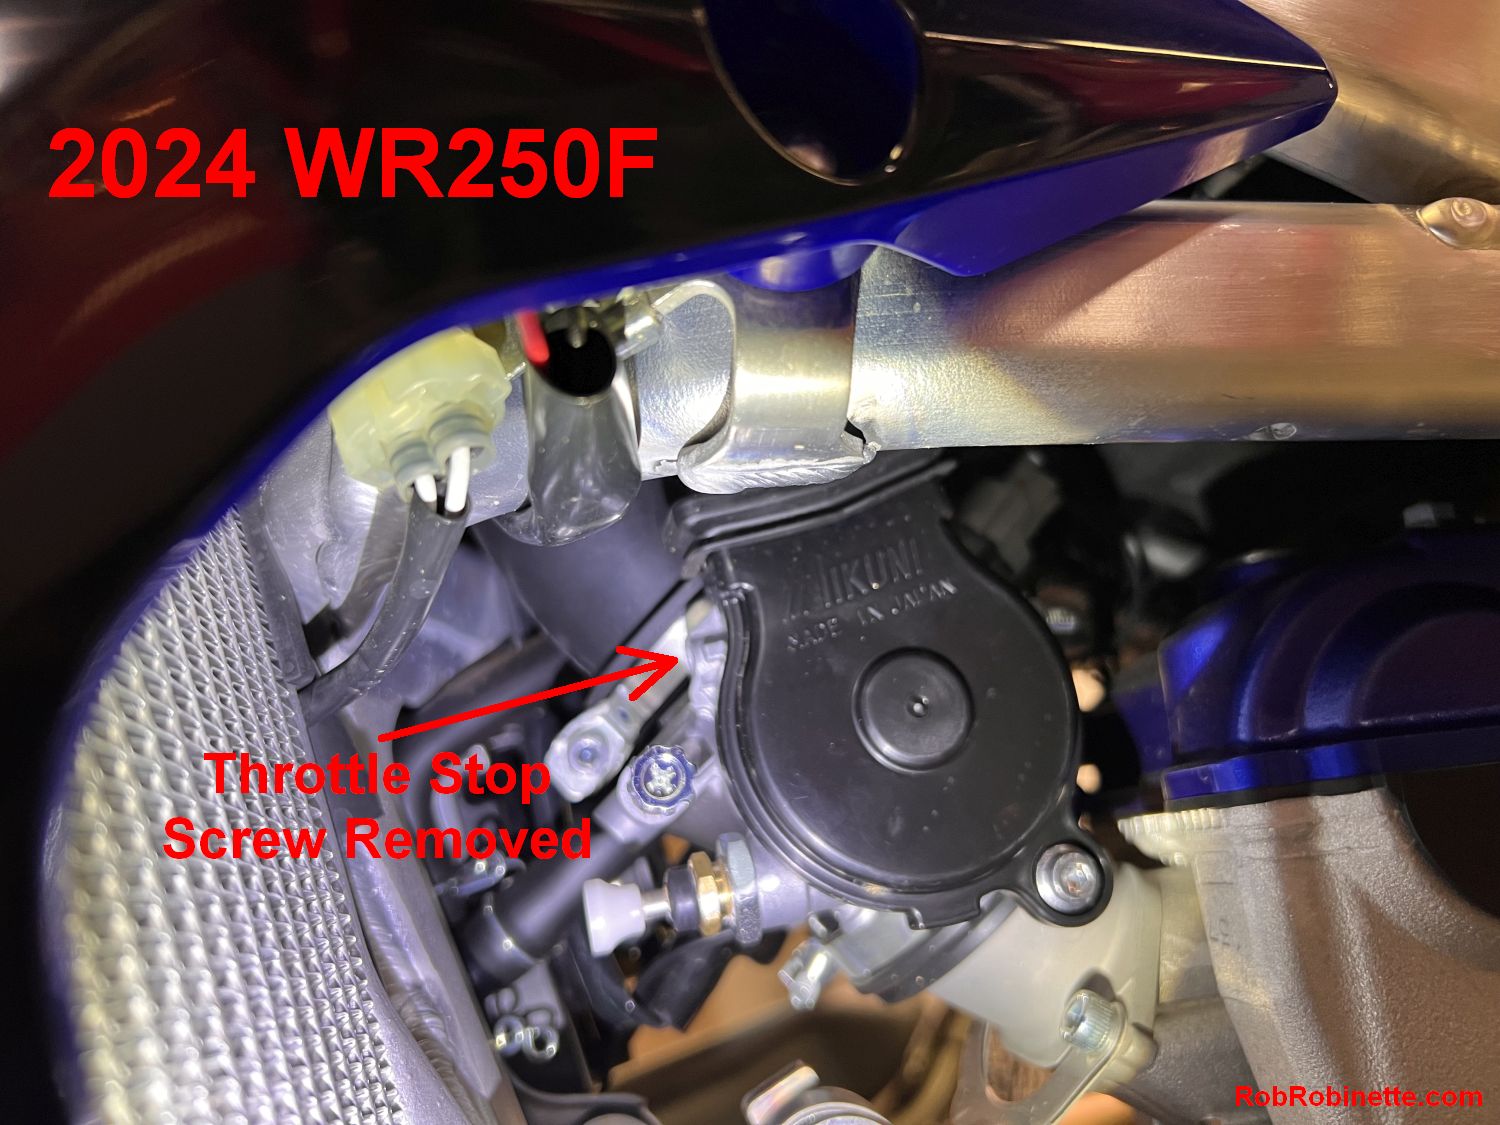
You MUST remove the comically restrictive throttle stop screw to allow full throttle. The empty hole should be plugged with a short 5mm bolt (hole is empty in photo above). The bolt has a Torx CR-VT25 security bit. The throttle stop screw has a center spike, so your bit must have a hole in the center. I read about one guy that got the throttle stop screw out by hitting the top part of the screw head with a chisel and hammer to make it turn counter-clockwise and back out. You can also remove the left radiator shroud, then loosen the left radiator enough to move the radiator outward to make room to run the security bit screwdriver between the frame and left radiator.
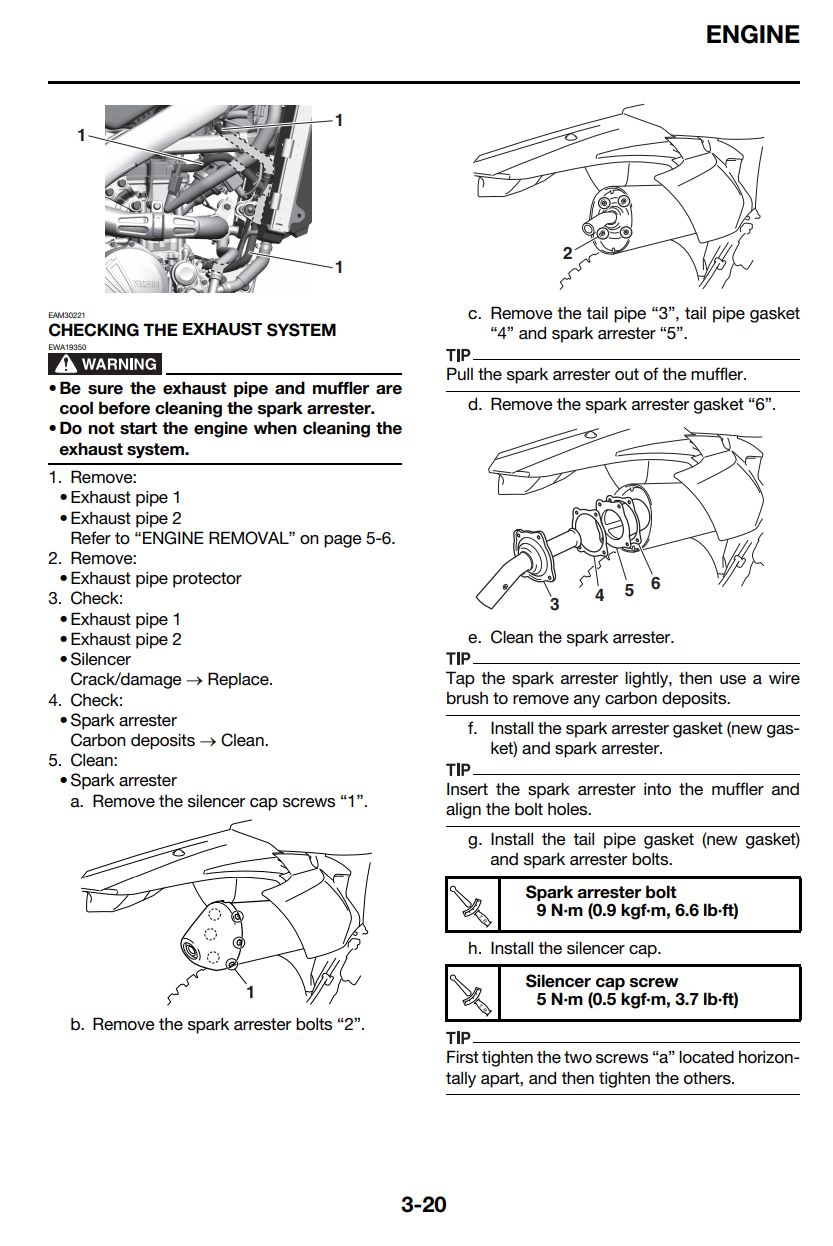
2024 WR250F Manual on Exhaust. The exhaust restrictor is not shown. The restrictor is inside #3 Tail Pipe.
Uncorking the Exhaust
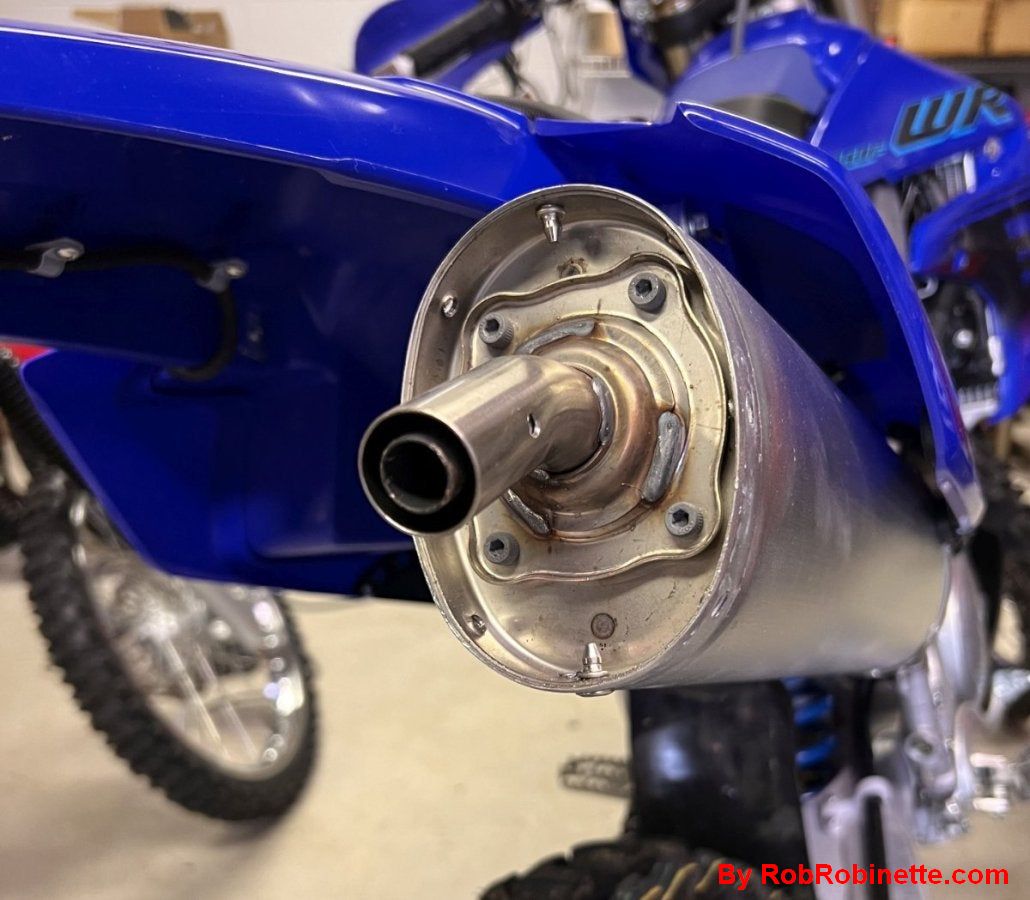
Remove the exhaust silencer cap by removing the four bolts holding it in place. The exhaust restrictor is shown in place inside the tail pipe (rivets have already been drilled out).
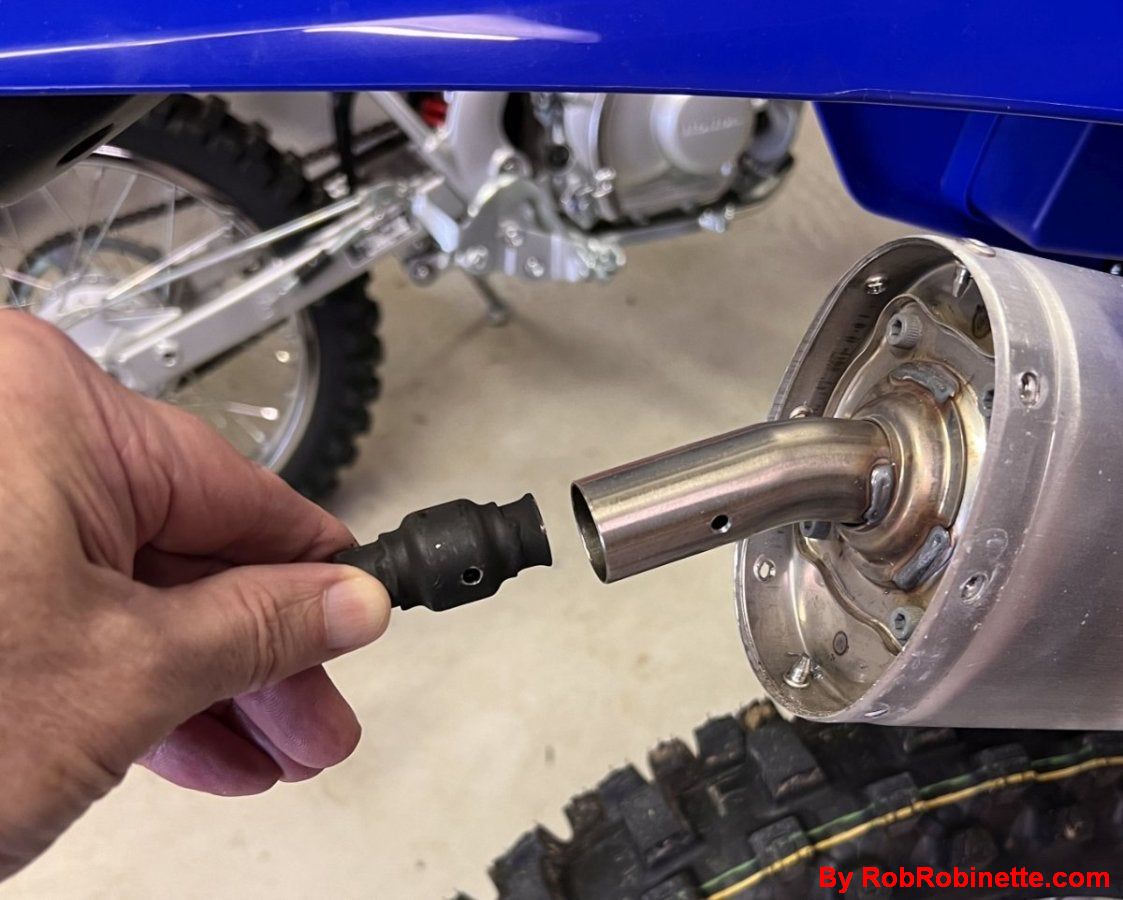
"Uncork" the exhaust by removing the exhaust restrictor (in hand) by drilling out the two rivets holding it inside the tail pipe. Use a 1/8" or 3mm drill bit to drill through the rivets then grab the restrictor with needle nose pliers and pull it out. Removing this is the normal exhaust "uncork."
Remove Tail Pipe and/or Spark Arrestor
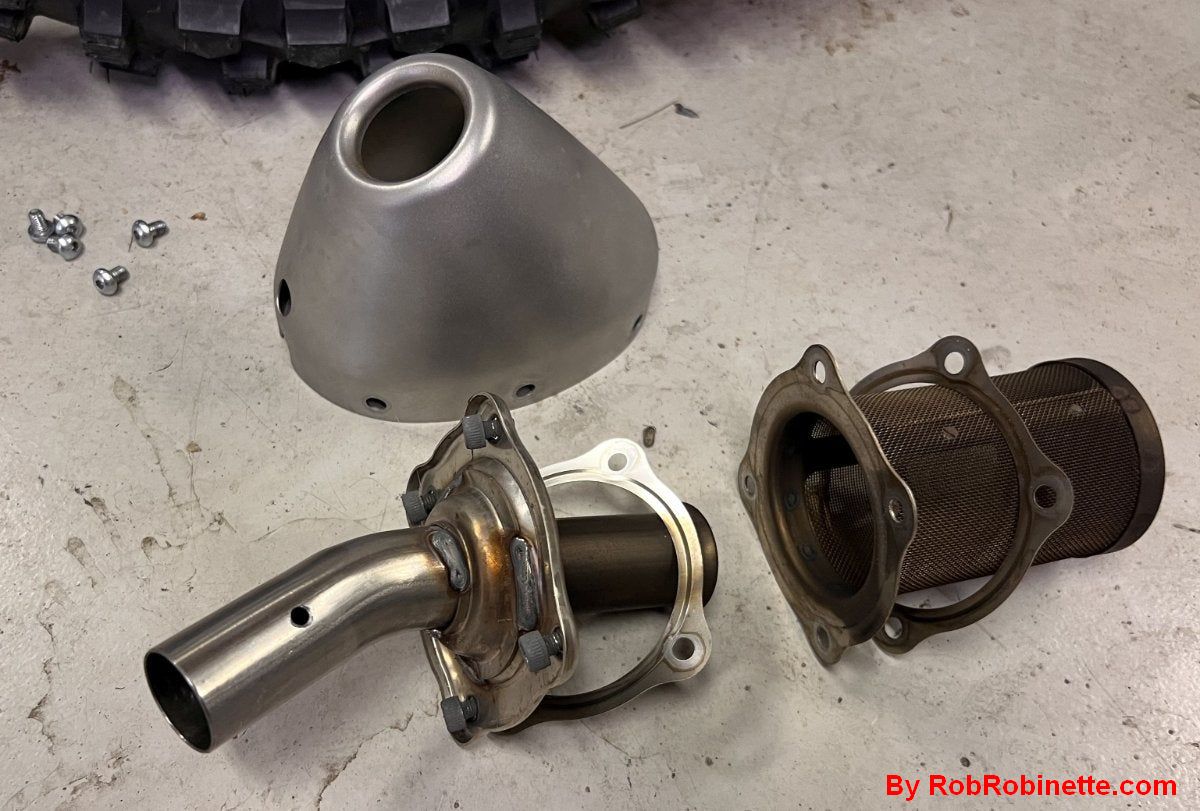
Silencer cap at top, tail pipe - gasket - spark arrestor - gasket (part names are from the Yamaha maintenance manual). You can remove both the tail pipe and spark arrestor and just run the silencer cap, or you can install just the tail pipe and leave off the spark arrestor, or you can install the spark arrestor and leave off the tail pipe (what I did). Exhaust will flow better, but the bike will be a little louder and run leaner.
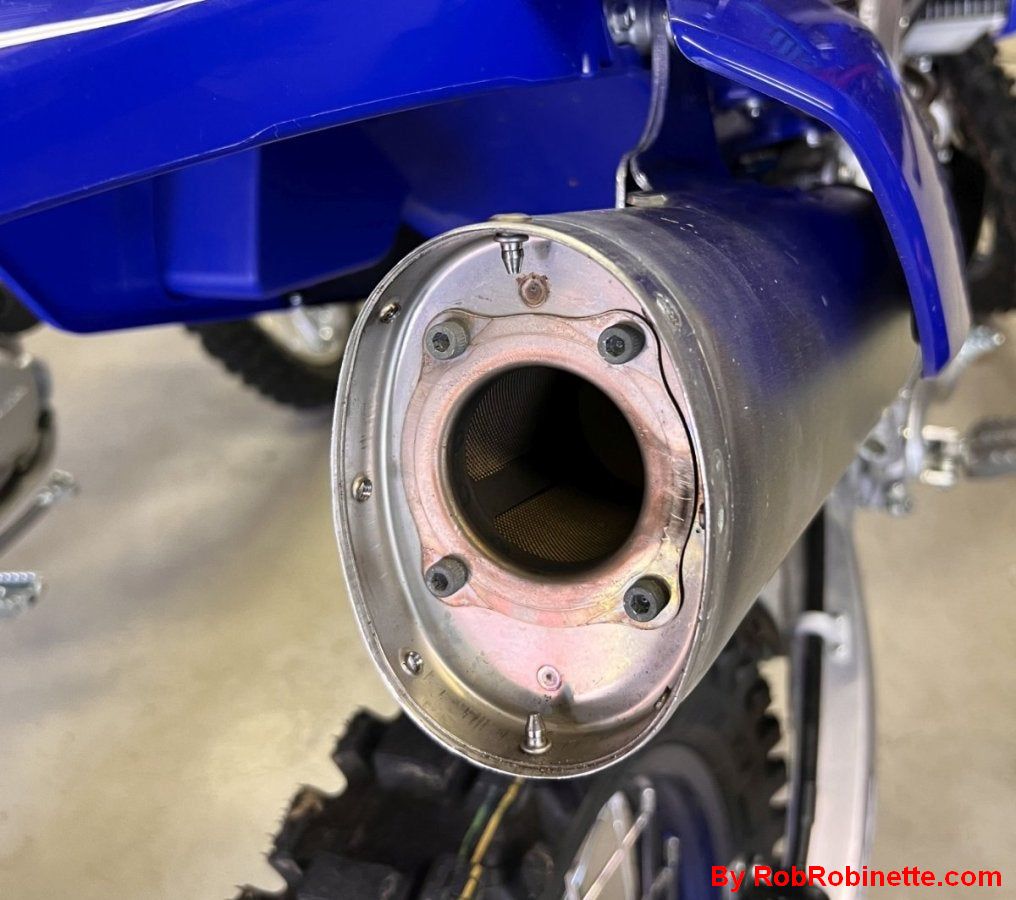
Spark arrestor installed without the tail pipe (I plan to ride some government land and want to stay legal). Remember to put the gasket between the spark arrestor and muffler. For maximum power I recommend you remove both the tail pipe and spark arrestor, then add +2 to the fuel across the board as a tuning start. Unless you have the Comp ECU and CCU to add fuel, I do not recommend you remove the tail pipe and/or spark arrestor because the bike will probably run lean enough to hurt the engine.
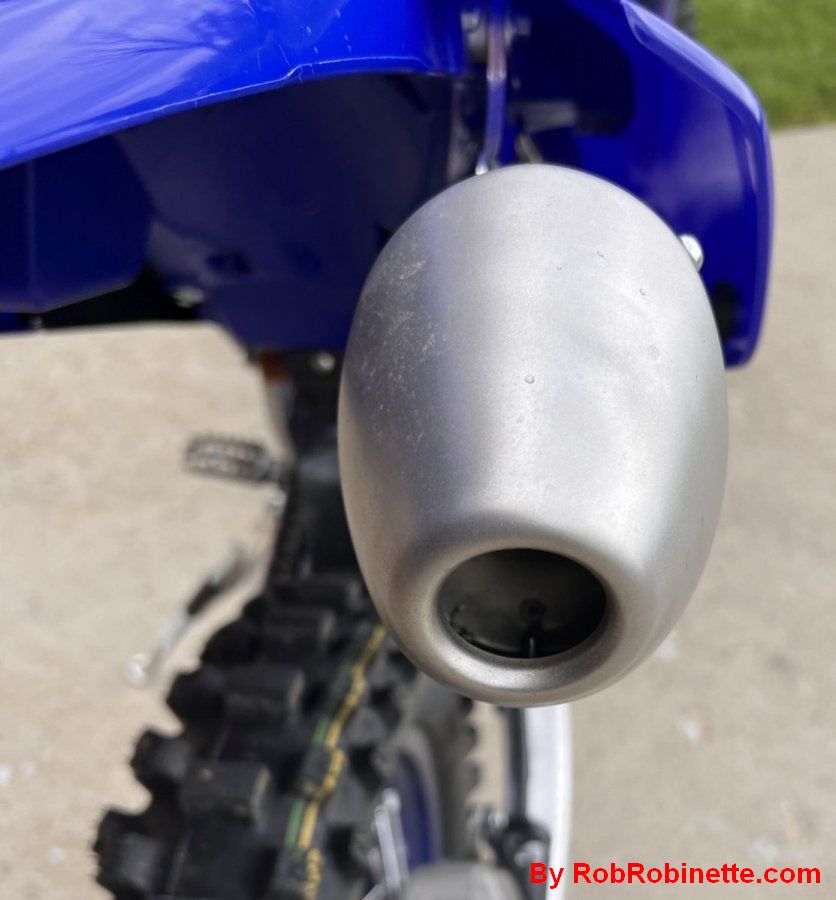
Silencer cap installed with tail pipe deleted.
I had the fuel map setup for just the exhaust restrictor delete but after I removed the tail pipe the bike seemed to like +1 fuel added to the top right corner of the fuel map (full throttle & high rpm).
Recommendation: Do not remove the tail pipe and/or spark arrestor unless you have the Competition ECU and CCU to richen the mixture. Running the stock ECU and removing them will most likely make the bike so lean you may damage the engine.
The third part of uncorking the bike is removing the intake "air flow restrictor." It's primary purpose is to quiet the noise from the intake so be aware that removing it will make the bike much louder to the rider (surprisingly louder). The intake restrictor is a large, white plastic "bong" looking thing that is attached to the underside of the intake backfire screen (see Figure 6 below). You have to remove the air filter to get to the intake screen. Remove the screen and simply snap off the restrictor and reinstall the screen and filter. I do not recommend deleting the backfire screen. The risk of burning your WR to the ground is just too great. Take your time and make sure everything goes back together right--you don't want any air box air leaks.
Previous WR250F Generation (2019) Uncork Instructions
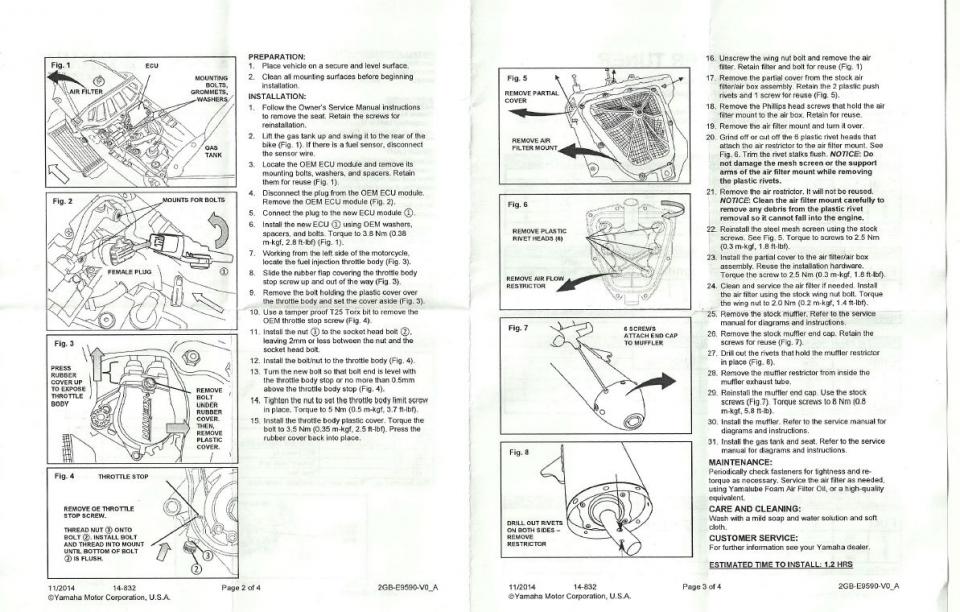
The previous generation WR's throttle stop screw is very different than the 2020+ WR but the intake air restrictor and exhaust restrictor are very similar.
I rode a friend's 2003 WR250 back in 2005 and absolutely loved it. Fast forward to 2024 and I bought a new 2024 WR250F and was absolutely shocked by how hard the power hit off-idle. Some call this a "twitchy throttle." It made slow going on tight trails really difficult. The modern WR250F was designed as a full-up, off road race bike based on the YZ250F motocross bike. It is NOT a trail bike. When I uncorked the bike the off-idle hit was even worse.
I heard the Competition ECU ($130) helped soften the hit so I installed it and the bike did run stronger but really no change in off-idle response. I began to seriously consider trading the bike in for a CRF250F (trail bike, not CRF250R).
I decided to try the GYTR CCU (Communication Control Unit) + free Power Programmer app to see if I could de-tune the beast. I'm glad I did because it did allow me to cut the timing back (a lot) and add a little fuel down low which makes the WR tractor around like a trail bike. It now feels like that old 2004 WR250 on tight single-track but it still rips at WOT and high RPM. I was even able to drop from a 13T to 12T front sprocket without problem (lower gearing makes the off-idle hit even harder due to increased torque). With the handlebar mounted map switch I can go from trail bike to hard hitting YZ power.
2020 - 2024 WR250F Part Numbers
Competition ECU (Electronic Control Unit $130) is part # BAK-E9500-T0-00. To install the Competition ECU, simply remove the fuel tank, turn it 180 degrees and set it where the seat was (no need to disconnect wires or hoses on the fuel tank), then swap out the ECU. Note: the 2025 WR250F has traction control so its ECU is probably incompatible with the 2020-2024 WRs.
GYTR CCU (Communication Control Unit $390) is part # B7R-H59C0-V0-00 (allows WiFi programming from your phone). To install the CCU, see instructions below.
Handlebar Map Switch part # B7B-83976-10-00 (optional, allows you to switch between two ECU maps at the push of a button, $70). To install the map switch, see the map switch photo below.
Yamaha GYTR Power Tuner App is free from Google and Apple app stores. In the app you have to select the bike model. Select "WR250F GYTR Kit 2020-2024". Note: I could not get my Apple 13 Pro to work with the CCU. I had to use an old Android phone.
Note: The 2025 WR250F uses a different ECU with traction control. I do not know if the CCU is different for 2025.
2020-2024 WR250F CCU Install
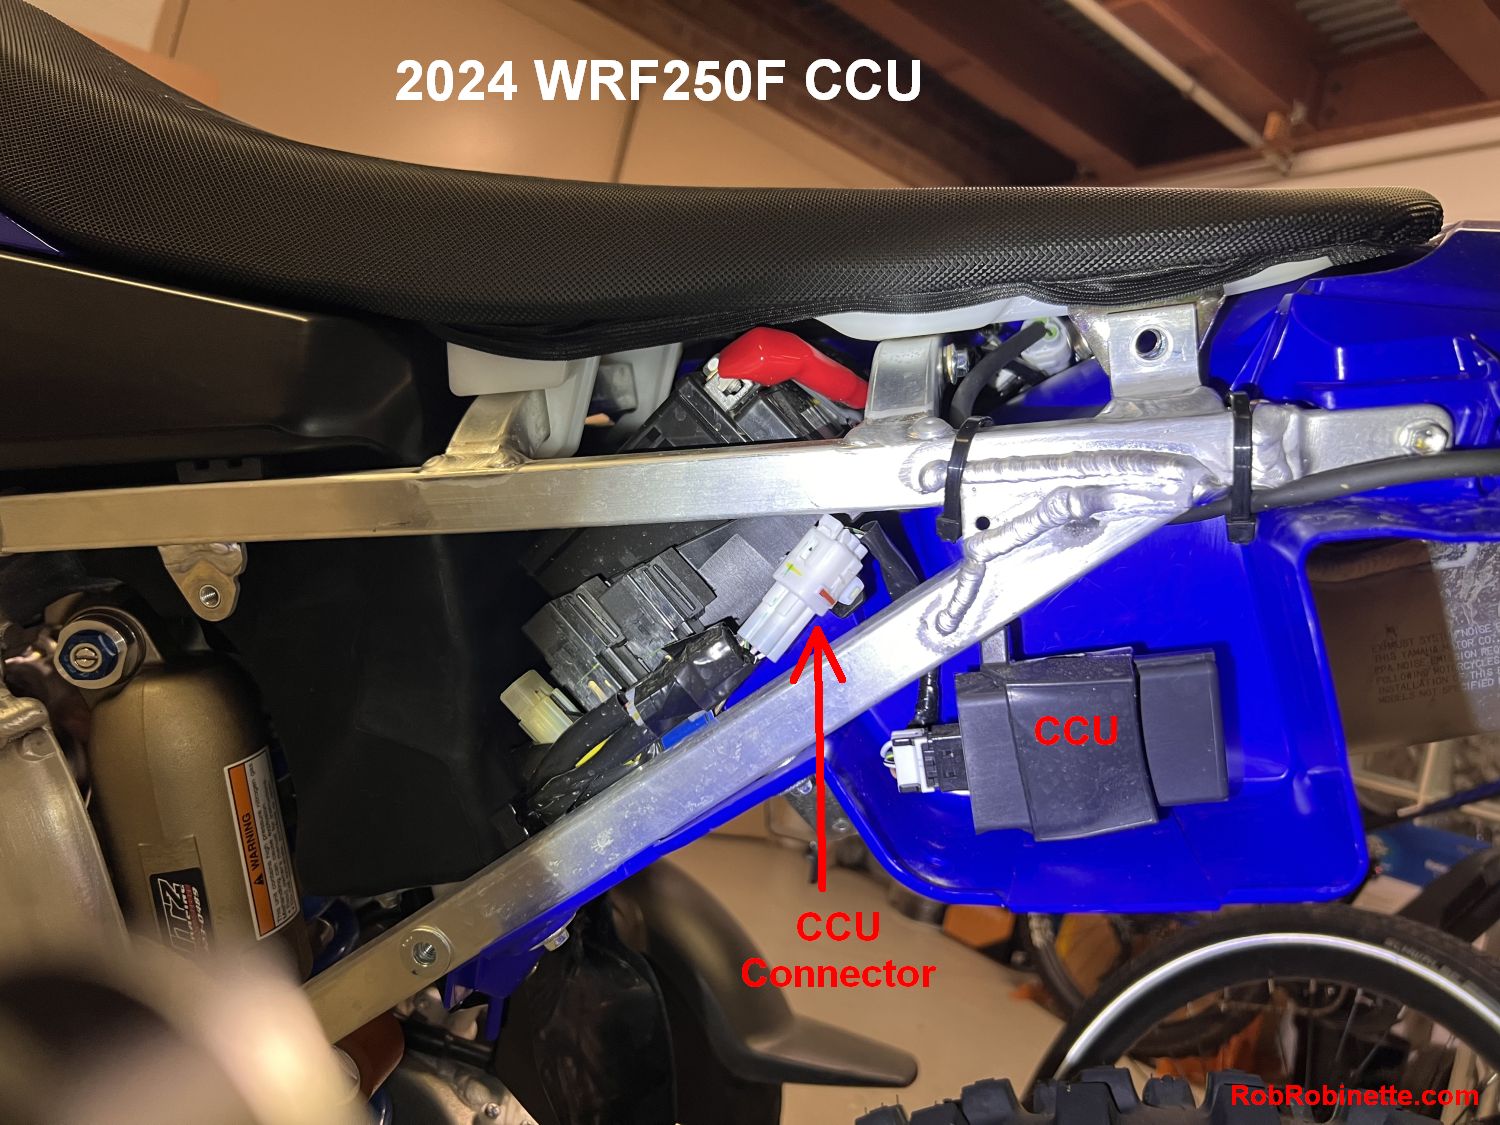
Location of the CCU and connector. The white CCU connector comes with a cap installed and the connector is attached to the fender with a plastic push-plug. Just pull the connector up and away from the bike and it will come loose. Remember to write down the CCU serial number before installation. The CCU serial number is the Tuner App WiFi password.
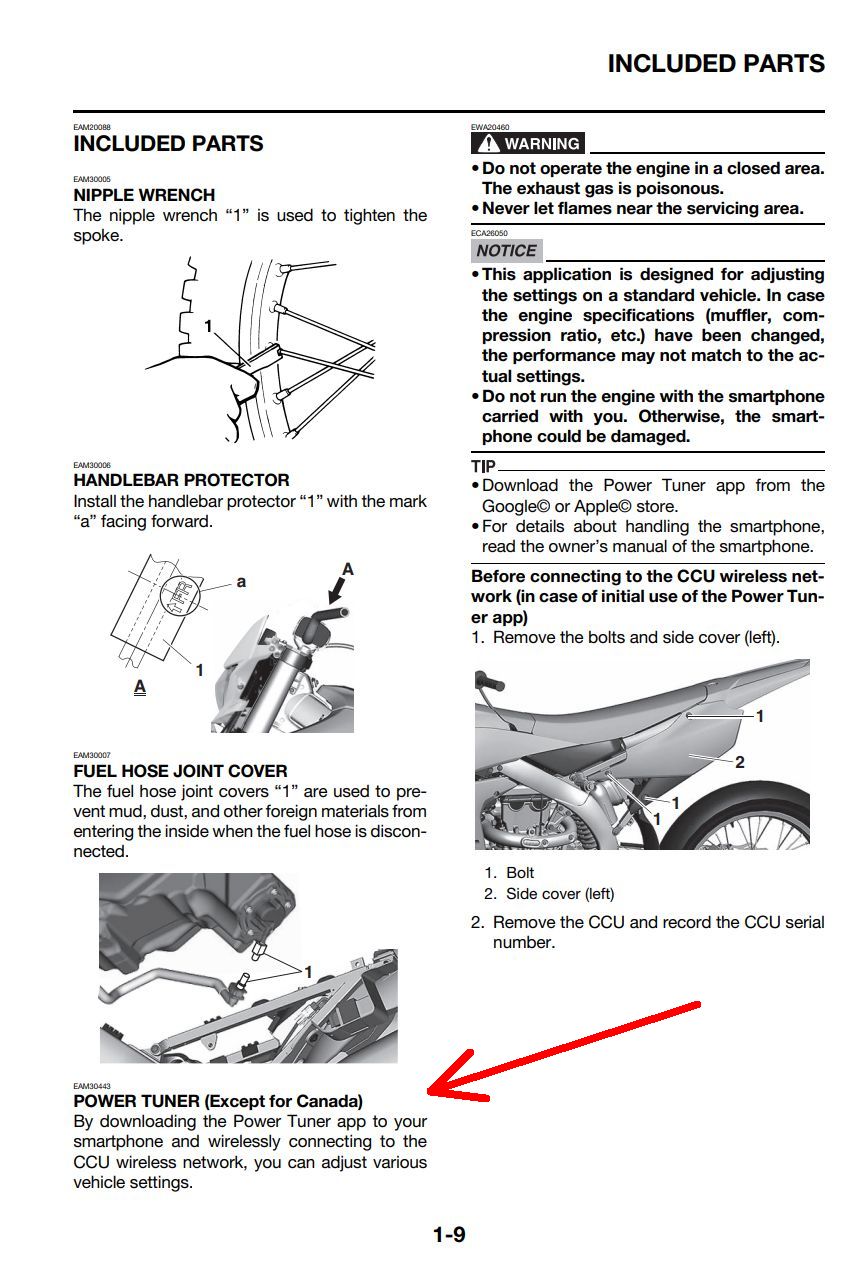

The CCU serial number is the WiFi password for connecting your phone so write it down before installation. The CCU coupler is held in place by a plastic plug. Pull the coupler outward and it will pop off the fender.
The ECU, CCU and map switch install are all plug-n-play. They all plug into existing connectors. The CCU and switch plug into connectors that have caps installed.
The ECU is a simple swap--just lift the gas tank, turn it 180 degrees and set it where the seat would be and you have all the access you need to swap the ECU. You don't have to disconnect fuel or wires to the tank.
The CCU plugs into a connector behind the left side cover. There is an empty plastic box pre-made to hold the CCU. The connector is held to the fender with a plastic push-plug. Pull the connector hard enough and it will come away from the fender so you can remove the cap and plug in the CCU harness. See CCU photo above.
The following serious detune maps make the bike much easier to control when going slow and when riding in slippery conditions:
Detune Fuel Map
90% 0 0 0 0
65% 0 0 0 0
40% +2 0 0 0
15% +2 +2 0 0
2k 5k 8k 10k RPM
Detune Ignition Map
90% -4 -2 0 0
65% -6 -4 -1 0
40% -9 -6 -4 -2
15% -9 -9 -6 -4
2k 5k 8k 10k RPM
-9 is the maximum detune allowed by the CCU. The Power Tuner App Setup page says to add fuel to help soften the off-throttle response so that's why I added a little fuel down low.
I put the De-Tune map in map 1 and left map 2 all 0s (standard Comp ECU settings).
Programming Tips
The CCU WiFi password is the CCU serial number so write it down before you install it.
I tried to use my iPhone 13 Pro but I could not connect to the CCU WiFi--I tried everything and gave up and tried my old Android phone and it worked like a charm. I had difficulty trying to get maps uploaded before the CCU power timed out but I finally came up with a way to get it done every time:
The easy way to use the 2024 GYTR Power Programmer App
Get the map ready in the app offline (with the bike off)
Switch to the phone's WiFi page
Tap the starter button to power the ECU, it takes about 15 seconds before the programmer WiFi becomes visible
Connect your phone to the CCU WiFi signal
Switch to the programmer app and hit the up arrow to upload the map.
You can also start the bike and let it run and download maps and do everything else except upload a map. Simply shut down the engine and hit the upload arrow to upload the map.
Both competition ECU maps were all zeros from the factory so with just the Comp ECU and handlebar map switch the switch does nothing since map1 and map2 are the same. If you don't have a map switch, then Map1 is always active. Another note, Map1 is active with the map switch light off, Map2 is blue light on.
One benefit of the handlebar map switch that I hadn't considered is it makes comparing two maps very easy when developing your maps. Wonder if a little less ignition off idle helps or hurts? Load the two maps and switch between them during your ride.
The CCU can be used with other Yamaha bikes with a comp ECU. In other words, the CCU is not "married" to a specific ECU. If you have a comp ECU you can borrow a CCU, pull the left side cover, plug in the CCU, and upload two maps. You could also remove your ECU and install it in another WR that has a CCU, program it, then remove it and install back in your bike.
Map Switch Connection
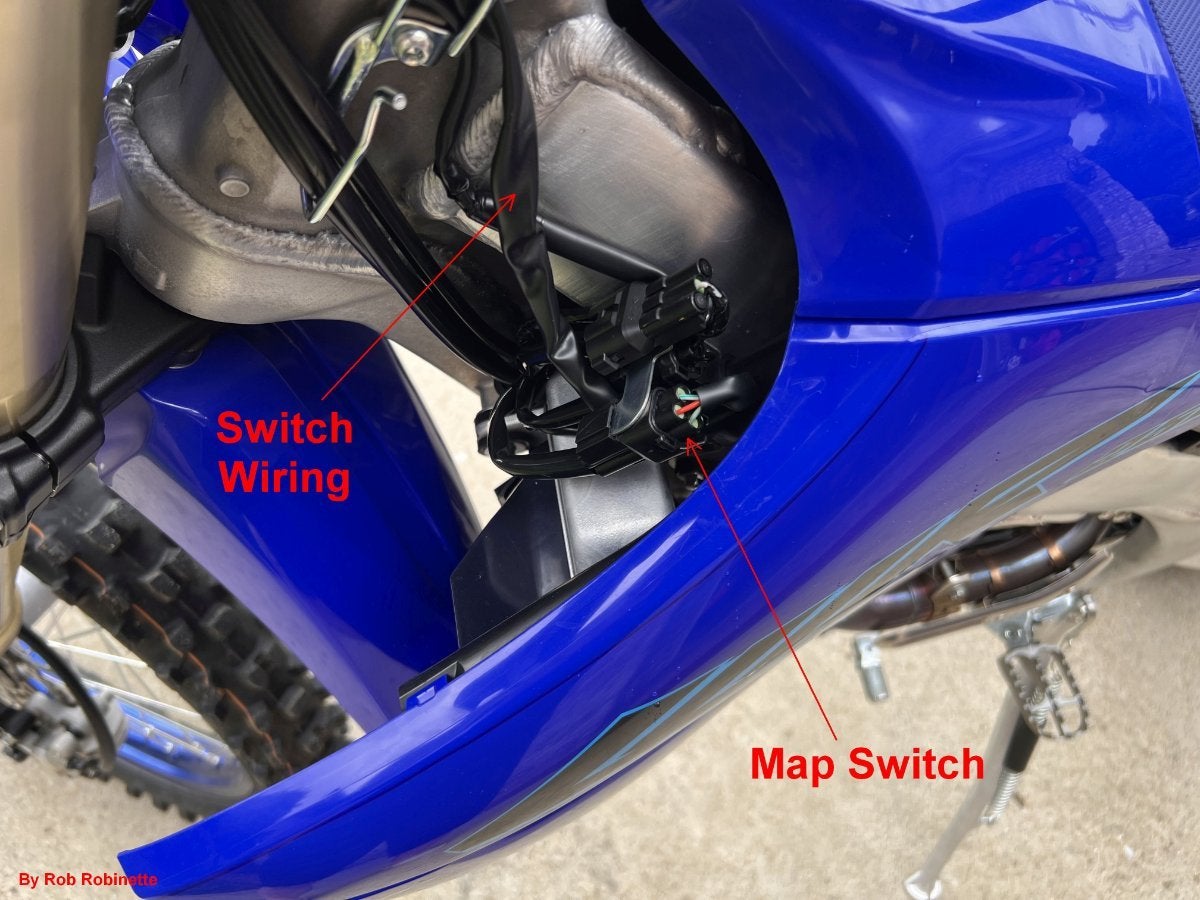
The map switch socket (diagnostic port) has a cap on it that must be removed before plugging in the switch. Switch wire routing goes down behind the socket then out between the two sockets then up to the handlebars.
The map switch plugs into the diagnostic connector on the left side, just inside the left radiator shroud near the steering head (see photo above). The connector is visible without removing the left radiator shroud.
Quick video showing improved throttle response using the de-tune maps.
I did some test sessions with the exhaust restrictor to see if it might make the off-throttle response even smoother. I know that typically more exhaust backpressure helps increases low end torque but I wanted to see for myself. I removed the exhaust restrictor when I uncorked the bike but I wanted to try the new de-tune map with the restrictor in to see if it helps or hurts.
I rode it first without the restrictor and tractored around, then put the exhaust restrictor in and did the same circuit. It seemed to be a little worse off-idle, not as smooth but that is not to say I could have made it better by playing around with the maps but I didn't try.
I then removed the restrictor and did the circuit again. I then installed the restrictor backwards--which is even more restrictive than the right-way. It was even worse than with the restrictor in right. I then removed it again (did a lot of riveting and drilling out) and did the circuit again and I'm sure it is smoothest with the exhaust restrictor out.
By Rob Robinette