KW V3 Shock Tuning Guide
(or damper tuning for non-Americans)
By Rob Robinette based on the Penske Tech Manual
This procedure is based on the Penske damper tuning "Basic Start-up Procedure" found in their tech manual. Starting with both compression and rebound set to full soft and working toward a baseline setting will teach you a lot about how your car feels when it needs damping adjustment so I believe it's a good idea to take the time to run through this full procedure even though the S2000 community has a pretty good handle on optimal settings of the KW V3. Although this guide is specific to the Honda S2000 KW V3 shock the basics will apply to any double adjustable (compression & rebound) shock.
The KW V3 has separate adjusters for low speed compression and low speed rebound damping. High speed damping is handled by two separate nonadjustable blow off valves. For more info on how the V3 shock works see: How the KW V3 Works.
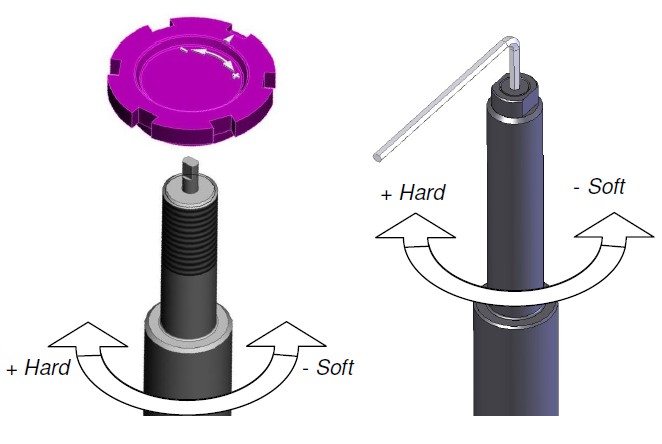
Setting Compression
Compression, or bump setting, is on the bottom of shock. The old style adjusters use 1/4 turn "sweeps" using a KW provided pin tool. The adjuster is behind a plastic, pop-off cover. New style adjusters have a numbered wheel with clicks. Two clicks equal a 1/4 turn sweep. Warning from KW: Do not turn the adjuster by force when you reach the end of the adjustment range, this may damage the needle valve inside the system.
Old Style Pin Tool Compression Adjustment
Turning the compression adjuster to the right increases spring preload on the low speed compression needle valve located at the bottom of the shock in the "Foot Valve." The added spring preload restricts oil flow and increases damping. High speed compression damping is handled by a spring loaded blow off valve in the Foot Valve and is not adjustable.
Adjust compression to suit bumps in critical areas such as corners, corner exit and braking zones.
1. Start by setting the rebound adjuster to near full soft--turn the top shock adjuster out, counter-clockwise about 3 turns (18 clicks)--as if screwing the adjuster up, out of the shock--don't force the adjuster beyond its limit. KW warns not to drive the car with the shock settings at full hard or full soft so we want to go to full soft and then back off 1 click so you're at 17 clicks out.
2. Set the compression adjuster to near full soft--turn the bottom shock adjuster from right-to-left--as if screwing the adjuster down, out of the bottom of the shock about 2 turns (8 sweeps or 16 clicks) then back off 1/2 sweep so you're at 7 1/2 sweeps out. Drive a lap with compression set at full soft to definitely feel what too soft feels like. Use caution because the car will handle poorly. The car should bounce and oscillate pretty badly. Come in and add compression (bottom of shock, move adjuster left-to-right, one sweep (or 2 clicks) at a time. Do not adjust rebound (top adjuster). Continue lapping and adding compression to minimize upsets until the car becomes harsh, loses tire compliance and traction. When this happens you have gone too far, back off 1 sweep (or 2 clicks).
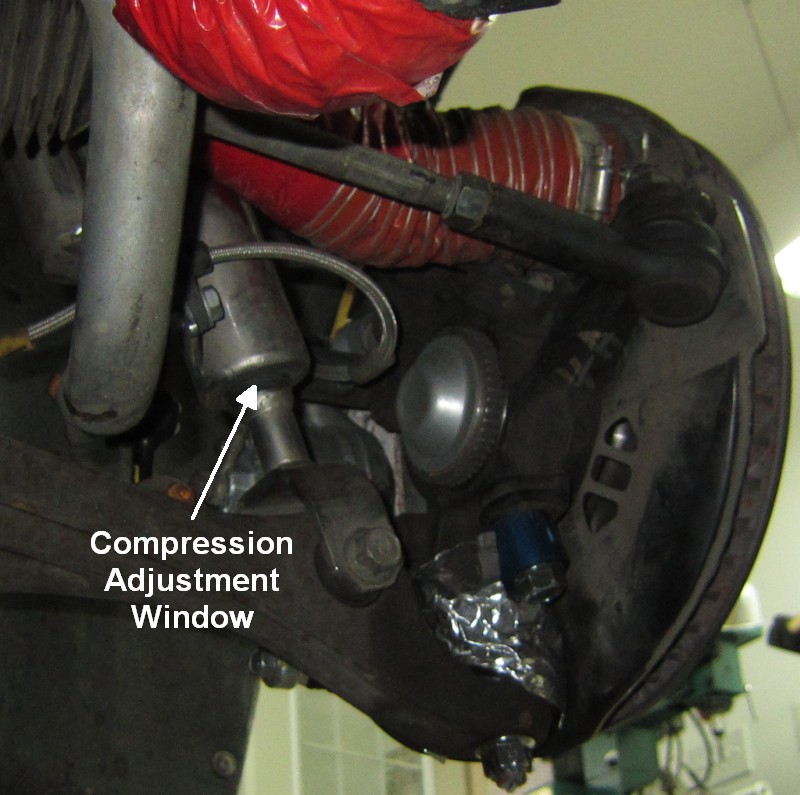
Front Shock Compression Adjustment Window Behind Plastic Plug
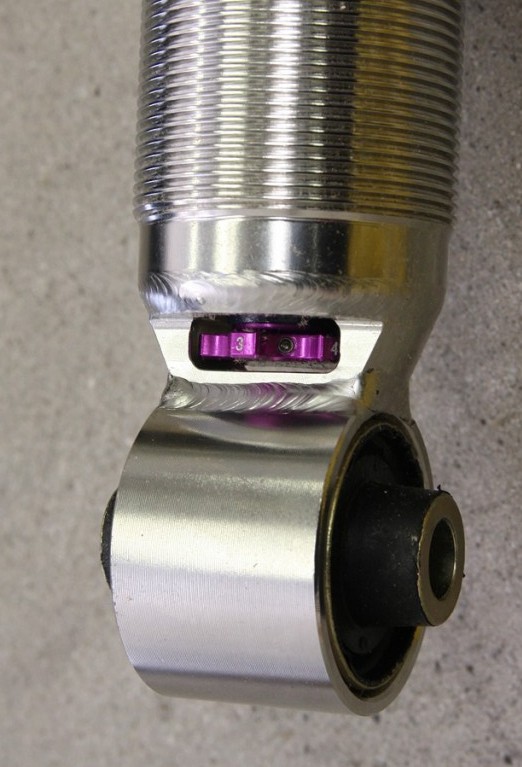
New Style Compression Adjuster on Bottom of Shock
Setting Rebound

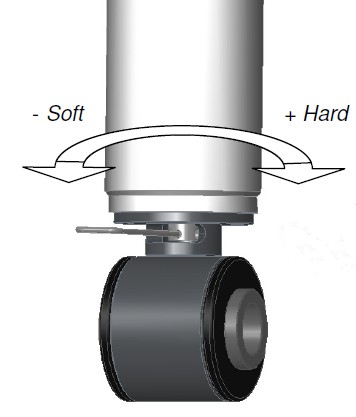
The rebound setting is on top of the shock, full soft is 3 turns out (counter-clockwise). Old style rebound adjusters do not have clicks but new style adjusters have 6 clicks per turn. Turning the adjuster clockwise moves the piston's low speed rebound needle valve inward restricting oil flow and increasing damping. High speed rebound damping is handled by a spring loaded blow off valve on the piston and is not adjustable.
Adjust rebound to tighten up the car, stabilize the platform and eliminate the floating "Cadillac feeling" (control pitch and roll caused by steering, throttle and braking inputs) This will also reduce the rate of body roll.
1. With the rebound set at 7 1/2 sweeps out (1/2 sweep or 1 click from full soft) drive a lap to definitely feel what too little rebound damping feels like. Add 1 full turn in of rebound for the first adjustment then add 1/4 turn (or 2 clicks to the top adjuster, clockwise) at a time until the car becomes "skittish" or the rear wheels hop under braking. When that happens you've gone too far so back off 1/6 turn (or 1 click, top adjuster counter-clockwise) at a time for fine tuning.
Old Style Rebound Adjuster on Left, New Style on Right
Front Shock New Style Allen Wrench Rebound Adjuster
Right Rear Shock New Style Rebound Adjuster Viewed From Trunk
Old Style Front Rebound Adjuster Without Cap
With Adjustment Cap

Left Rear Rebound Old Style Adjuster Viewed From Trunk
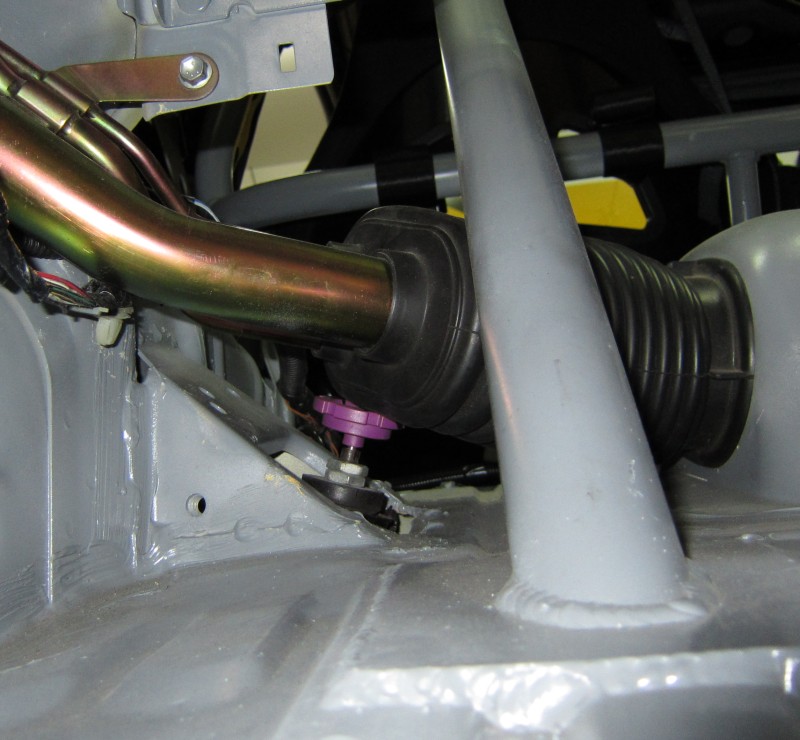
The adjuster rubs against the fuel line seal.
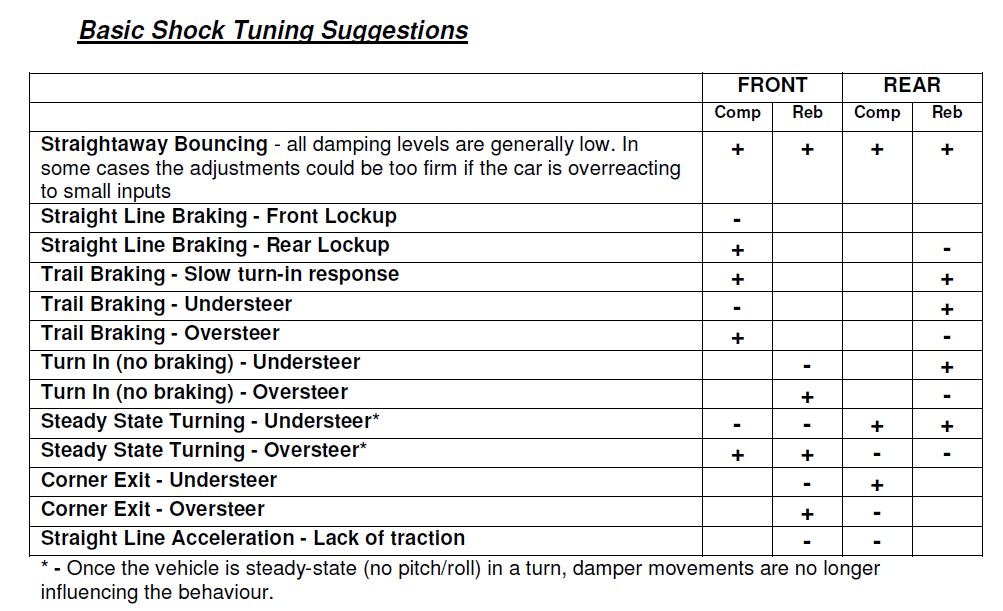
Fine Tuning
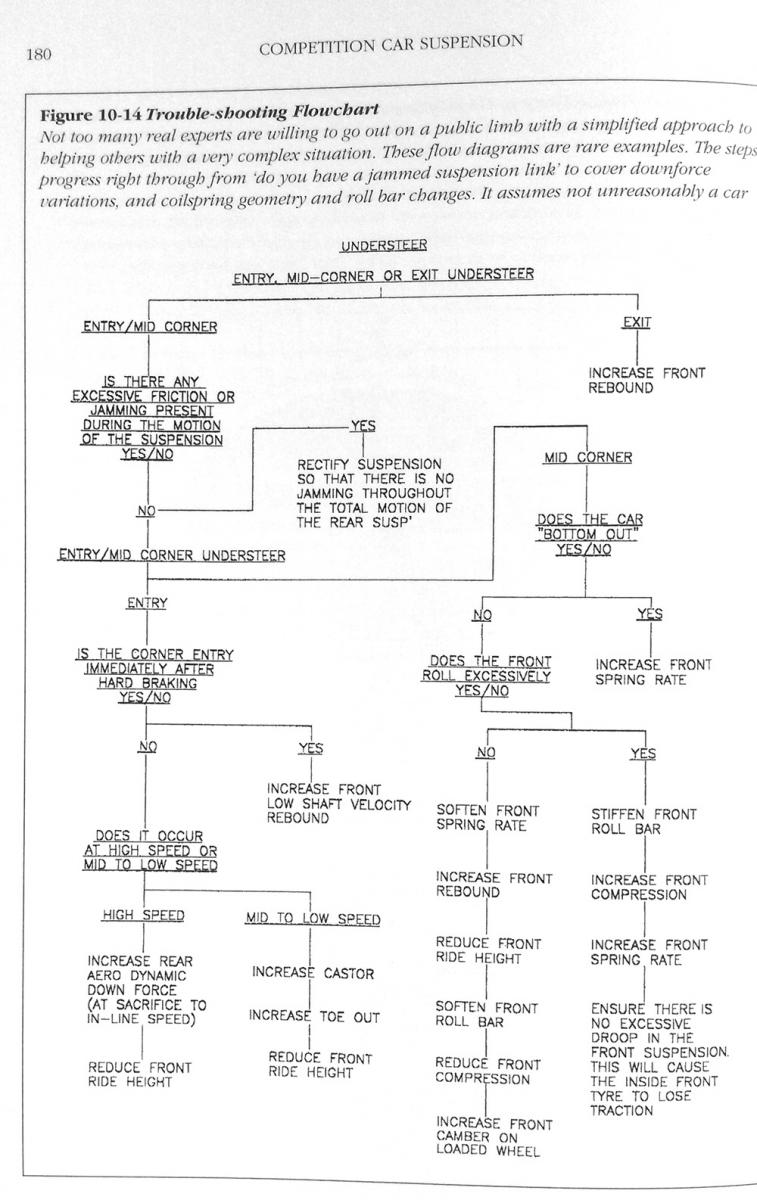
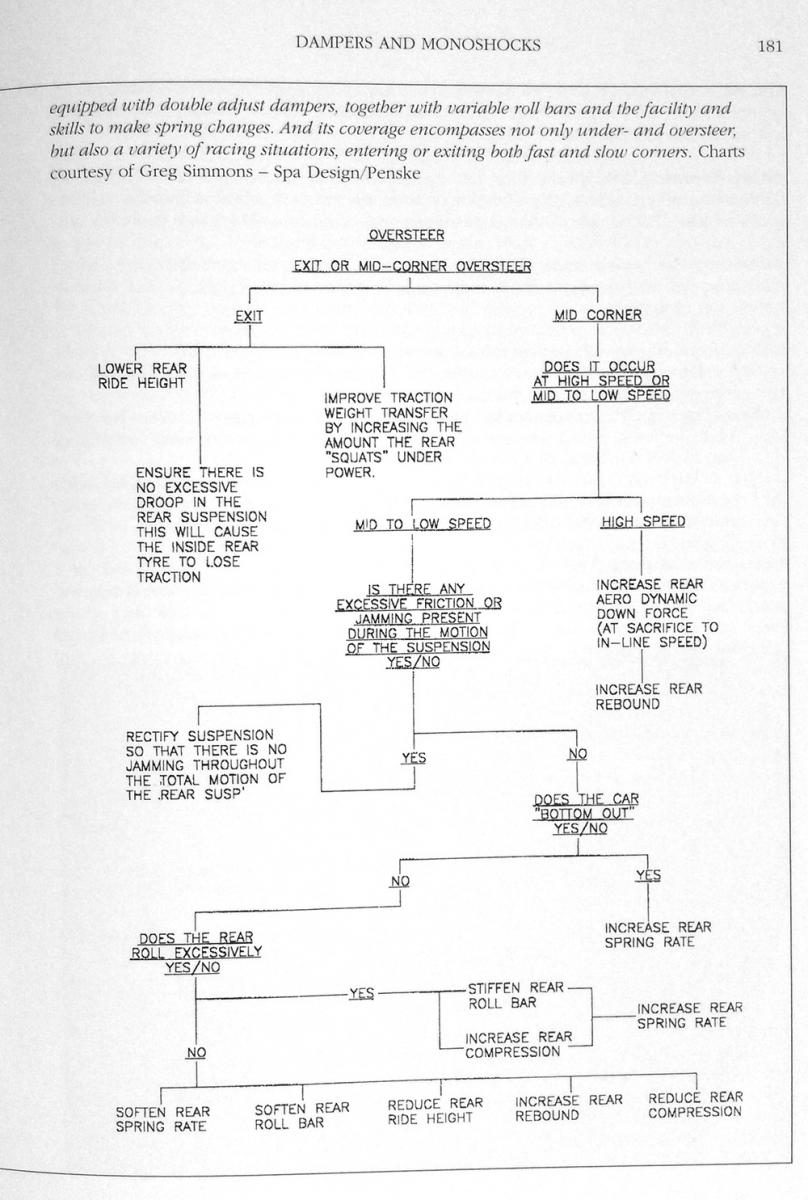
Here's the tuning guidance from Allen Staniforth's Competition Car Suspension.
Understeer
Oversteer
The Sachs Damper Guide for the FR500S Mustang
Understeer Fixes for the BMW M Coupe

Smithees/Roberts Tuning Guide

Once you get the settings right you might want to try this as a learning experience. Make sure you have your settings documented then set the compression to full soft and do a few laps to see what it feels like with the rebound set properly but compression too soft. Be cautious because the car will handle poorly. Then set compression back to the proper setting and set rebound to full soft and take the car out. This exercise may help you troubleshoot your damper settings in the future.
Notes
The KW V3 Manual is available here (pages 3 & 4 are in English): KW_V3_Manual.pdf
The KW Clubsport Manual is here: KW_Clubsport_Manual.pdf
I remember which adjuster is which with this mnemonic: Bump is Bottom (bump = compression)
I shortened the KW compression adjustment pin tool to make it easier to make adjustments.
KW recommended track settings for the S2000 with 80N/mm (457lb/in) springs:
Compression all around at 0.75 turn out from full stiff (3 sweeps or 6 clicks)
Rebound: Front 0.75 turn out (about 5 clicks); Rear 1.5 turns out (9 clicks)
When changing springs if the spring/shock combination was balanced, the rule of thumb is a stiffer spring requires slightly lower compression and higher rebound. A softer spring requires higher compression and lower rebound.
KW V3s for the S2000 have come from the factory with 80N/mm (Newton per millimeter or 457lbs/in, same springs front and rear) and 90N/mm (513lbs/in) springs. The V3s that came with 90N/mm springs come with stiffer rebound valve shims. V3s currently come with 80N/mm springs. The top rebound adjusters originally came with no click adjusters and used a removable plastic wheel for adjustments. Newer shocks come with an Allen wrench adjuster with 6 clicks per turn. The rebound adjustment range is three full turns or 18 clicks. The bottom compression adjusters originally came with a 1/4 turn "sweep" adjustment made with a metal pin tool. Newer shocks come with a wheel that has 8 clicks per turn. The compression adjustment range is two full turns (8 sweeps or 16 clicks).
The ClubSports come with 100N/mm (571lbs/in) springs. The newest ClubSports come with rear shocks with 3 full turns of compression (24 clicks). The front ClubSports have the standard 2 turns of compression (16 clicks). ClubSports have 15% firmer damper settings than the standard V3 and include nice pillow-ball top hats but are almost twice as expensive as the V3.
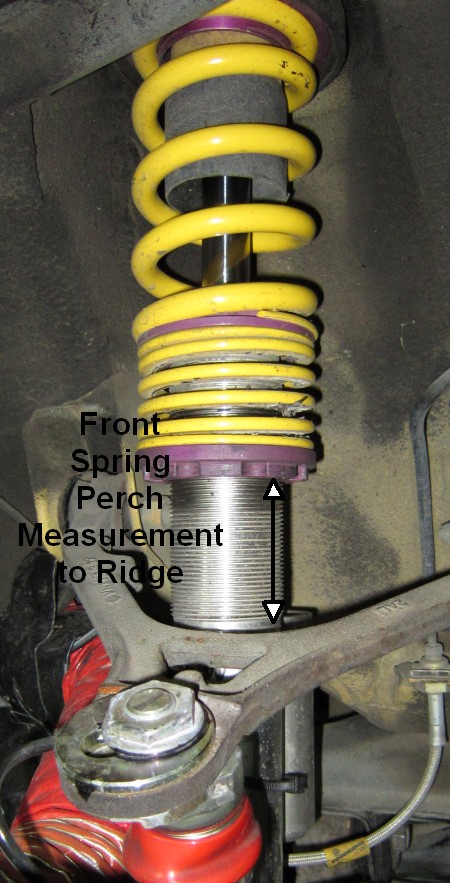
Set the ride height by using the suspension motion ratios of front 1.43 and rear 1.49. What this means is for every 1.43 inch of wheel movement the shock absorber moves 1 inch. For example, if you want to lower your car by 0.5 inch divide that by the motion ratio to figure out how much to move the spring perch: 0.5 / 1.43 = 0.35 inch of perch adjustment will give you 0.5 inch of body lowering in the front. For the rear it's 0.5 / 1.49 = 0.34 inch. For every turn of the spring perch collar it moves 0.085" which translates to 0.125" or 1/8" at the wheel.
Springs come from KW at 63mm inside diameter x 152mm in length (2.48 inches x 6 inches). The marking on the KW springs, such as 80 140, means 80N/mm. Aftermarket 2.5 x 6 inch springs fit.
For both the rebound and compression adjusters, screwing them into the shock adds damping; screwing them out reduces damping.
For rain settings both compression and rebound should be reduced.
Rebound greatly affects weight transfer between the front and rear tires. Adding rebound will add stability. Too little will let the car pitch and roll too much but will help with tire wear. Less front rebound damping allows weight transfer to the rear under acceleration.
Less rear rebound allows more weight transfer during braking and trail braking turn in.
Too much rebound can make the car "pack down" in a series of bumps and the car will feel too stiff (this can easily be misdiagnosed as too much compression damping). Too much rebound can also cause skittishness and/or lack of grip in corners.
Controlling rebound is normally more important than compression. This is why most single adjustable shocks give you control of rebound.
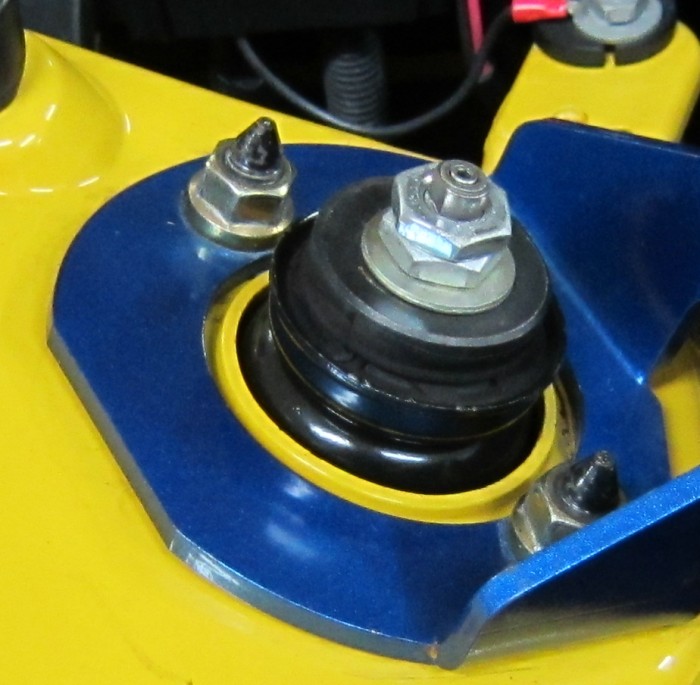
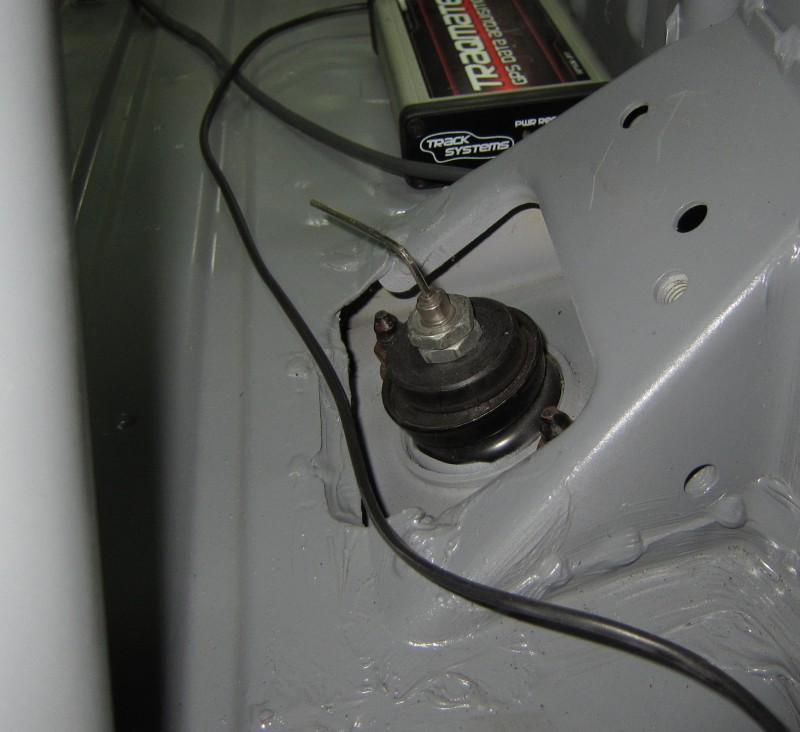
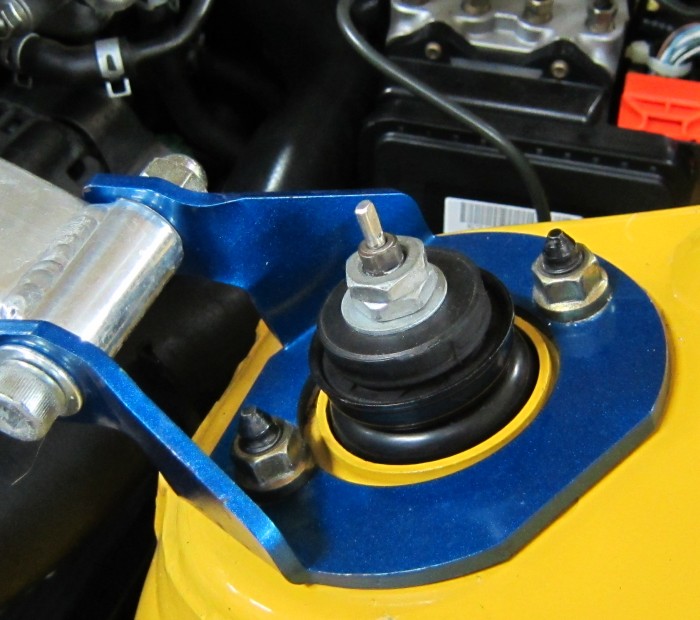
To install & remove your shocks you have to move the lower suspension arm down and out of the way. In the front it helps to disconnect one end of the anti-roll (sway) bar to make this easier. This isn't required in the rear. If you have a helper have them push down or even stand on the wheel hub to move it down. If you are installing/removing the shocks alone a long breaker bar will help move the hub down and out of the way. For the front shocks you have to twist the bottom of the shock to help clear the lower A-arm. When removing the shocks remember how you twisted the shock to get it off, you'll have to do the same thing to get it back on.
KW USA 800-445-3767. They charge $167 per shock for a rebuild. They will not re-valve the V3 shock.
I was able to get my KW V3 shocks revalved for stiffer springs by s2ki.com user TWF. He owns a motorcycle racing suspension shop. He can not get replacement parts from KW but he does have a source for different damping shims to alter the shock's compression and rebound properties. If your V3s need to be rebuilt and you want them revalved then send them to KW USA first for rebuild then send them to TWF to get them revalved.
My Current Suspension Setup & Settings
My 2001 S2000 has a full roll cage and is very stiff so it can run stiffer springs and damper settings than a less modified car. My best lap at Summit Point Main is a 121.7, only seven hundredths of a second off the S2000 lap record. I was running the following suspension for that lap:
I run a Comptech adjustable front anti-roll bar (sway bar) usually set at position 3 or 4 of 5 (5 is stiffest). The rear anti- roll bar is the stock 2001 bar.
I have SPC adjustable ball joints in front for extra camber.
The rear suspension has a Megan Racing bump steer link. The link is also adjustable for toe which allows more camber than stock.
Alignment: Front -3.3º camber, 7.0º caster, 0 toe Rear -3.0º camber, 0.25 inch total toe-in.
Springs: Front 800lbs/inch, Rear 700lbs/inch. All are aftermarket 2.5 x 6 inch.
Compression
Front: 3/4 turn out from full stiff (3 sweeps)
Rear: 1 turn out (4 sweeps)
Rebound
Front: 0.66 turn out (4/6 turn or 4 clicks)
Rear: 0.83 turn out (5/6 turn or 5 clicks)
Spring Perch Settings for Approximately 1.2 inch Lower Than Stock
Front shocks measured from the ridge just below the threads to the leading edge of the adjuster ring: 2.5 inches.
Rear shocks measured from the beginning of the threads to the leading edge of the adjuster ring: 1.57 inches.
Front Shock Spring Perch Measurement