How To Corner Balance Your Car
By Rob Robinette
Corner balancing, sometimes referred to as "corner weighting," "weight jacking," or "scaling," involves adjusting the spring perches of a car to get a balanced diagonal weight on the tires. Typically, a road racing car should have 50% of its weight on the Left Front and Right Rear tires, and 50% on the Right Front and Left Rear. Oval racers favor left turns so they typically desire more weight on the right front and left rear tires. If your car's diagonal corner weights are not equal then its handling will be unbalanced--it will turn better in one direction than in the other (all other things being equal). If your car has coil over adjustable shocks you should consider renting/borrowing/buying some scales and corner balancing your car. It's a lot of work but in the end it's worth it. Keep in mind the stiffer your springs the more important corner balancing becomes.
Cross Weight = Right Front + Left Rear
Cross Weight % = (Right Front + Left Rear) / (Left Front + Right Rear)
When balanced the Cross Weight % will = 50%
Bite and Wedge Delta are important for oval racers, especially on dirt ovals. Since oval racers only turn left we can balance the car for better grip in left turns. Bite tells us how much we are favoring the left rear tire for better acceleration out of left turns. Bite = Left Rear - Right Rear and a positive value means the Left Rear tire is carrying more weight so it will get more traction and bite, a negative value means the Right Rear is favored.
Wedge is a term used in the oval racing world and is simply another word for Cross Weight. Oval racers discovered they could insert an actual wedge into the left rear springs to put more weight on the left rear (and right front) tires and it would help the car turn left and accelerate better. Today's oval racers add "wedge" by adjusting the right rear spring perch--they retract the right rear tire which puts more weight on the Left Rear and Right Front tires.
When a NASCAR crewchief says he's "adding wedge", what he means is he's adding weight to the left rear and right front tires. To keep things clear I call this added LR/RF weight Wedge Delta which is simply the difference between the two diagonal tire weights. Wedge Delta can also be thought of as Left Rear Bite + Right Front Bite.
Wedge Delta is equal to (Right Front + Left Rear) - (Left Front + Right Rear) and tells us how much extra weight is on the left rear and right front tires which gives them more traction or bite in left turns. For ovals we want a positive Bite and positive Wedge Delta. When Wedge is balanced at 50% then Wedge Delta will be 0. Of course you can add too much Wedge Delta and make the handling worse. Keeping track of Bite and Wedge Delta and what values work best for certain tracks and conditions can help us get our setup right with less testing. Road racers are typically not concerned with bite and wedge delta because they usually want balanced turning in both directions.
Road racers can take a page out of the oval racing book and intentionally favor a turn direction. If most of the important turns on your track are left turns then having more weight on the Right Front and Left Rear will help with those turns. To favor right turns, put more weight on the Left Front and Right Rear but you'll have to test to find out what works best.

On The Scales
I created a Microsoft Excel spreadsheet do the following corner weight calculations: Corner_Balance.zip The spreadsheet's second page has a good article that goes into more detail of how and why to corner balance a car. You can see the article here: Grassroots Motorsports » Understanding Corner Weights This spreadsheet will also give you an estimated center of gravity height if you raise the rear of the car 10 inches or more and re-weigh it. The CG height values shown below are totally fictional.
You can also use this online calculator to compute your corner weights: Corner Weight Calculator if you don't use Microsoft Excel. You can estimate your car's center of gravity (CG) height by using this online calculator: CG Height Calculator
I used these scales to weigh the car: Intercomp SW500 EZ Weigh Scales
The following are screen shots from the Corner_Balance.zip Excel spreadsheet. Note the "Conditions and Changes Made" box in the "Ride Height" section of each spreadsheet.
First some baselines. Here's a box stock 2006 Honda S2000 with 5/8 of a tank of gas, and no driver or passenger:
![]()
Now here's the same stock S2000 with a 215lb driver in the seat:
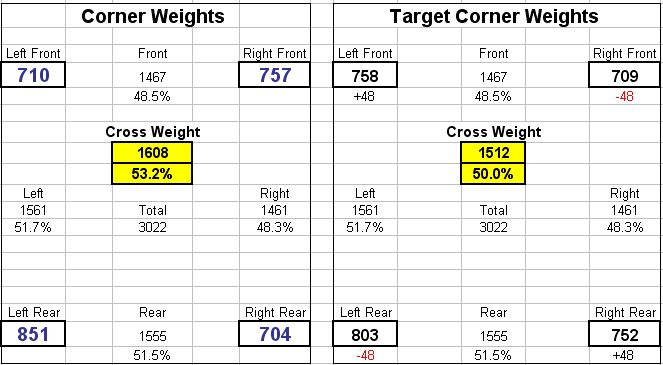
I was really surprised to see how far off the stock S2000 was from a balanced Cross Weight. With the stock setup the car should have more grip in left hand turns than in right turns.
Recommended Reading
You need a nice, flat and level surface for the scales. I highly recommend using a laser level to confirm the 4 scales are level to one another. Even 1/8 inch difference will make a difference, especially if you have stiff springs on your coil overs. I used a laser level to project a horizontal line above the scales and then stood on each scale and placed a ruler on the top of the scale to take a reading. All 4 scales must be within 1/8 of an inch. You're better off not corner balancing the car than doing it on an unlevel surface. I used cheap linoleum tiles (49 cents each at Home Depot) to shim two of my scales to get them exactly level. I put the tiles on top of the scales. The tiles I used are 0.045" thick. I needed 3 tiles on the left front and 1 on the left rear scales.
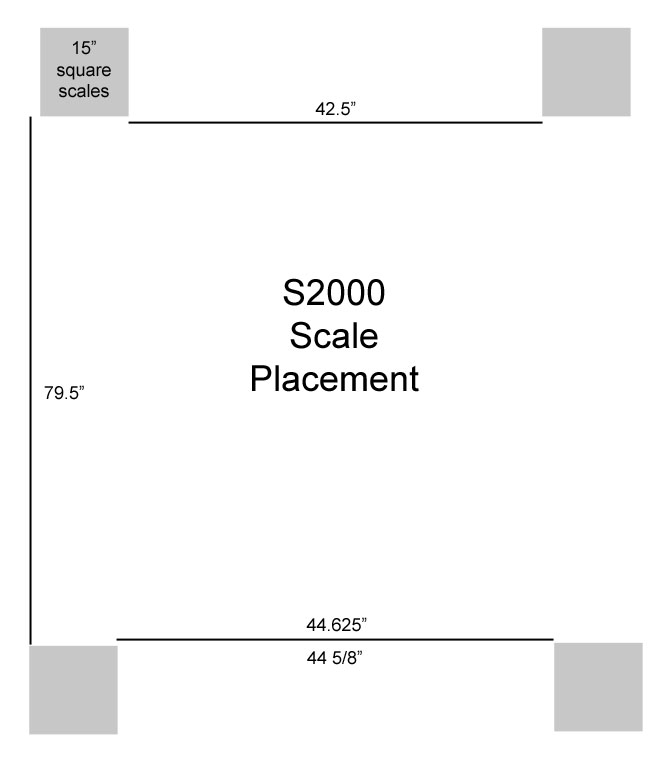
My track width with CE28 17" x 9" wheels and measured between the outside bottom rim edge is 67.75" front and 69.875" rear. The rear is 2.125" wider. Measuring from the center of the tires I got 57.5" front and 59.625" rear. All of these measurements are widened by the camber angle of the wheels (-3.5 front, -3 rear).
I recommend you start with your car at your desired ride height and the shocks set to the exact same spring perch height left to right. Since the front and rear shocks are of different lengths you shouldn't match the front to the rear but your left front and right front shocks should have their spring perches in the same spot and your left rear and right rear should be the same.
Check your tire pressure and bump it up to the hot pressure you run on the track. I use 2x6 wood planks as ramps to drive the car onto the front ramps then jack up the rear and lower it onto the rear scales. It's difficult to position all 4 scales so you can just drive up on all of them at the same time.
Before putting your car on the scales you need to power up the scales and zero them with no weight on them. Also double check that the scales are connected properly--you can really screw up your suspension settings if you have any of the scales connected improperly (i.e. front left and right swapped).
If you don't have adjustable end links on your anti-roll bars then leave them connected. If you do have adjustable end links then disconnect them for the corner balance. Once the corner balance is complete put someone in the driver seat and reconnect them so there's no preload on them.
Once you get the car up on the scales you'll need to roll the car back and forth a few inches several times, being careful not to push it off the scales, to unbind the suspension (as the car is lowered onto the scales the tires will need to spread out to unbind the suspension). You will have to repeat this every time you lower the car onto the scales. You can also put two linoleum tiles with salt between them on your scales. The salt acts as tiny ball bearings and will allow the tires to spread when the car is lowered onto the scales. I use this technique and it works well. You can also use this technique when adjusting your alignment and turning the front wheels to measure caster.
With my KWV3 shocks I had to remove the wheel to adjust the spring perch so I left my jacks in place between lifts and only put two lug nuts on each wheel to speed shock adjustment.
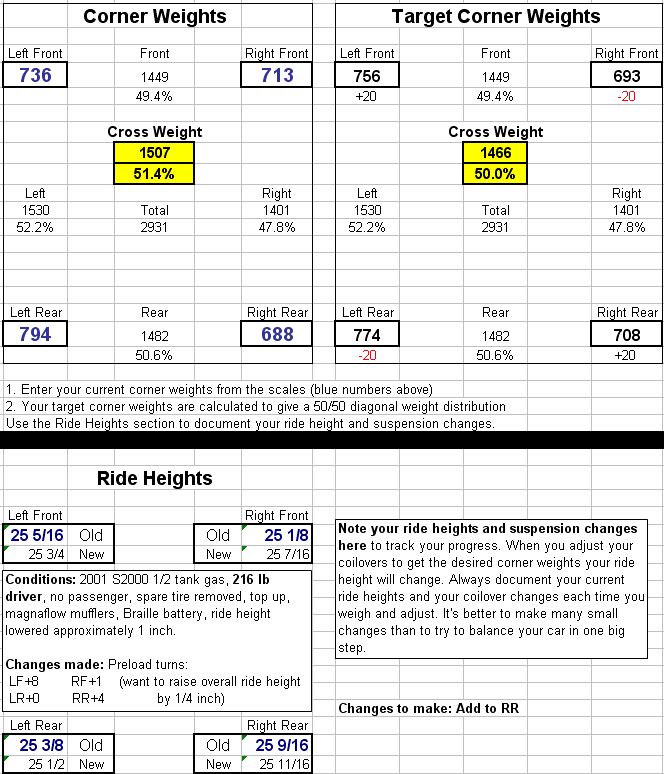
The first spreadsheet below is what I started with. This is my 2001 S2000 with 1/2 tank gas, 216 lb driver, no passenger, spare tire removed, soft top up, Magnaflow mufflers (-20lbs), Braille battery (-15lbs), ride height lowered approximately 1 inch, all 4 Bilstein PSS9 coil over shocks set to same length left to right (front to rear will be different).
I put the car on the scales and input the four corner weights into the spreadsheet (the blue numbers in the left "Corner Weights" section). You can see in the "Target Corner Weights" section that the Left Front and Right Rear need 51 lbs of additional weight to balance the car. I decided to try 5 turns total of spring perch movement to balance the car.
You can make this adjustment in several ways:
If you don't want to change the ride height of the car then split the adjustment between all four wheels--extend the LF and RR 1 1/4 turns each and retract the RF (Right Front) and LR 1 1/4 turns each.
If you want to raise the ride height then extend both LF and RR coil overs 2 1/2 turns.
If you want to lower the ride height then retract both RF and LR coil overs 2 1/2 turns.
If you want to raise the front of the car then extend only the LF coil over 5 turns.
If you want to lower the front of the car then retract only the RF coil over 5 turns.
If you want to raise the rear of the car then extend the RR coil over 5 turns.
If you want to lower the rear of the car then retract the LR coil over 5 turns.
This was my first adjustment: Four turns of positive coil over preload (extending the shock) to the Left Front, and one positive turn to the Right Front. I added the turn to the RF simply to raise the ride height of the front of the car. I started with the Left Front because I wanted to raise the ride height of the car by about 1/4 inch so most of my adjustments were positive--they raised the car. If you don't want to change your ride height then a more balanced approach would be appropriate such as making small adjustments to all 4 wheels--add preload to LF and RR (extend coil over), remove preload to RF and LR (shorten the coil over).
Its important to measure and note your ride heights after every change. I saved a copy of the spreadsheet for each adjustment so I have a history of each adjustment. You can see on the right side of the spreadsheet's "Target Corner Weights" section that after this adjustment we still need to add 39lbs to the Left Front and Right Rear.
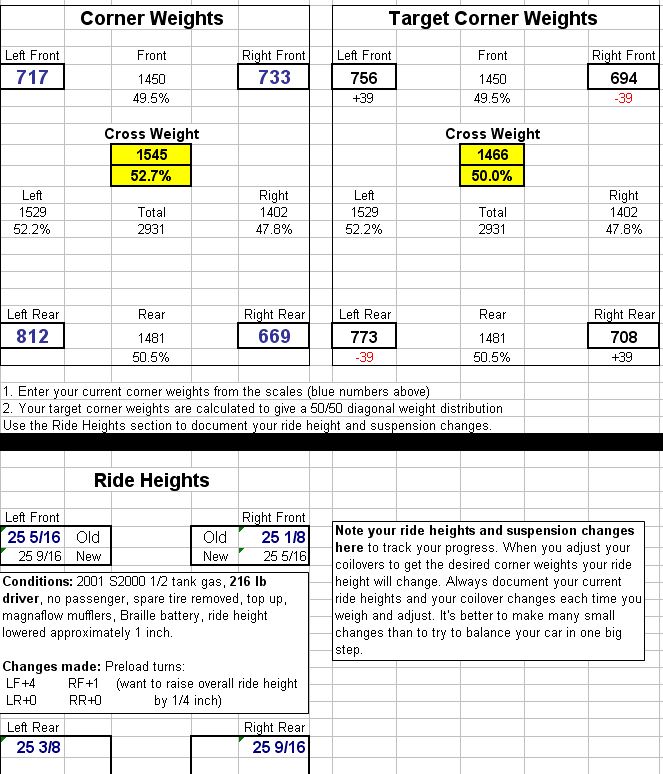
I still needed more weight on the Left Front and Right Rear so I added + 4 turns to the Right Rear:
I still needed more weight on the LF and RR so I added +4 to the LF:
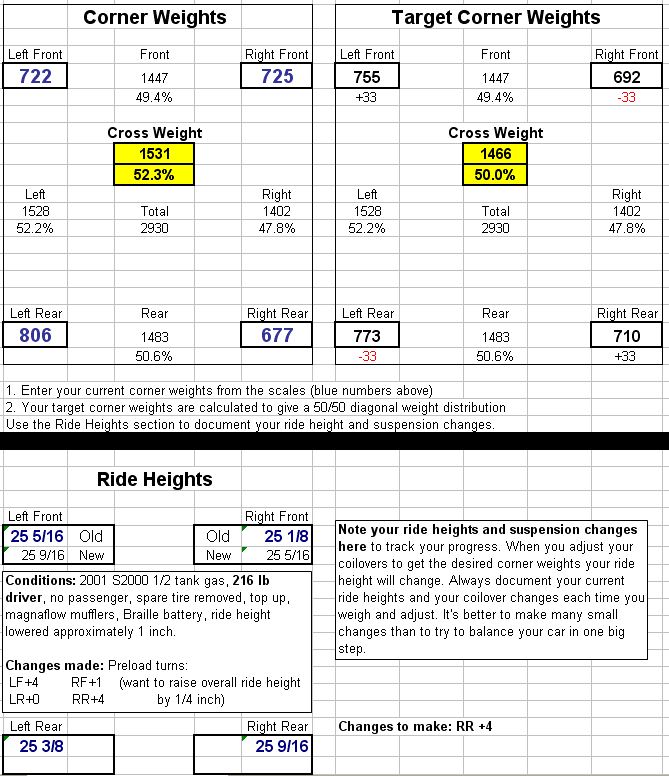
I still needed more so I added +2 to the RR and drove the car for a week to let the suspension settle:
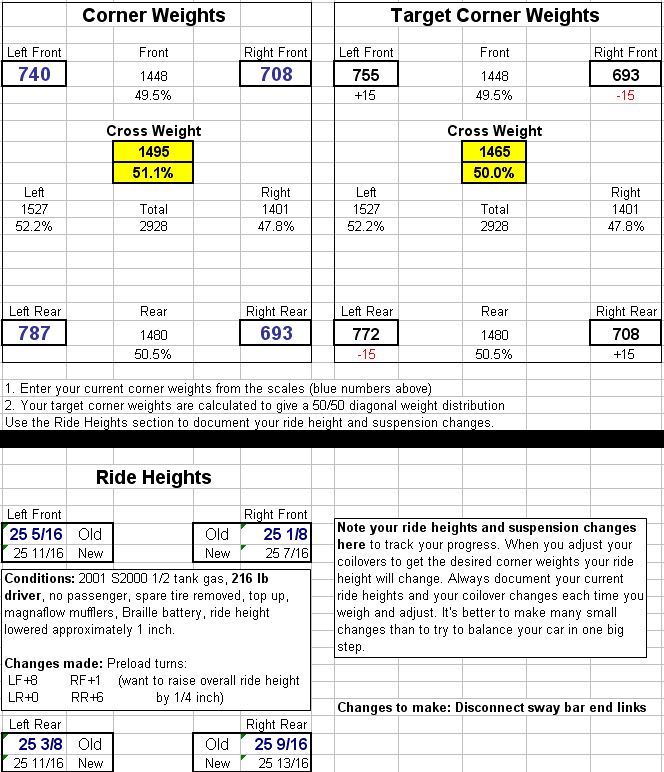
I decided to disconnect the front and rear sway bars to see what difference that made. It changed the wheel weights by 10 pounds at each wheel:

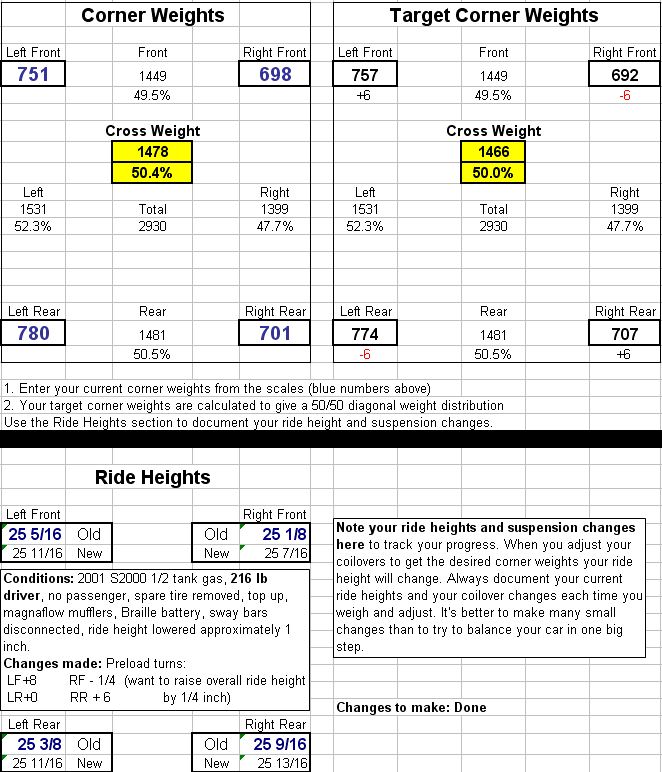
I finally went too far when I took two turns off the Right Front (went from +1 overall to -1):

I put + 3/4 of a turn back on the Right Front and ended up very close to ideal. I installed McMaster-Carr adjustable end links for the front and rear sway bars and installed them with my girl friend sitting in the driver's seat to load the suspension. Adjustable end links are more important for cars with upgraded (stiffer) sway bars because they can exert a lot of force to the suspension.
Here's my final results:
Here's the car with the same settings but empty:
![]()
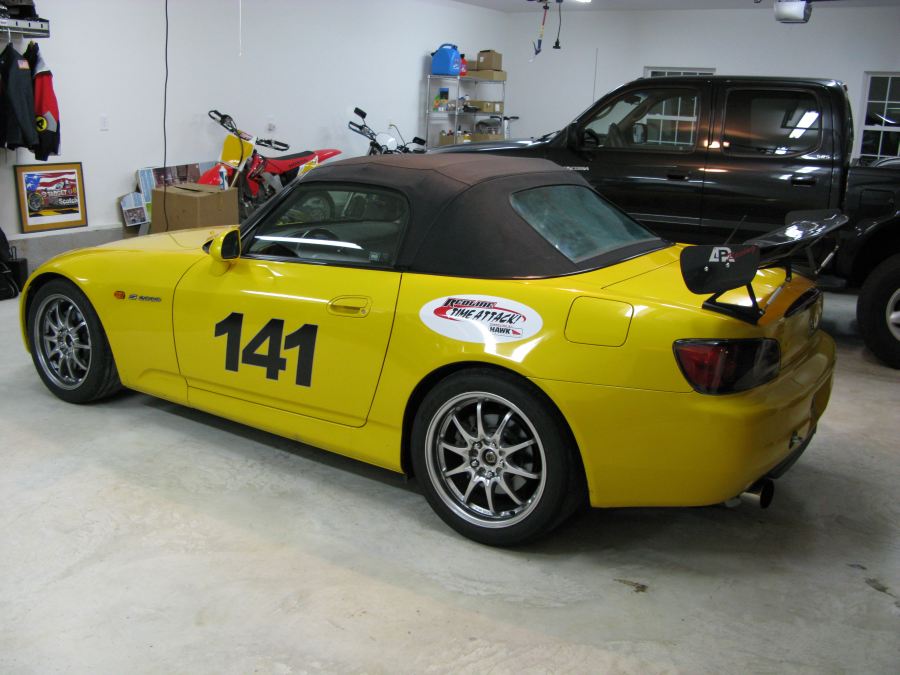
I took the newly corner balanced S2000 to a Summit Point Raceway Friday at The Track (FATT) event and it handled superbly. Corner weighting your car is hard work but it makes all that high dollar suspension work together the way its supposed to.
In April 2013 I corner balanced the S for the first time in two years. Since I went to 800 front and 700lb rear springs over the winter I knew I needed to put the car on the scales. Don't be in a hurry to set ride height and corner balance new springs. I was surprised how much these high rate springs settled over the first 3 months. Speaking of springs, it's a good idea to measure your new springs and put the longest spring in the left front--this is especially true if you don't have adjustable spring perches.
I painstakingly leveled the scales and marked their locations on my garage floor for future reference. I needed 3 linoleum tiles (0.045" thick tiles) on the left front and 1 on the left rear to level the scales. I tried the "two linoleum tiles & salt" technique to allow the tires to slide on the scales so the suspension can settle and unbind. I still rolled the car back and forth a few inches several times on the scales before each reading though just for good measure (literally). The tiles & salt seemed to help because the weight never shifted by more than 1 pound after rolling the car on the scales.
Just to confirm the theory I checked the corner weights with and without me in the driver seat and yup, the theory is right--the cross weight does not change when a driver is added.
The following weights are with the front Comptech adjustable and stock rear sway bars connected. I gave up on running adjustable end links on the sway bars because they fail so often and the bars only added a couple of pounds of preload to the scale weights.
I started out with the KW spring perches set exactly the same left to right (measured with a digital caliper) and my ride height was pretty close to where I wanted it. My starting cross weight was 50.6%, I was off 7lbs per wheel.
I lowered the right front spring perch 1 full turn (equates to about 1/8" of wheel movement) to reduce the weight on the right front and left rear and tried again but I still needed more weight off the right front and left rear.
I lowered the left rear spring perch 1 1/4 turn and put it on the scales. I overshot by a little so I raised the left rear spring perch by 1/2 turn and ended up with a perfect 50.0% cross weight. The total spring perch adjustments were 1 turn to the right front and 3/4 turn to the left rear.
Here's the ending corner weights with no driver and 9/10 fuel:

Rob Robinette