RR763 Blackvibe Guitar Tube Amp
By Rob Robinette
Have comments or corrections? Email rob at: robinette at comcast dot net
Design Philosophy
The 1963 Fender AB763 blackface Vibroverb is my favorite amp of all time. It will be forever linked to Stevie Ray Vaughan's amazing tone but building a blackface amplifier with reverb and tremolo is a daunting task, even for an experienced amp builder. Troubleshooting a new build AB763 can be extremely difficult and the bane of hobby builders. I designed the RR763 Blackvibe amp for builders who don't want to deal with the complexity of the AB763 circuit's reverb, tremolo and dual channels but still want its authentic Normal channel tone. Throw a Strymon Flint reverb & tremolo pedal in front of the Blackvibe and you have a Vibroverb Vibrato channel too.
Removing the reverb, tremolo and Vibrato Channel drops the preamp tube count to only two but the tone stays 100% Normal Channel Vibroverb. The rest of the amp stays true to the Vibroverb. This amp uses authentic Vibroverb power and output transformers and choke so voltage levels and power output are all blackface Vibroverb. The Blackvibe can be built as any of the AB763 blackface amps, not just the Vibroverb. Take a look at the AB763 blackface model differences page to see what components to change to create your desired AB763 amp.
Here's a SoundCloud sound clip of a Blackvibe 6V6 in action.
Note: All of my amp designs, Blackvibe, JCM800 Micro, Bassman Micro, RobRob Deluxe etc., are released under the Open Source Hardware Association license. You may build, modify and sell my designs without limit. All I ask is that for amps you sell you include, "Design by RobRobinette.com" on your webpage and advertising.
AB763 Blackface With Reverb But Tremolo Deleted
AB763 Blackface Single Channel With Reverb But Tremolo Deleted
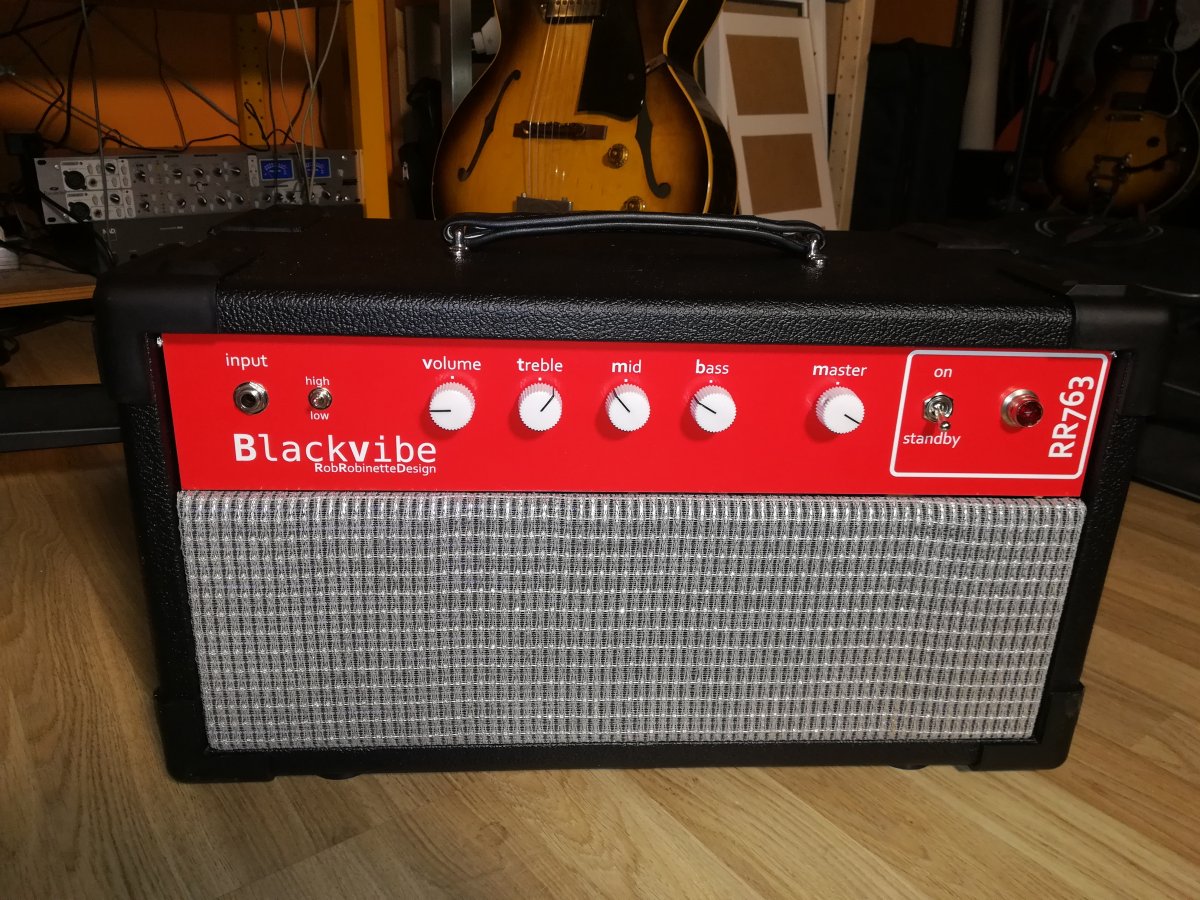
Blackvibe
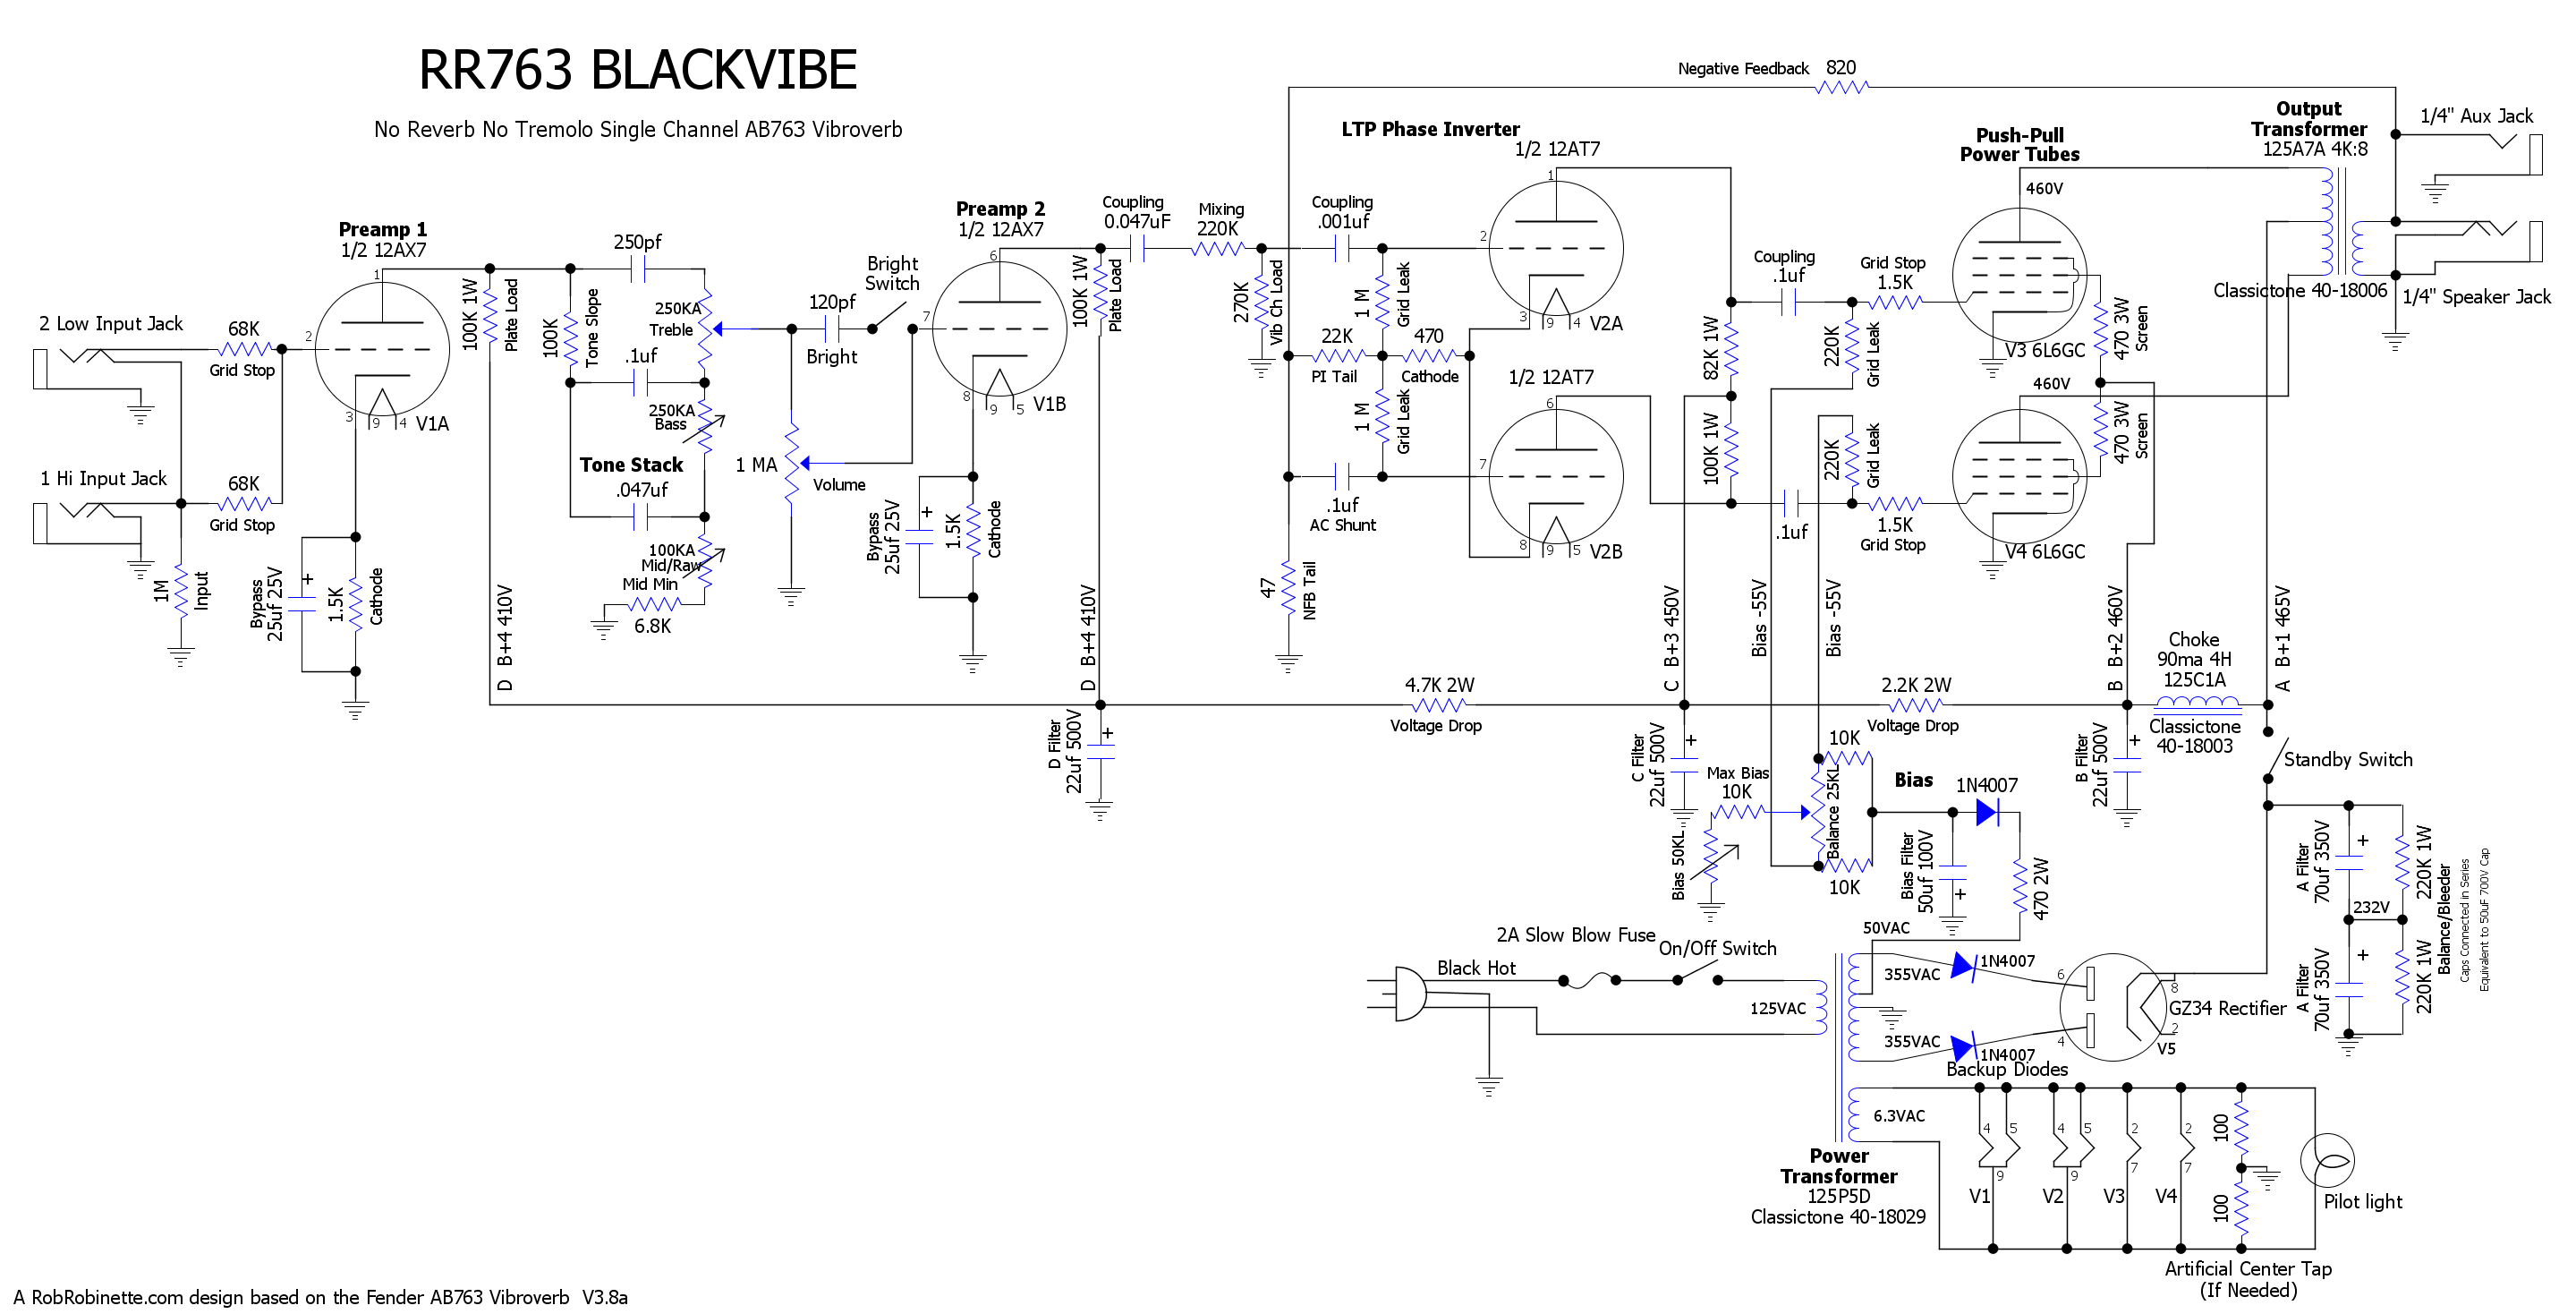
It's very much a single channel Vibroverb with standard 6L6GC power tubes. Download the schematic pdf here and the DIYLC file here.
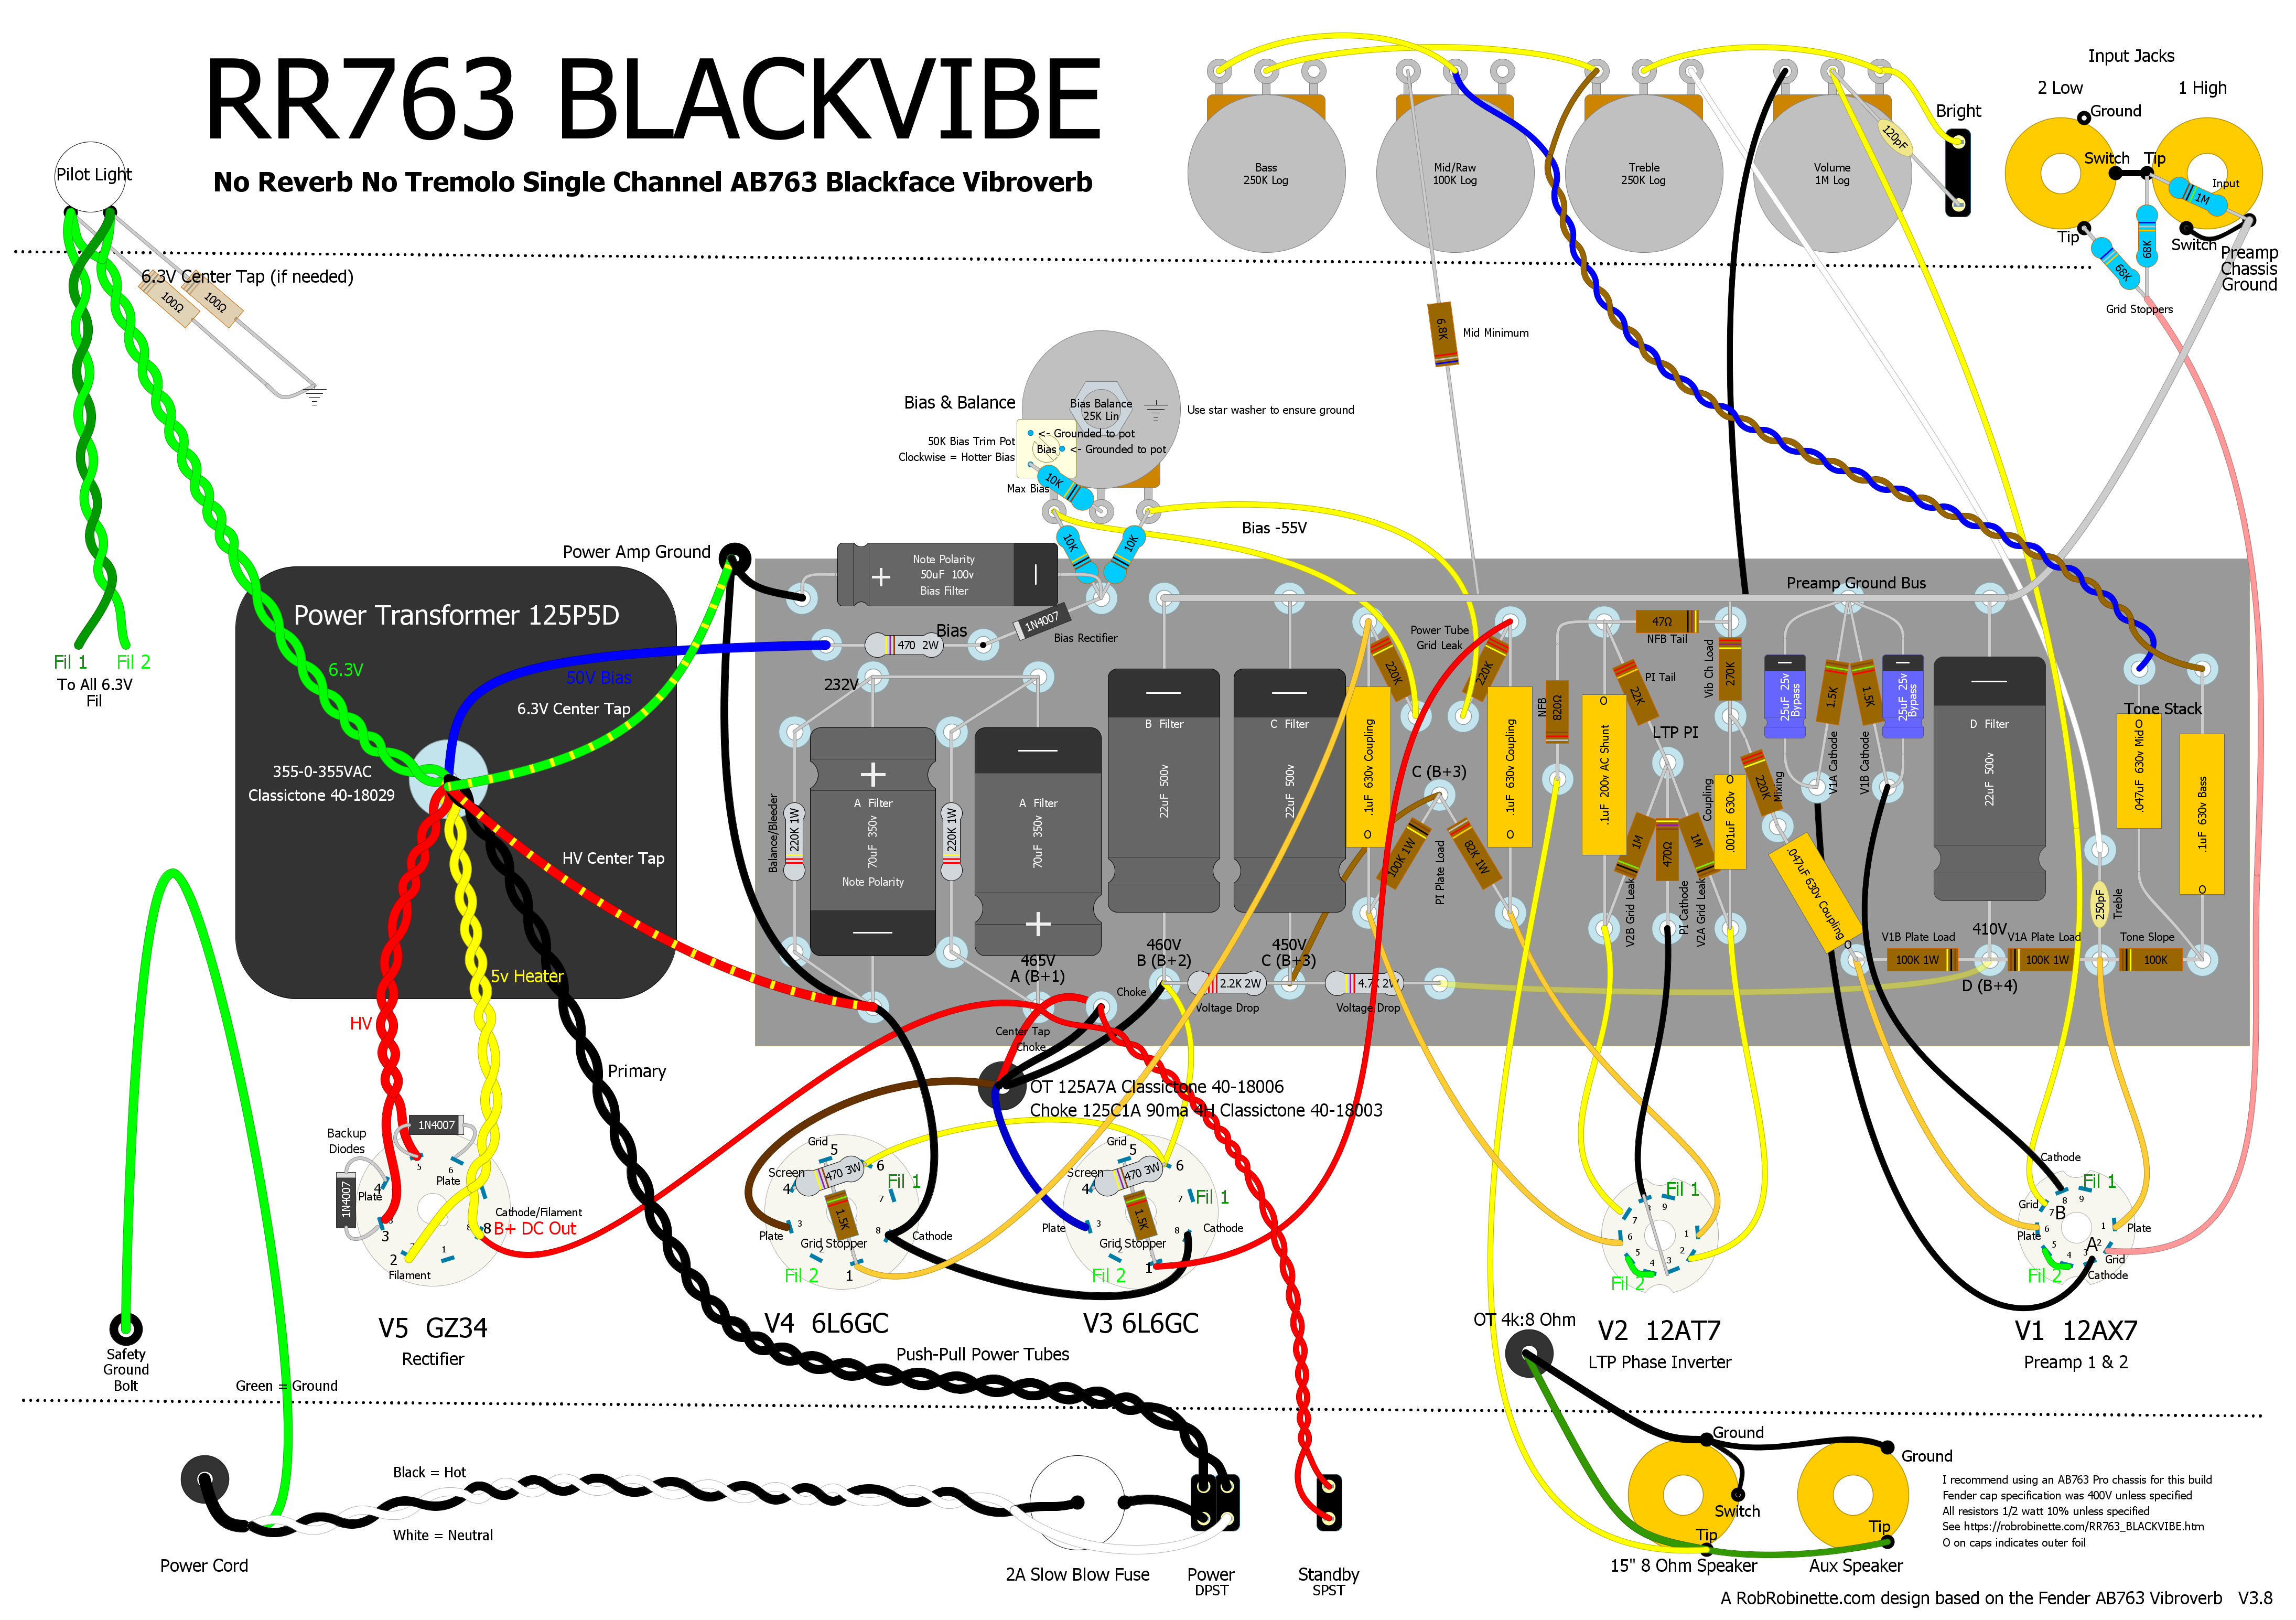
It's a very simple amp compared to the Vibroverb below. Period correct carbon composition (carbon comp) resistors shown but consider using all metal film resistors to minimize hiss. Download the layout pdf here, the Blackvibe DIYLC Hoffman board file here and the full DIYLC file here.
Blackvibe vs True Blackface Tone
Johannes Specht from Vienna, Austria built a Blackvibe 6V6 and compared it to his original 1966 blackface Deluxe Reverb. For a direct comparison between the two, Johannes recorded a Strat into a TC Electronic Looper to get exactly the same signal into both amps. He also used the same cab with a Weber 12F150 speaker for both amps and recorded mostly dry with just a bit of dirt and reverb/delay in post production.
Here's his 66 Deluxe Reverb Normal channel mp3 file
Here's the Blackvibe mp3
Here's a very high quality Blackvibe 6L6 soundcloud recording with clean and distorted playing.
You be the judge.
Iain Moncrieff's Blackvibe
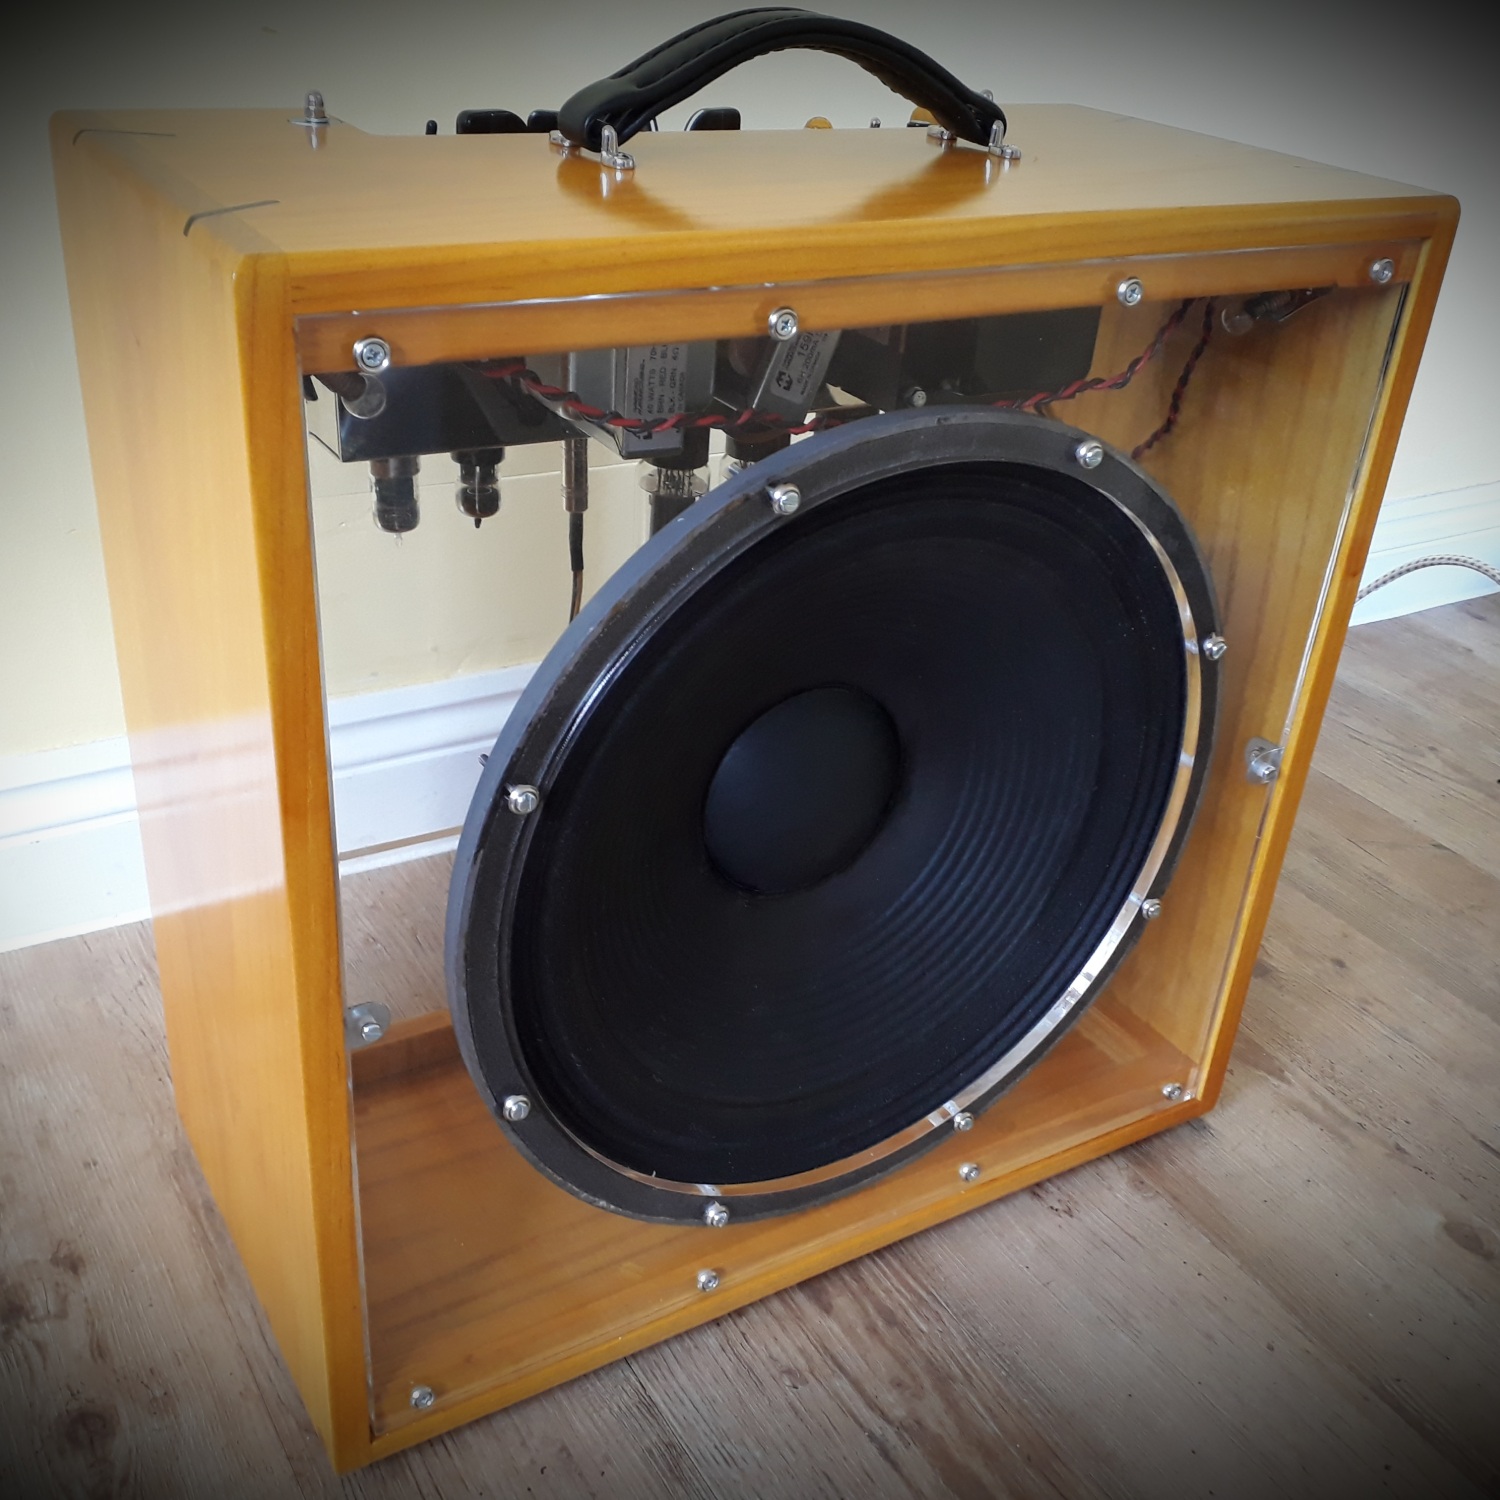
The speaker is a 15" JBL D140. Build by Iain Moncrieff.

The amp was hand made by Iain, from the turret board to the ash/ebony cab and nitro finish. The chassis is a drilled out 5F2 Princeton chassis (it was a tight squeeze). He used a tweed Bassman power transformer and a 9 Henry choke. The output transformer is a standard Hammond Vibroverb.
Circuit Tweaks
The AB763 Vibroverb's reverb, tremolo and Vibrato Channel were deleted.
The Vibroverb has no Mid tone control on either channel but I added one to the Blackvibe to enhance tone shaping. I used a 100KA pot for the Mid/Raw control versus the AB763 standard 10KA so we can dial out some mid scoop and boost preamp gain. This added gain is enough to surpass the Vibroverb's Vibrato Channel preamp gain. With the Mid/Raw control at full "down" you get the Vibroverb's standard 6.8k of mid resistance so keep the Mid/Raw control full down for true Vibroverb tone but turn the control up and mid frequencies and gain are added. Near the end of the knob turn we're approaching tweed territory.
I deleted the separate bias board and moved the components to the main circuit board. I also modified the bias circuit to add a Balance pot and increase the bias range. The Balance pot allows us to set the same bias current in both power tubes even without a matched pair. It also allows us to dial in some intentional mismatch to add sweet sounding even order harmonic distortion to thicken up the clean tone. The bias circuit 50k trim pot can bias 6L6GC tubes hot and yet can still cool the bias for a pair of JJ6V6 too. See Adjustable Balanced Bias for details. If you want to stick with the "normal" AB763 bias circuit just reference the Vibroverb layout at the bottom of this page.
The filter cap "doghouse" has been eliminated by moving the filter caps to the main circuit board. The deletion of the reverb and tremolo freed up lots of circuit board real estate.
Skip Johnson's Blackvibe
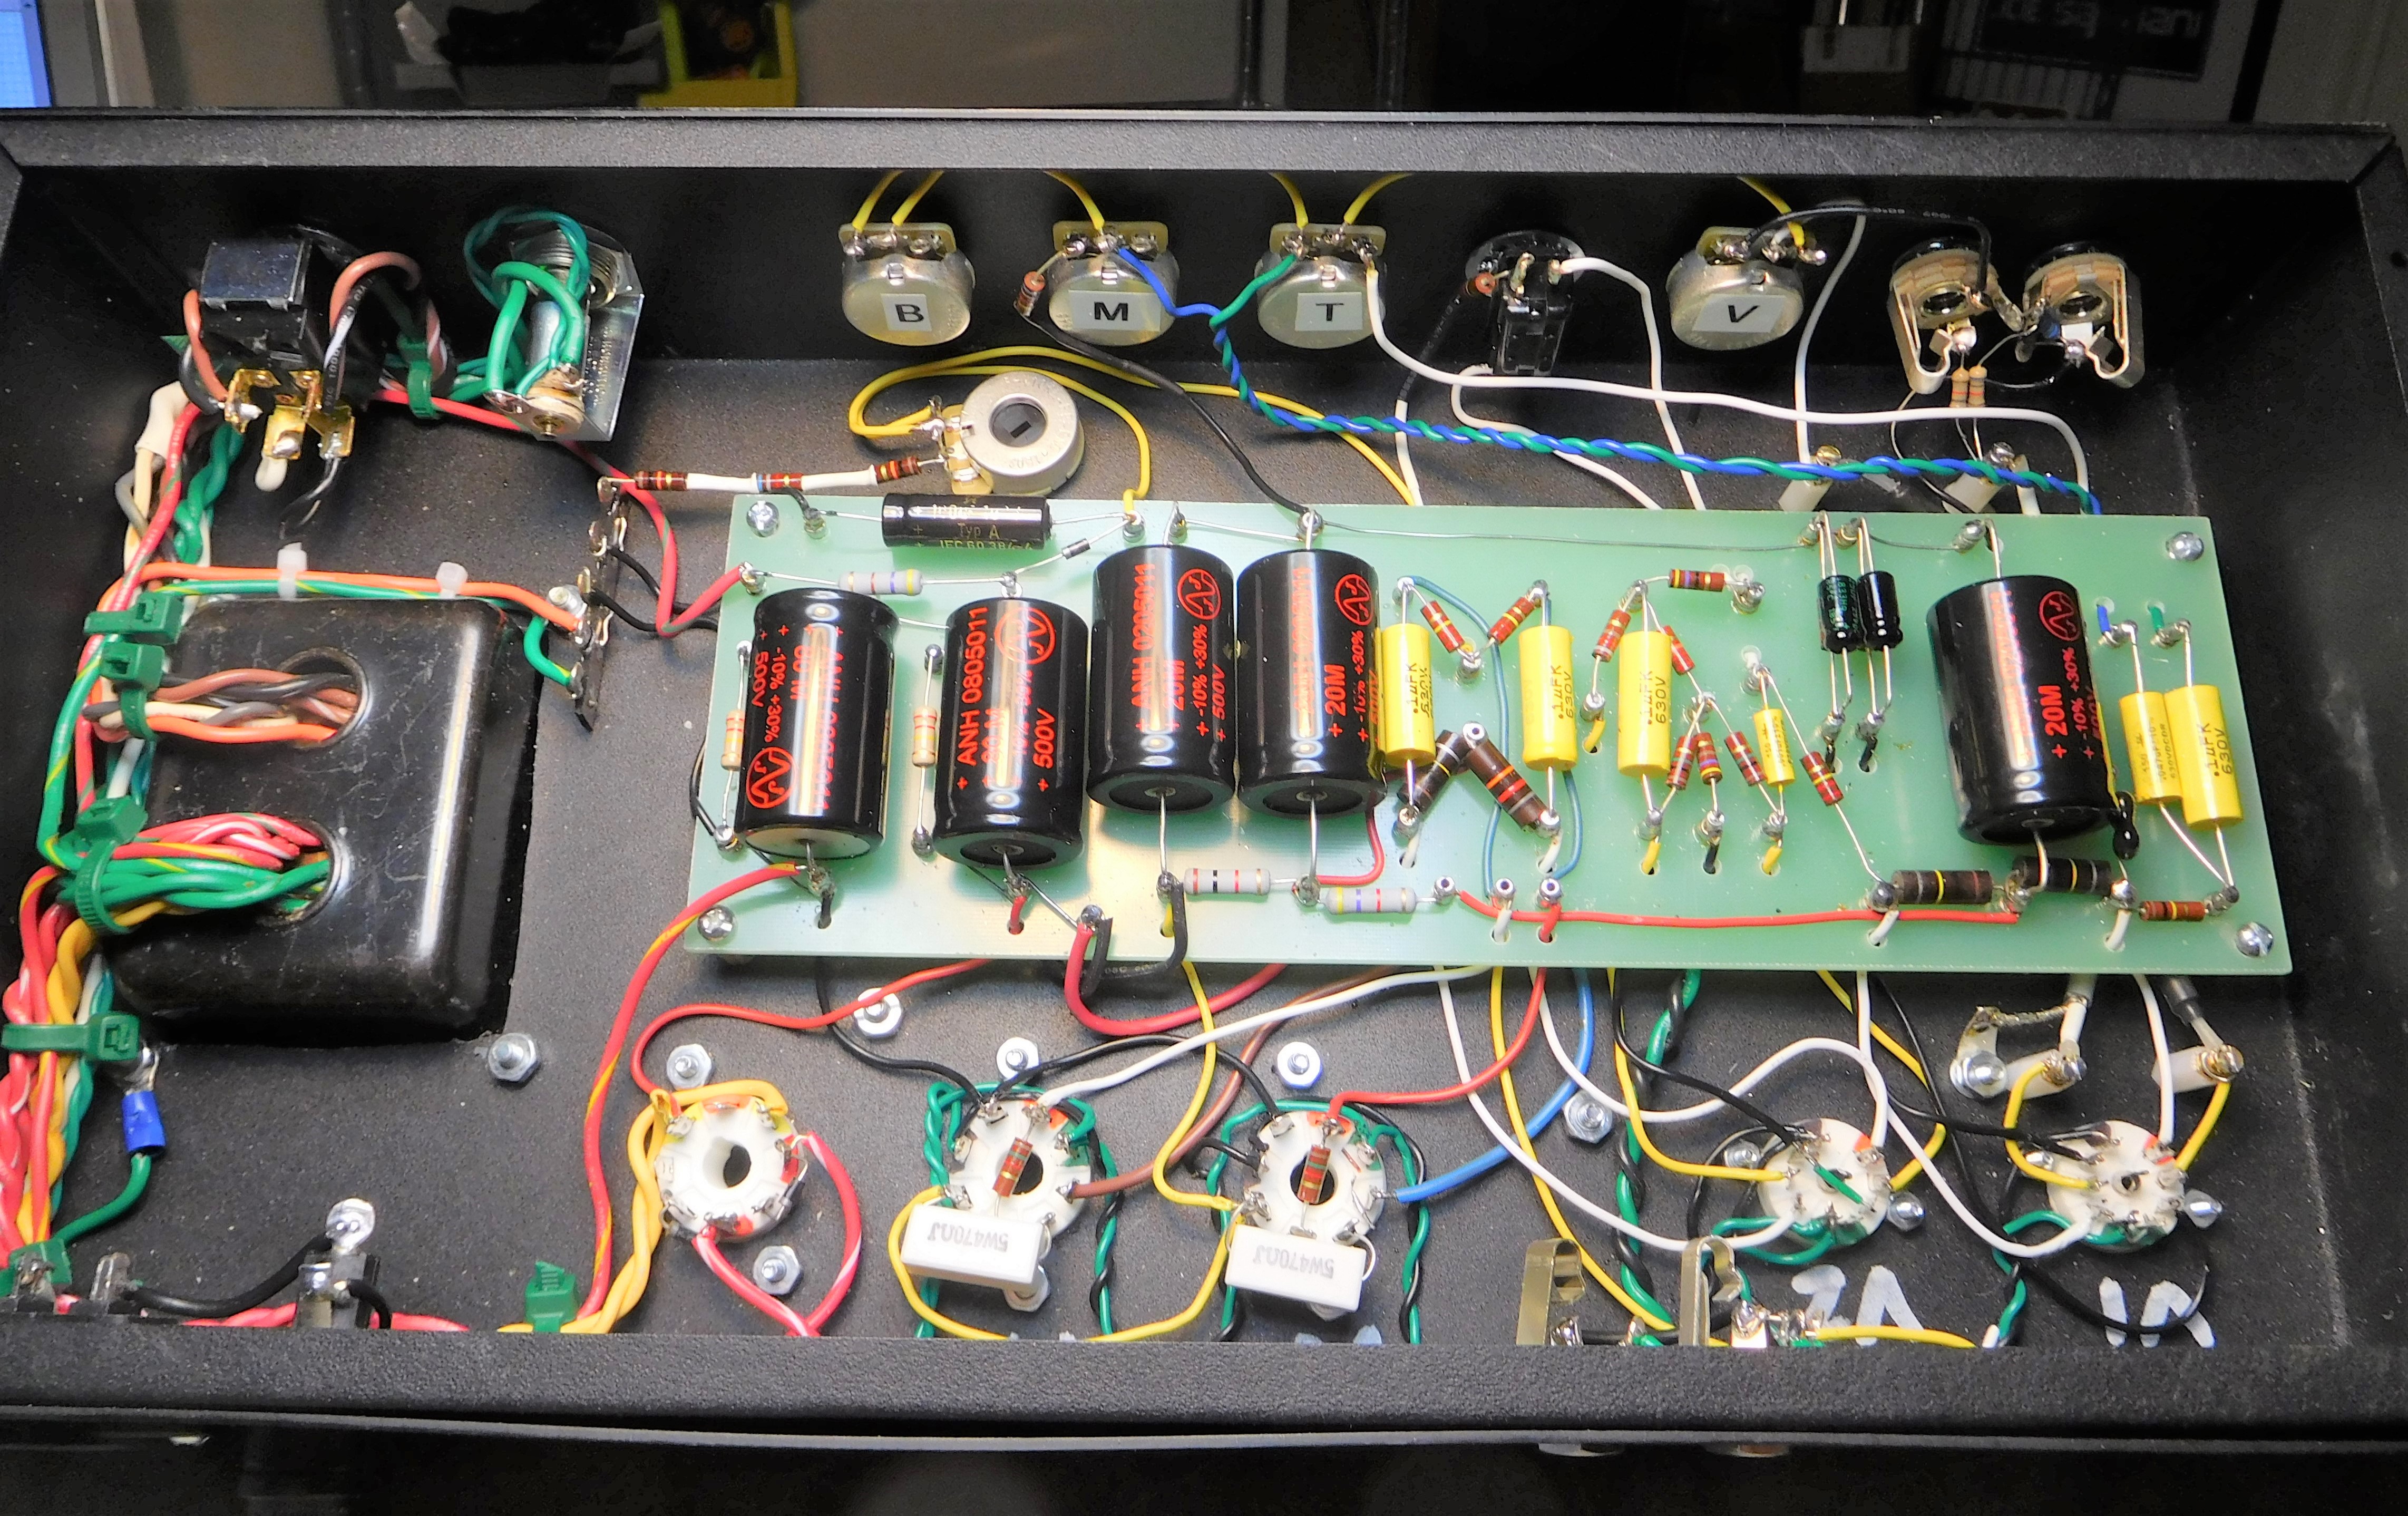
Photo and chassis by Skip Johnson.
A Fender style dual ground bus is used. The power tube screens, phase inverter and preamp triodes are grounded to the chassis at the input jacks. You must use a star washer on the input jack with the chassis ground to ensure a solid chassis ground connection. The power tubes are grounded to the chassis at the "Power Amp Ground" located near the power transformer. The 6.3v center tap is also grounded there. The transformer high voltage tap should be soldered to the first filter cap pair's negative terminal to minimize hum as shown in the layout above. The bias circuit is grounded to the Bias Balance pot so use a star washer on the pot for a solid ground connection.
Although the Blackvibe is a single channel amp I kept the AB763 220k channel mixing resistor because it has an effect on the phase inverter's overdrive tone and preamp gain. When testing the Blackvibe I realized it had quite a bit more preamp gain than my blackface Band-Master and blackfaced Bandmaster Reberb normal channels. I soon realized I had underestimated the load presented to the normal channel by the vibrato channel. I added a 270k "Vibrato Channel Load" resistor to take the place of the Vibrato Channel's 220k mixing resistor and 50k Tremolo Intensity pot to ground (the Tremolo pot is also in parallel with a 100K plate load resistor to "AC ground"). The Blackvibe's 220k Mixing and 270k Vibrato Channel Load resistors form a voltage divider which attenuates the guitar signal by 45% just like in the two channel AB763. I did this to recreate the most authentic AB763 blackface normal channel tone but you can delete the 220k mixing resistor and 270k Vibrato Channel Load resistors to add preamp gain if you prefer. Placing the Vibrato Channel Load resistor on a switch will provide a nice "Preamp Boost" when the resistor is disconnected. We can also raise the value of the Vibrato Channel Load resistor to increase preamp gain. A 1M load resistor will only attenuate guitar signal by 18% compared to the 270k at 45%.
I added rectifier "backup diodes" to protect the amp from a rectifier tube short failure. The diodes also make life easier on the rectifier tube so it should last longer.
I increased the watt rating for many resistors to promote longevity and reduce speaker hiss.
The layout also shows the use of metal film resistors on the input jacks in an effort to reduce hiss. If you plan to use the amp in the studio consider using all metal film resistors to minimize hiss.
The build can be simplified by eliminating the Bright Switch, Bright Cap and Standby Switch, none of which are really needed.
Many AB763 blackface modifications apply to the Blackvibe.
I recommend using an AB763 Pro chassis for the build because the power transformer will drop right in and it has only 4 preamp socket holes versus 6 for the AB763 reverb amps. The Pro chassis also has a rectifier tube socket hole. A blackface Super Reverb chassis will also accept the Classictone 40-18029 power transformer. Mojotone lists their Super Reverb chassis at: (H) 1 ¾“ x (W) 23 ½“ x (D) 8 ¼“. You will have extra control panel and preamp tube holes though. A tweed Bassman 5F6A chassis will also work. The open tube socket holes will aid in chassis cooling or you can cover the tube socket holes with covers from Mojotone.com. A custom faceplate can cover the unused control holes. You might want to consider adding a presence control and master volume to fill those empty holes ;) See the Blackvibe Micro layout to see a simple but effective Trainwreck Type-3 master volume and presence control.
The Classictone AB763 Vibroverb transformers are as follows:
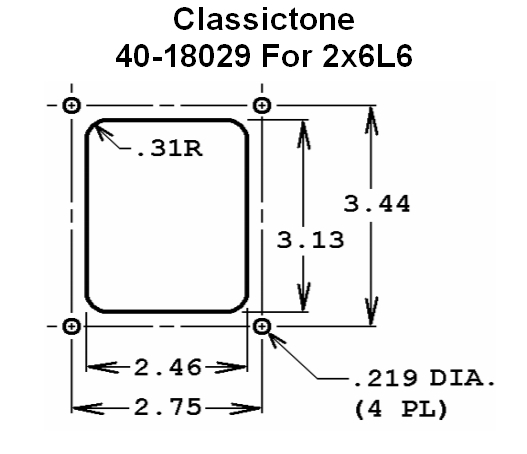
Power Transformer 40-18029 355-0-355V 200ma (use red high voltage leads for 710V)
This power transformer will drop into any of these chassis which can be used for a Blackvibe 6L6 chassis: Super, Tweed Super, Super Reverb, Super 5F4, Super 6G4, Super 6G4-A, Brownface Super, Blackface Super Reverb, Super Reverb AA763, Super Reverb AB763, Silverface Super Reverb, Super Reverb AB568, Super Reverb AA270, Pro, Tweed Pro, Blackface Pro, Pro AB763, Pro Reverb, Silverface Pro Reverb, Pro Reverb AB668, Pro Reverb AA1069, Pro Reverb AA270, Tweed Bandmaster, Bandmaster Reverb, Blackface Bandmaster Reverb, Bandmaster Reverb AA763, Silverface Bandmaster Reverb, Bandmaster Reverb AA1069, Bandmaster Reverb AA270, Tweed Bassman, Bassman 5F6, Bassman 5F6-A, Bassman Ten, Blackface Vibroverb, Vibroverb AB763, Vibroverb AA763
Chassis Cutout Specs
Output Transformer 40-18006 40 watts, 4k:8ohm
Choke 40-18003 4H 90ma
If you use a power transformer that does not include a 50 volt bias tap you can use this circuit to generate bias voltage from the power transformer high voltage tap.
You can substitute two common 80uF 500v caps for the first two filter caps (70uF 350v A Filter shown in layout).
You can purchase the Blackvibe eyelet board from HoffmanAmps.com. If you prefer a turret board you can upload the Blackvibe DIYLC Hoffman board file to HoffmanAmps.com and Doug will make a turret board.
There are many cab makers that can build you an AB763 Vibroverb cab that the Pro chassis will slide right into. I'm a big fan of Mergili cabs. Mojotone.com also sells excellent cabs.
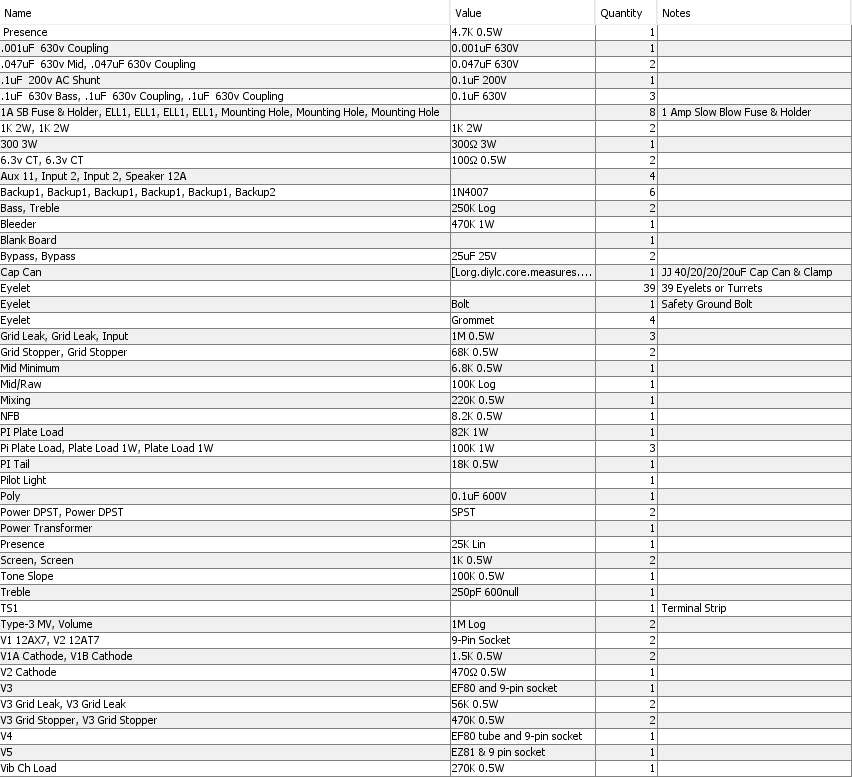
Bill of Materials for the Blackvibe
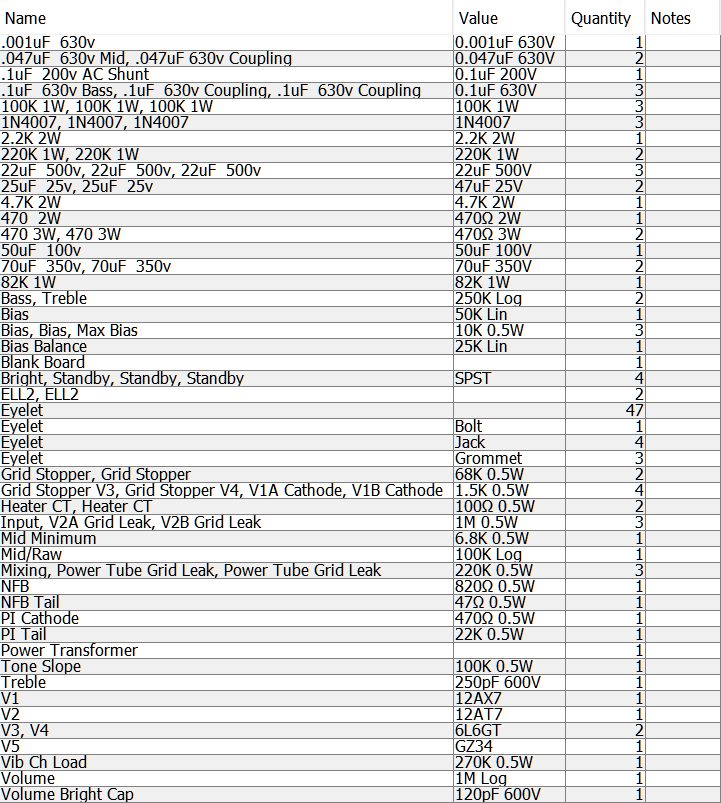
You'll also need a chassis, cab, speaker, power cord, wire, power and output transformers and choke.
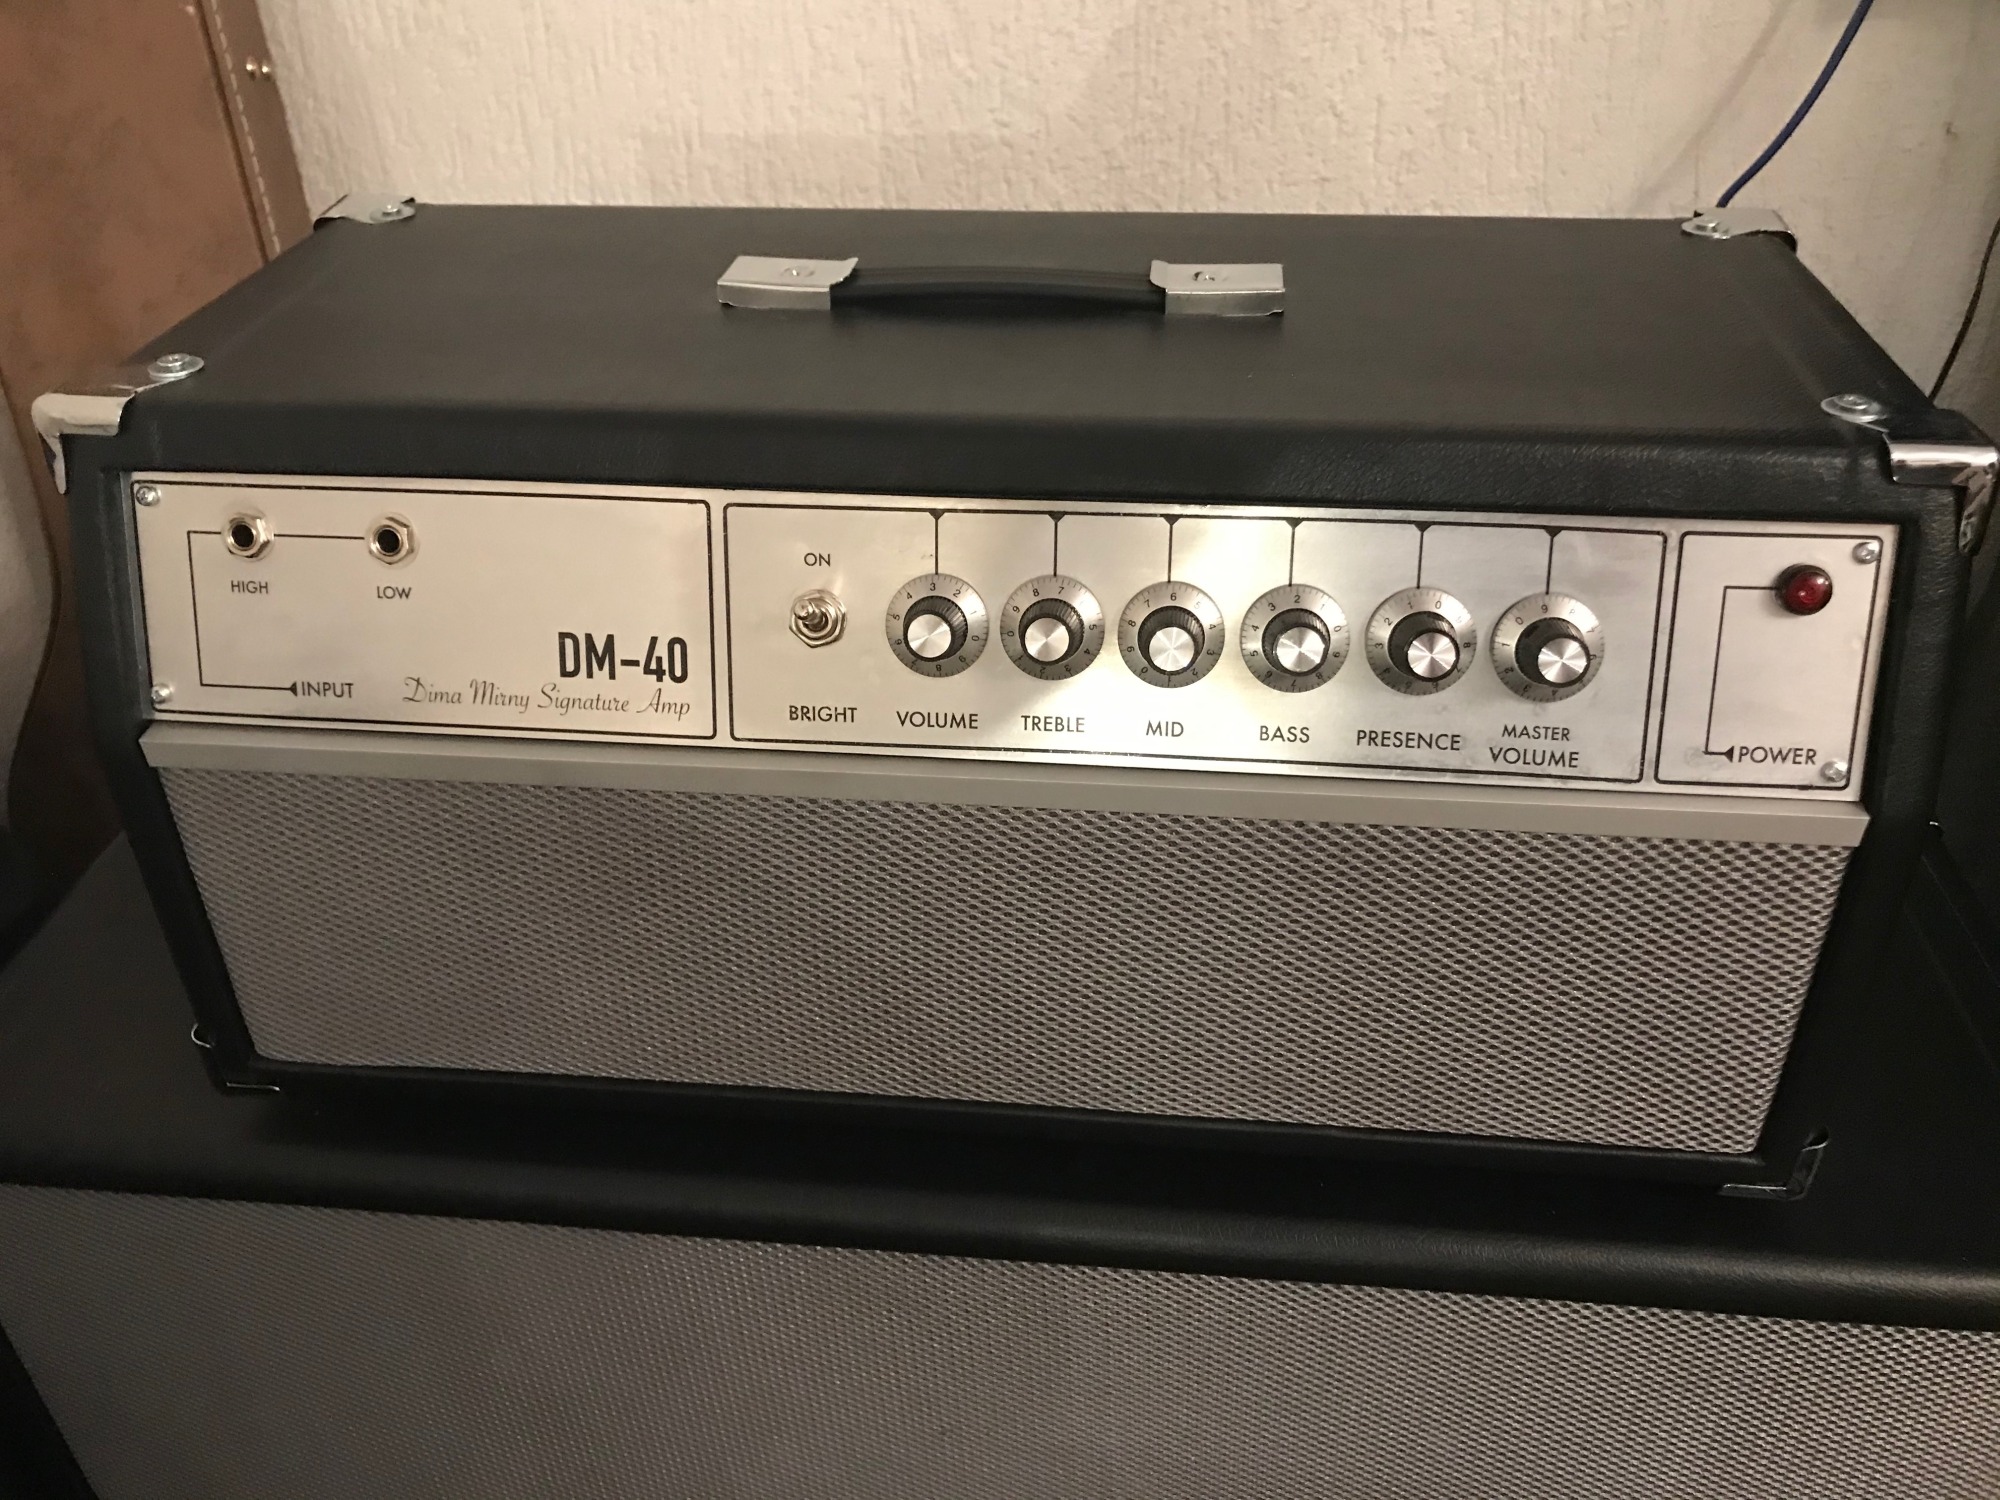
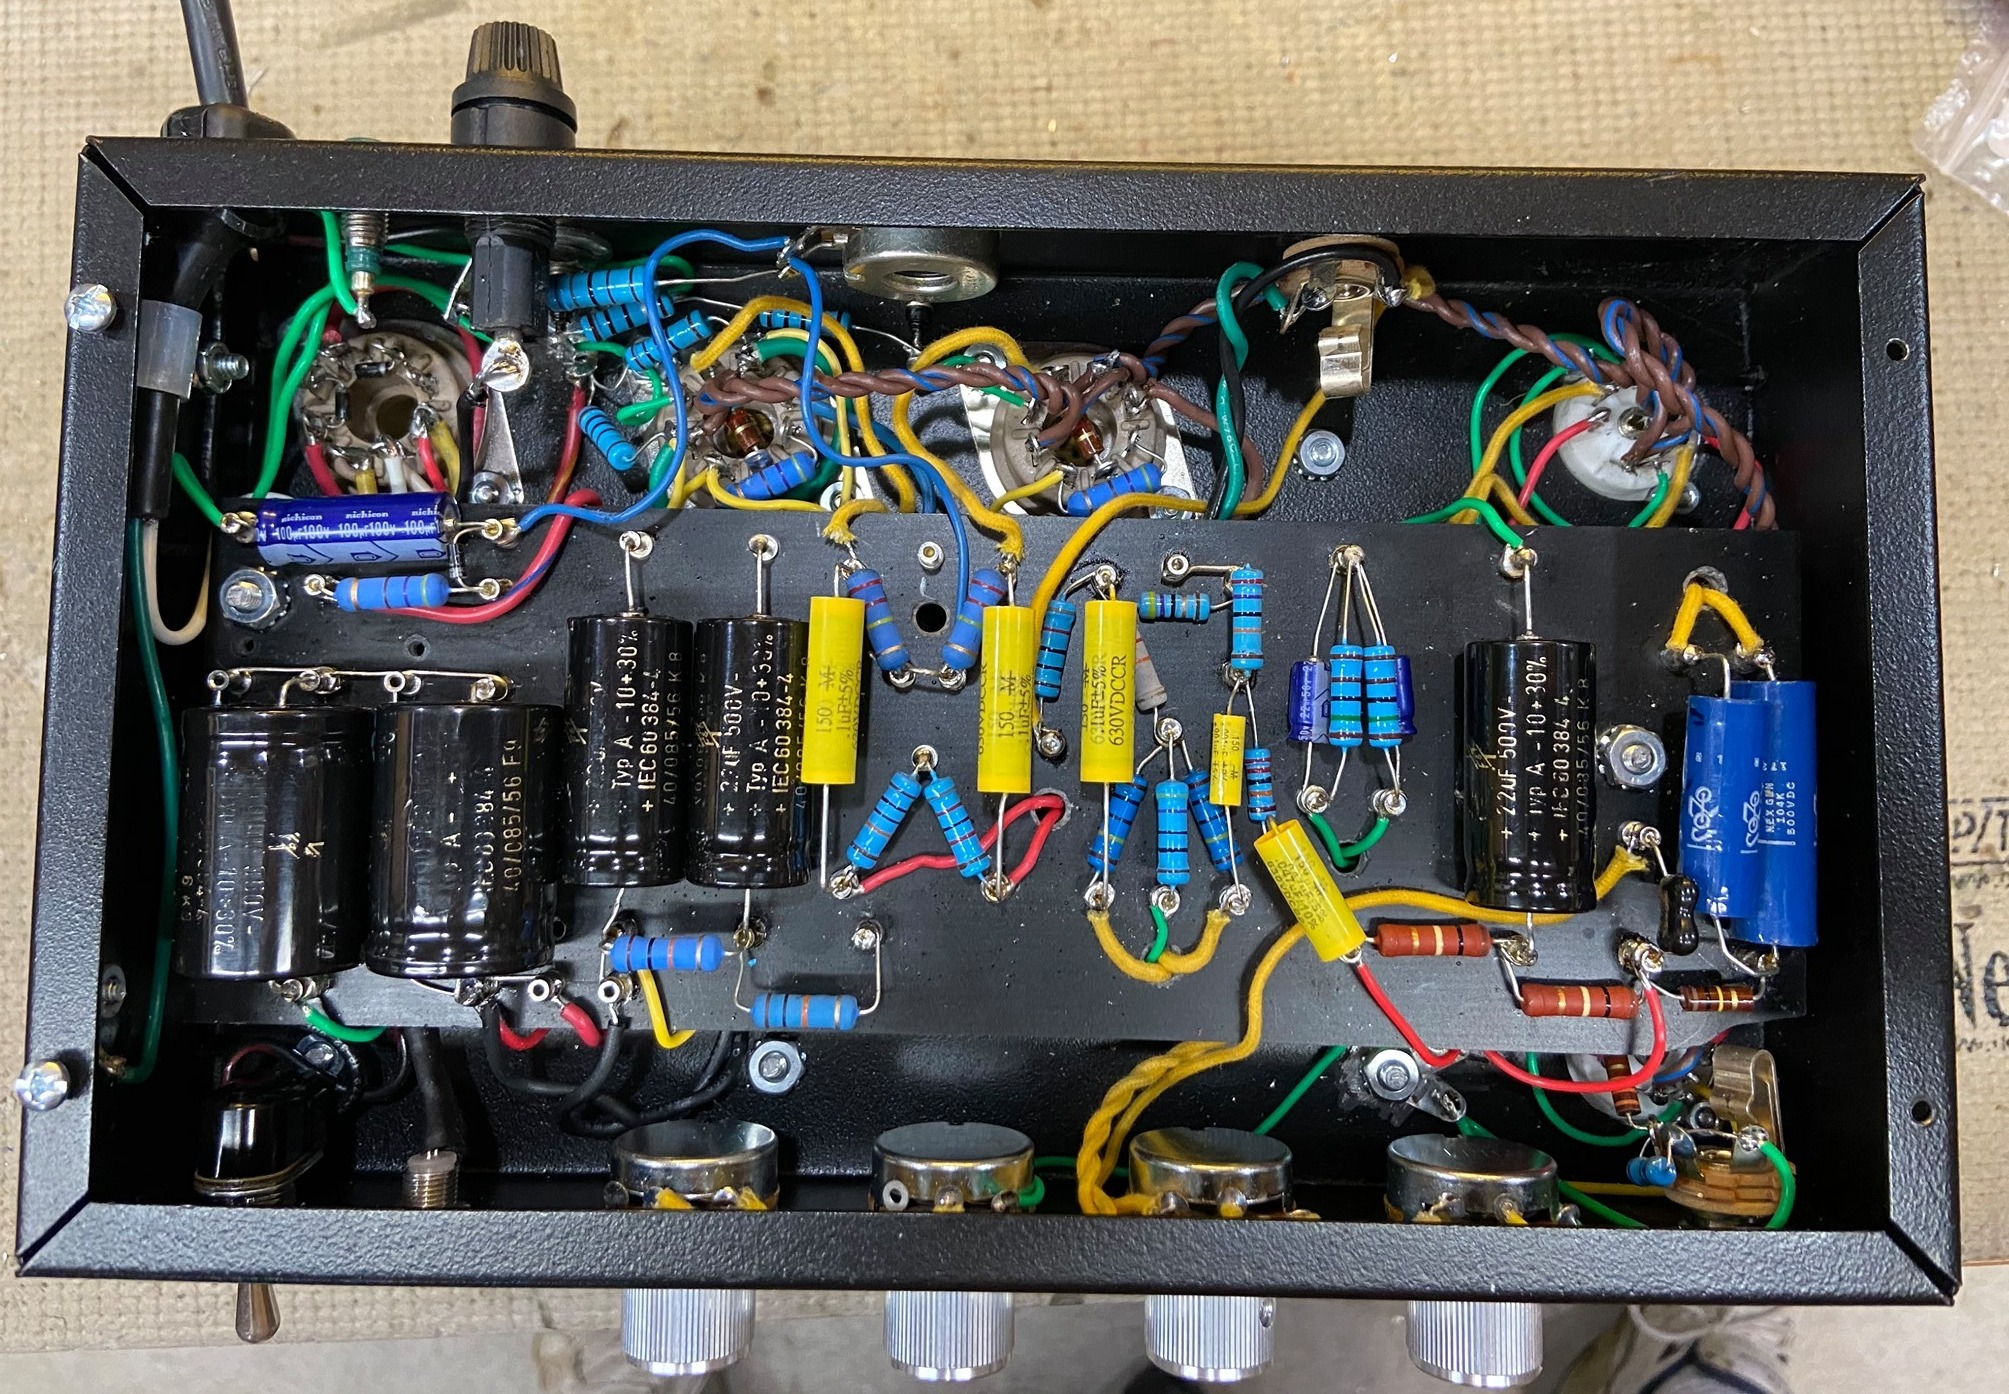
Valentin Mirnyi's Blackvibe 6L6
Speaker Recommendations
The Vibroverb came with a 15" speaker but you can build the Blackvibe with whatever speaker compliment you wish or simply build it as a head. The Classictone 40-18006 Vibroverb output transformer comes with 4, 8 and 16 ohm secondaries for very flexible speaker options.
Stevie Ray Vaughan used an EVM 15L with a distinct American voice. Unfortunately they are out of production but re-cones do show up on ebay occasionally.
Weber California 15 in ceramic 80 watt and AlNiCo is an excellent choice. The Weber California 15" was designed to mimic the JBL D130 which was a Fender Vibroverb OEM speaker (along with the Jensen C15n in the next paragraph). The 80 watt, 8 ohm ceramic version is much less expensive but louder than the AlNiCo version. I highly recommend the paper or "LargeH" dome option over the aluminum dome. The "LargeH" dome (large hole cloth) was designed to tame the brightest amps so use it if you prefer a darker tone. Remember to ask for the free speaker break-in service.
Jensen C15n AlNiCo is the modern equivalent of what the AB763 Vibroverb came with from the factory and it gets goods reviews. American voice and relatively inefficient so not as loud as other speakers.
Eminence legend 1518 is a popular 15" speaker. It has a loud, efficient and punchy American voice.
If you prefer 12" speakers my recommendation is a pair of Weber 12F150 ($117, 16 ohm, 50w, light dope, standard dust cap) which is their go-to blackface speaker.
My favorite 10" blackface speaker is the Weber 10F150 ($97, 16 ohm, 50 watt, light dope, standard dust cap). You'll need a pair of them to safely handle the amp's 40 watts of output. A less expensive choice is the very nice $47 Weber Ceramic Signature 10" but you'll need 4 of them to safely handle the Blackvibe's power.
Weber on speaker dope: Put simply: the higher gain you use, the more dope you should have on your speaker.
Mike Robbins Blackvibe
Blackvibe 6L6 By Dieter Declercq
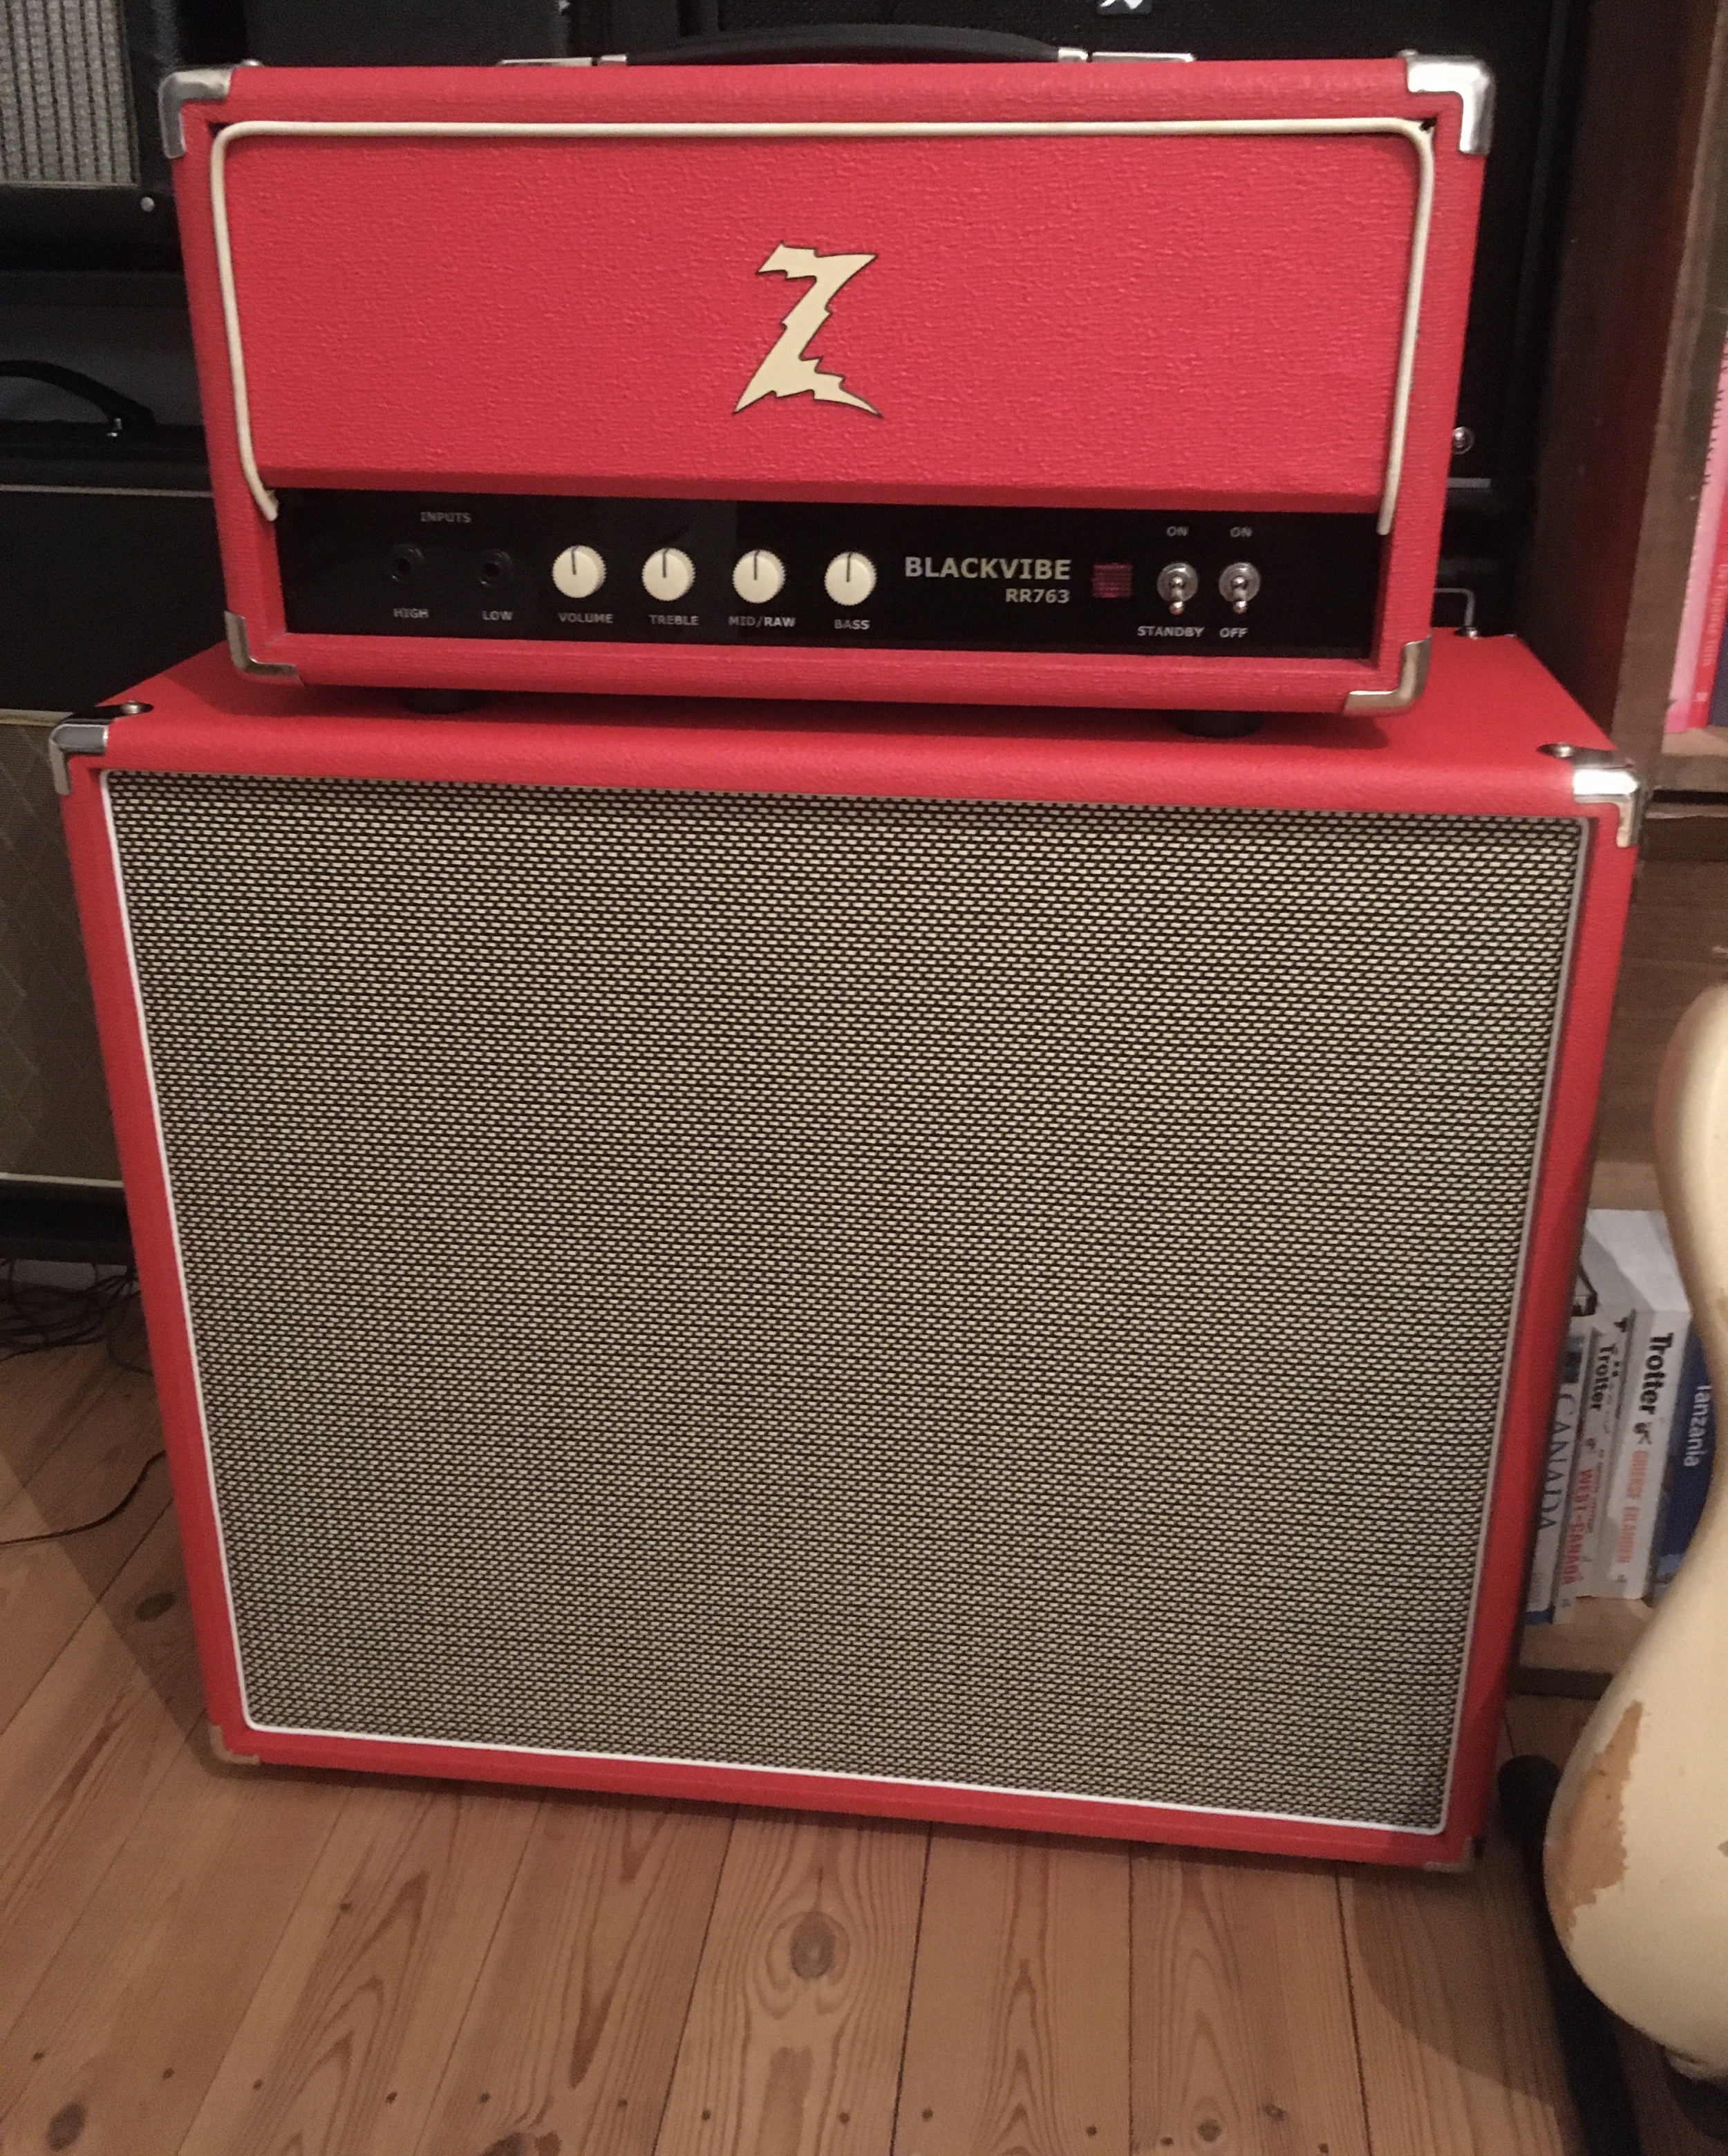
RR763R Blackvibe Reverb
I had many people ask about a Blackvibe with Reverb added so here you go. This is the Vibroverb circuit (2x6L6) minus the normal channel and tremolo. Due to adding reverb back to the circuit I reverted to a separate doghouse board for the filter caps and bias board. The simplest way to build this amp is to order a blackface kit and then have Doug Hoffman make an eyelet or turret main circuit board. Upload the Blackvibe Reverb Hoffman file to the Hoffman DIYLC analyzer to order the main circuit board. Cost of the board will be around $20 + shipping.
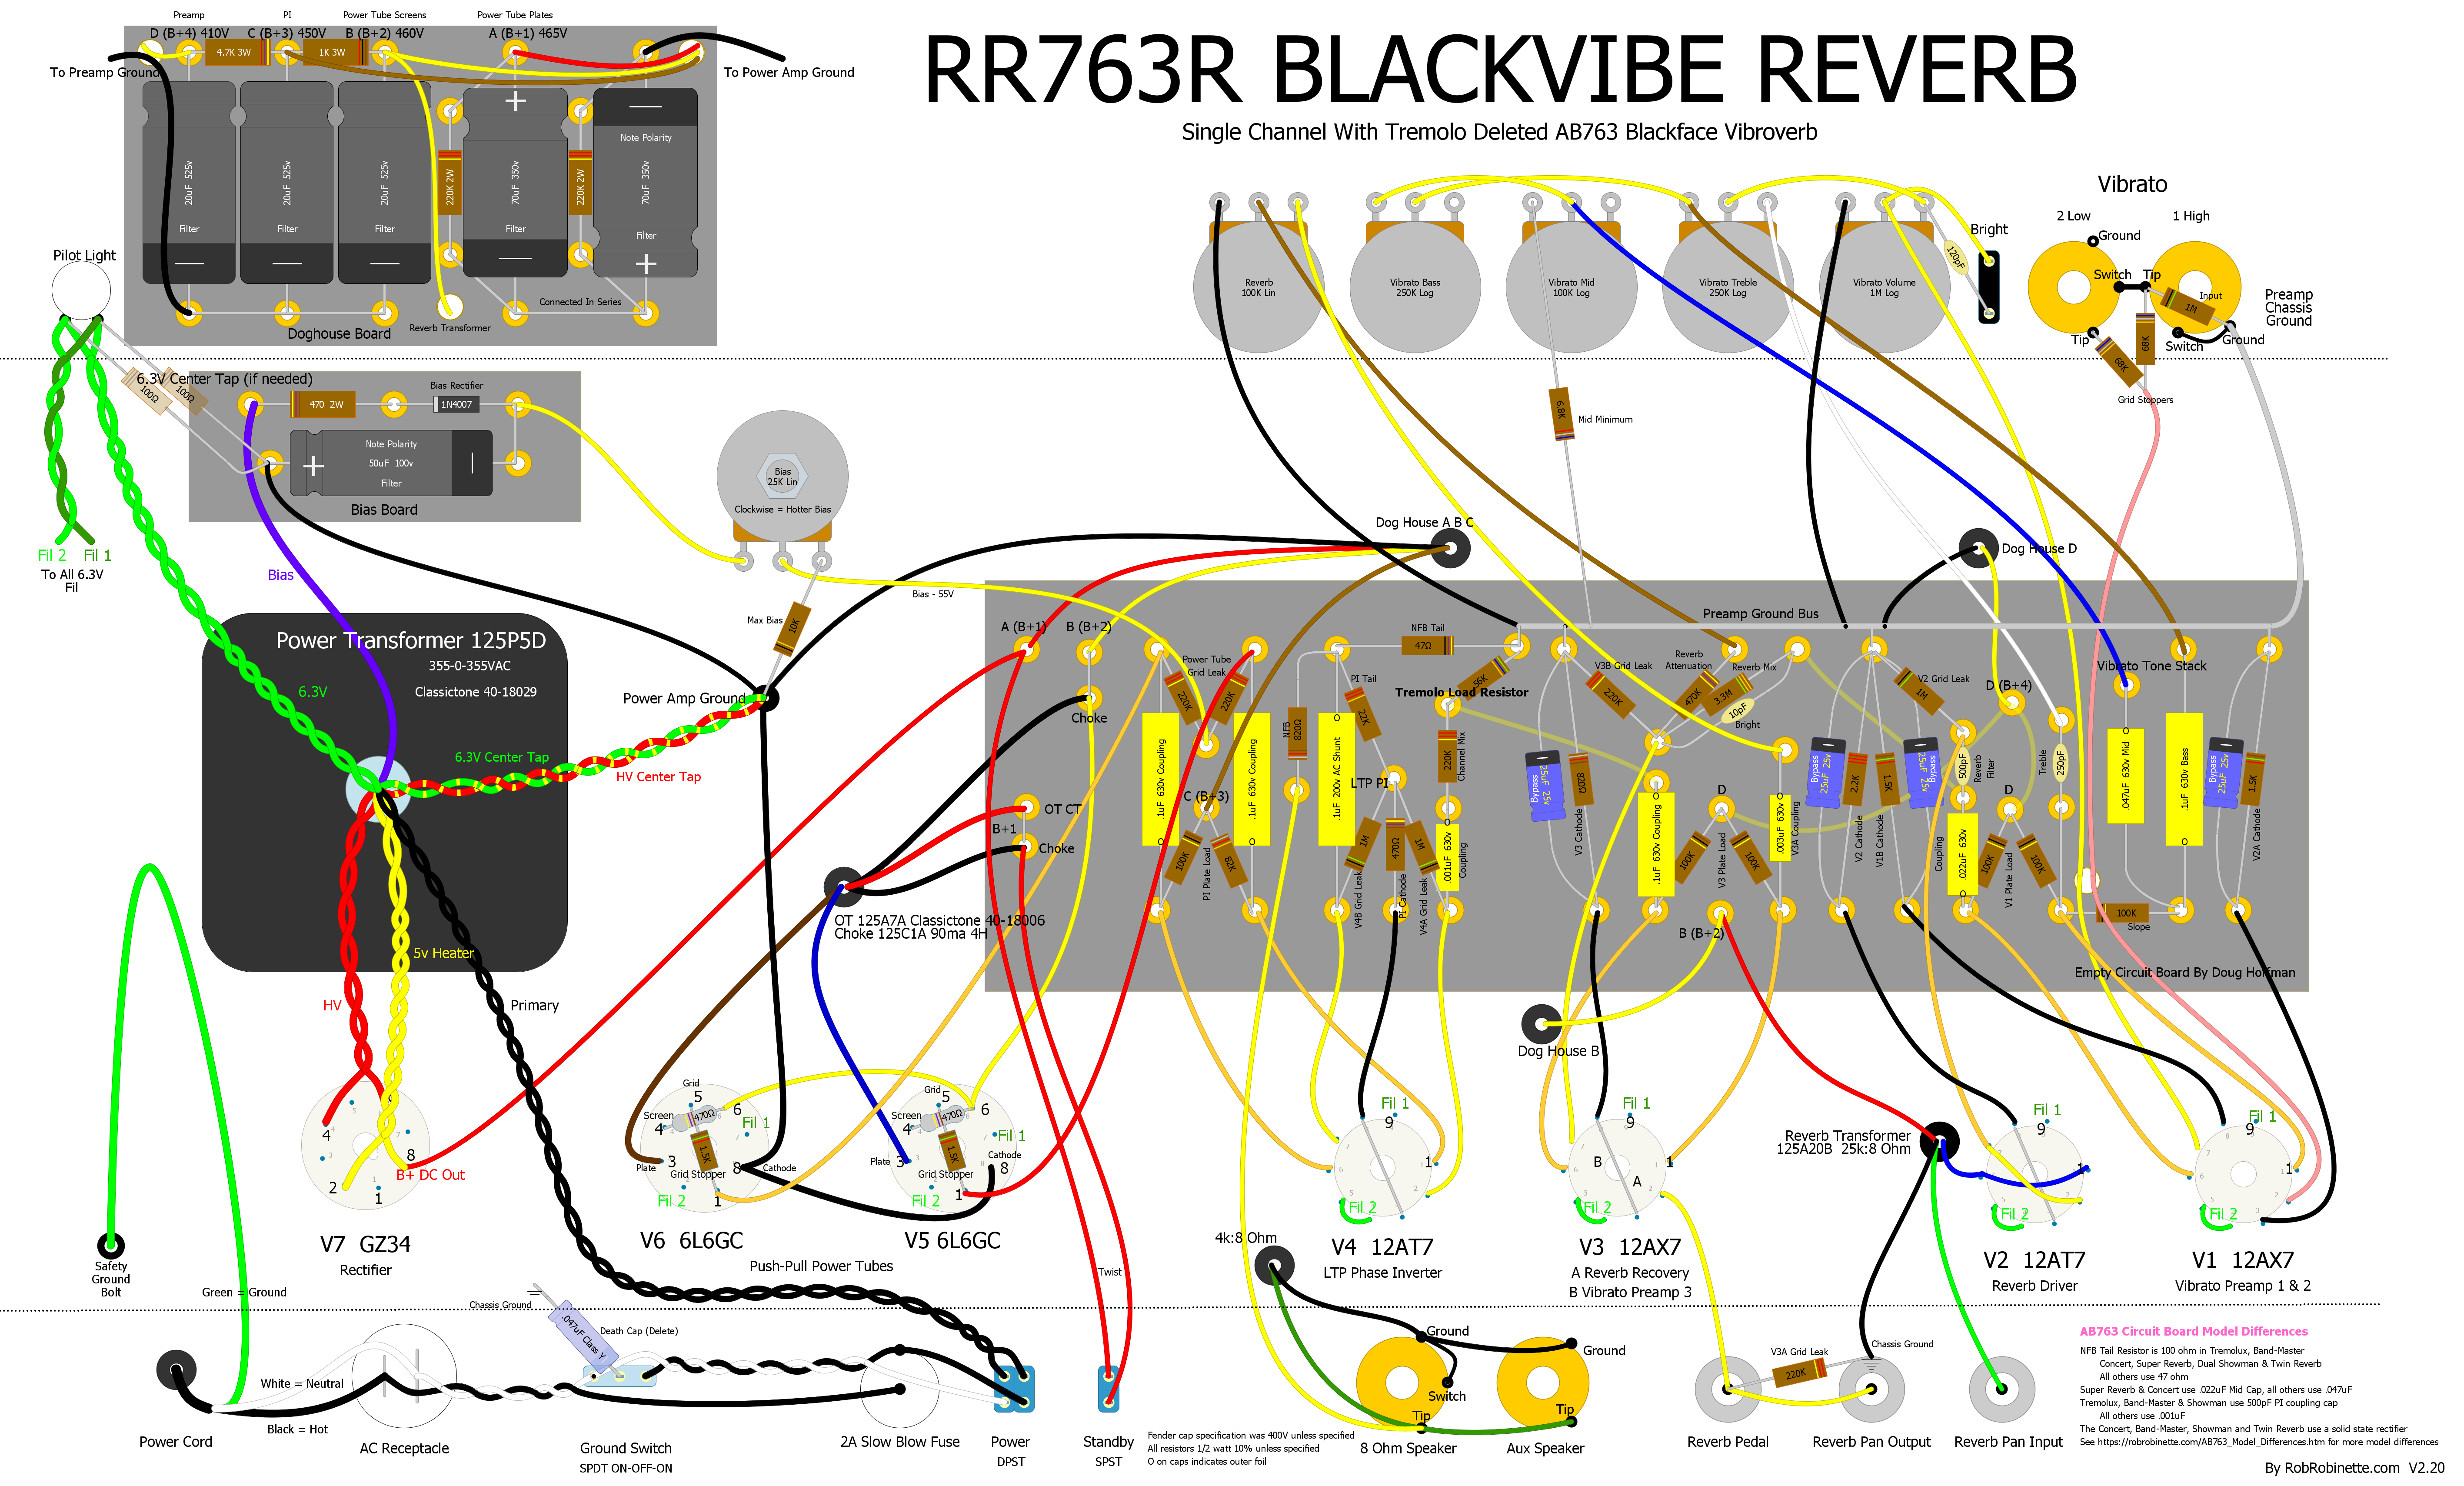
The Blackvibe Reverb is a single channel AB763 with reverb but no tremolo. It requires two extra preamp tubes to add reverb and the Vibrato Channel third preamp gain stage. The doghouse and bias circuit boards are standard AB763 parts. The main circuit board is a custom design. The "Tremolo Load Resistor" takes the place of the tremolo circuit to keep preamp gain the same as a normal AB763 amp. You can put the resistor on a switch or delete it to add a significant amount of preamp gain. See the .pdf and .diy file here.
Blackvibe Reverb Bill Of Materials

You'll also need a chassis, cab, speaker, power cord, wire, reverb pan and cables, power and output transformers and choke.
RR763V Blackvibe 6V6
The Blackvibe 6V6 is designed for those that don't need the big 40 watt output of the 6L6 Blackvibe. The Blackvibe 6V6's 22 watts of output is enough for most club gigs and still sounds great in the studio. Although the Blackvibe 6V6 uses the AB763 Deluxe Reverb power and output transformers we use higher phase inverter and preamp supply voltages to keep the tone closer to a 6V6 Vibroverb. Voltage dropping resistors and the bias circuit are changed to suit the 6V6. The NFB tail resistor was increased from 47 ohms to 56 ohms to compensate for the lower output transformer secondary voltage of the 6V6 power amp.
Although the GZ34 rectifier tube is specified, power supply filtering is slightly reduced compared to the 6L6 Blackvibe to support the 5U4GB rectifier in case we want to use it to lower the amp's voltages.
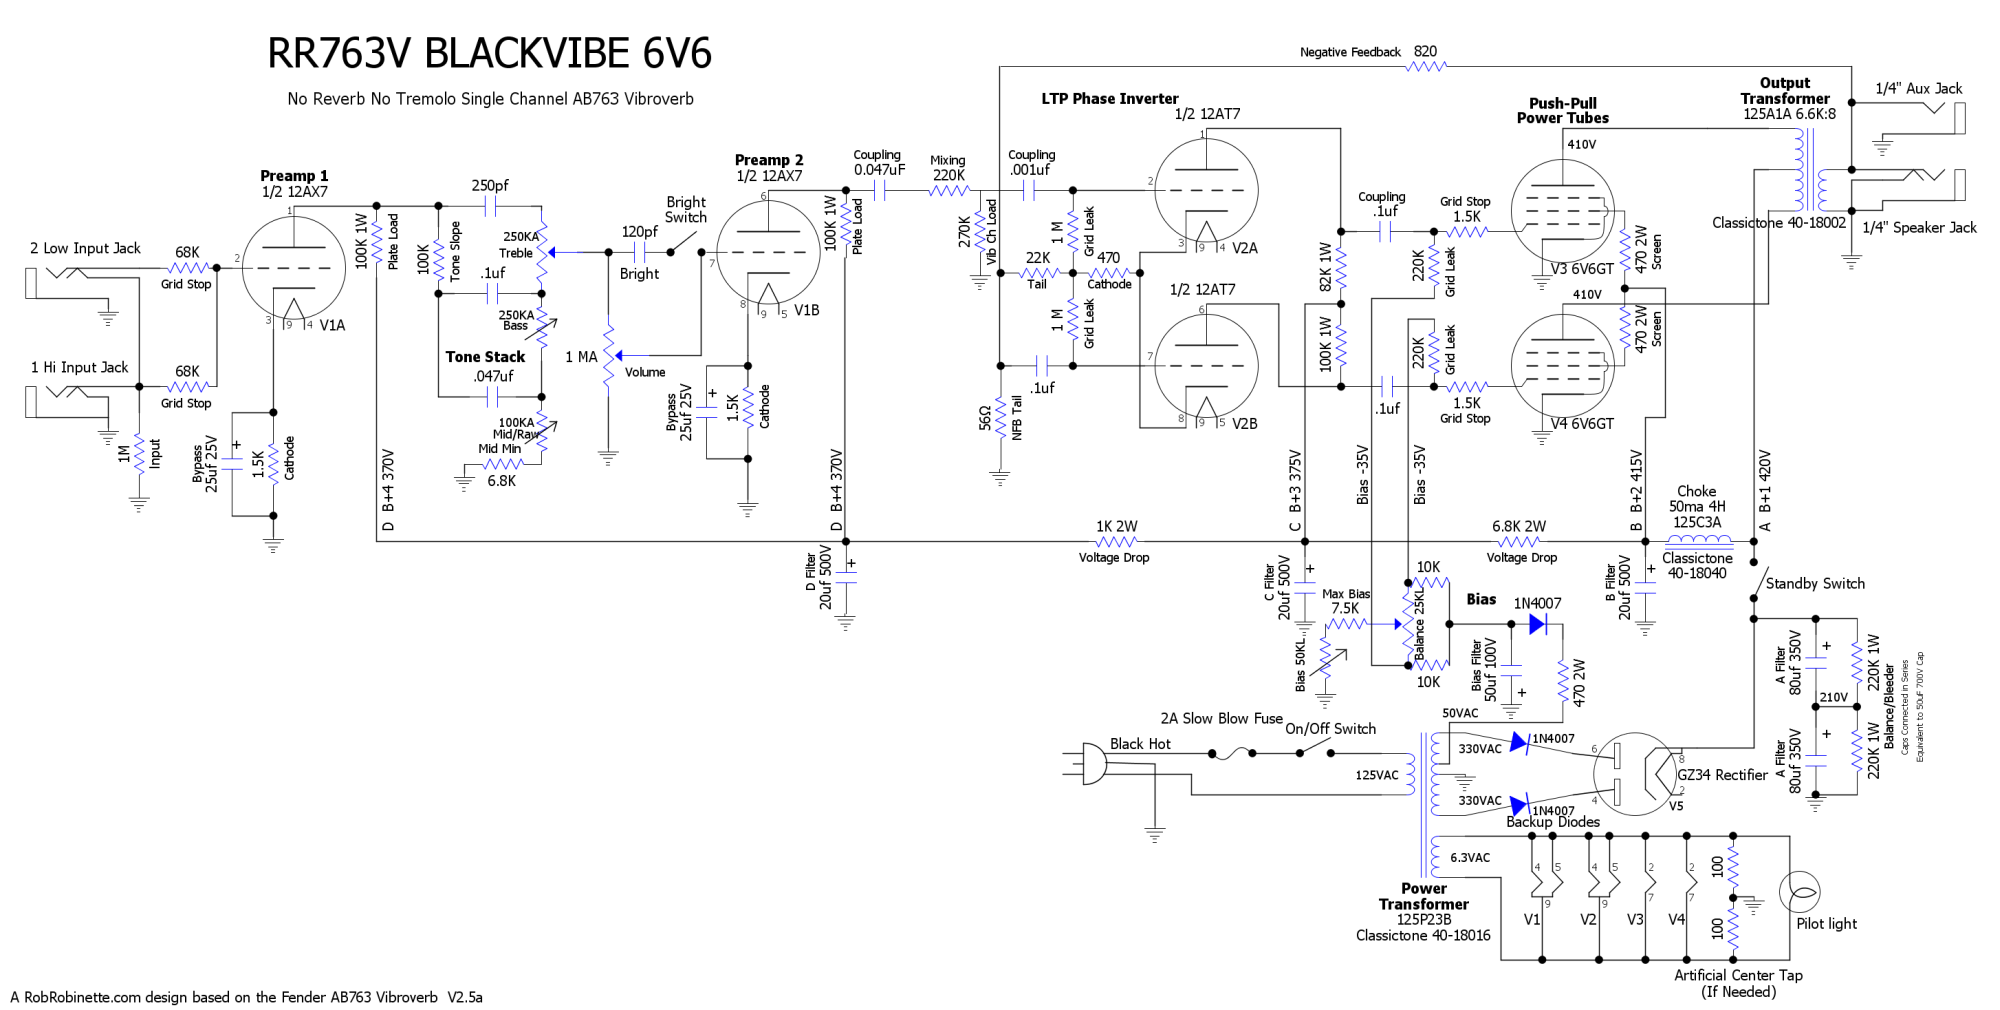
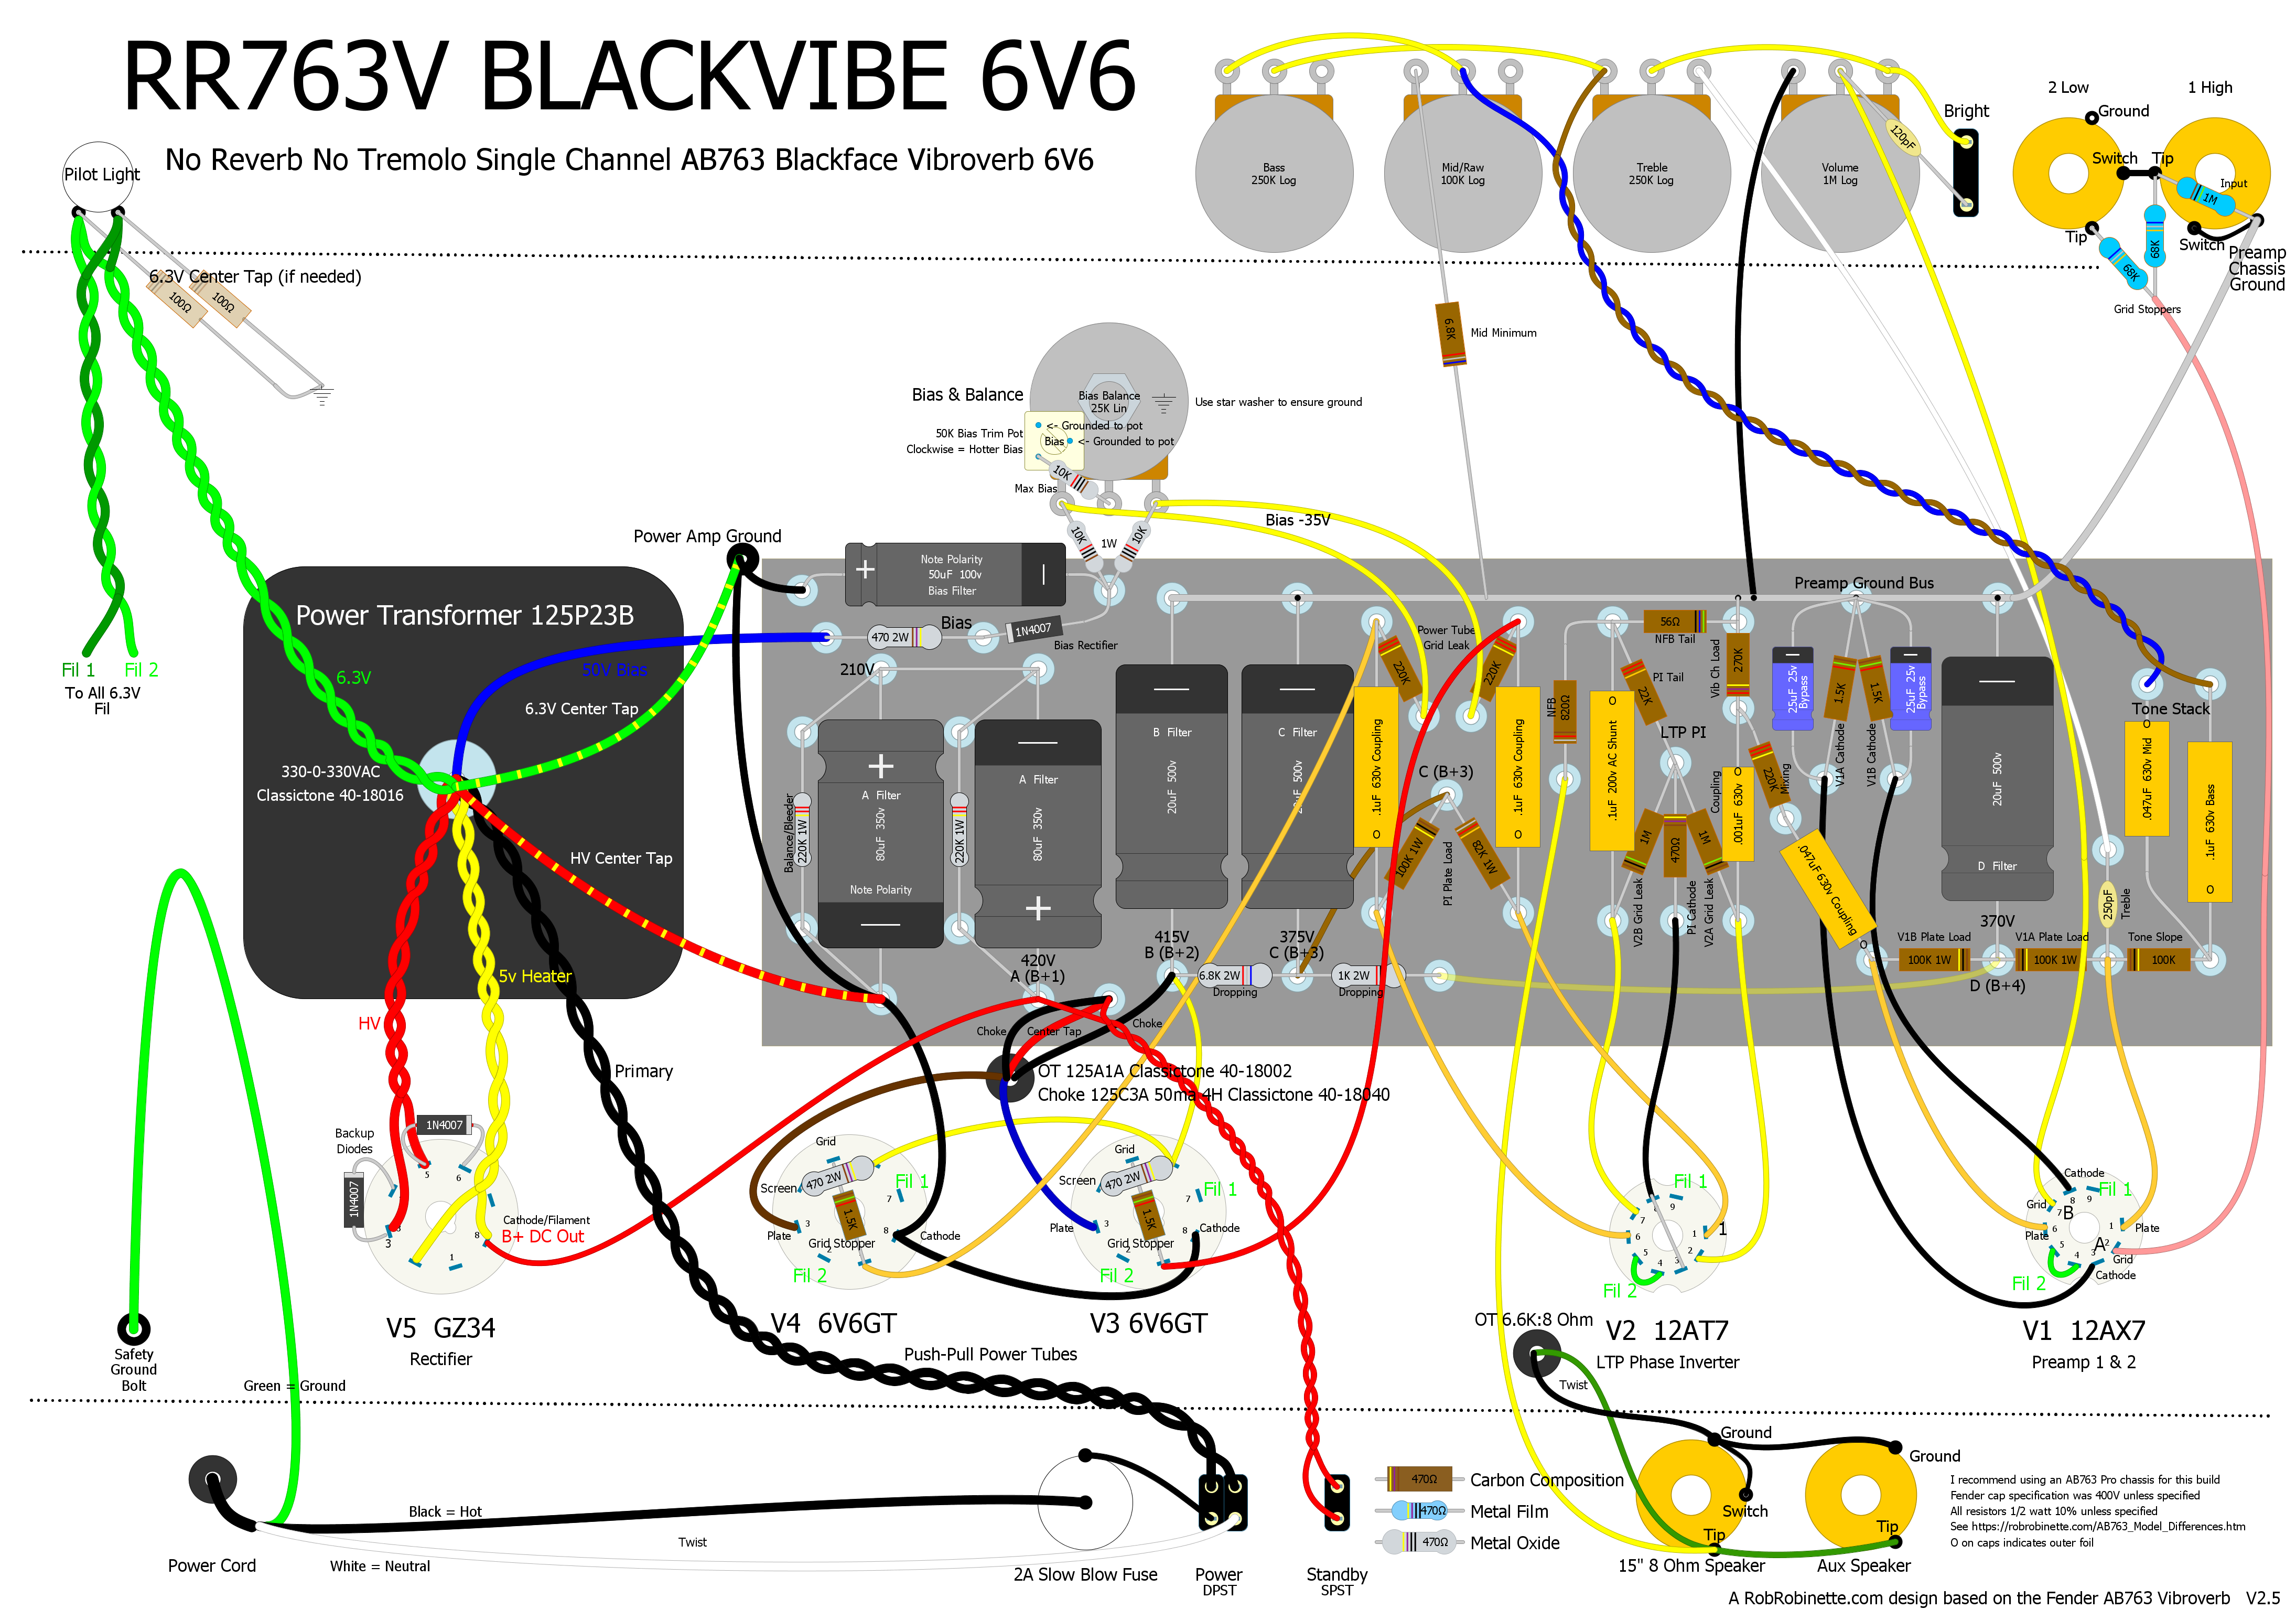
Download the pdf here and the DIYLC file here.
We'll use the AB763 Deluxe Reverb's chassis, power transformer, output transformer and choke.
The Classictone Deluxe Reverb transformers are:
Power Transformer 40-18016 330-0-330v 120ma
Output Transformer 40-18002 6.6K:8 ohm 20 watts
Choke 40-18040 4H 50ma
I recommend using an AB763 Deluxe Reverb chassis for the build because the transformers will drop right in. The Deluxe Reverb chassis also has a rectifier tube socket hole. You will have extra control panel and preamp tube holes though. The open tube socket holes will aid in chassis cooling or you can cover them with covers from Mojotone.com. A custom faceplate will cover the unused control holes. You might want to consider adding a presence control and master volume to fill those empty holes ;) See the Blackvibe Micro layout to see a simple but effective Trainwreck Type-3 master volume and presence control.
We can substitute two common 80uF 500v caps for the first two filter caps (80uF 350v A Filter shown in layout).
You can purchase the Blackvibe eyelet board from HoffmanAmps.com. The Blackvibe and Blackvibe 6v6 use the same eyelet board. If you prefer a turret board you can upload the Blackvibe DIYLC Hoffman board file to HoffmanAmps.com and Doug will make a turret board.
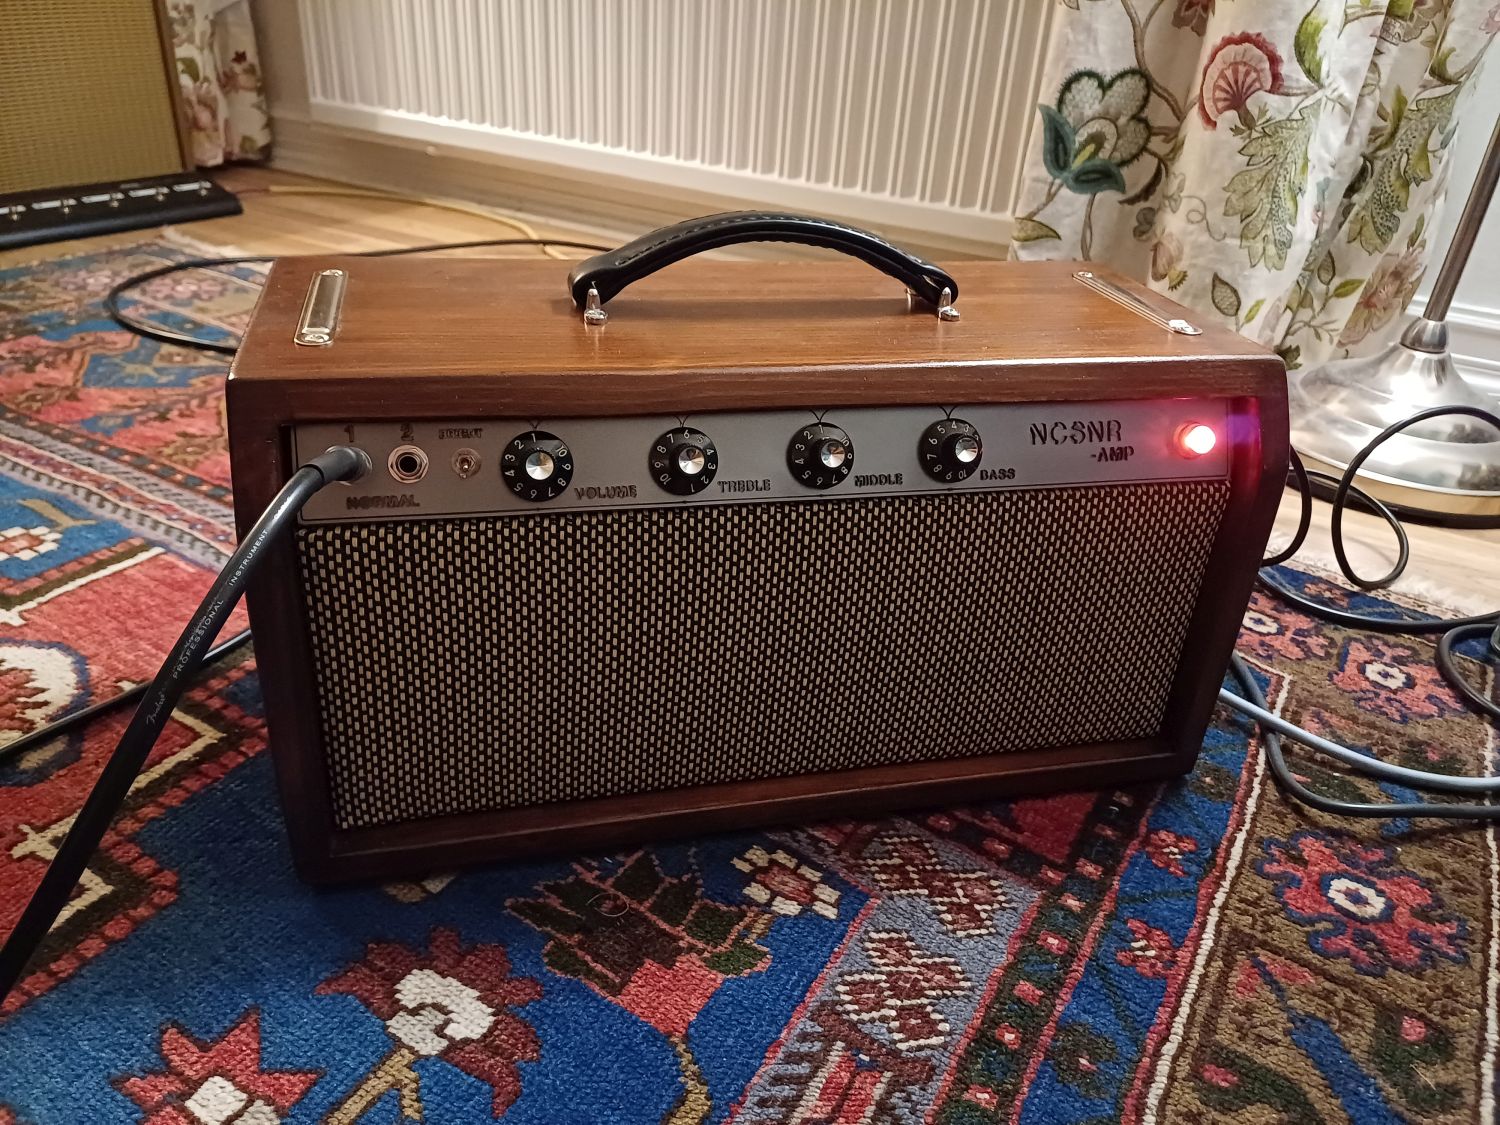
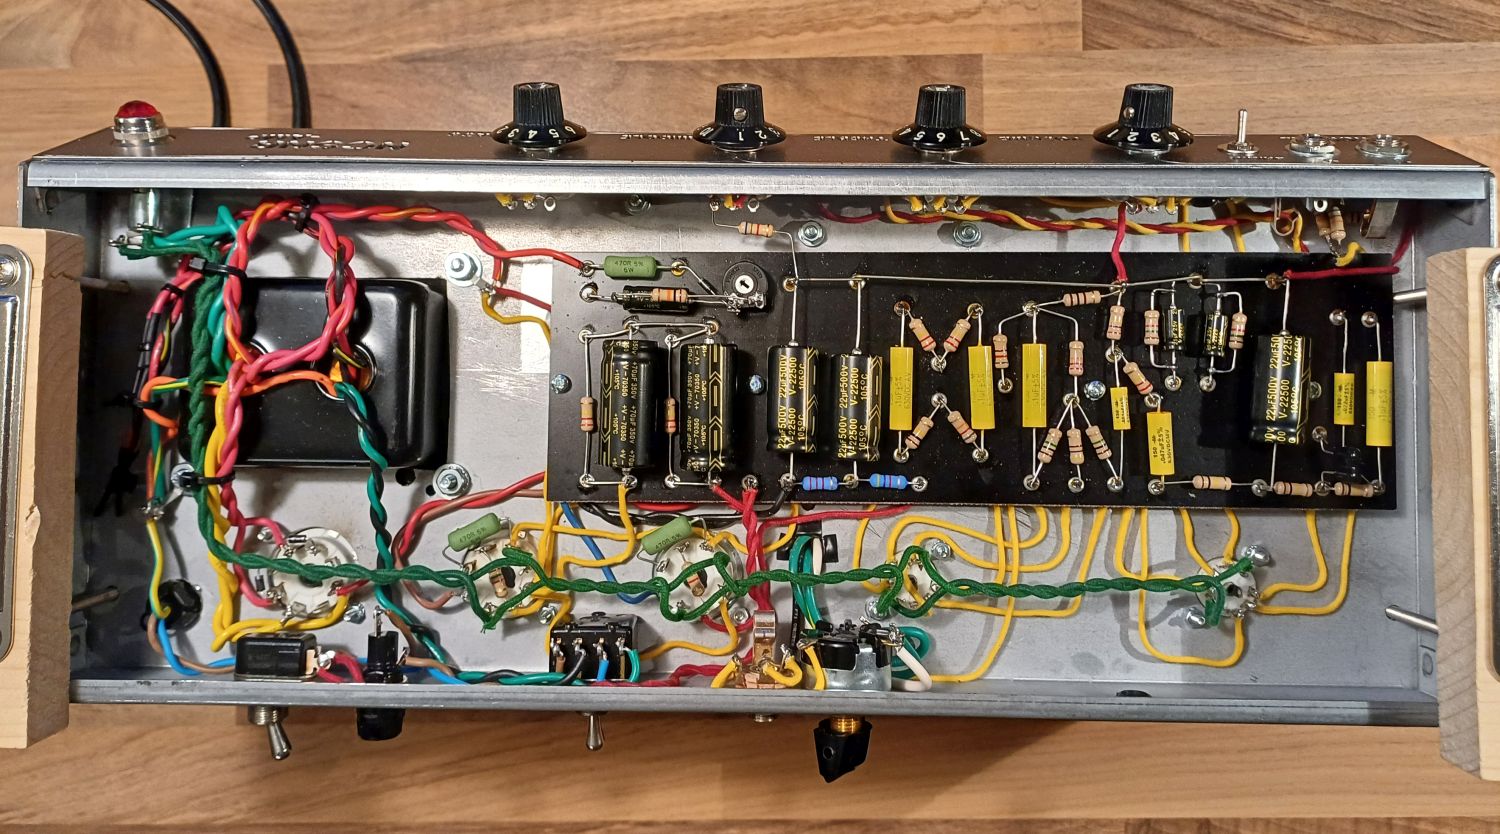
Christan Hillman Blackvibe
Speaker Recommendations
Weber California 15 in ceramic 80 watt and AlNiCo is an excellent choice. The Weber California 15" was designed to mimic the JBL D130 which was a Fender Vibroverb OEM speaker (along with the Jensen C15n in the next paragraph). The 80 watt, 8 ohm ceramic version is much less expensive but louder than the AlNiCo version. I highly recommend the paper or "LargeH" dome option over the aluminum dome. The "LargeH" dome (large hole cloth) was designed to tame the brightest amps so use it if you prefer a darker tone.
Jensen C15n AlNiCo is the modern equivalent of what the AB763 Vibroverb came with from the factory and it gets goods reviews. American voice and relatively inefficient so not as loud as other speakers.
If you prefer a 12" speaker my recommendation is the Weber 12F150 ($117, 8 ohm, 50w, light dope, standard dust cap) which is their go-to blackface speaker. A pair of the $52 Weber Ceramic Signature 12" speakers would also work well in the Blackvibe 6V6. Remember to ask Weber for their free speaker break-in service.
My favorite 10" blackface speaker is the Weber 10F150 ($97, 8 ohm, 50 watt, light dope, standard dust cap). Another option is Weber's #1 recommendation for the Princeton Reverb, the 10F150T. A less expensive choice is the very nice $47 Weber Ceramic Signature 10" but you'll need a pair of them to handle the amp's power.
Download the pdf here and the DIYLC file here.
Blackvibe 6V6 Bill of Materials
You'll also need a chassis, cab, speaker, power cord, wire, power and output transformers and choke.
Source Bias Voltage From High Voltage
If your power transformer does not have a 50v bias tap you can use the above circuit to generate bias voltage from a power transformer high voltage lead. Tap into the power transformer high voltage at the rectifier. You must connect the bias tap wire to the same end of the diode as the transformer high voltage lead as shown above. The Bias resistor must be increased to 100k 2 watt. This bias circuit will only work with power transformers with a center tap.
The build can be simplified by eliminating the Bright Switch, Bright Cap and Standby Switch, none of which are really needed.
Many AB763 blackface modifications apply to the Blackvibe 6V6.
RR763-M Blackvibe Micro
This is the one watt, 12AU7 push-pull power tube version of the Blackvibe that is perfect for true bedroom level practice and studio work. The preamp and long tail pair (LTP) phase inverter are 100% AB763 Vibroverb but the power amp uses a single, cathode biased 12AU7 power tube wired in true push-pull. Throw a Strymon Flint reverb & tremolo pedal in front of the Blackvibe Micro and you have a Vibroverb Vibrato channel too.
A Presence control is added to the NFB circuit which has been massaged to compensate for the Micro's low output transformer secondary voltage.
A Trainwreck Type-3 post phase inverter master volume is added to help control how hard the little power tube is driven.
Large value power tube grid stop resistors are used and the grid leaks are reduced. The grid stopper and grid leak resistors have been rearranged to form a voltage divider to attenuate the phase inverter output to help the little triodes work as our power tubes without being overwhelmed.
The Blackvibe power supply has been modified to keep the little power tube happy. Since our triode power tube has no screens the screen power node has been deleted. The choke now smoothes the entire amp's power supply.
The 6.3v heater center tap is elevated by connecting it to the power tube cathode resistor (see layout below).
I offer three rectifier options:
Standard GZ34 tube 8-pin rectifier
Solid state conventional rectifier
The choice of rectifier will have little effect on the amp's tone due to its very low current demand. The solid state rectifiers are definitely the simplest to build.
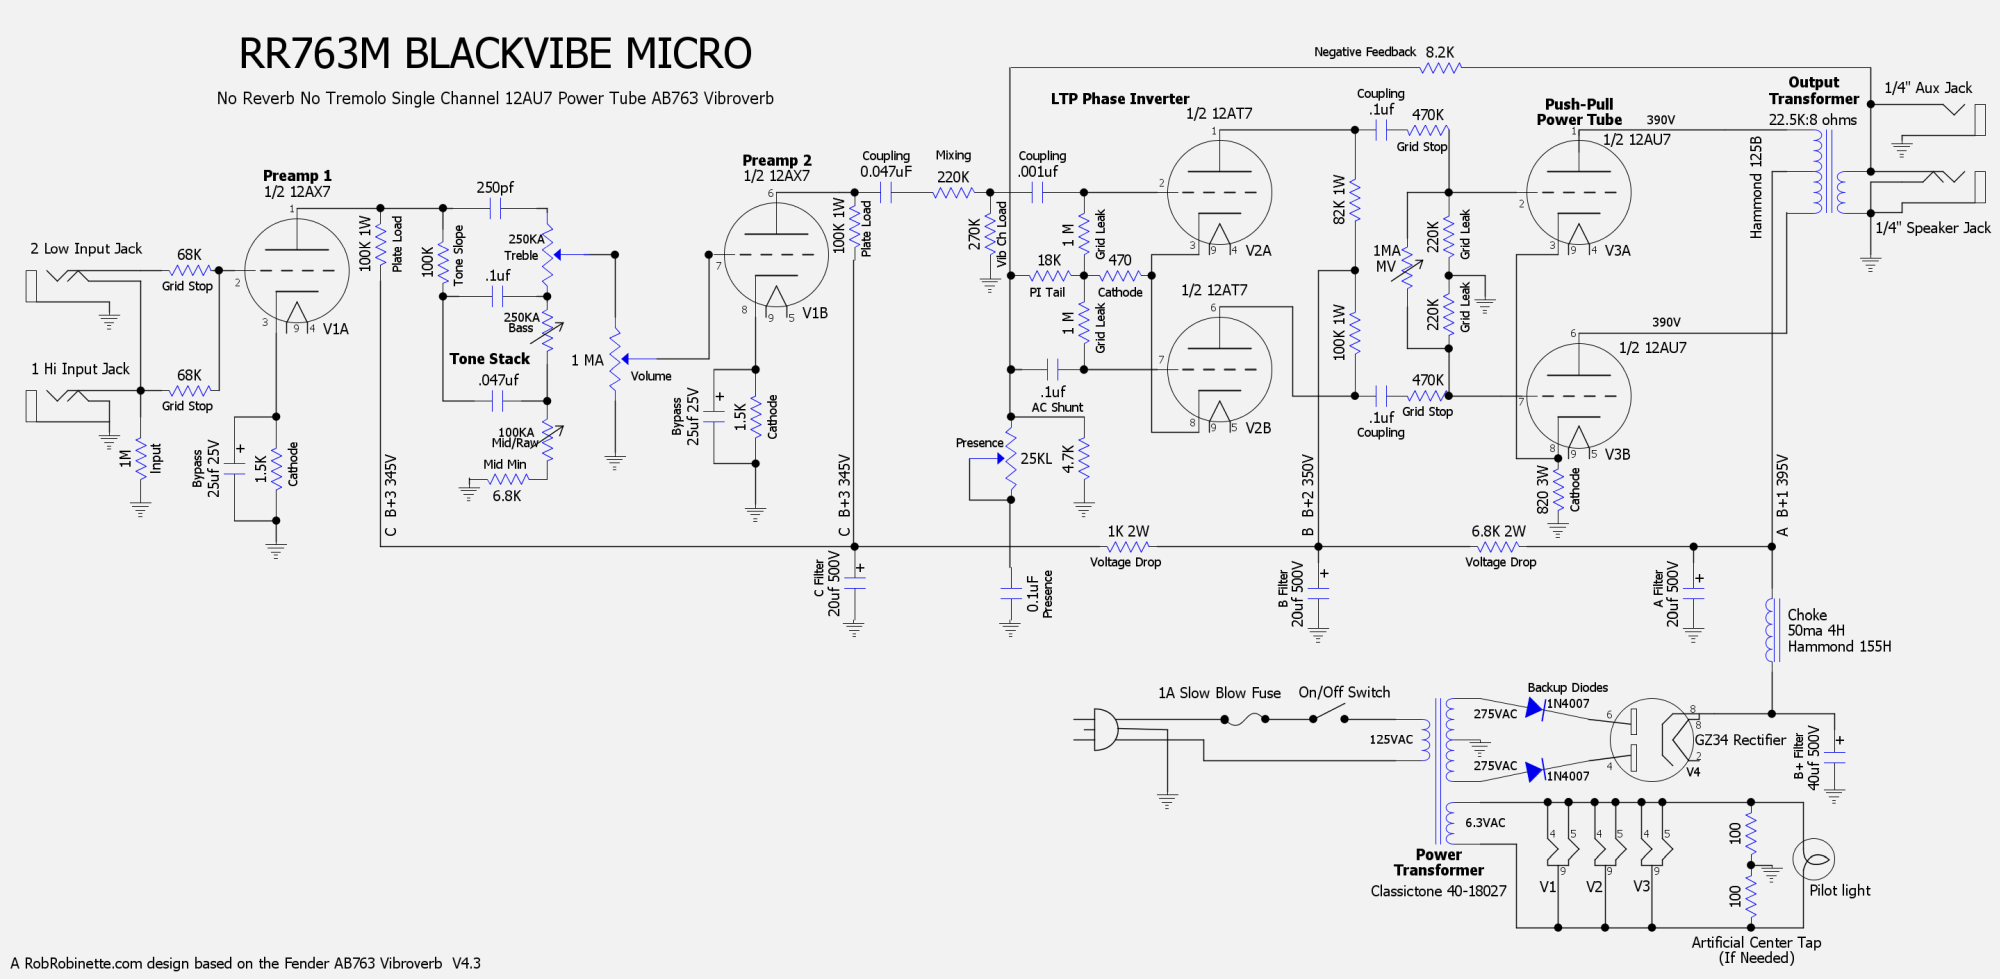
Most of the Micro changes are after the phase inverter. Click the schematic to see the high definition version. Download the schematic pdf here and the DIYLC file here.
Blackvibe Layout With GZ34 Rectifier
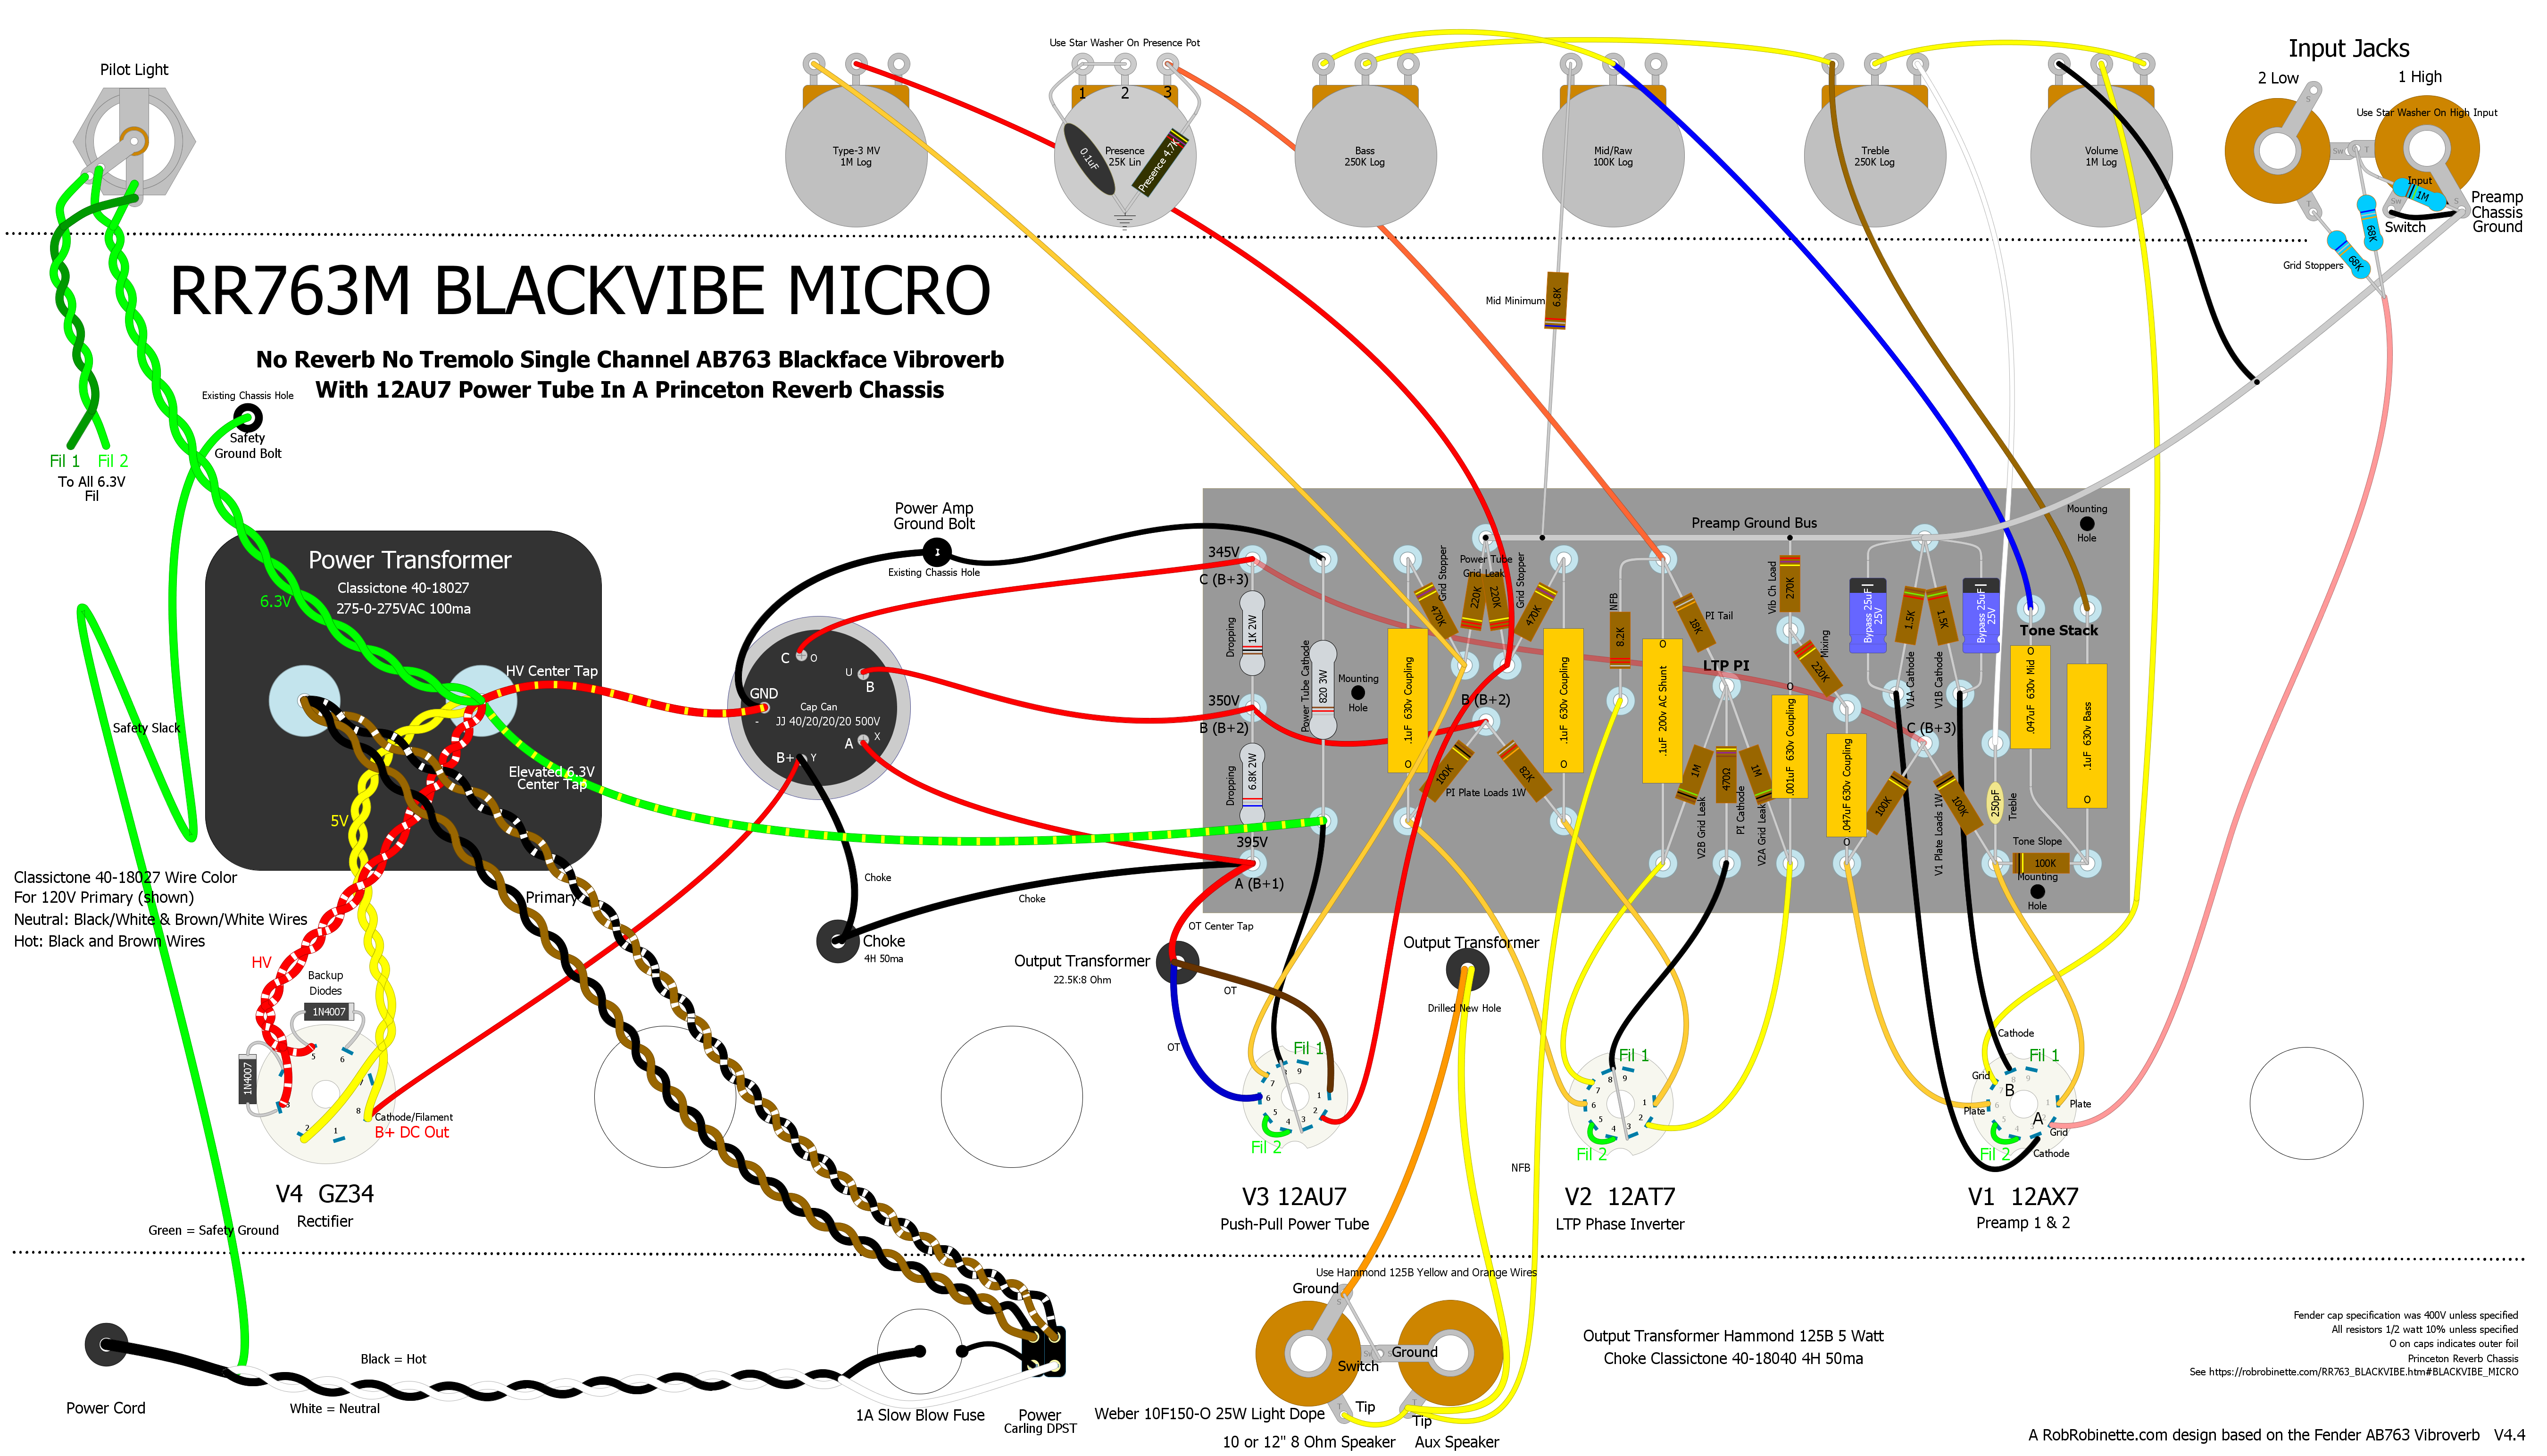
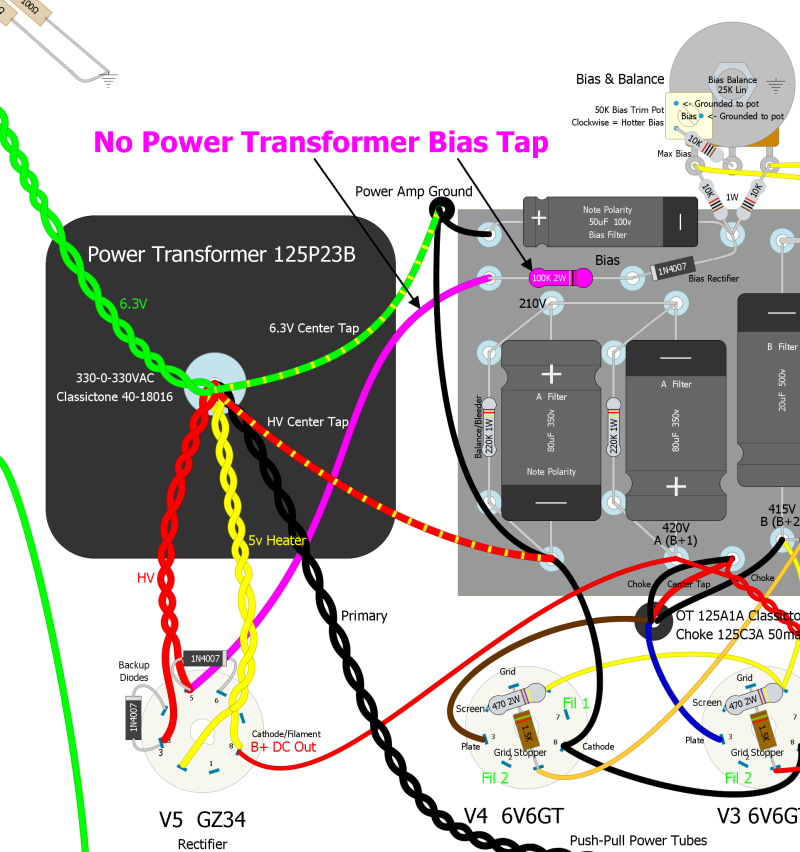
Princeton Reverb chassis layout. The preamp ground bus is grounded at the High Input jack ground terminal. Power Transformer wires match the Classictone 40-18027 for 120v USA mains power. Click the layout to see the high definition version. Download the layout pdf here and the DIYLC file here. V4.4 Jan 2024 layout above fixes a wiring error on the master volume.
I recommend the use of a Princeton Reverb chassis and Classictone 40-18027 Princeton Reverb power transformer. The 40-18027 supports 120v and 240v mains and has two high voltage windings. We'll use the 275-0-275v 100ma red-white high voltage leads which are perfect for the Blackvibe Micro. The entire amp uses only 24ma at idle. The power transformer has a 6.3v center tap so an artificial center tap is not needed. We connect the 6.3v center tap to the hot side of the power tube cathode resistor to elevate its ground reference to reduce heater hum. If you need a stand-up transformer the Classictone 40-18085 is perfect.
Classictone 40-18027 Power Transformer Wiring & Specs
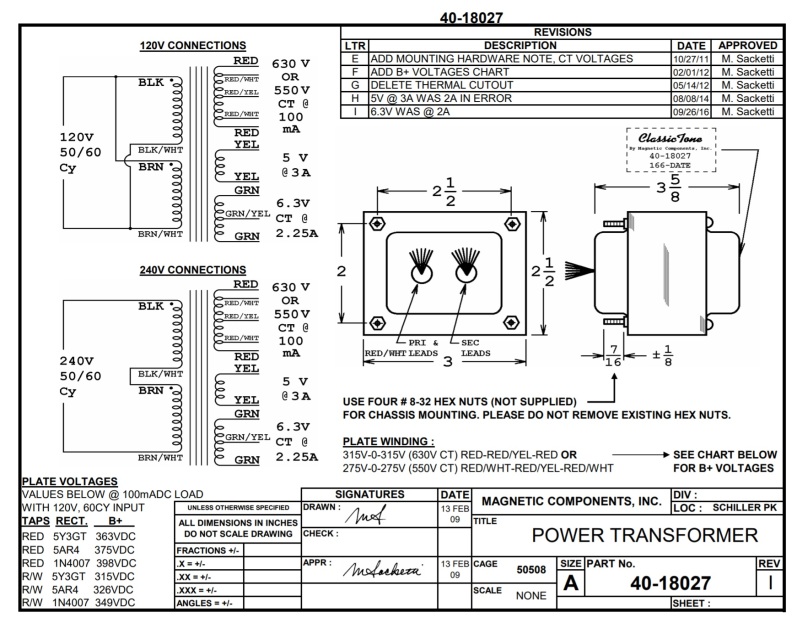
Note the 120v and 240v primary options. For 120v mains voltage we connect the Black & Brown wires together at the power switch and we connect the Black/White & Brown/White wires to the power switch or power cord neutral (see layout above). For 240v mains we join just the Black/White and Brown wires. We'll connect the Red/White 550v high voltage wires to the rectifier tube. Shrink-tube the two unused red wires so they cannot touch each other or anything else.
Output transformer specs are 22.5k:8 ohms push-pull. I recommend the Hammond 125B 5 watt. Output impedance is very flexible with 22.5k:8 using secondary wires 2 & 4 (orange & yellow). This impedance is optimized for the 12AU7 but will work for both the 12AU7 and 12BH7 power tubes. If you plan to use the higher power 12BH7 exclusively then an output impedance of 12.8k:8 using secondary wires 4 & 6 will give more output power and slightly better tone. If you plan to use both the 12AU7 and 12BH7 then I recommend you split the difference between them at 17.6k:8 using wires 3 & 5. Note that we do not use the black (wire 1) secondary wire.
I purchased mine from Mouser.com.Hammond 125B Output Transformer Wiring & Specs
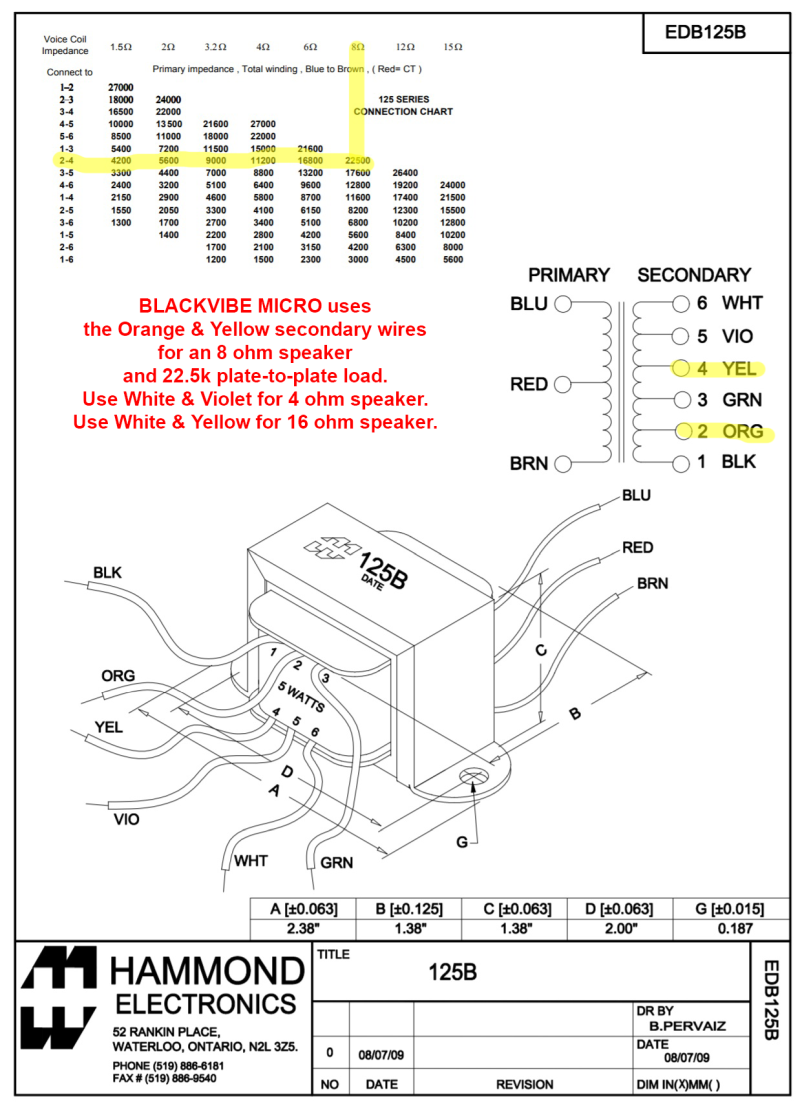
We do not use the Black secondary wire.
A Classictone 40-18040 4H 50ma choke easily supplies the entire amp with ripple-free power.
The cap can is a JJ 40/20/20/20uF 500v can from Mojotone.com. The can's terminals are marked with Y, X, U, O and "-" stamped in the terminals. The Y terminal is 40uF and the X, U and O have 20uF. The "-" is the negative or ground terminal.
I've heard great things about the long plate JJECC802S 12AU7 as a power tube so give it some consideration.
You can use a standard Princeton Reverb size cab with either a 10" or 12" speaker. Mojotone sells a nice Princeton Reverb head cab too.
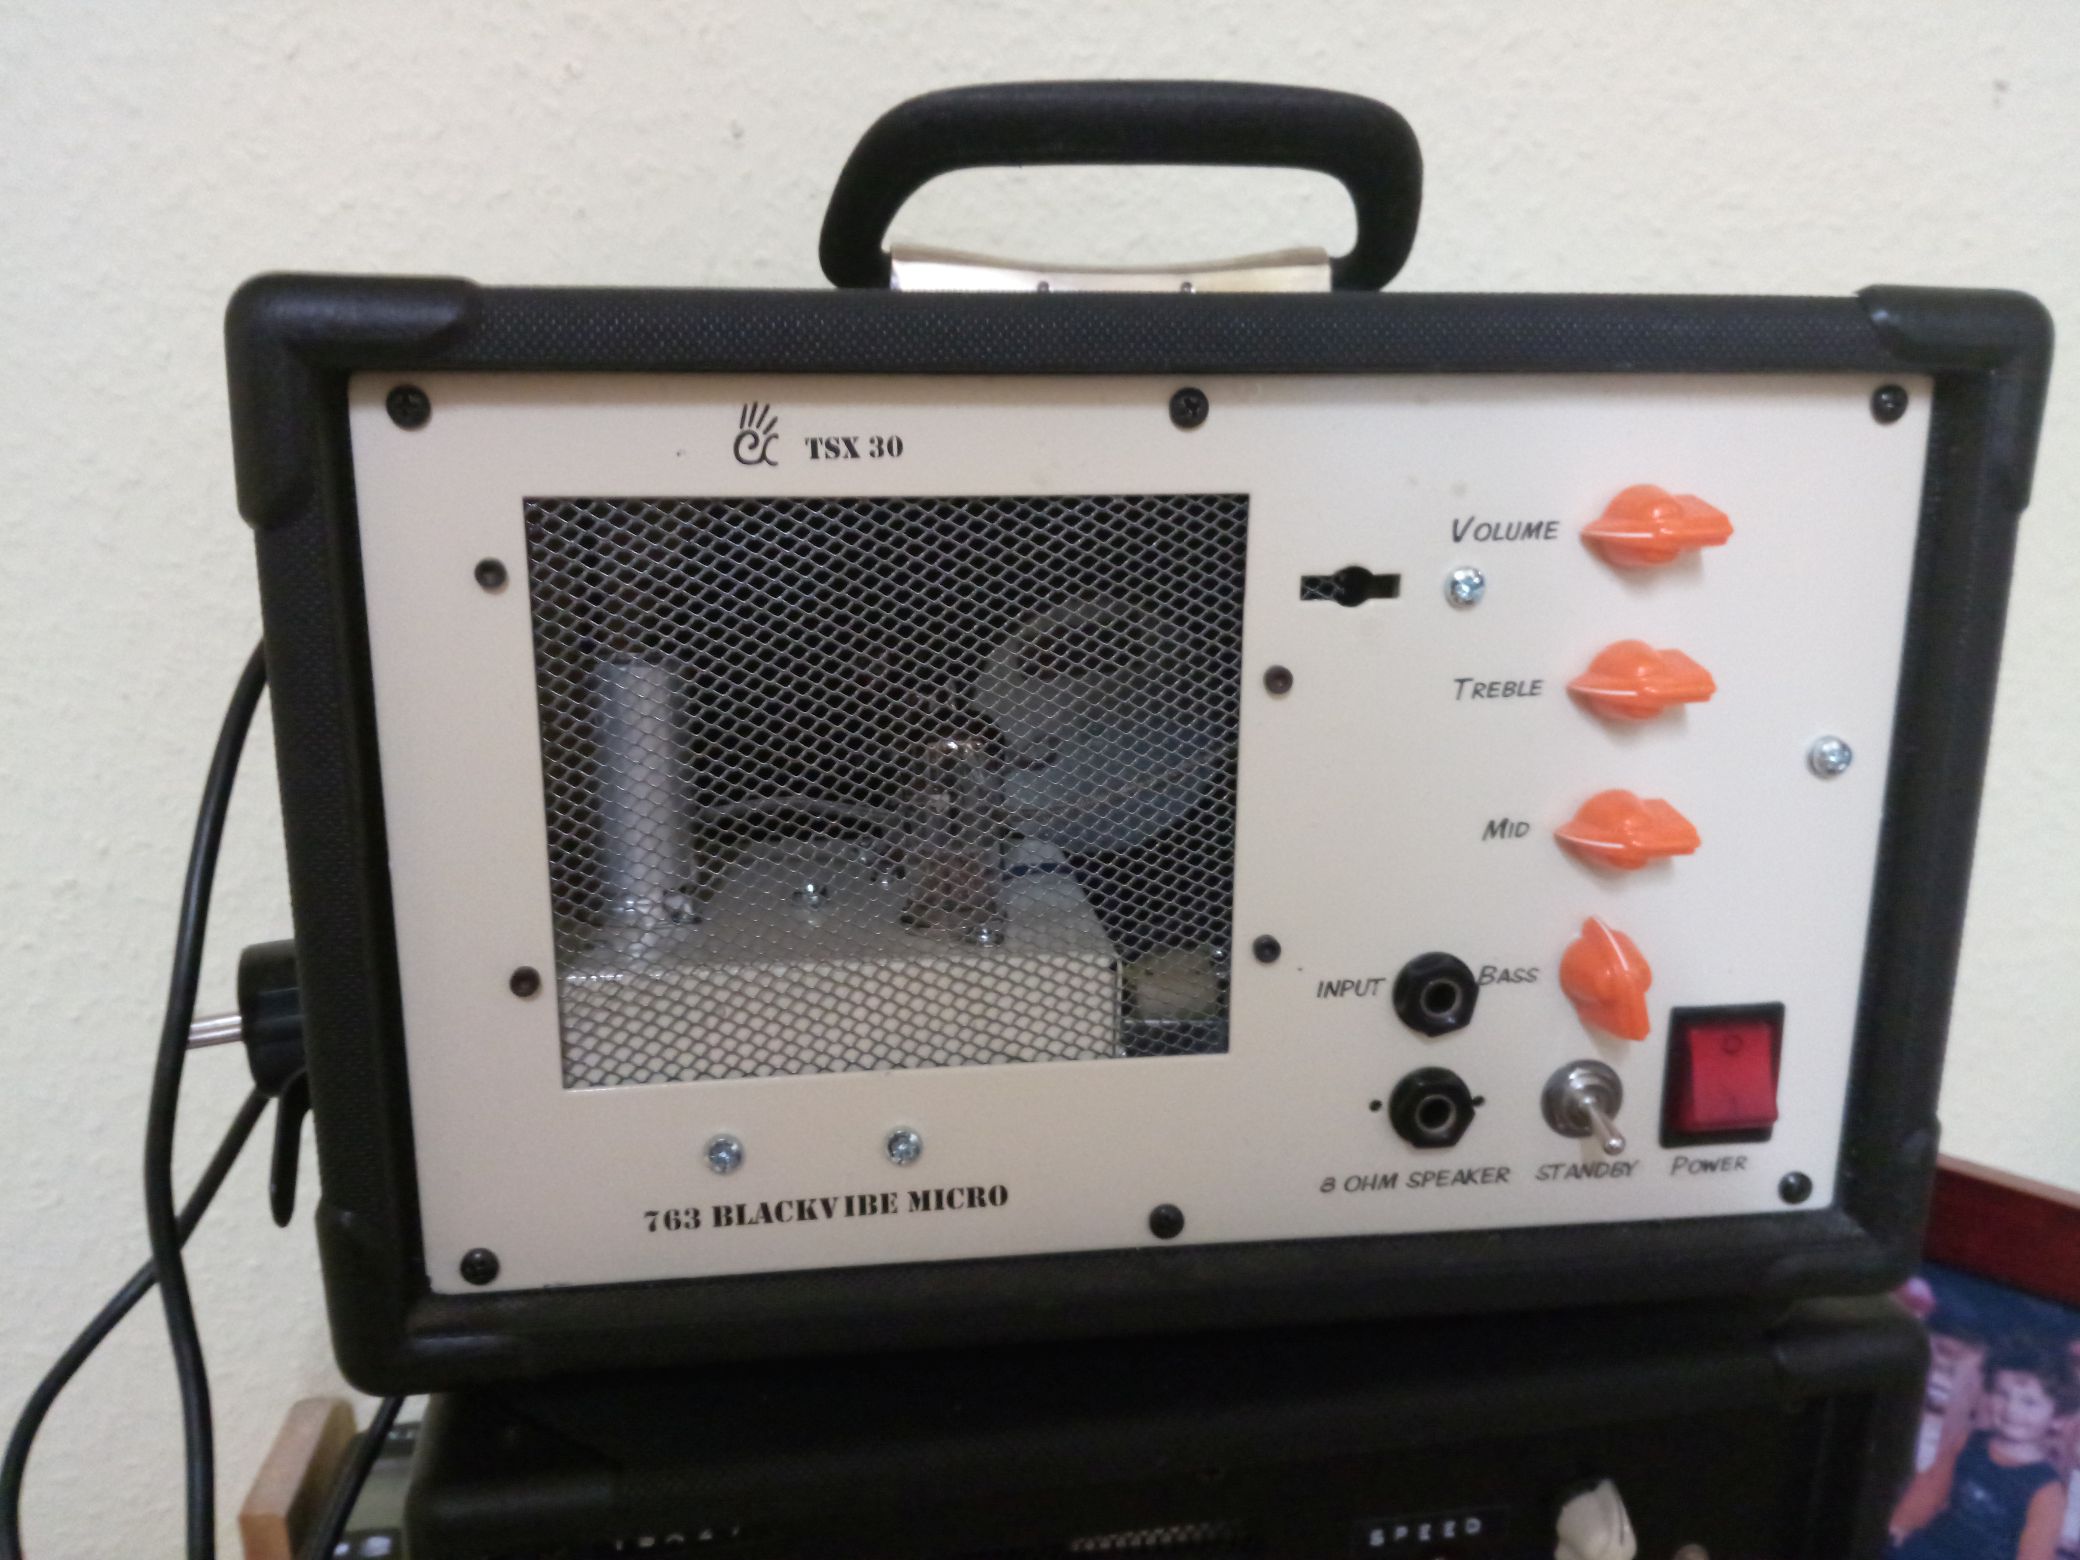
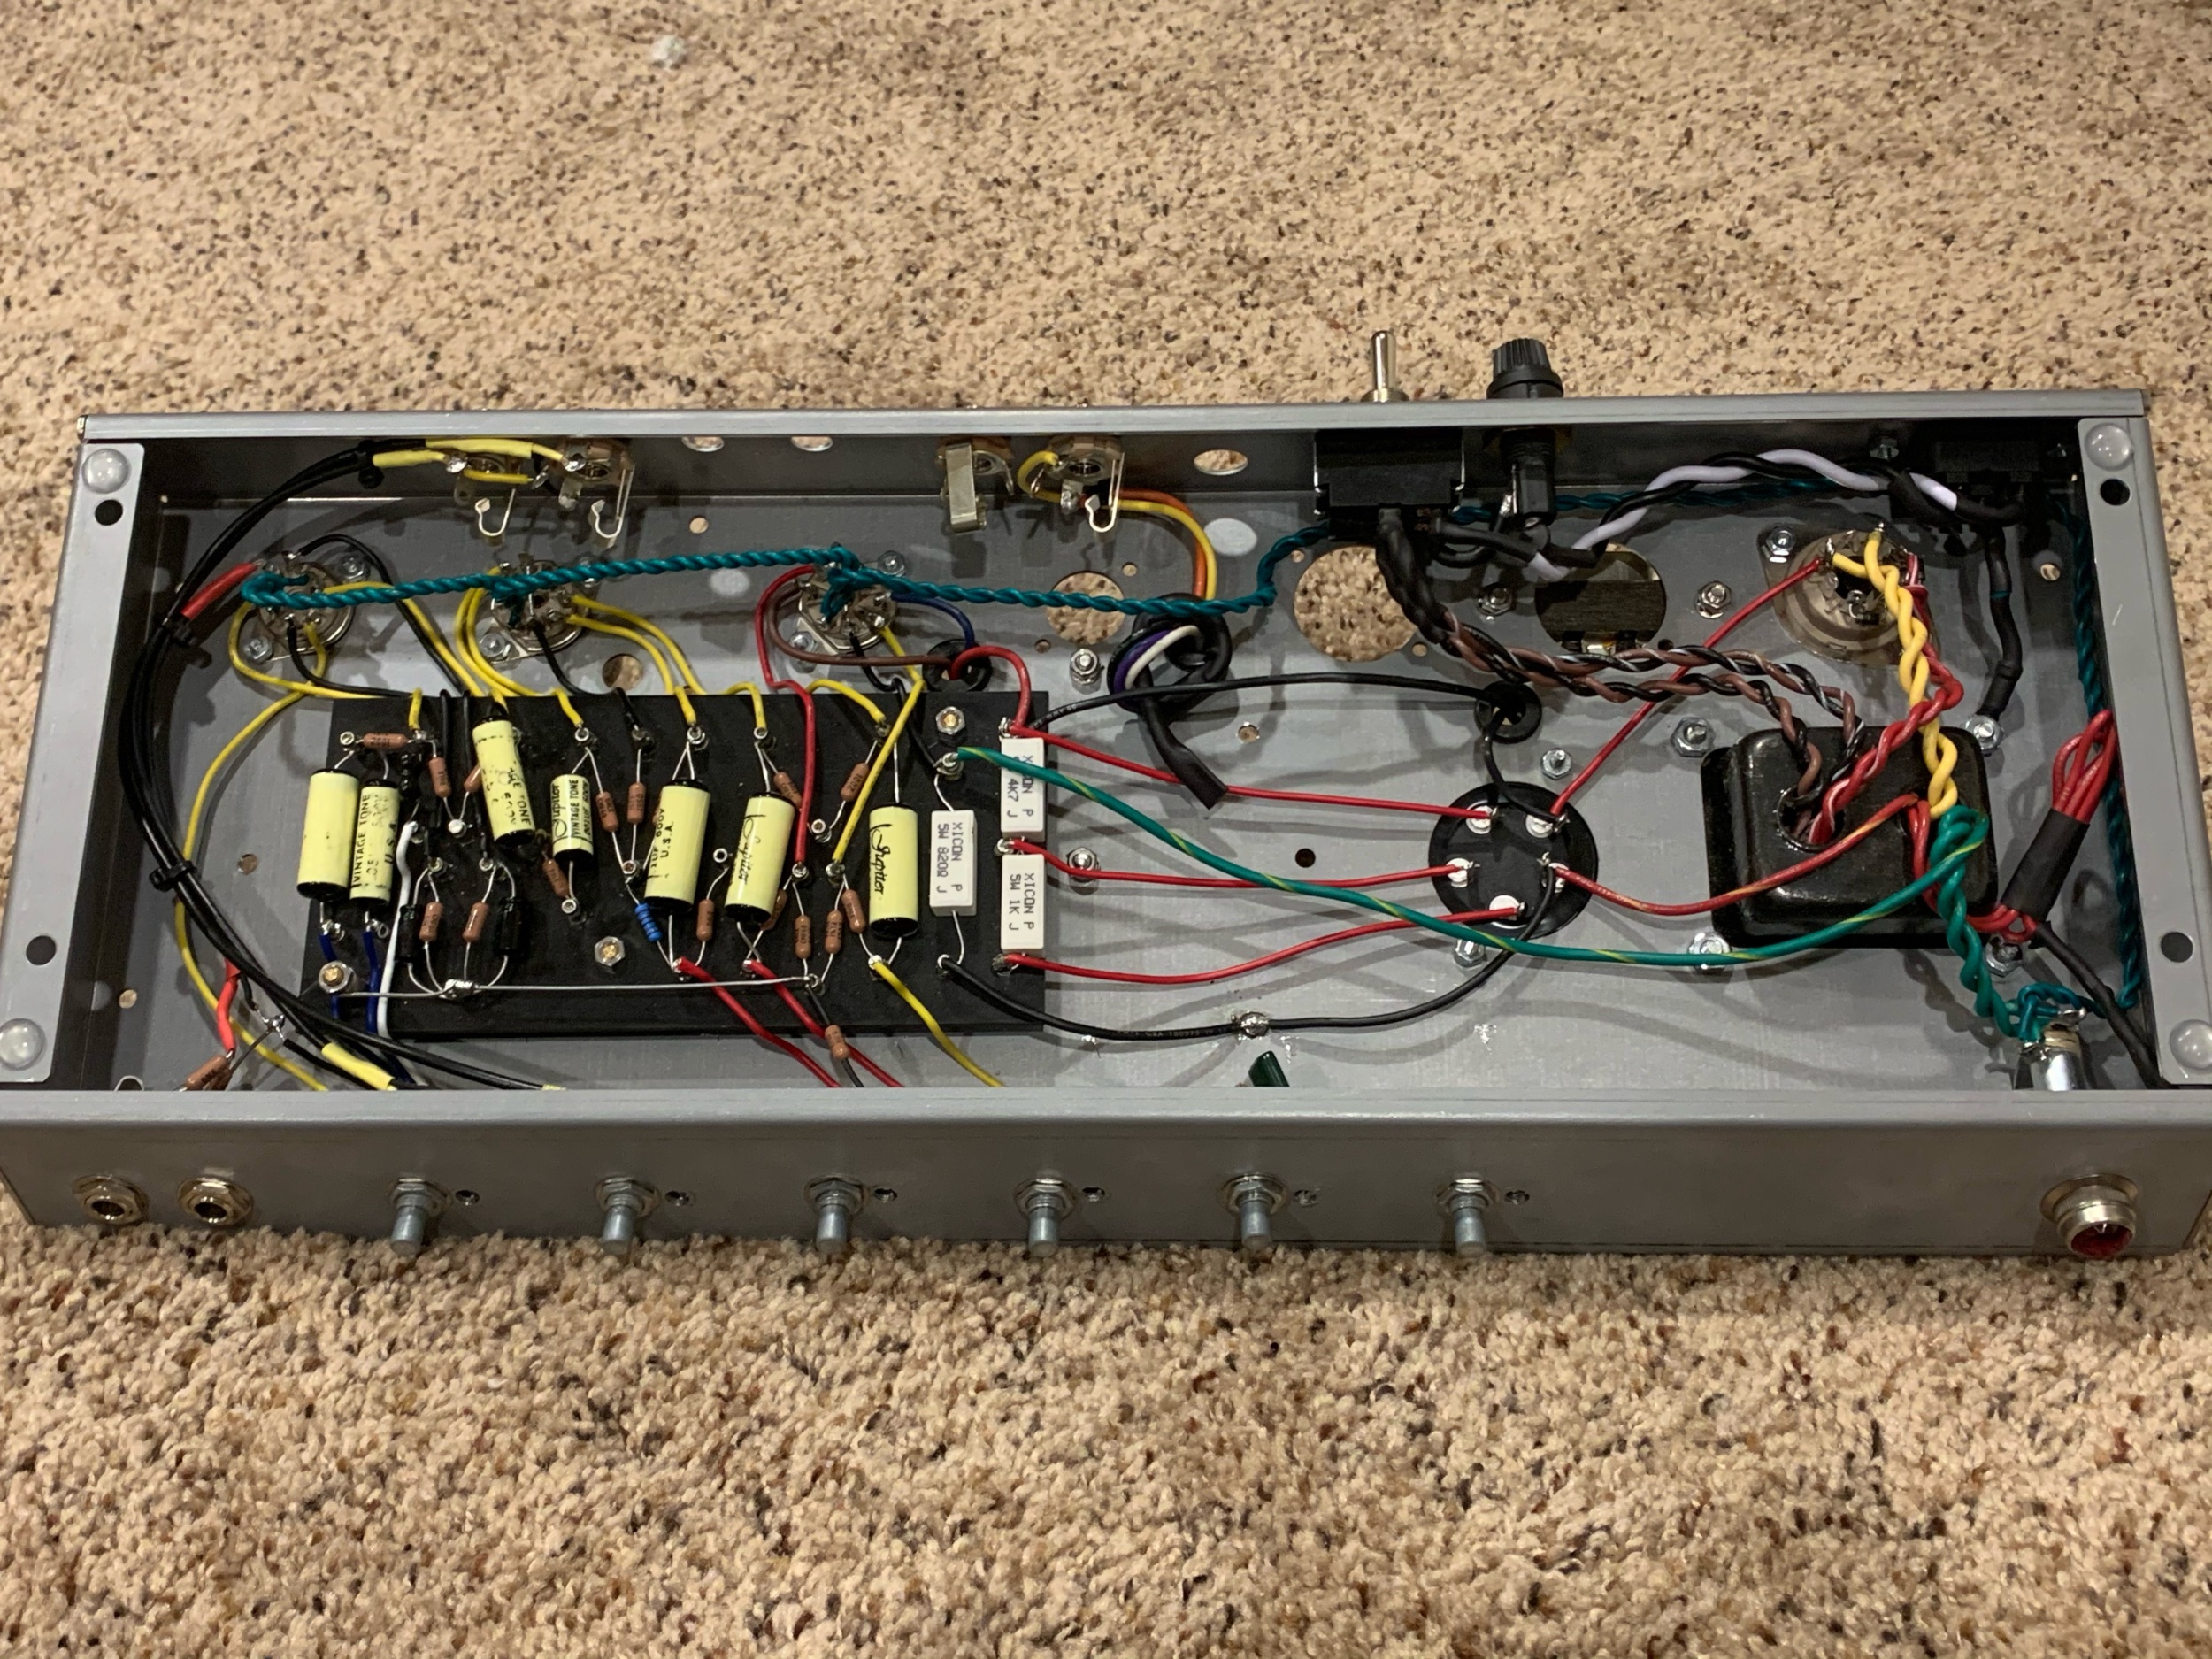
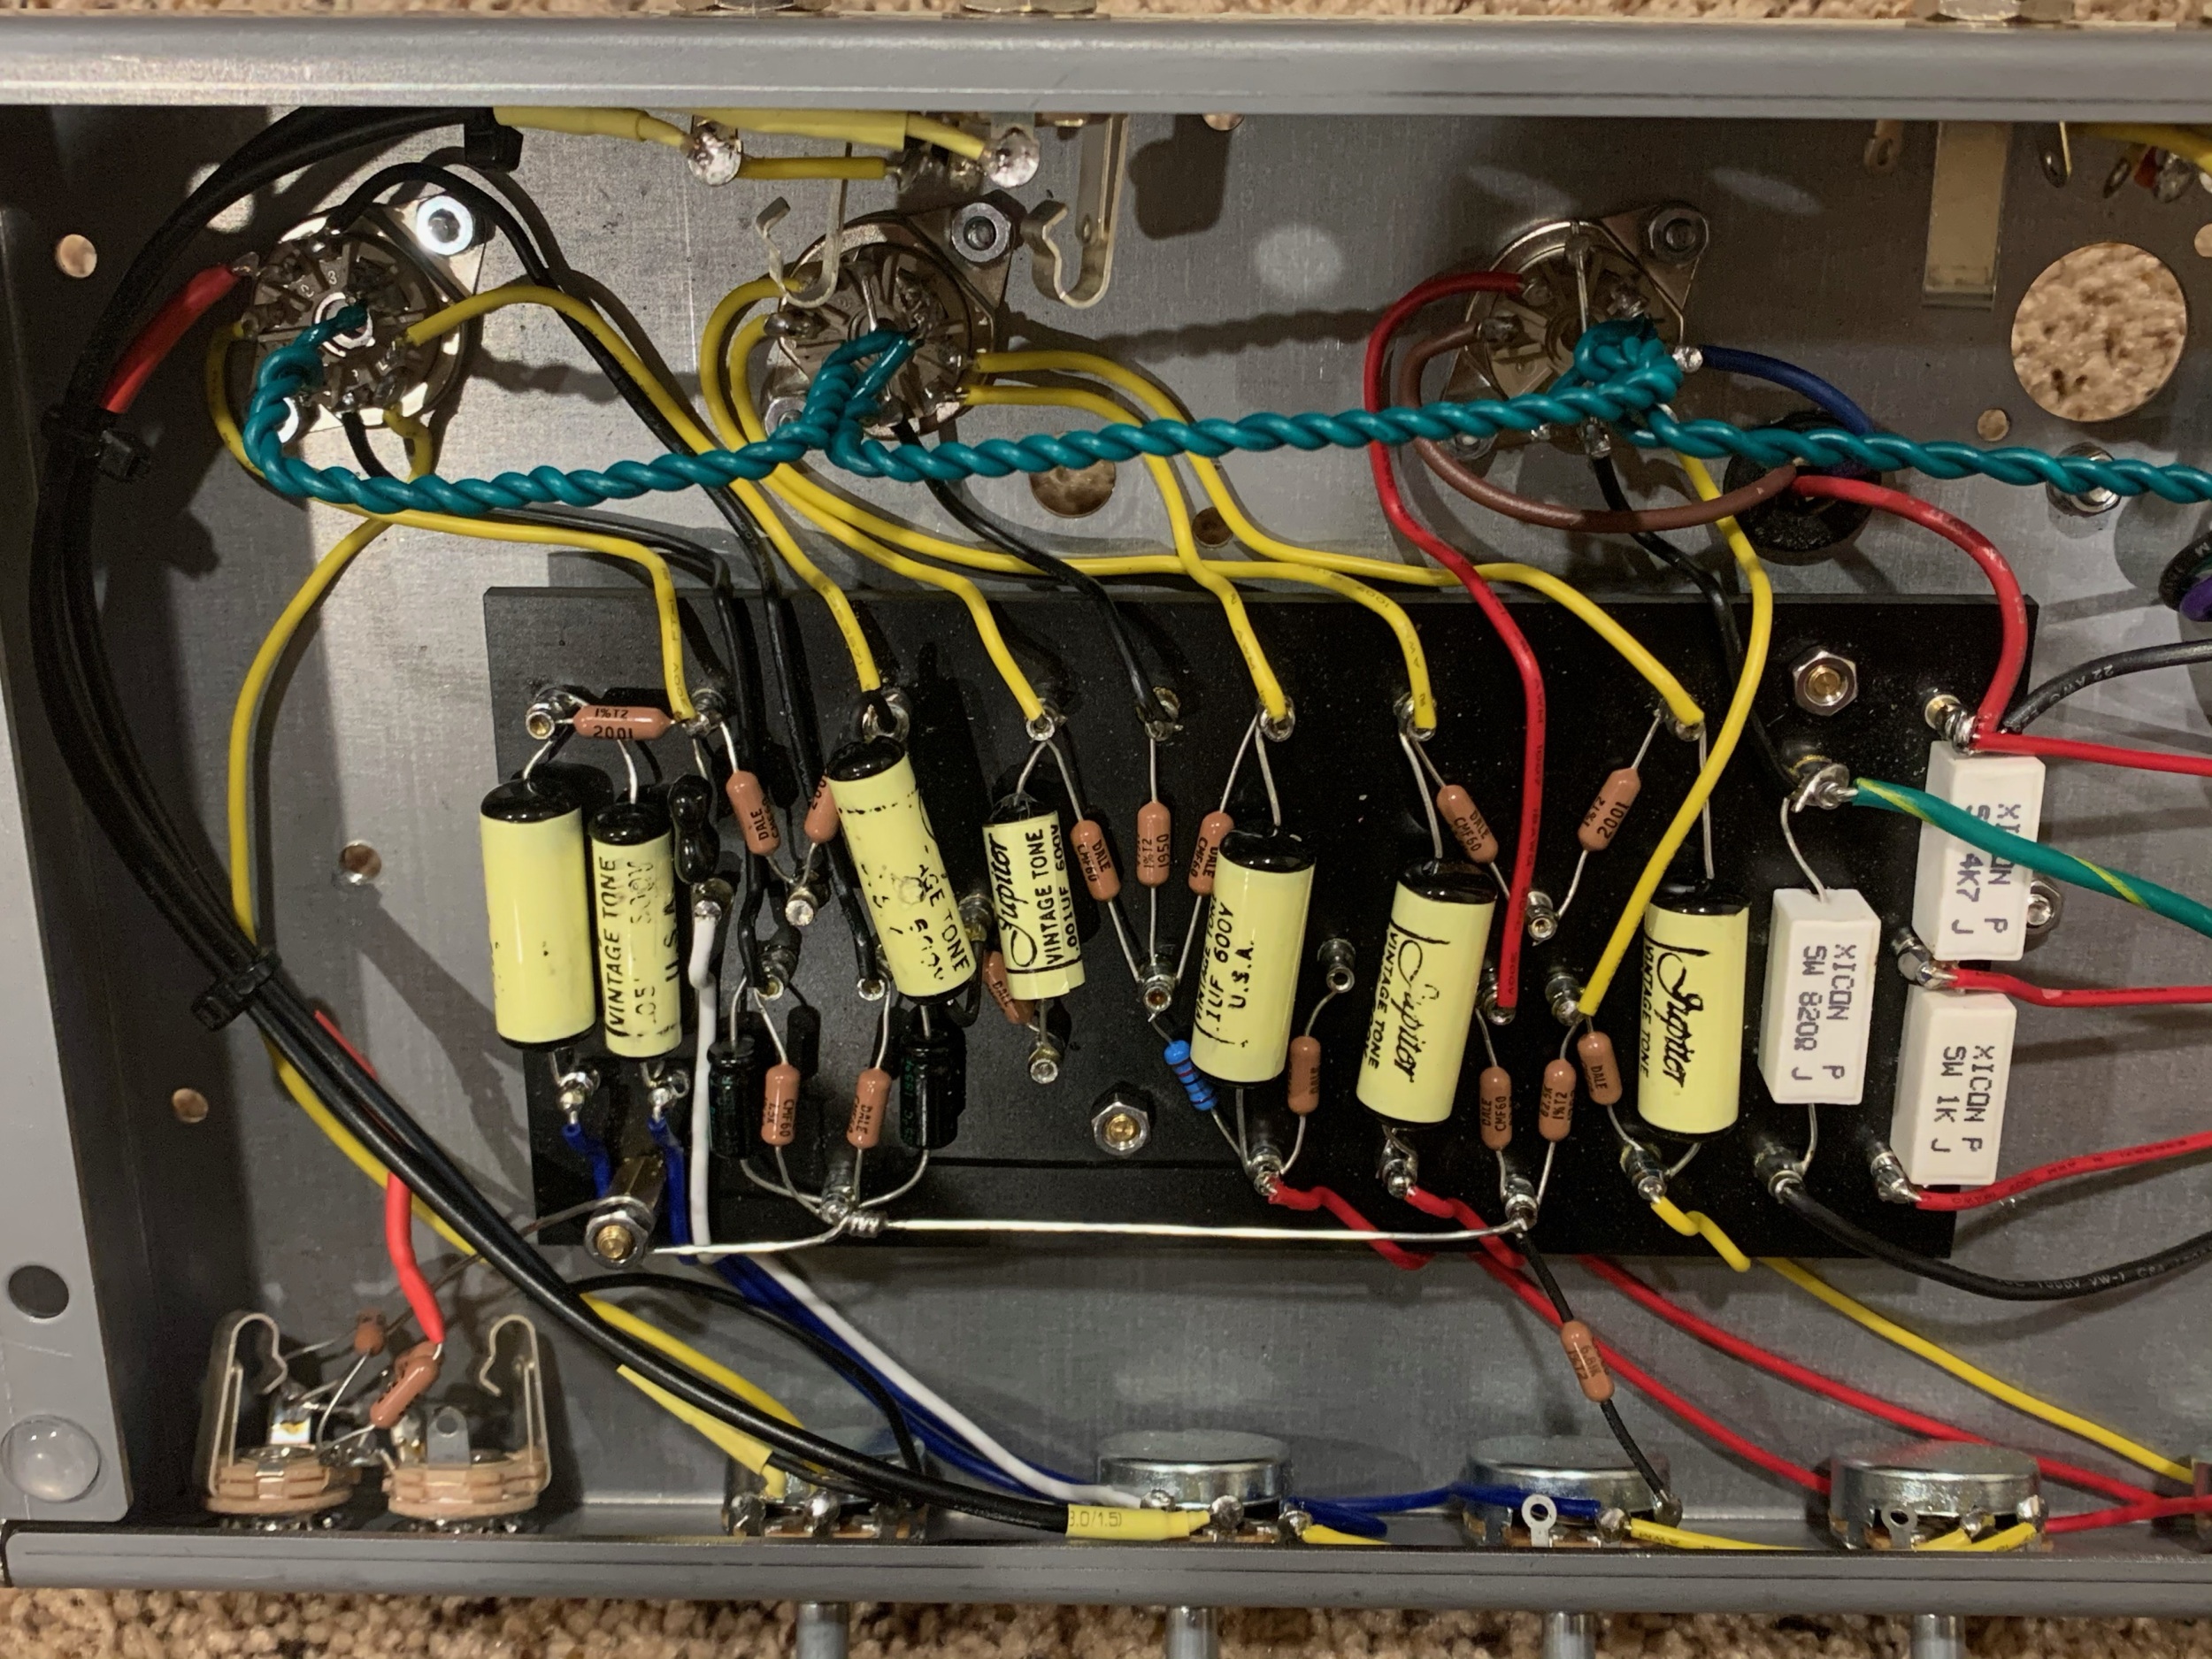
Drew Sutter's Blackvibe Micro
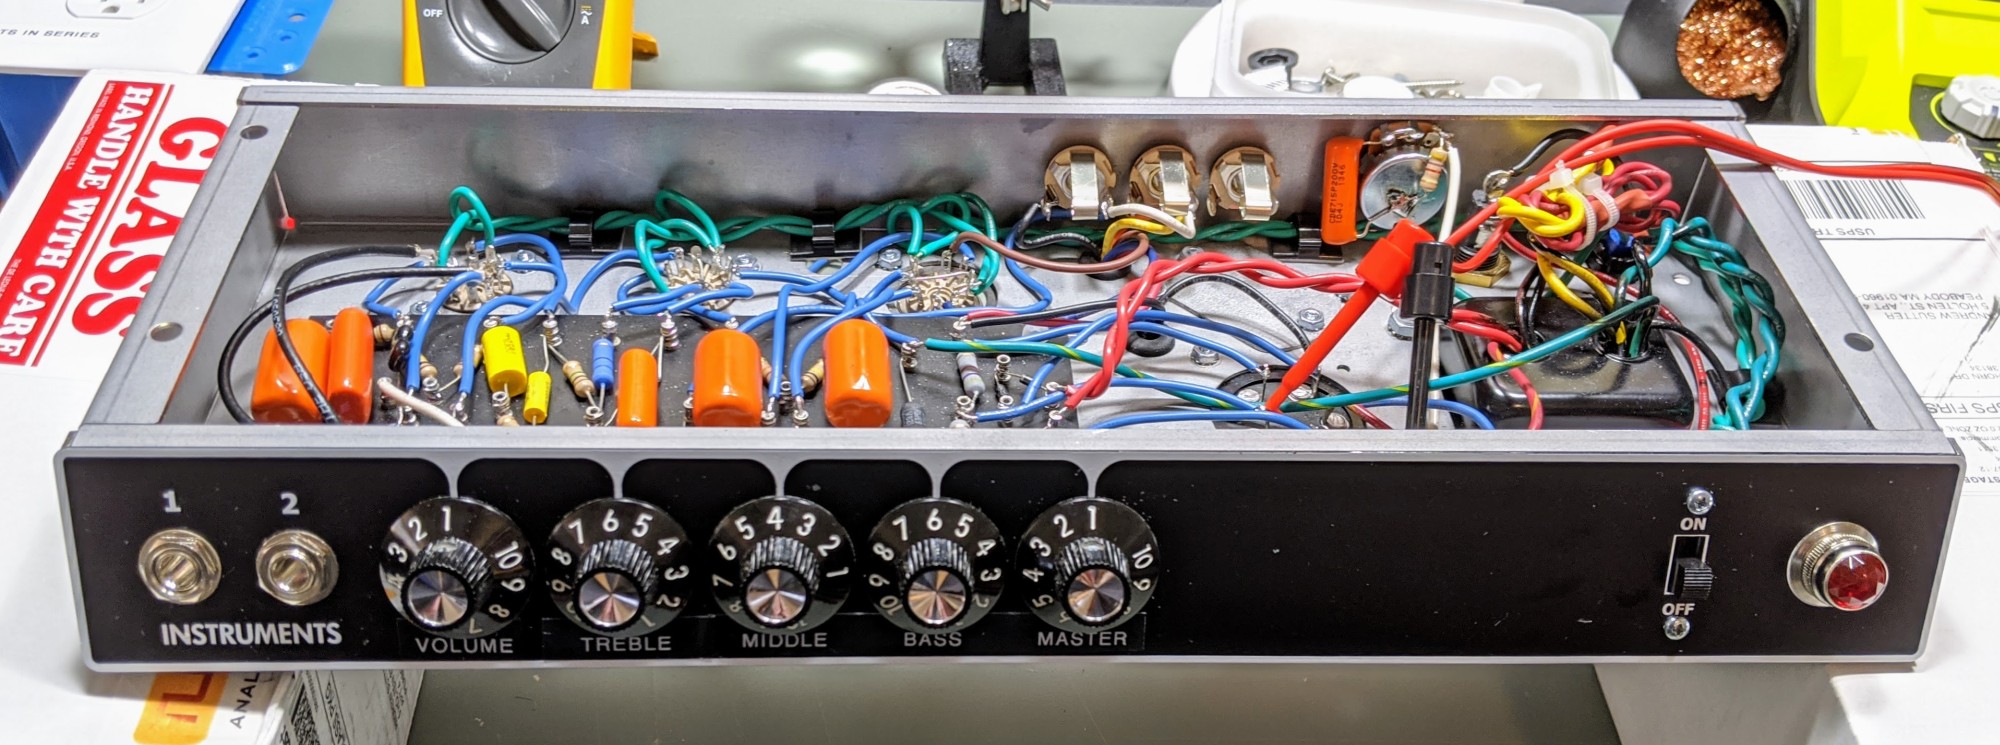
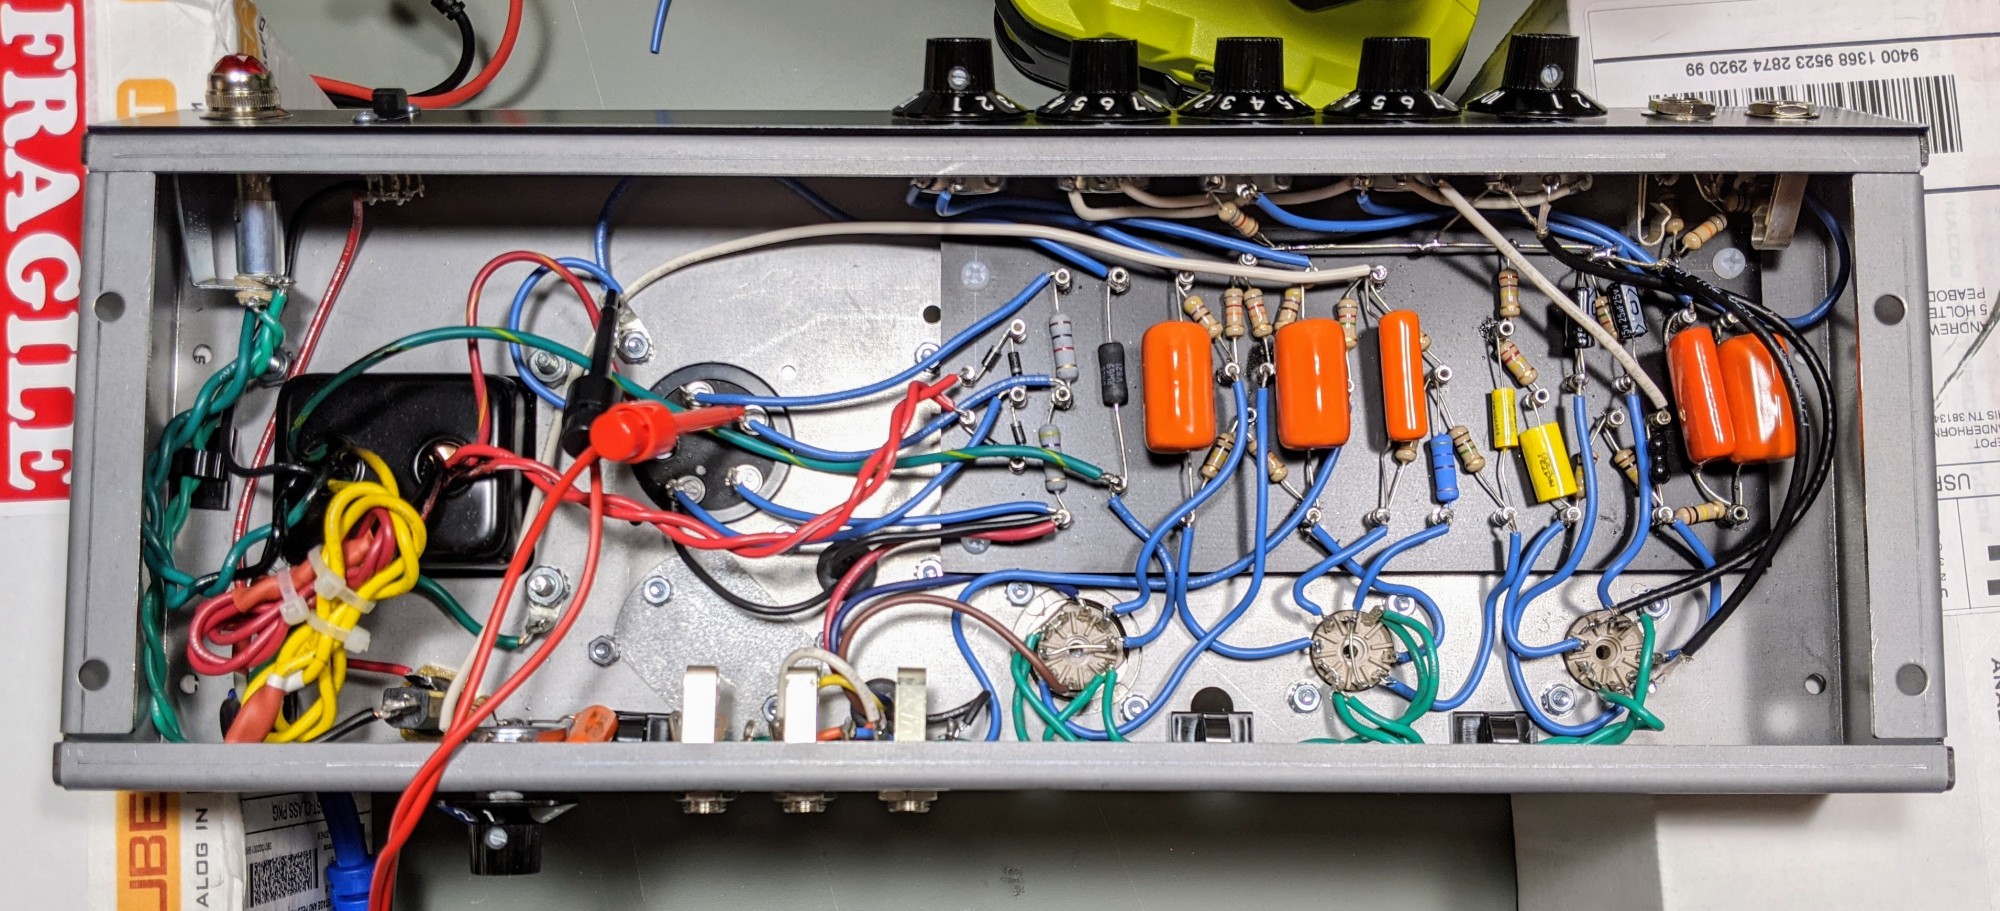
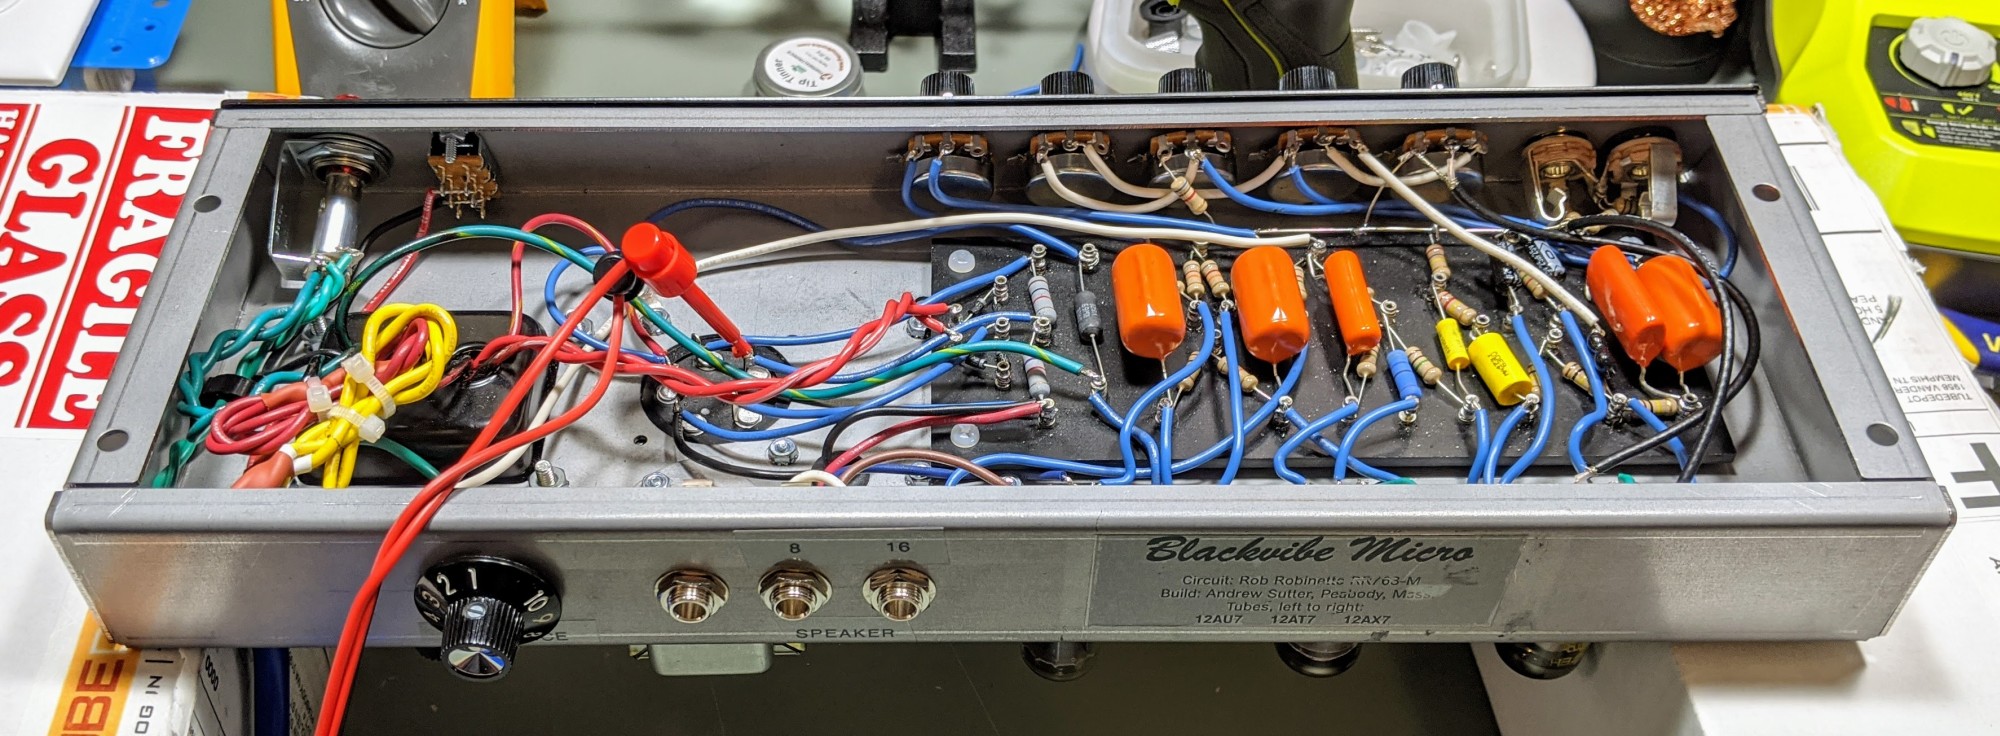
Photos and build by Drew Sutter.
Speaker Recommendations
The amp sounds great with full size cabs and speakers but I believe the Princeton Reverb sounds best with a 10" speaker. If you want something different you can use four 6 inch speakers in a cab and call it a Super Reverb Micro. A 10 or 12 inch speaker works great for a Vibroverb Micro but you can use a 15" just like a real Vibroverb.
Weber California 15 in ceramic 80 watt and AlNiCo is an excellent choice. The Weber California 15" was designed to mimic the JBL D130 which was a Fender Vibroverb OEM speaker (along with the Jensen C15n in the next paragraph). The 80 watt, 8 ohm ceramic version is much less expensive but louder than the AlNiCo version. I highly recommend the paper or "LargeH" dome option over the aluminum dome. The "LargeH" dome (large hole cloth) was designed to tame the brightest amps so use it if you prefer a darker tone.
Jensen C15n AlNiCo is the modern equivalent of what the AB763 Vibroverb came with from the factory and it gets goods reviews. American voice and relatively inefficient so not as loud as other speakers.
If you prefer a 12" speaker my recommendation is the Weber 12F150 ($117, 8 ohm, 25w, light dope, standard dust cap) which is their go-to blackface speaker. Their $52 Weber Ceramic Signature 12" is also a great blackface speaker.
If you use a Princeton Reverb cab then I recommend you go with Weber's Princeton Reverb recommendation, the 10 inch Weber 10F150T ($97, 8 ohm, 25 watt, light dope, standard dust cap). A less expensive choice is the very nice $47 Weber Ceramic Signature 10". Remember to ask Weber for their free speaker break-in service.
You can upload the Blackvibe Micro DIYLC Hoffman board file to Hoffmanamps.com and Doug will make an eyelet or turret board for you. The empty board with eyelets or turrets installed is $14 + shipping.
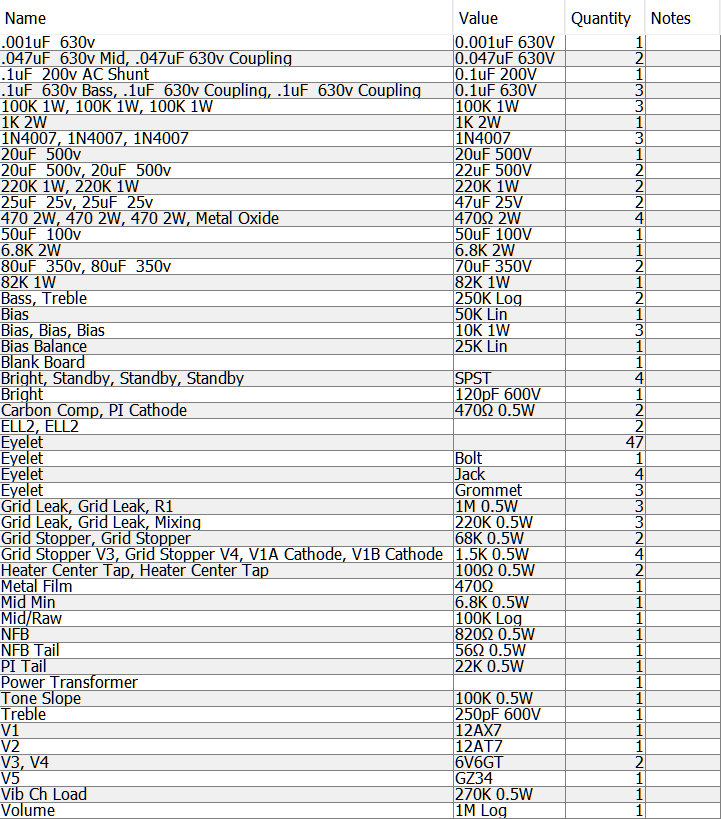
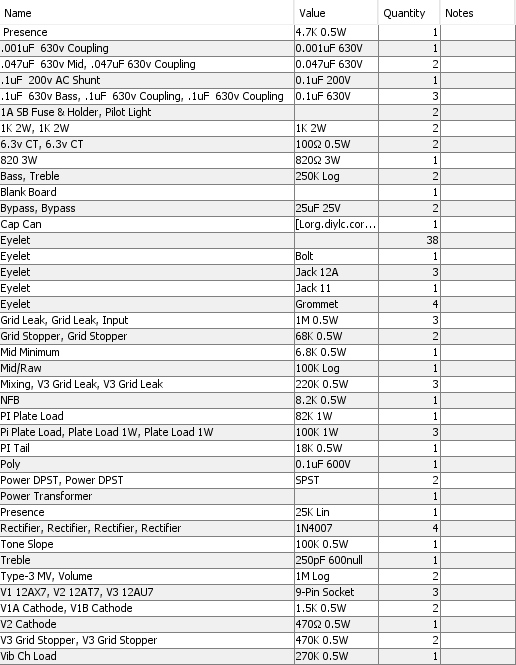
Blackvibe Micro Bill of Materials
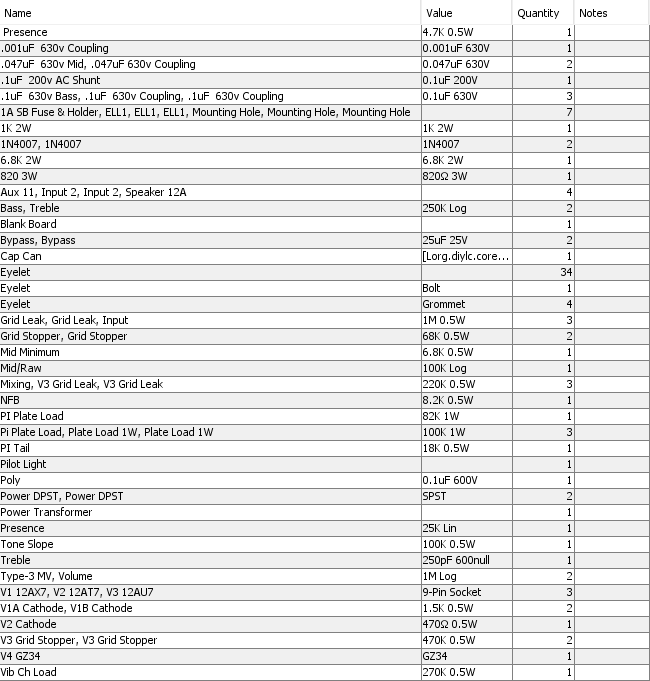
You'll also need a chassis, cab, speaker, power cord, wire, power and output transformers and choke. The 40/20/20/20uF 500v JJ cap can and mounting clamp came from Mojotone.com.
To summarize the parts sources I used: I purchased the Princeton Reverb chassis and most parts from Mojotone.com. I purchased the Classictone power transformer and choke from AmplifiedPartsDirect.com. I had to go to Mouser.com to get the Hammond 125B output transformer. Doug Hoffman at HoffmanAmps.com made my turret board. I used to make my own turret boards but with HoffmanAmps.com accepting DIYLC files to make custom boards it's just too easy and inexpensive to bother with making them myself.
Remember when playing the Blackvibe Micro you need to set the Mid tone control and the Presence control full down to get standard Vibroverb tone. The Mid tone control also has more authority than the typical blackface Mid control and near full up most of the blackface mid scoop is removed for a boost in gain and a tweed-like tone. When you turn up the Mid control for boost will need to roll back the Bass. The Presence control is a late-in-the-circuit tone control that can be used to fine tune your clean and overdrive top end.
Many AB763 blackface modifications apply to the Blackvibe Micro.
If you prefer a simpler solid state rectifier here's the layout:
Solid State Conventional Rectifier Option
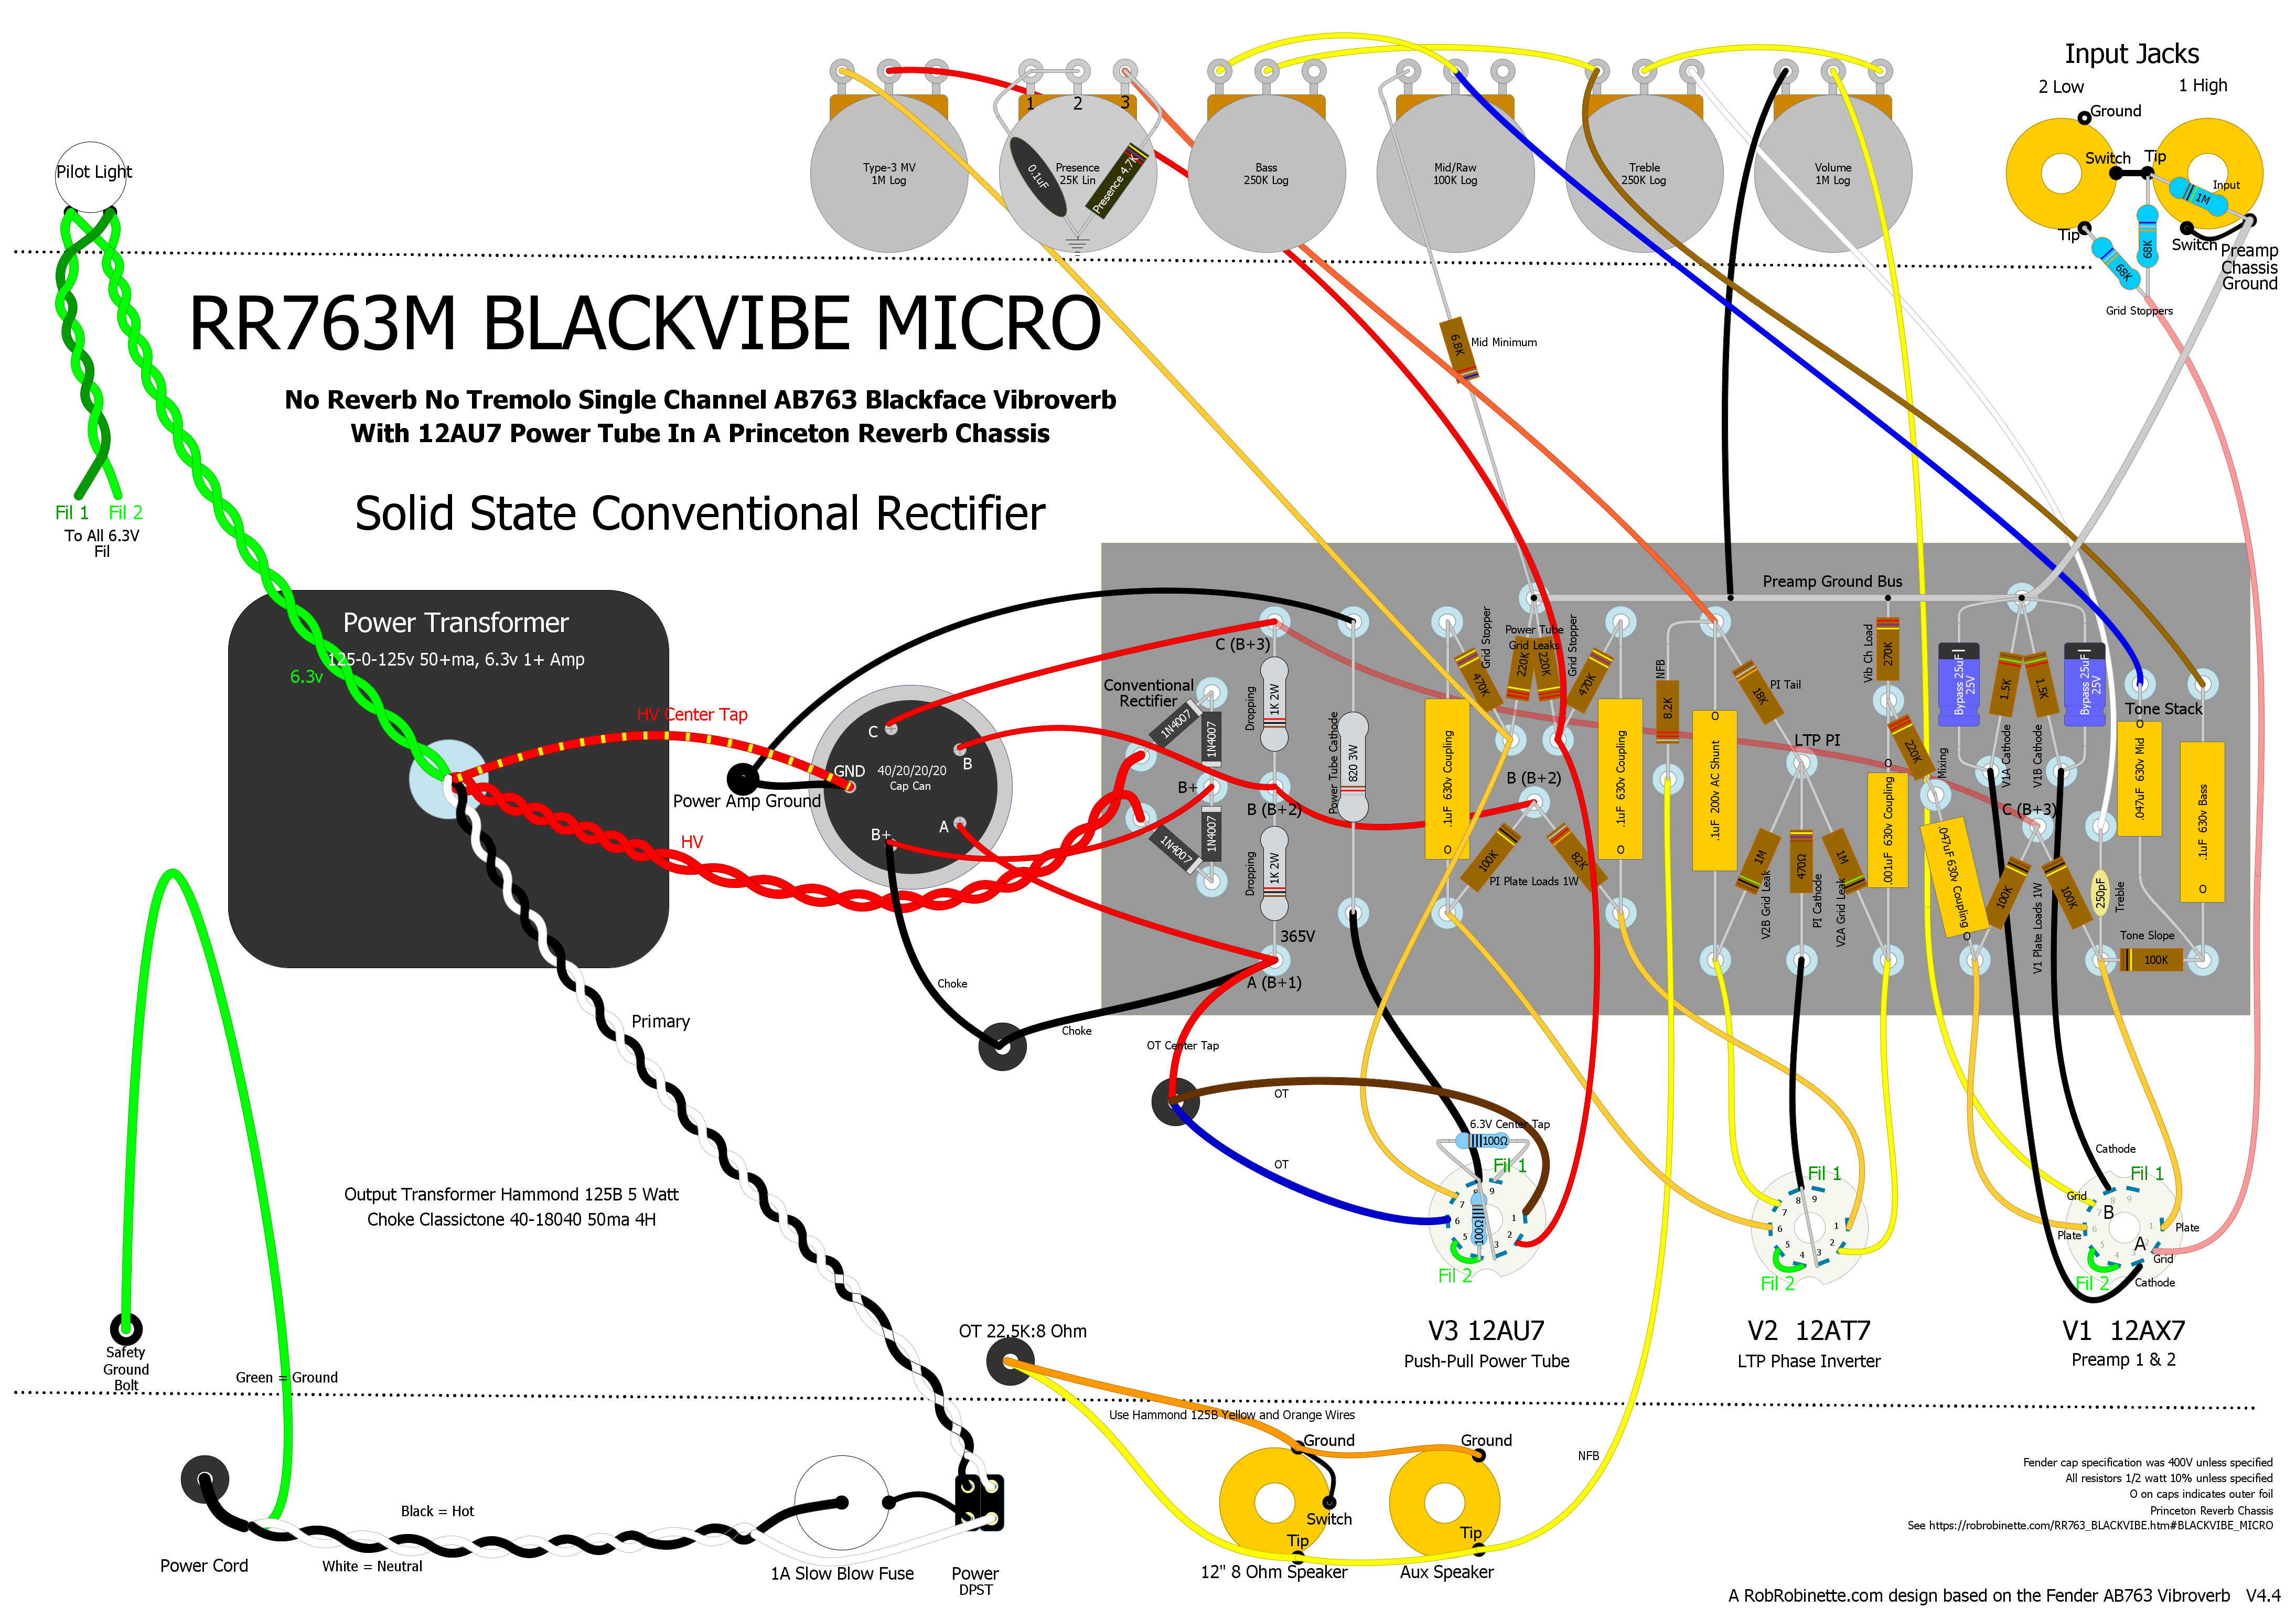
Larger circuit board is used to add the four 1N4007 diode conventional rectifier circuit which uses a high voltage center tap. Click the layout to see the high definition version. Download the Hoffman board DIYLC file here, the pdf here and DIYLC file here.
Bridge Rectifier Layout
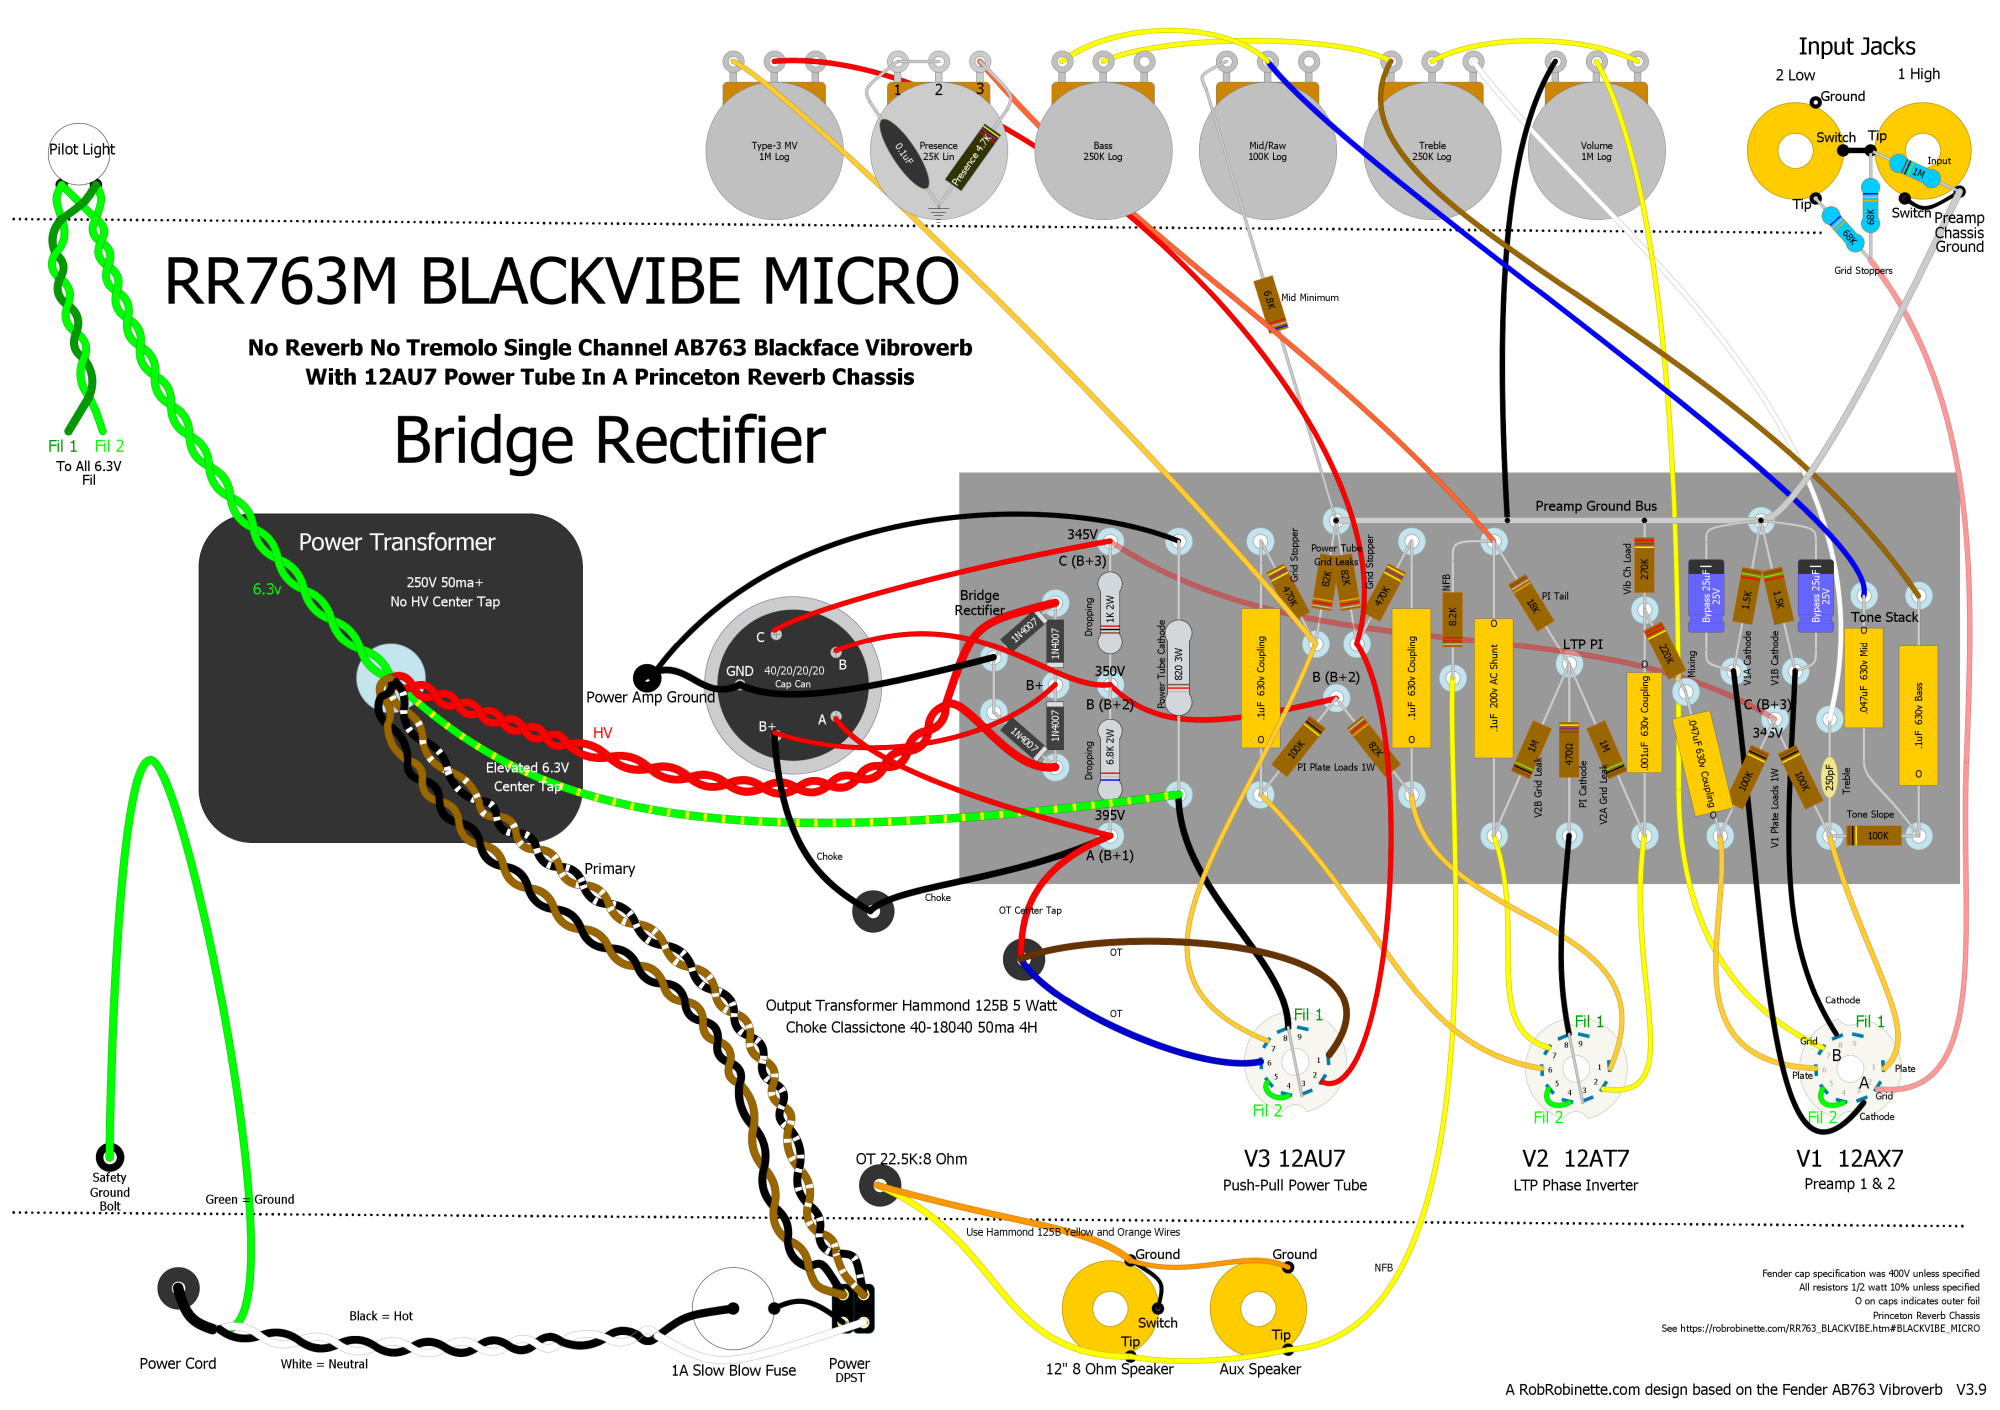
The 4 solid state 1N4007 diodes on the left end of the circuit board are configured as a bridge rectifier and use a 250V 50ma+ power transformer with no high voltage center tap. Don't forget the jumper that ties the left side of the rectifier together for the ground.
Blackvibe Micro SS Rectifier Bill of Materials
You'll also need a chassis, cab, speaker, power cord, wire, power and output transformers and choke.
You can upload the Blackvibe Micro Solid State Rectifier Hoffman board DIYLC file to Hoffmanamps.com and Doug will make an eyelet or turret board for you. The empty board with eyelets or turrets installed is $15 + shipping.
If you want to use a tube rectifier but your power transformer does not have a 5v heater circuit you can use an EZ81 rectifier tube which uses a standard 9 pin socket and the same 6.3v heater circuit as the rest of the tubes. The EZ81 uses 1 amp of 6.3v heater current and is rated for up to a 50uF first filter cap.
EZ81 9-Pin 6.3v Rectifier Tube Option
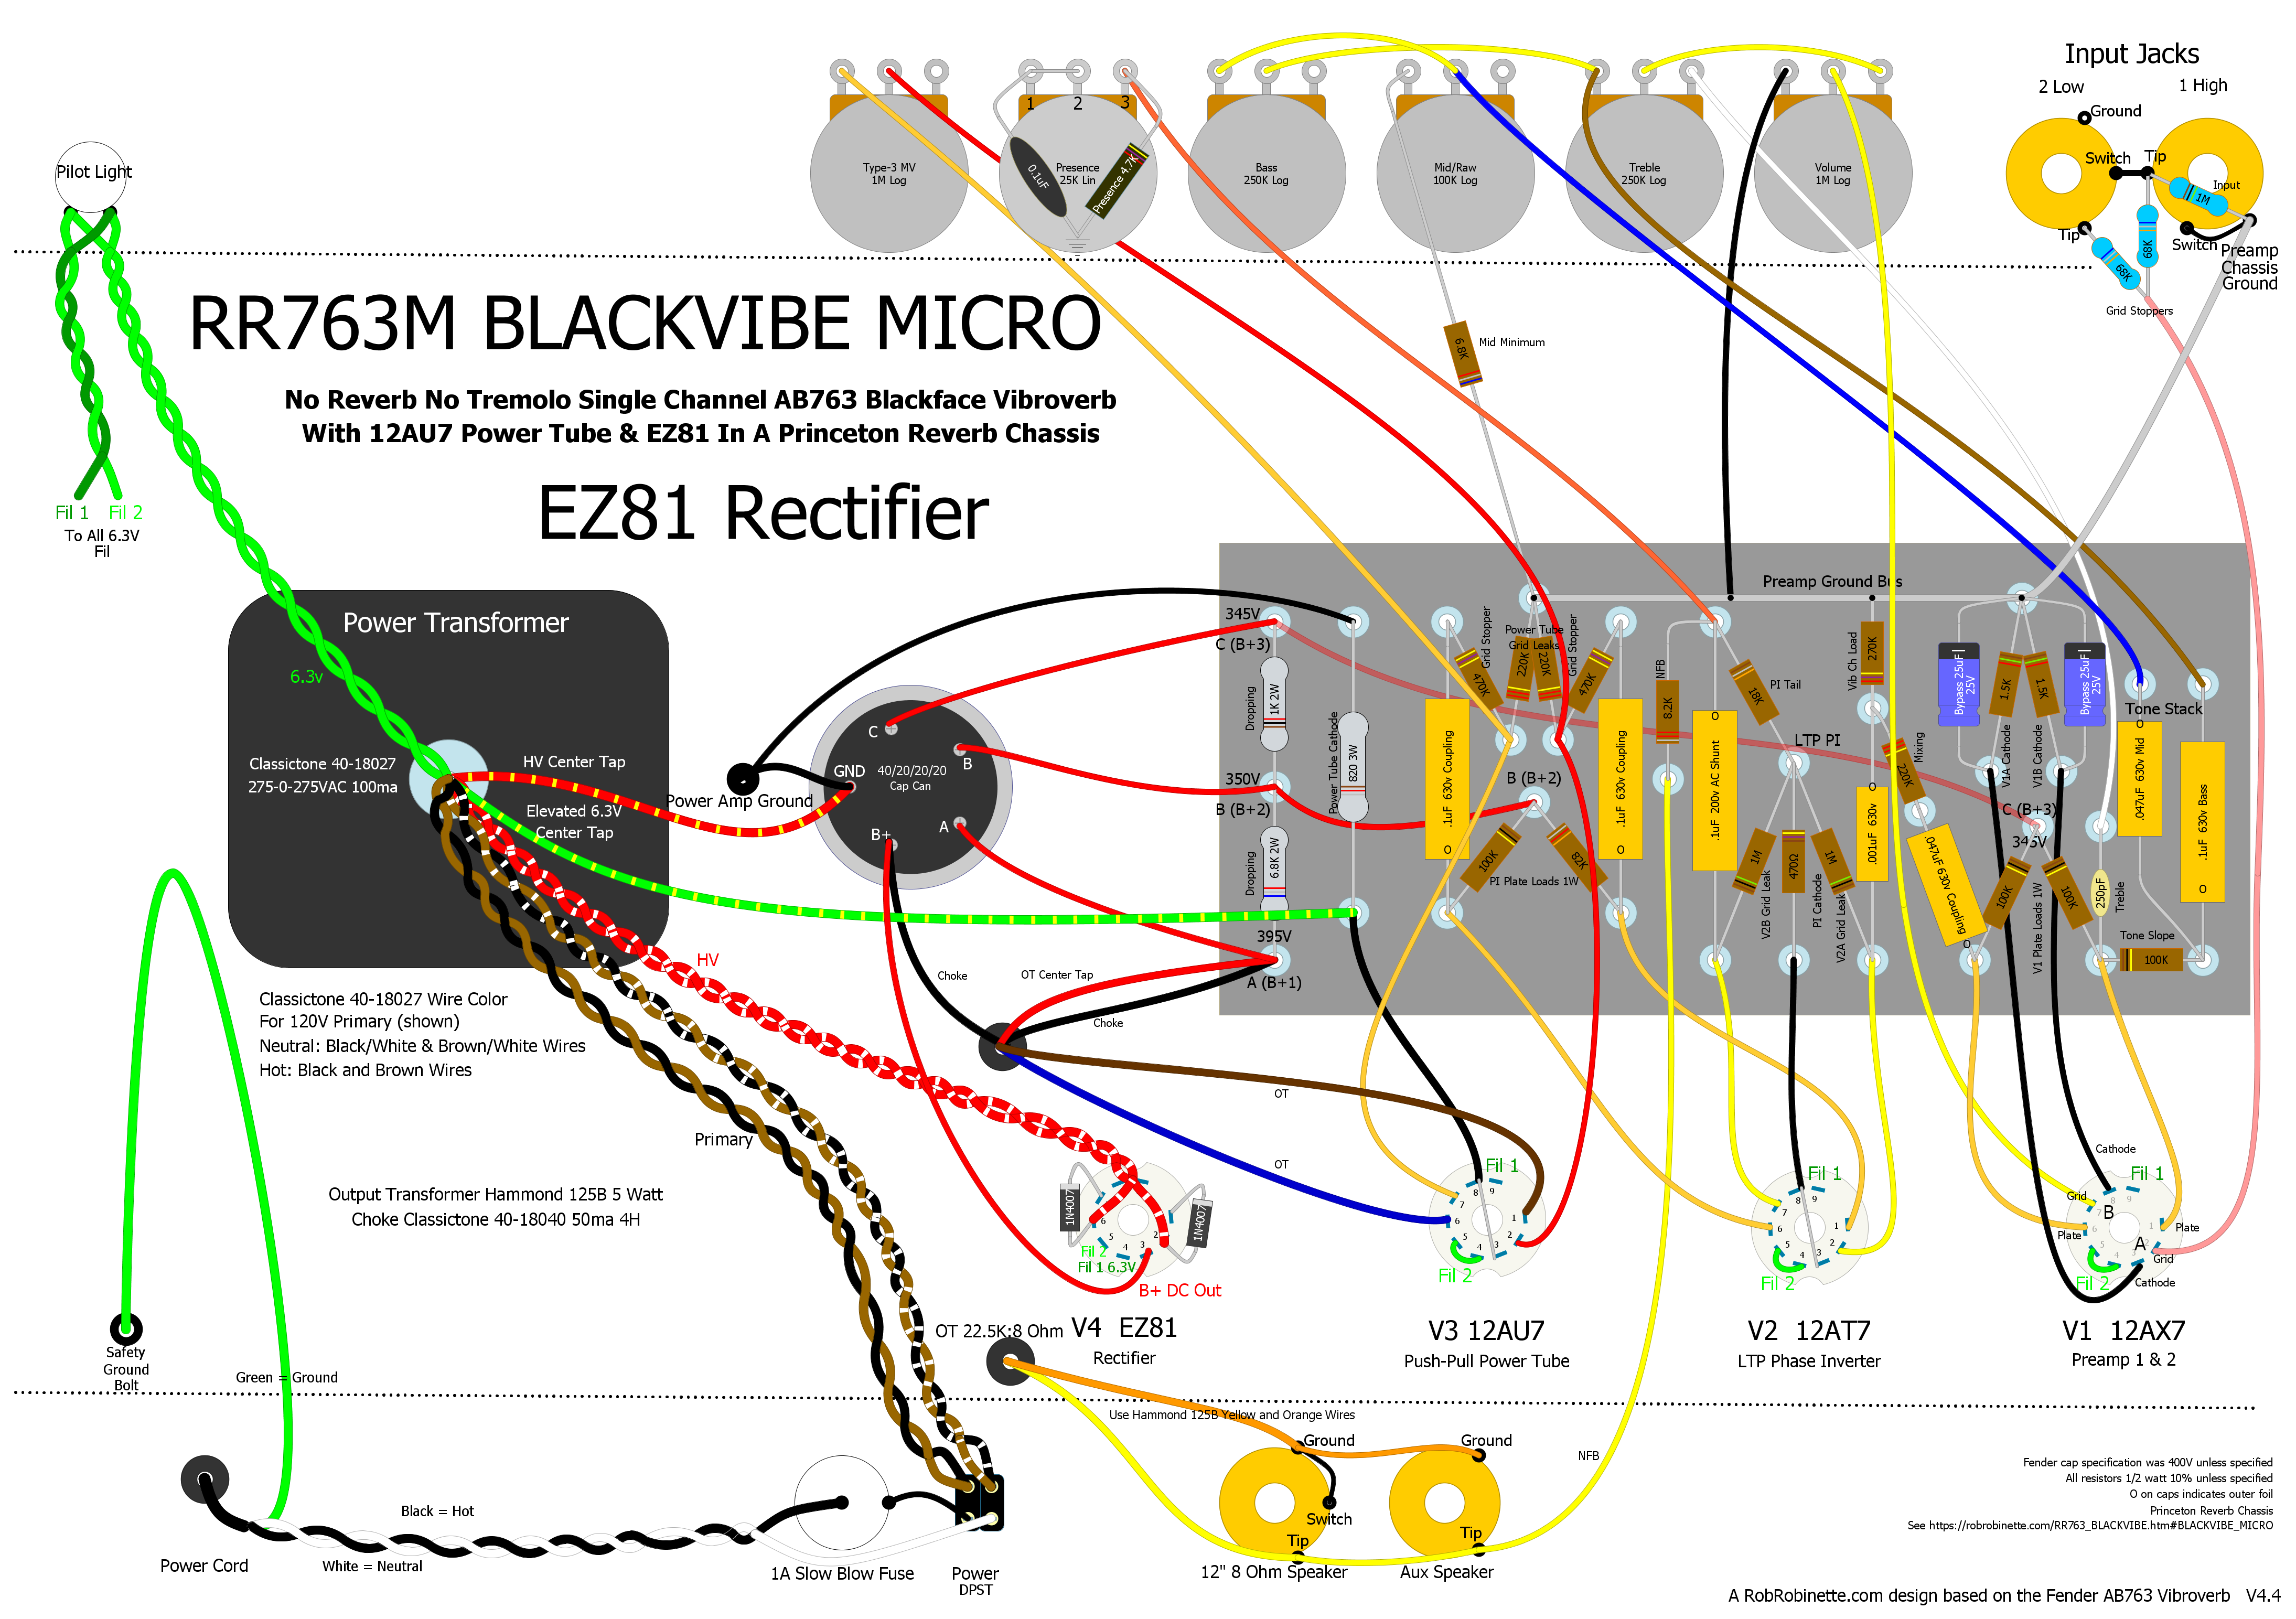
You can use one of the Princeton Reverb's 9-pin sockets to mount an EZ81 rectifier tube. It uses 6.3v heaters just like the other 9-pin tubes so a 5v transformer tap is not needed. The EZ81 rectifier uses pins 4 & 5 for 6.3v heaters. Pins 1 & 7 are the plates. Click the layout to see the high definition version. Download the Hoffman board DIYLC, the pdf here and DIYLC file here.
Blackvibe Micro EZ81 Bill of Materials

You'll also need a chassis, cab, speaker, power cord, wire, power and output transformers and choke.
You can upload the Blackvibe Micro EZ81 Rectifier Hoffman board DIYLC file to Hoffmanamps.com and Doug will make an eyelet or turret board for you. The empty board with eyelets or turrets installed is $15 + shipping.
Drew Sutter's Blackvibe Micro
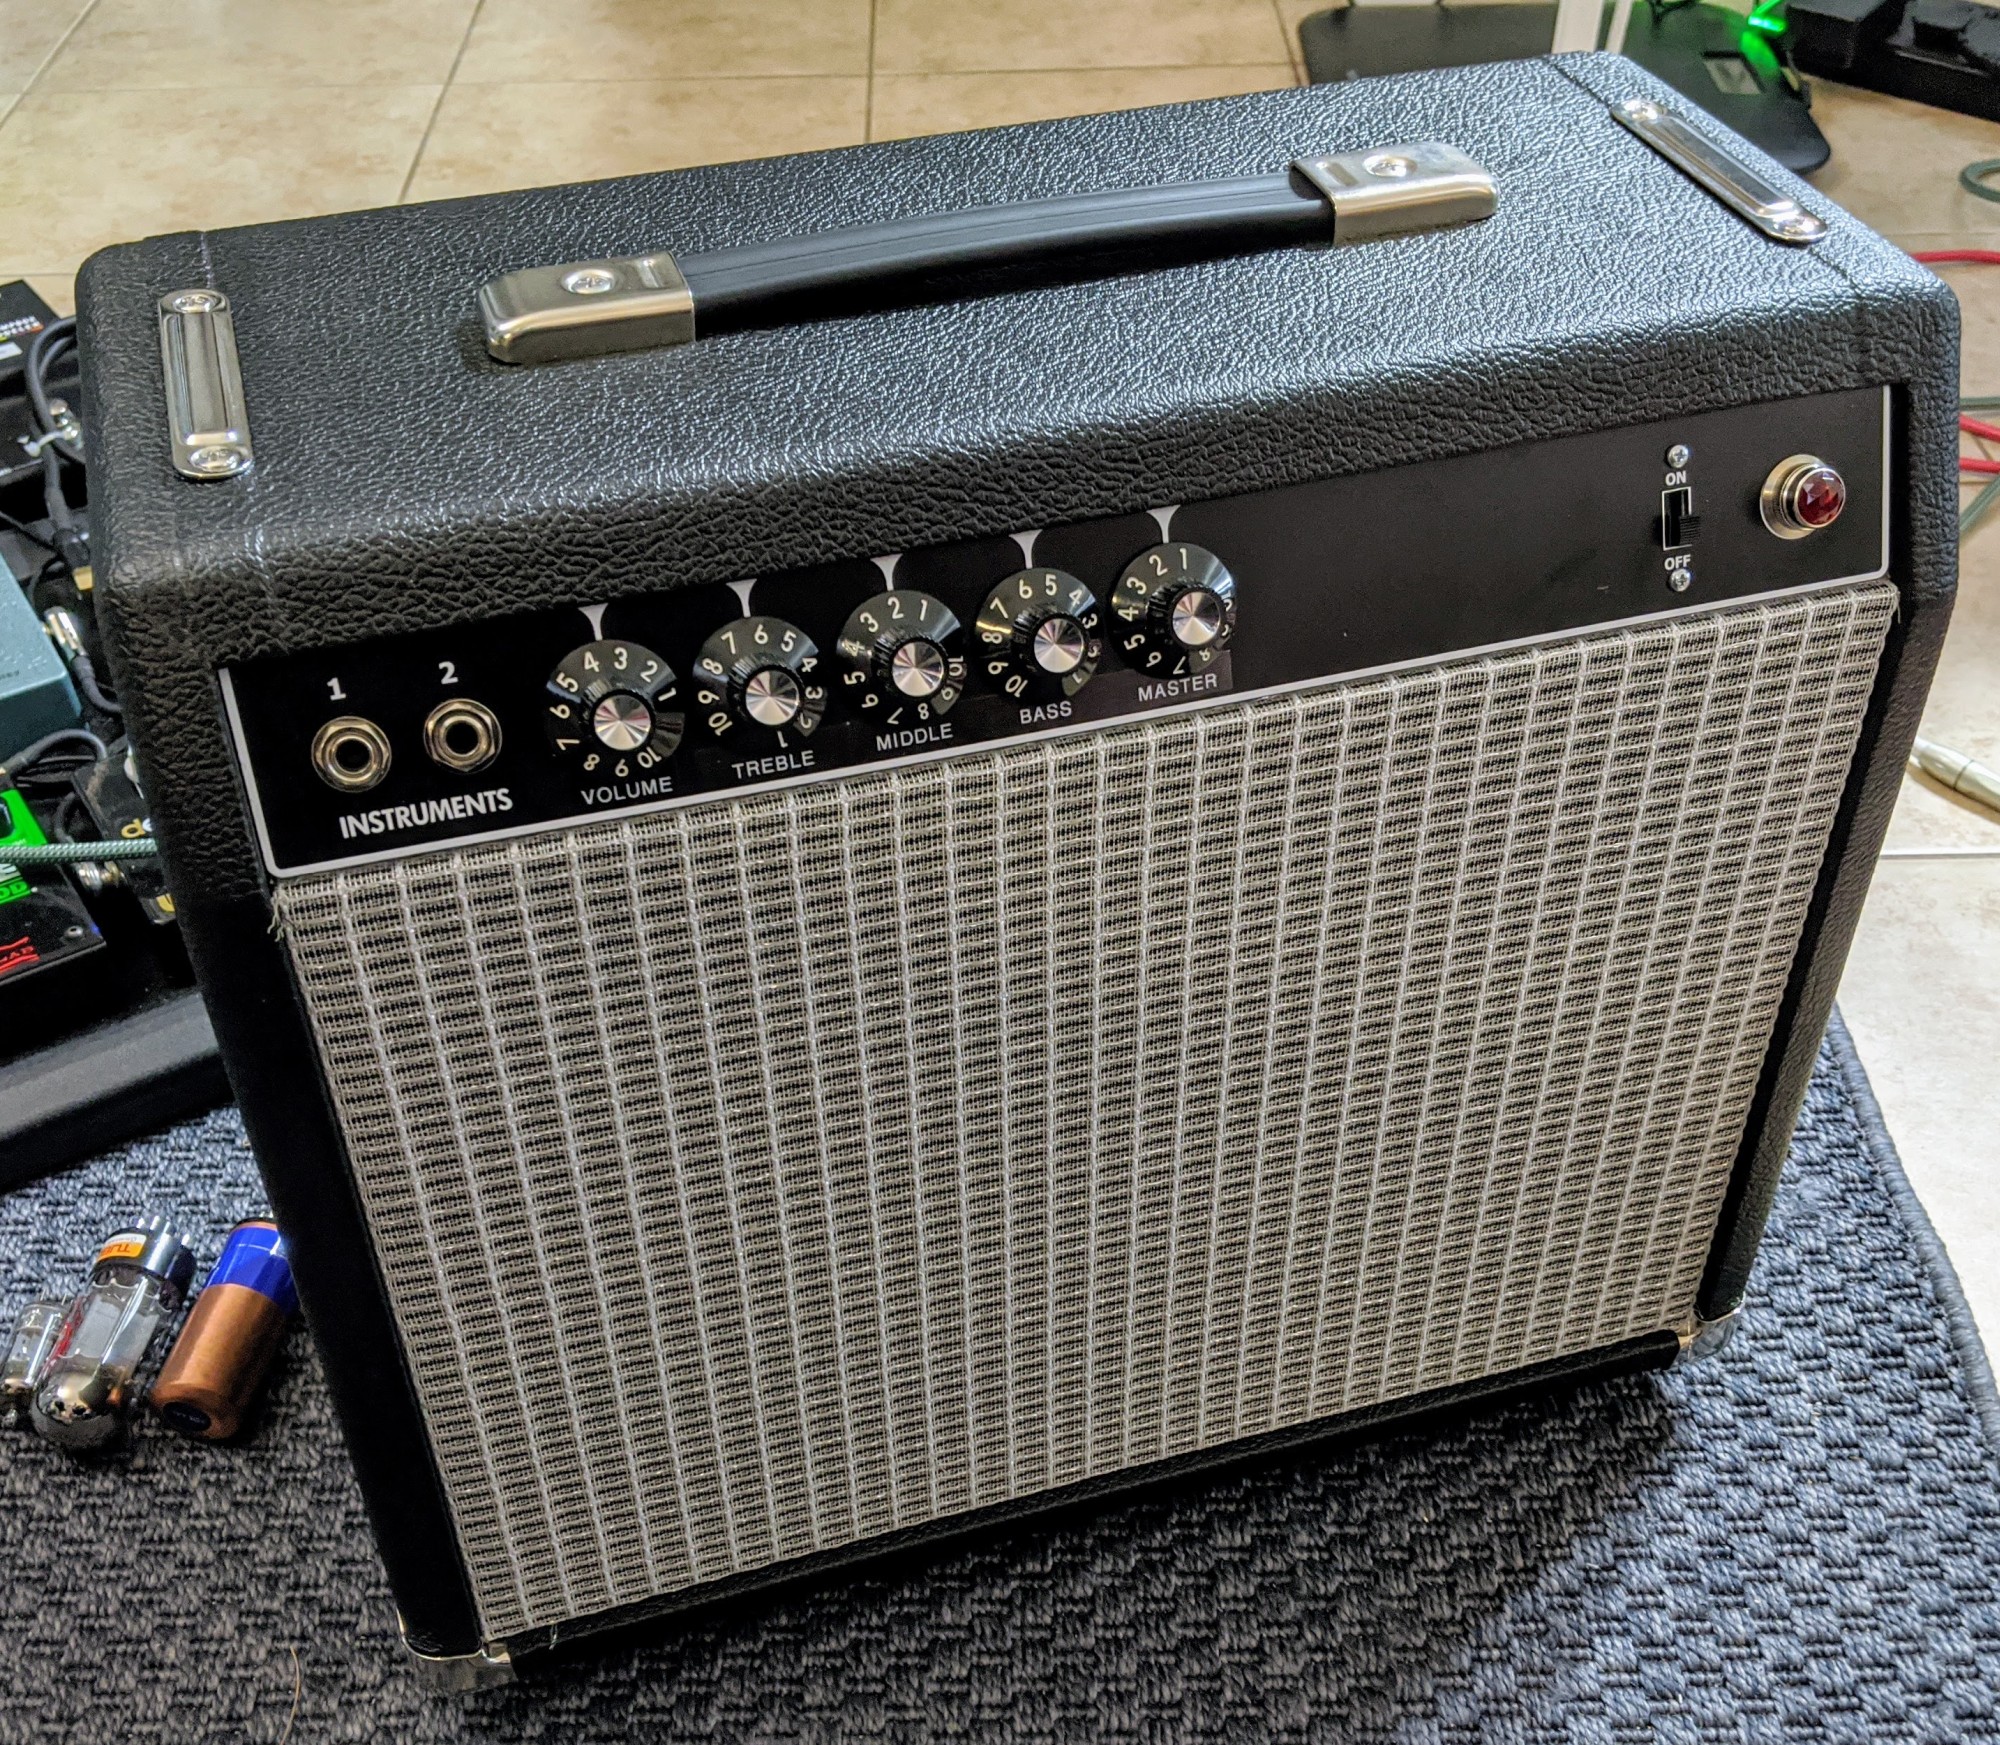
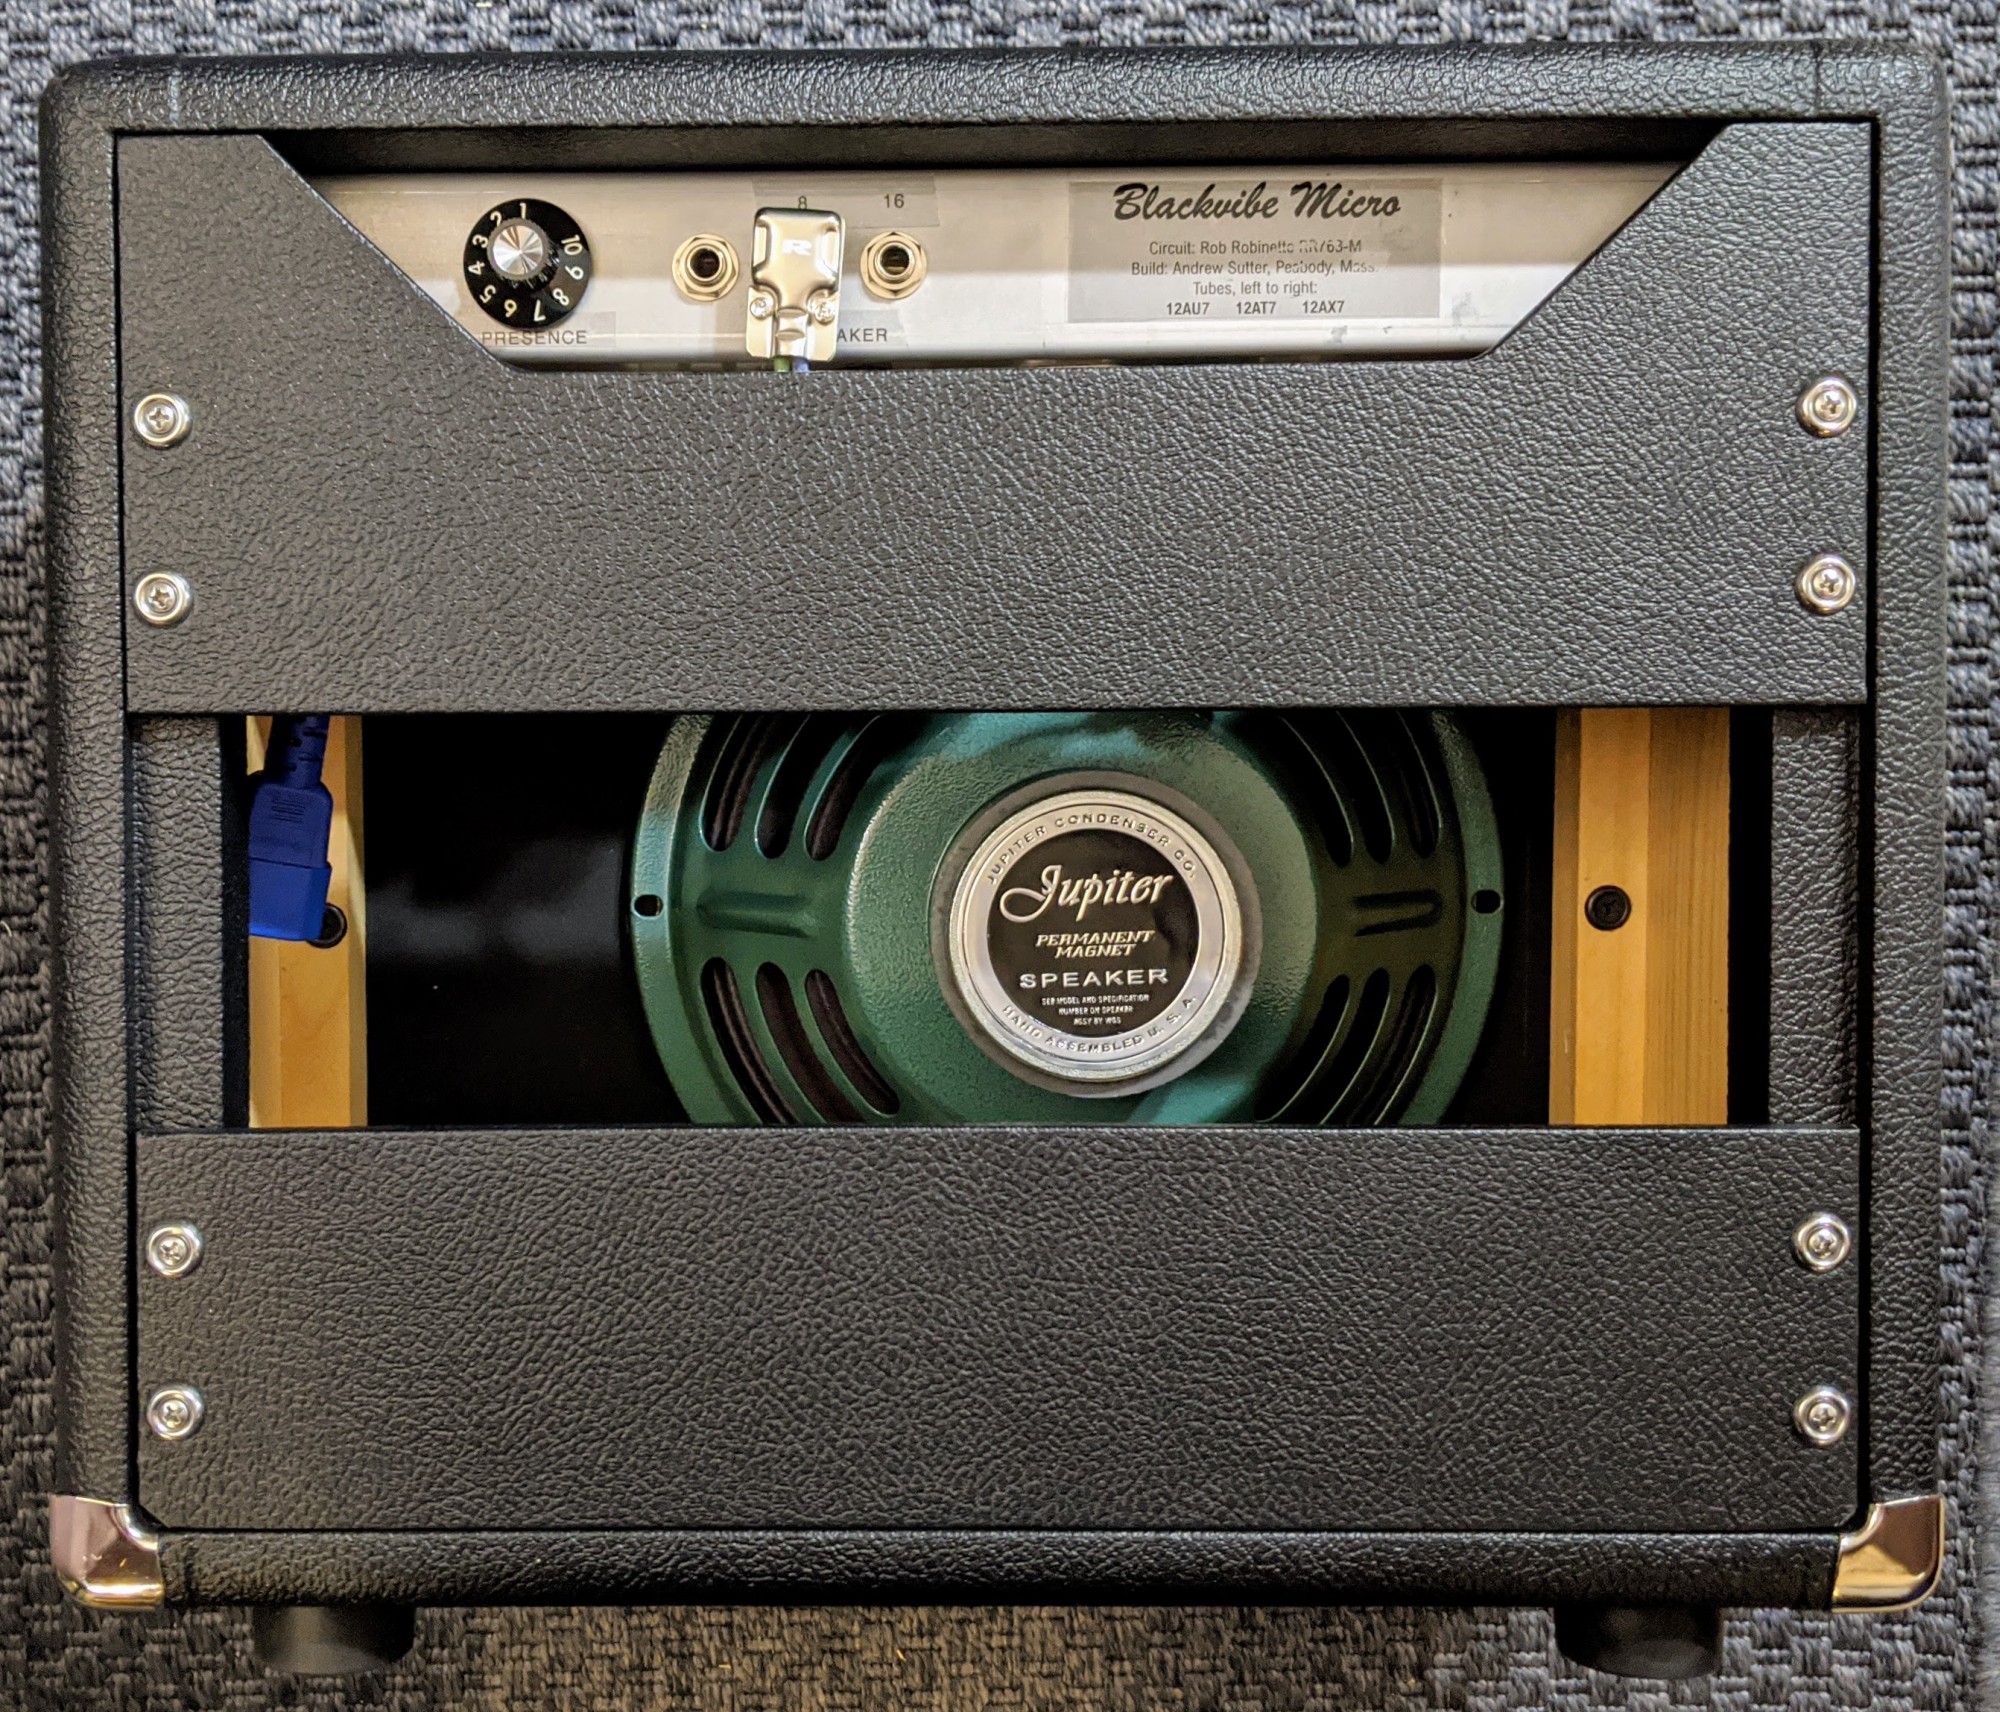
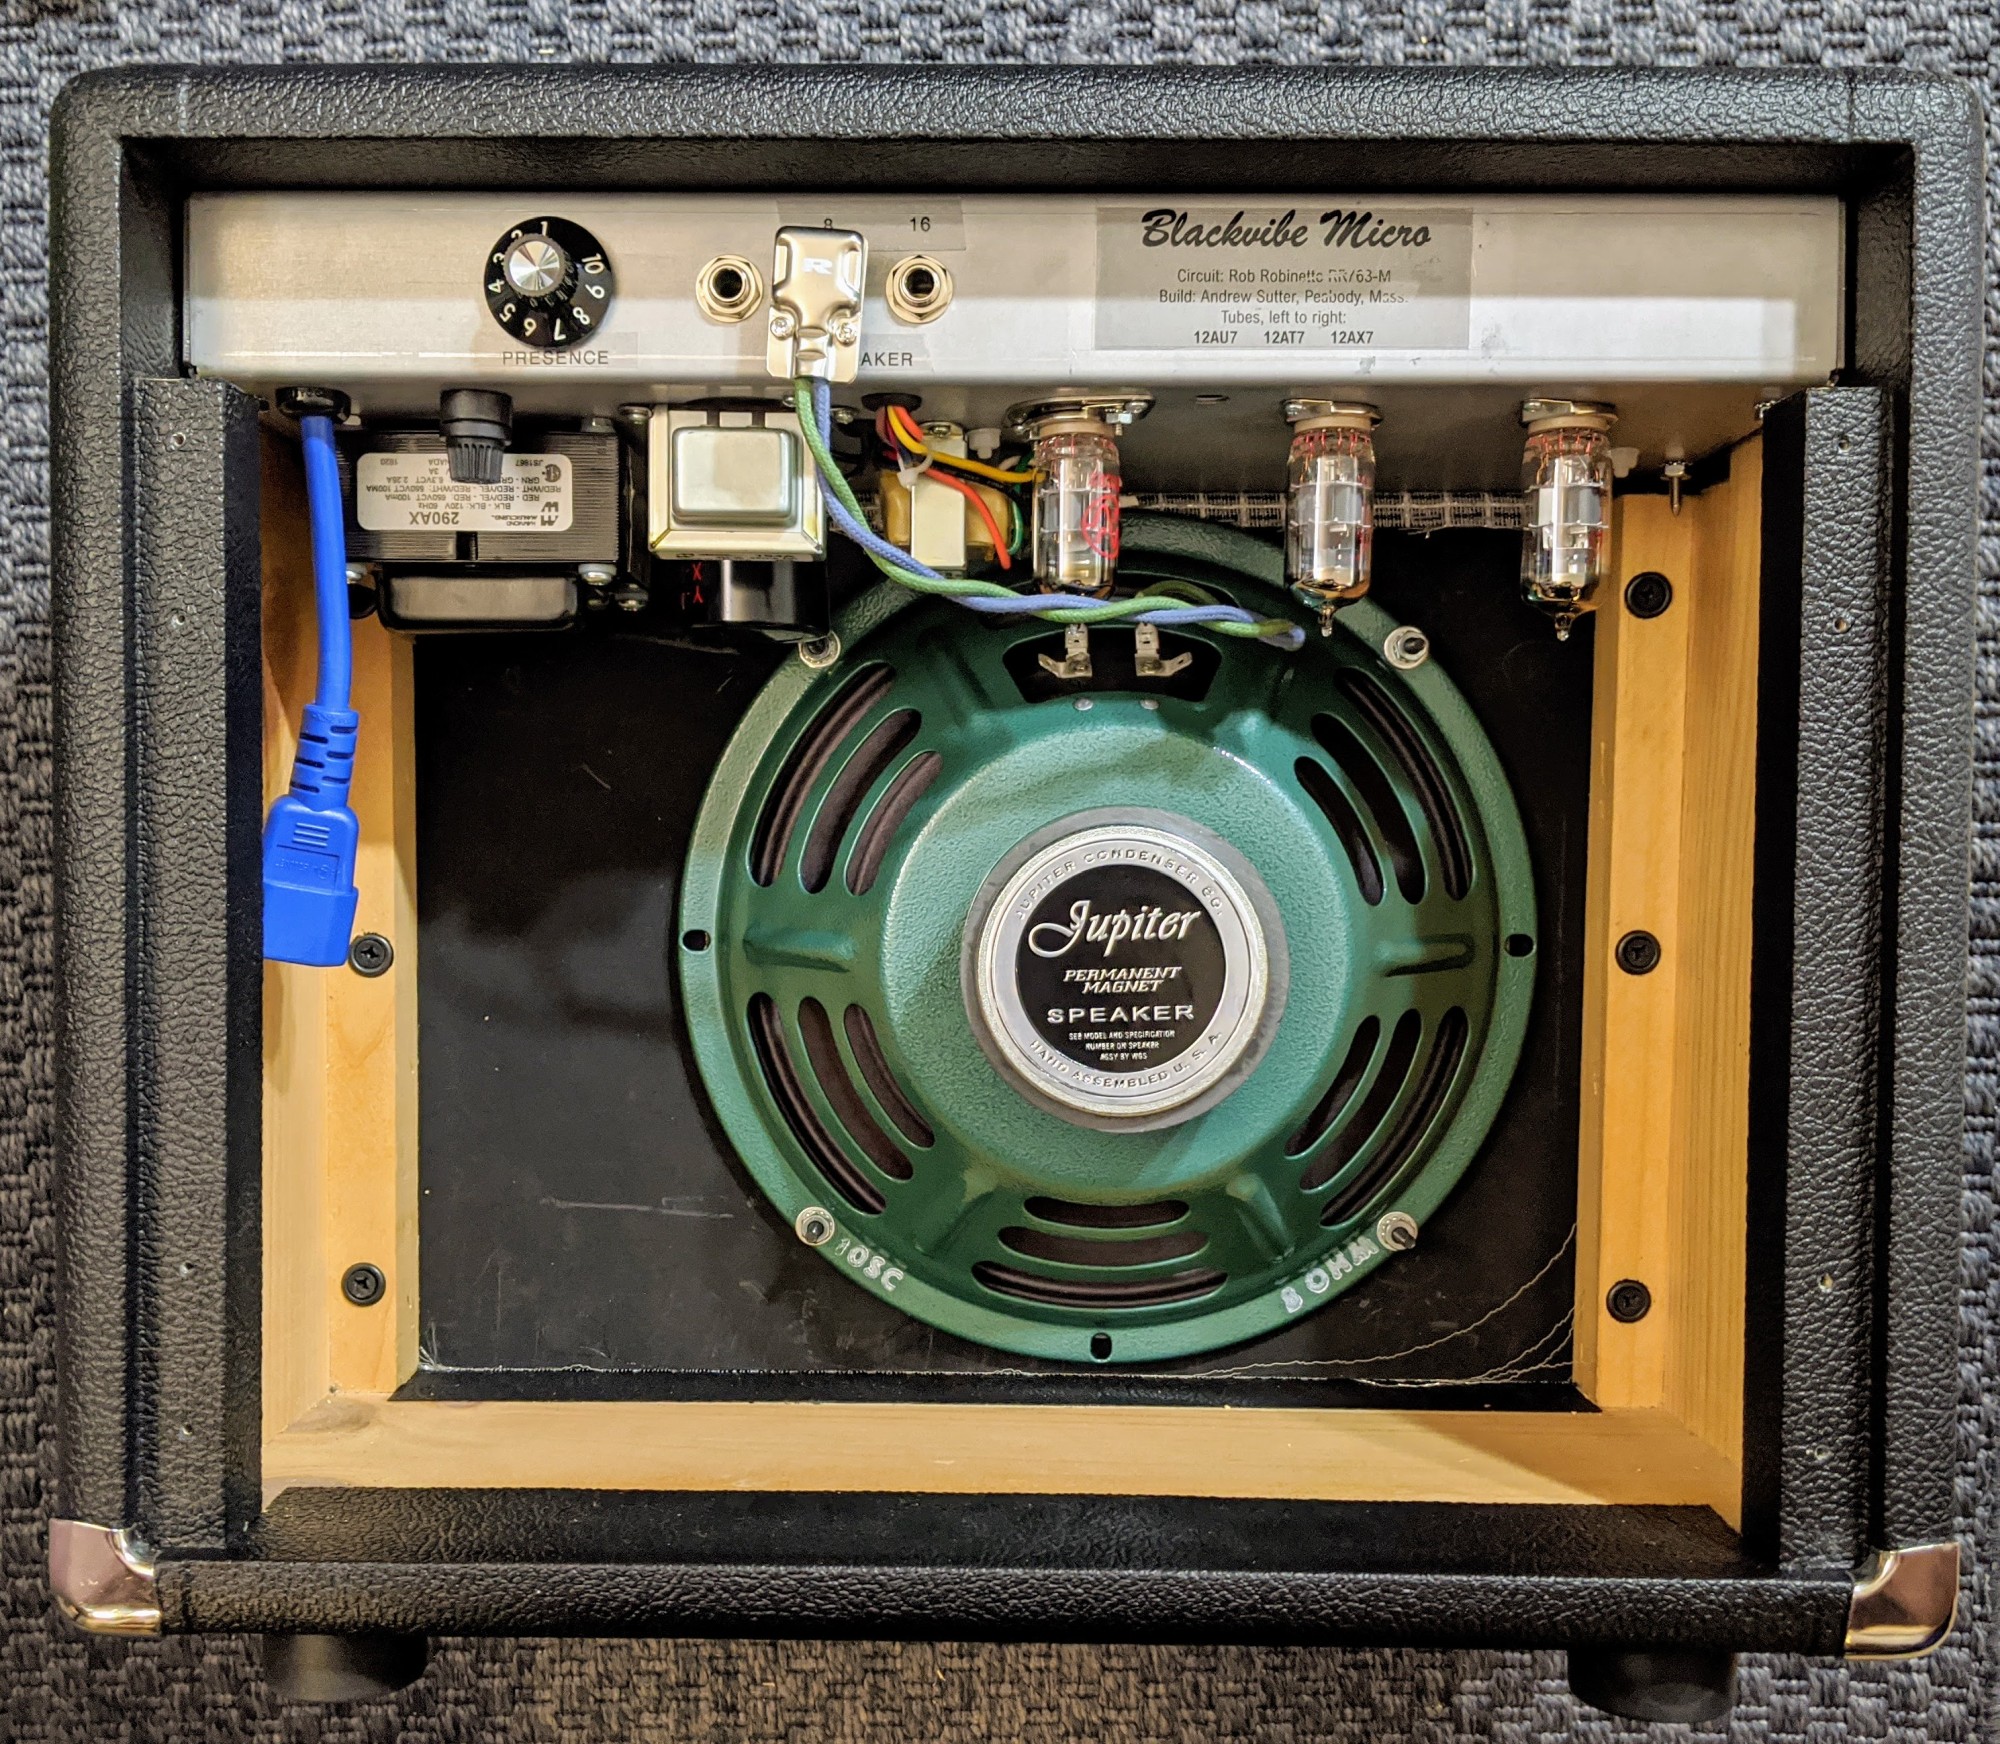
Photos and build by Drew Sutter.
Blackvibe Micro by Andre Achard
Amplifier and photo by Andre Achard from Germany.
Blackvibe Micro by Brian Dretschman
Photos and amp by Brian Kretschman.
Blackvibe Micro EF80
This version of the Blackvibe Micro uses two EF80 novel pentodes in push-pull for true pentode power tube overdrive with around 2 watts of output power. Pentodes overdrive differently than triodes due to their screen grid so this is a way to get pentode overdrive in a 2 watt power amp.
The Blackvibe Micro EF80 below uses 290 plate and 285 screen volts using a The Hammond 125B output transformer is a good match for the EF80. Use the yellow and orange secondary wires for 22.5K:8 ohms and 5 watts. A 300 ohm 3 watt cathode resistor is used and gives about 95% max plate dissipation at idle which is perfect for cathode biased power tubes. The choke is a Hammond 155H 4H 50ma.
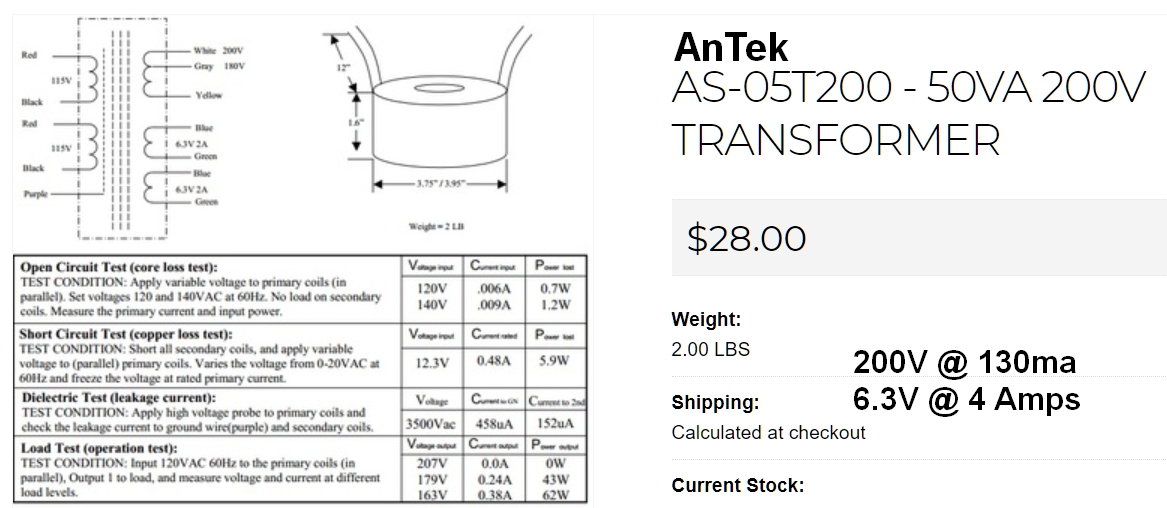
My recommended power transformer is the $28 AnTek AS-05T200 toroidal power transformer 200v @ 130ma (50VA), 6.3v @ 4 amps. It must be used with a bridge rectifier. You can build the bridge rectifier with four 1N4007 diodes or get an inexpensive bridge rectifier like this $1 three amp 1000v bridge rectifier from Mouser. The AS-05T200 has a 120v and 240v primary (the 240v primary is good for 220 to 250v mains). It also has a 180v HT tap in case you want to lower the amp voltages. Another bonus is it only weighs 2 lbs. Size is 3.75" in diameter and 1.6" tall. You can mount the transformer on the top of the chassis and purchase a 105x45mm round transformer cover or leave it exposed.
![]()
Detailed AnTek Wiring
![]()
An optional EZ81 tube rectifier can be used with an $89 Hammond 269EX 190-0-190V power transformer with 190-0-190 high voltage at 75ma, 2.5 amps of 6.3v heater current. For international builders I recommend the Hammond 369EX which has 100, 110, 120, 200, 220,230, 240 VAC 50/60 Hz primaries. The 269EX/369EX is a good choice for any amp using an EF80 power amp but it does not include a 5v secondary so use an EZ81 (6.3v) tube rectifier.
Doug Hoffman at HoffmanAmps.com can make you a Blackvibe Micro EF80 turret or eyelet board using this Hoffman Board File for about $20 + shipping. Just go to the HoffmanAmps DIYLC Analyzer page and upload the Blackvibe Micro Hoffman Board File.
New Old Stock EF80s (also called 6BX6) are inexpensive ($6) and plentiful but tend to be microphonic so they are best used in head amps and not combo cabs. If you do use them in a combo cab expect to have to try several tubes to find a pair that are not microphonic. Using rubber insulated sockets and silicone damping rings on the tubes may help with microphonics. The EF80 uses standard 9-pin sockets and 6.3v heaters so they are easy to implement into a modern amp build.
At 270 to 300v on the plates and a 300 ohm cathode resistor (as in the layout below) you can expect about 5.2v across the cathode resistor with the EF80s running at 2.45 watts, 95% plate dissipation with 8.4 milliamps of plate current per tube. Adding a 1k 1/2 watt screen resistor will add some screen sag distortion and emphasize the difference between triode and pentode overdrive.
If you like this amp but would like a little more gain check out the JCM800 Micro EF80.
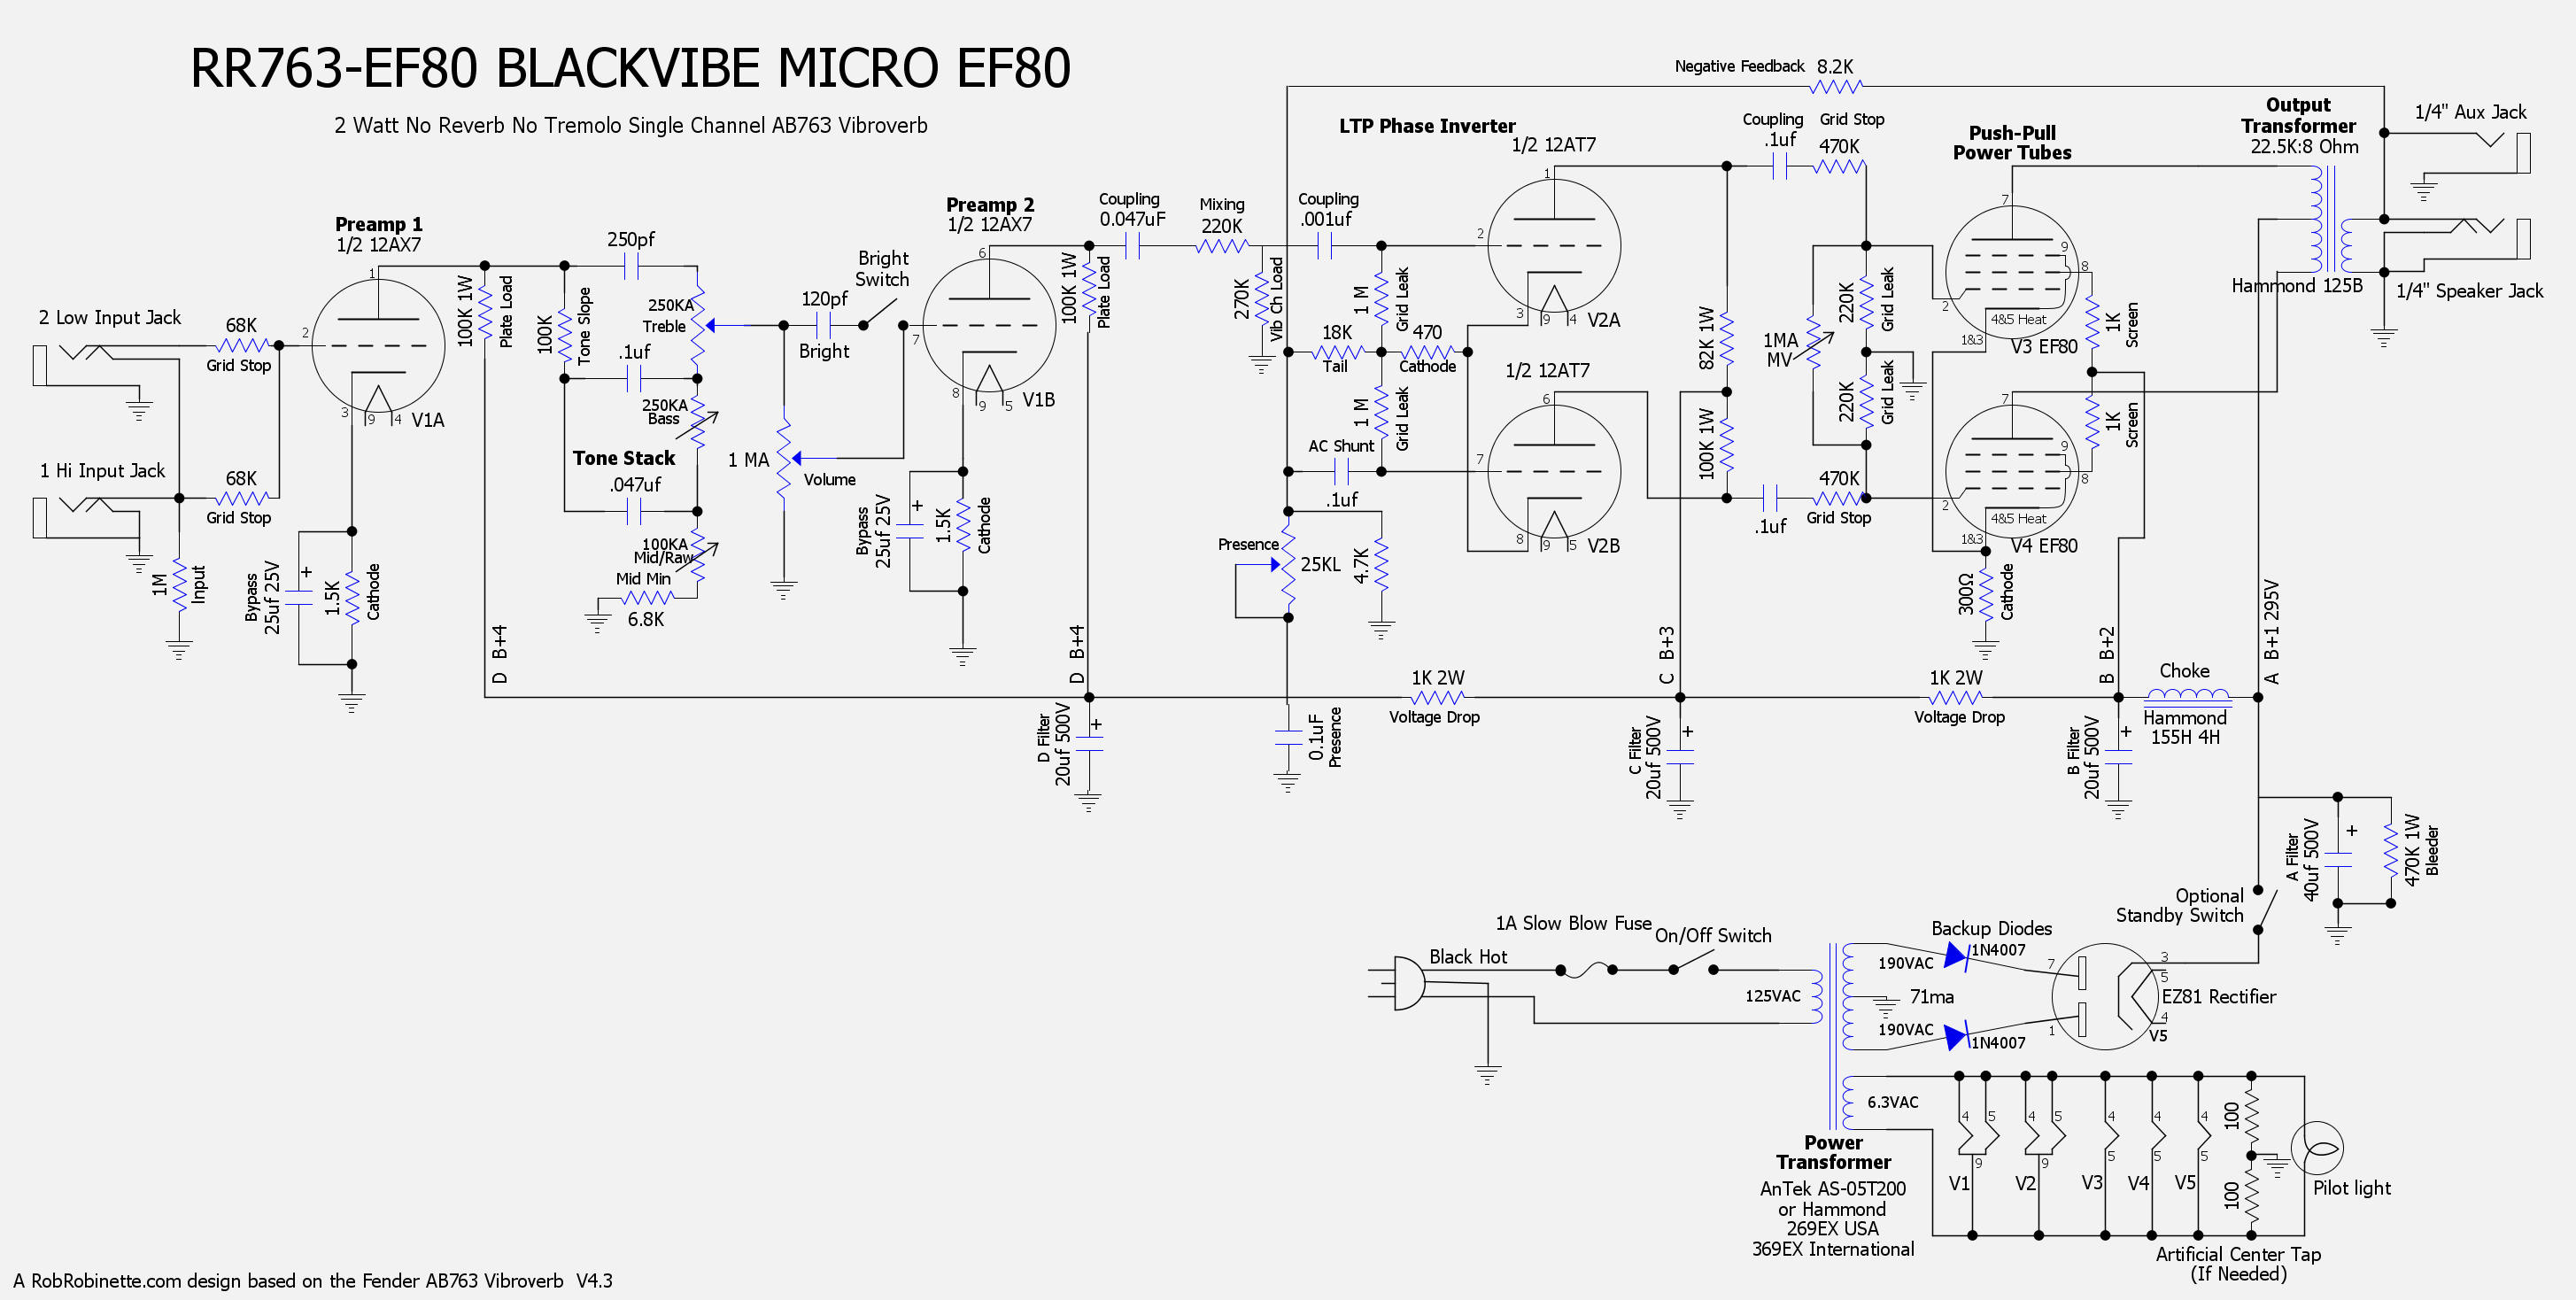
Click the image for the high resolution schematic. Download the pdf file and DIYLC file.
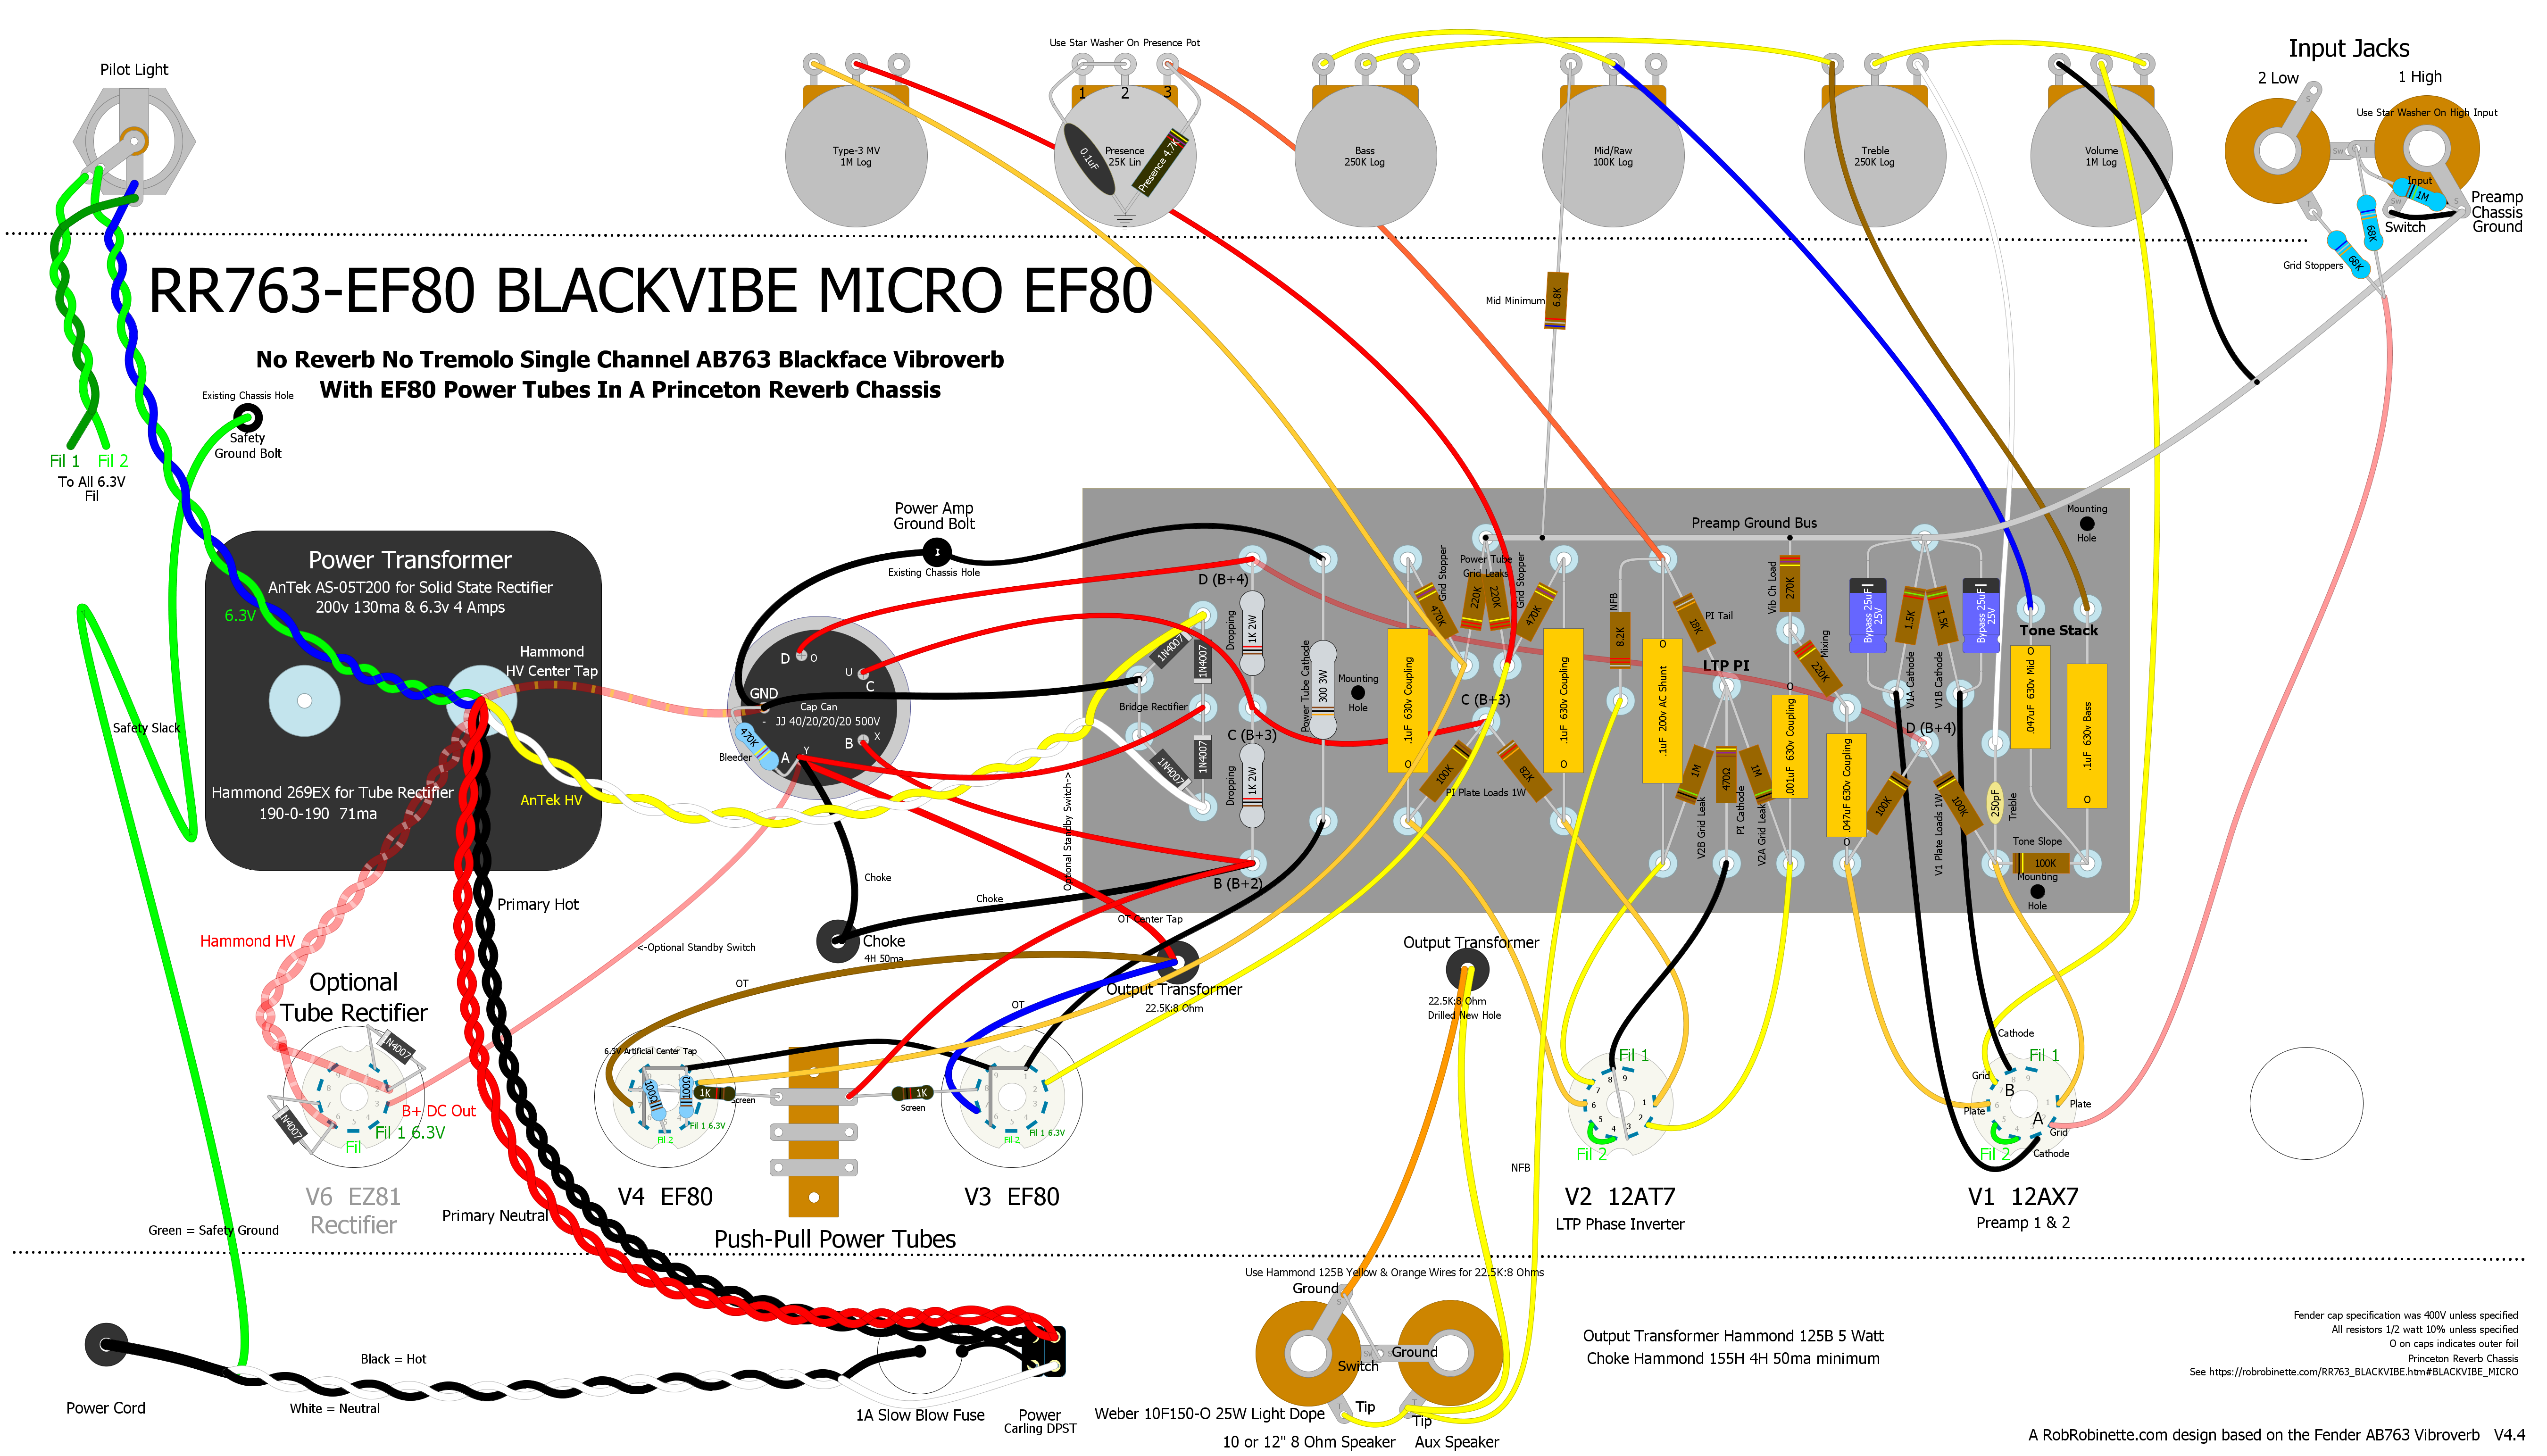
Optional tube rectifier shown at lower-left. Click the image to see the high resolution version. Download the pdf. Download the DIYLC file. Download the Hoffman DIYLC Board File.
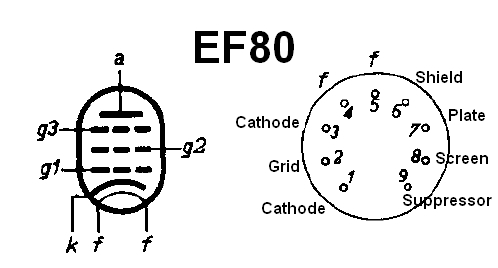
Pins 1 & 3 connect to a single cathode, pins 4 & 5 (f) are 6.3v heater filaments, pin 6 is an internal shield which is normally connected to the cathode or ground, pins 1 & 9 (cathode and suppressor grid) are normally tied together.
Hammond 125B Output Transformer Wiring & Specs
For the EF80 we want 22,500:8 ohms so we use the Yellow (4) and Orange (2) wires. We do not use the Black secondary wire.
![]()
Another (better looking) option for the output transformer is the $29 MusicalPowerSupplies.com OT5PP 22.5K:4-8-16 ohms.
Bill of Materials
You will also need a power transformer, Hammond 125B output transformer, Hammond 155H choke, bridge rectifier, chassis, cab, speaker and power cord.
Add a Presence Control To The Blackvibe 6L6 and 6V6
I'm a fan of late-in-the-circuit tone controls which allow tone tweaks with less side effects and the Presence Control is one of my favorites. To add a Presence Control we'll delete the 47 ohm NFB Tail resistor and replace it with the presence circuit. The circuit is made up of a 25KL pot with a .1uF (600v poly) cap and 4.7k 1/2 watt resistor. We also have to adjust the size of the NFB resistor and phase inverter tail resistor (PI Tail in layout) to compensate for the presence control's added resistance (going from 47 ohm NFB tail to 4.7k of tail resistance). With this presence circuit you'll get standard AB763 tone with the presence pot turned full down.
The 4.7k presence resistor on the presence pot acts as the NFB Tail resistor. The .1uF cap blocks DC flow through the pot to eliminate "static" when adjusting the control. The cap also sends high frequencies from the NFB loop to ground which boosts highs at the speaker. These boosted highs have less NFB so they are "thicker and harrier" with additional harmonic and intermodulation distortion which adds "presence". Since the back of the presence pot is used as a ground be sure and use a star washer on the pot to ensure good pot-to-chassis contact.
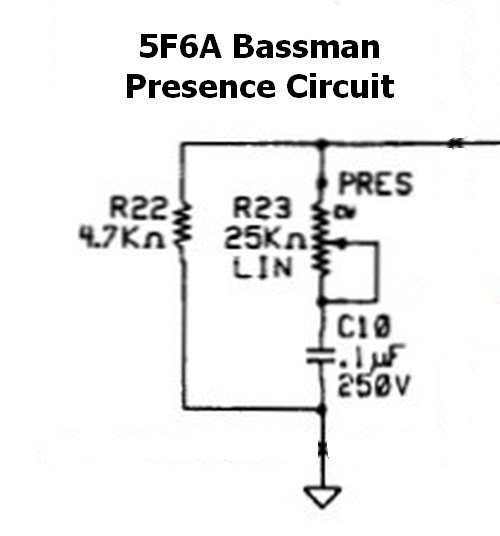
The Presence Cap bleeds NFB high frequencies to ground and also blocks DC from flowing through the Presence pot. This circuit differs from the Fender 5F6A schematic and layout but matches what was actually installed in most 5F6As from the factory.
The ratio of the NFB resistor to the NFB Tail resistor determines the level of NFB signal. The ratio of our Blackvibe 6L6 is 820 / 47 = 17.4. Since the NFB tail resistance is being increased to 4.7k we can use the NFB ratio to calculate the appropriate NFB resistor to pair with the presence circuit: 4.7k * 17.4 = 82k for the new Blackvibe 6L6 NFB resistor.
The ratio of our Blackvibe 6V6 is 820 / 56 = 14.6. We will use a 5.6k Presence resistor to compensate for the lower voltage output by the Blackvibe 6V6. Since the NFB tail resistance is being increased to 5.6k we can use the NFB ratio to calculate the appropriate NFB resistor to pair with the presence circuit: 5.6k * 14.6 = 82k for the new Blackvibe 6V6 NFB resistor (same as Blackvibe 6L6).
Since the presence control adds 4.7k or 5.6k of tail resistance to the phase inverter circuit we need to decrease the PI Tail resistor from 22k to 18k to compensate (18k is the closest standard resistor size for both the 6V6 and 6L6 version of the Blackvibe).
Be sure and use a star washer on the Presence pot since we are using it for a ground connection.
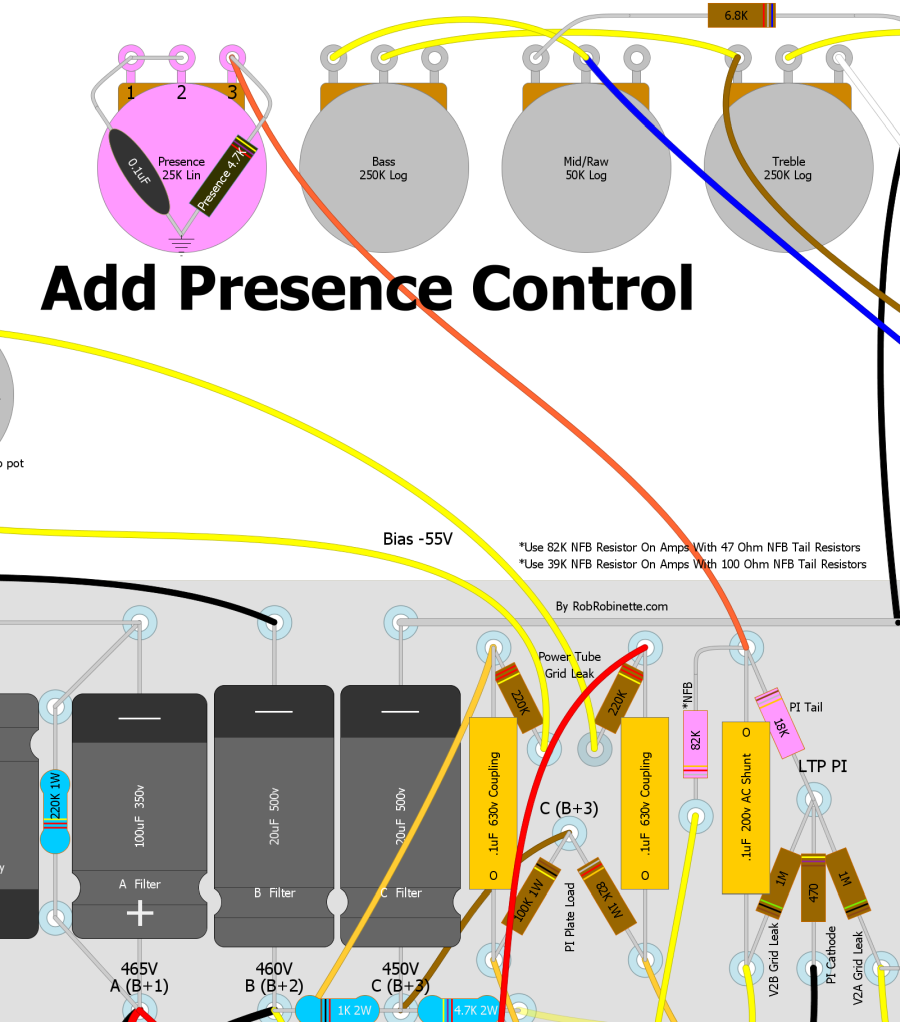
To add a Presence Control to the Blackvibe 6L6 we delete the 47 ohm NFB Tail resistor from the circuit board and replace it with a 4.7k Presence resistor mounted on the Presence pot (use 5.6k Presence resistor for the Blackvibe 6V6). The .1uF Presence capacitor forms an RC low pass filter with the NFB resistor. The Presence pot is wired as a variable resistor to control how much high frequency signal is bled to ground. The NFB resistor is increased to 82k and the PI Tail resistor is reduced by 4k to make up for the added NFB tail resistance.
We can use this circuit to install a presence control in any blackface or silverface amp with a long tail pair (LTP) phase inverter. See the AB763 Presence Control mod for details.
AB763 With Reverb But Tremolo Deleted
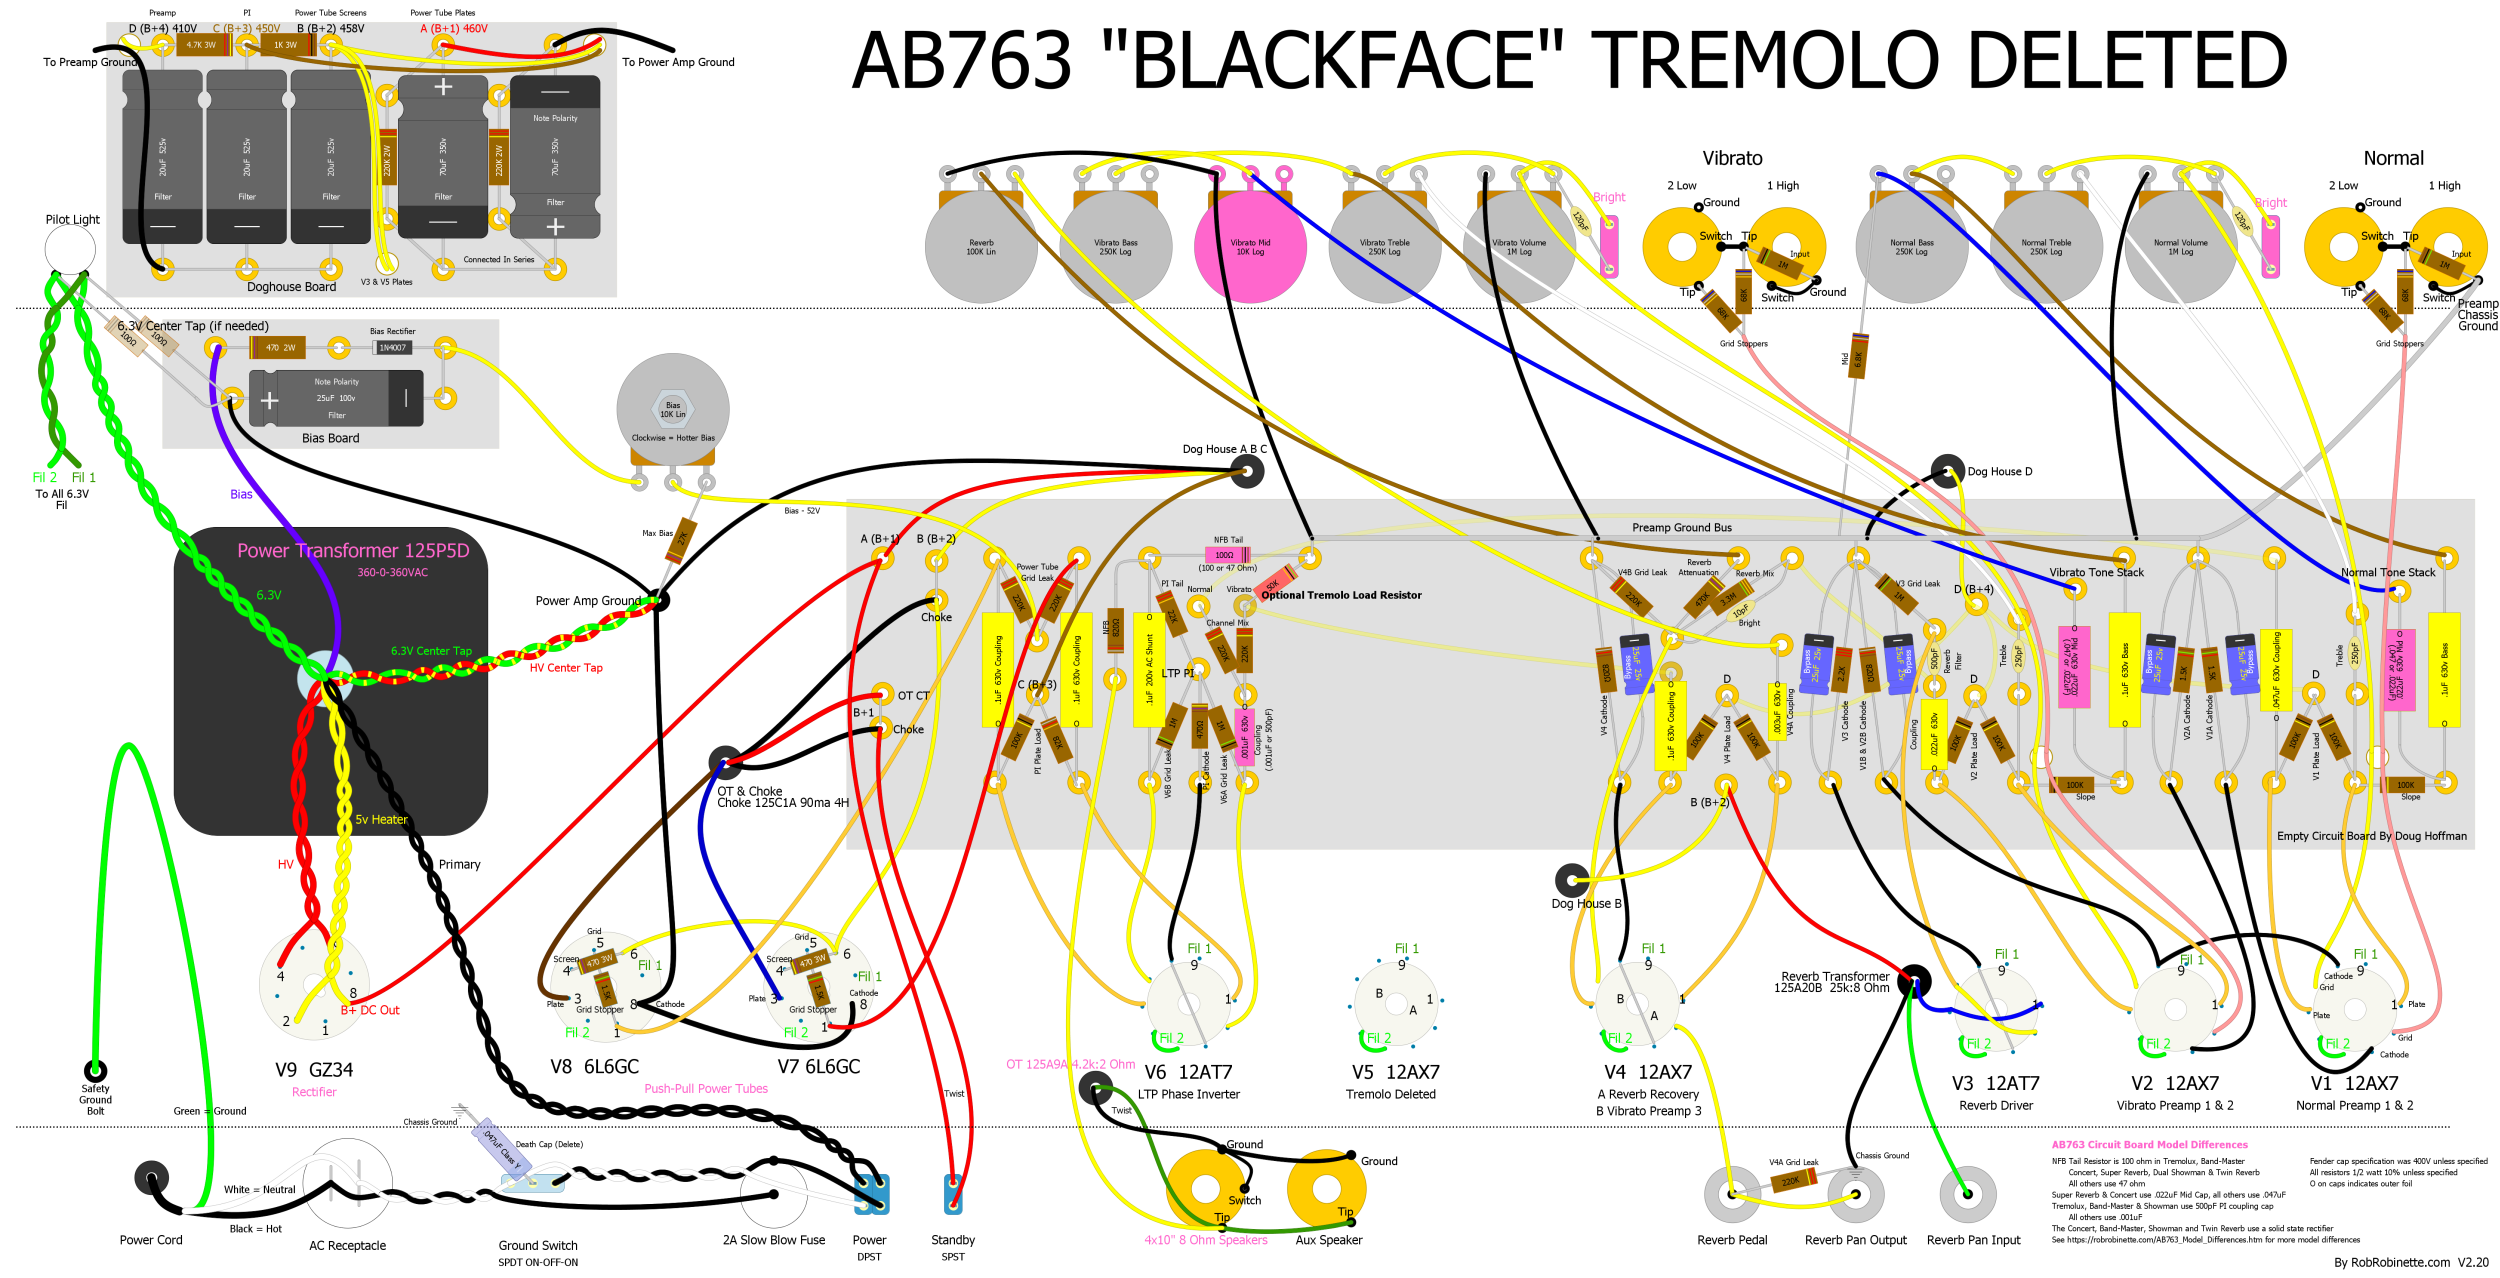
AB763 Vibroverb with two channels and reverb but tremolo has been deleted. V5 was used for tremolo so it is unused in this layout. Note the "Optional Tremolo Load Resistor" at center left of the circuit board. It applies the same circuit load as the tremolo to keep the Vibrato Channel's gain exactly the same as a normal AB763 blackface amp. Download the pdf layout here and the DIYLC file here.
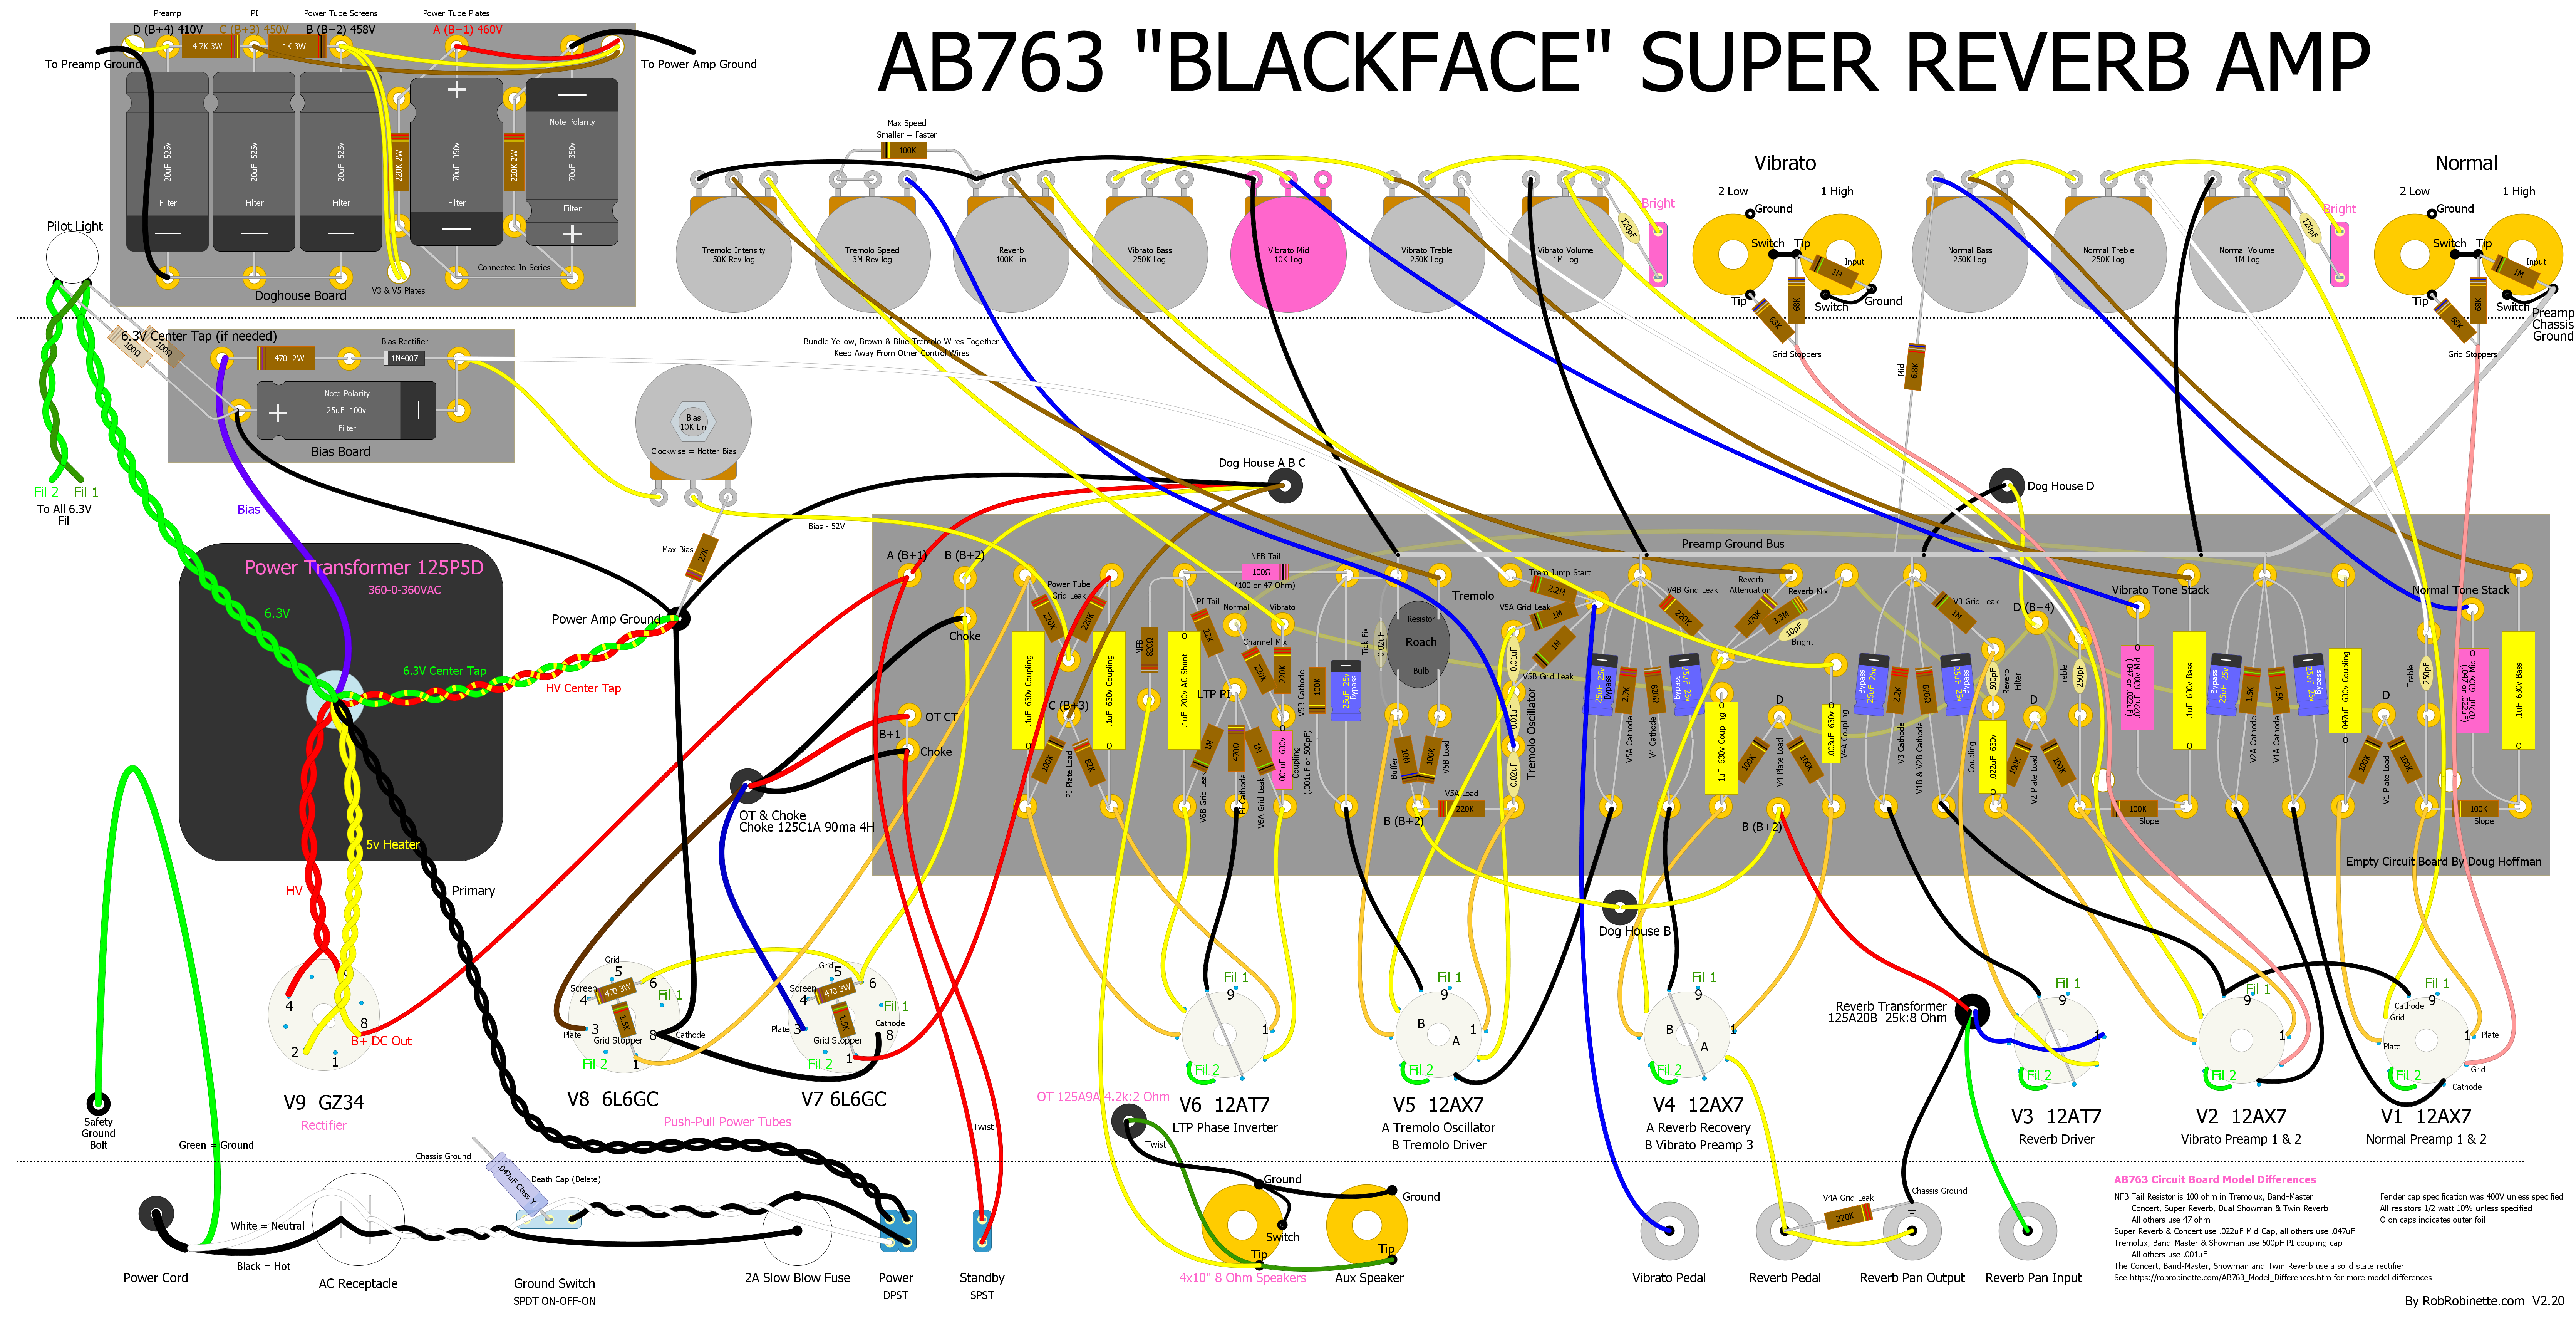
The Original AB763 Vibroverb
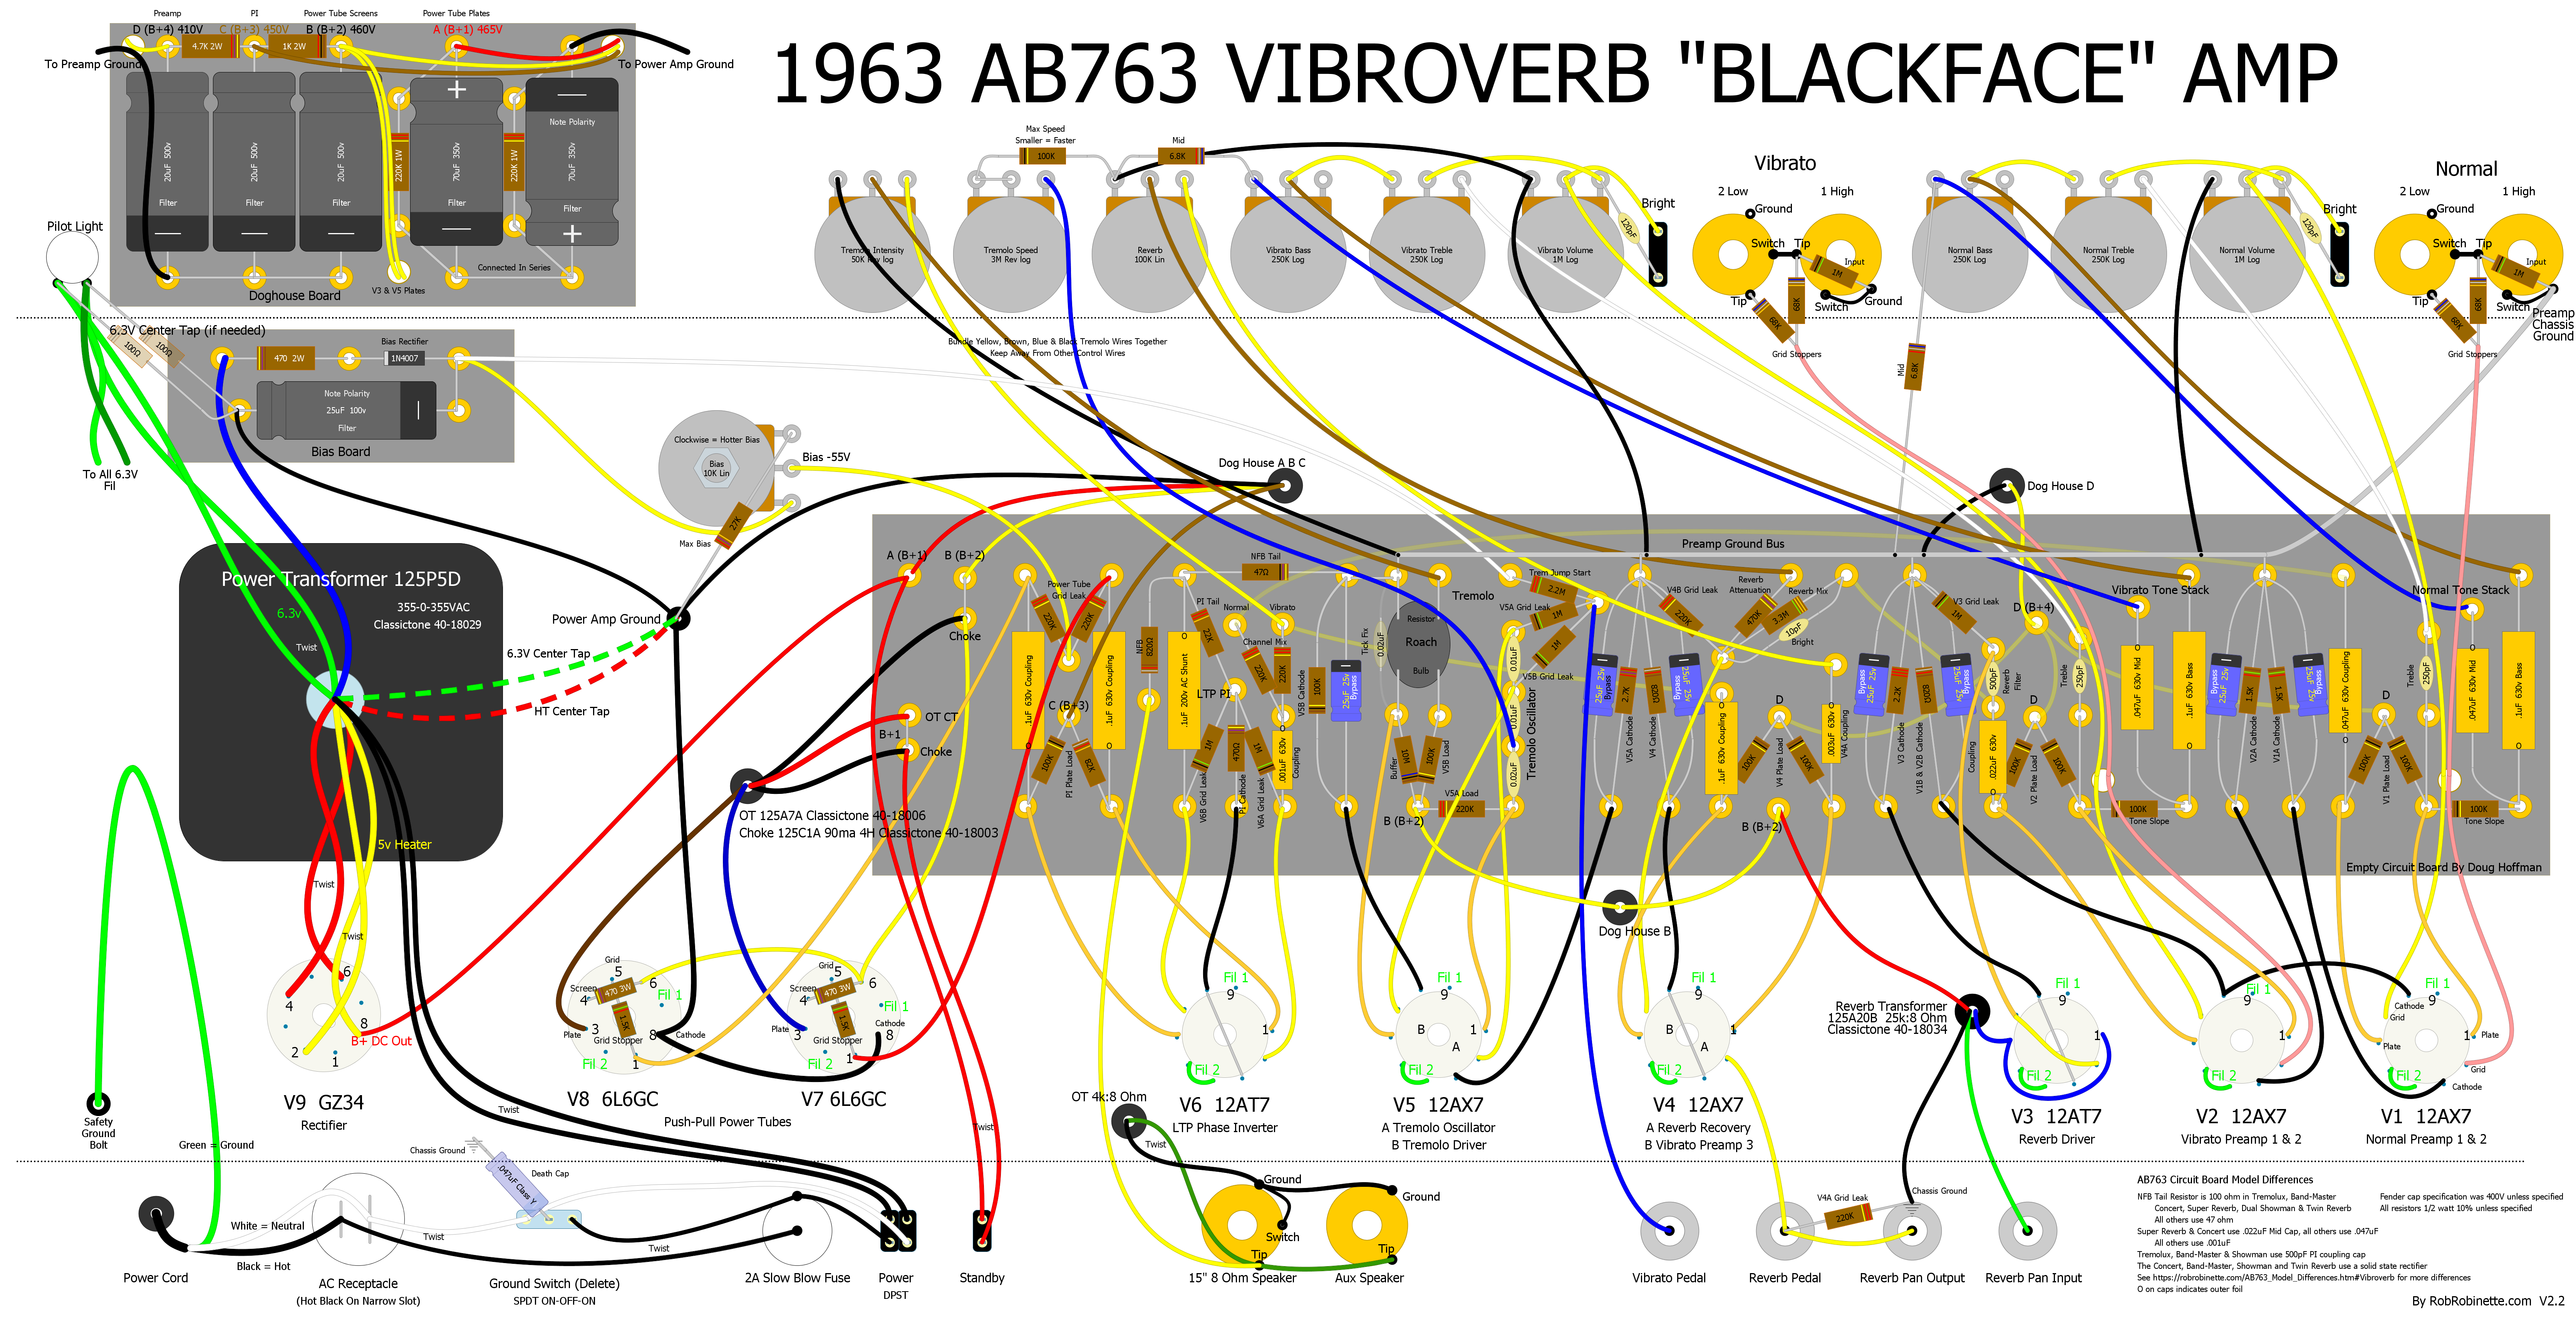
Reverb, tremolo and a second channel add a lot of complexity to AB763 amps. Download the pdf layout here and the DIYLC file here.
AB763 Model Differences
I used Vibroverb component values in the Blackvibe amps but you may want to mimic a Super Reverb or one of the other blackface amps. The layout below has the components that change by AB763 model highlighted in pink. Two components you may want to consider changing in the Blackvibe is the tone stack's Mid cap and phase inverter coupling cap. The Vibroverb used a .047uF Mid Tone cap while most other AB763 amps used a .022uF. The larger Mid cap gives slightly less mid scoop and shifts the Mid Tone control slightly higher in frequency. If you plan to use a 15 inch speaker with your Blackvibe I recommend you stick with the .047uF Mid cap.
The phase inverter coupling cap was .001uF in the combo cab AB763 amps but the head cabs used a 50% smaller 500pF cap. The smaller coupling cap can sound better in closed back cabs and the heavy overdrive tone is slightly tighter and more composed.
For more detailed info see the AB763 Model Differences page.
AB763 Model Differences In Pink